background image

132

as 120 due to inaccuracies in the start address (or loop 
start address) or end address, adjust “Source BPM” to 
the correct value of 120.
Next, set “New BPM” to 150. The “Ratio” will be calcu-
lated automatically.

It is not possible to make settings that would cause 
“Source BPM” or “New BPM” to exceed the range of 
40–480.
It is not possible to make settings that would cause 
“Ratio” to exceed the range of 50.00–200.00.

Depending on the sample, the length may not be 
exactly as you specify, due to limitations in processing 
accuracy.

7

To execute the Time Stretch operation, press the OK but-
ton

. To cancel without executing, press the Cancel but-

ton

.

When you press the OK button, the Time Stretch dialog 
box will appear.

8

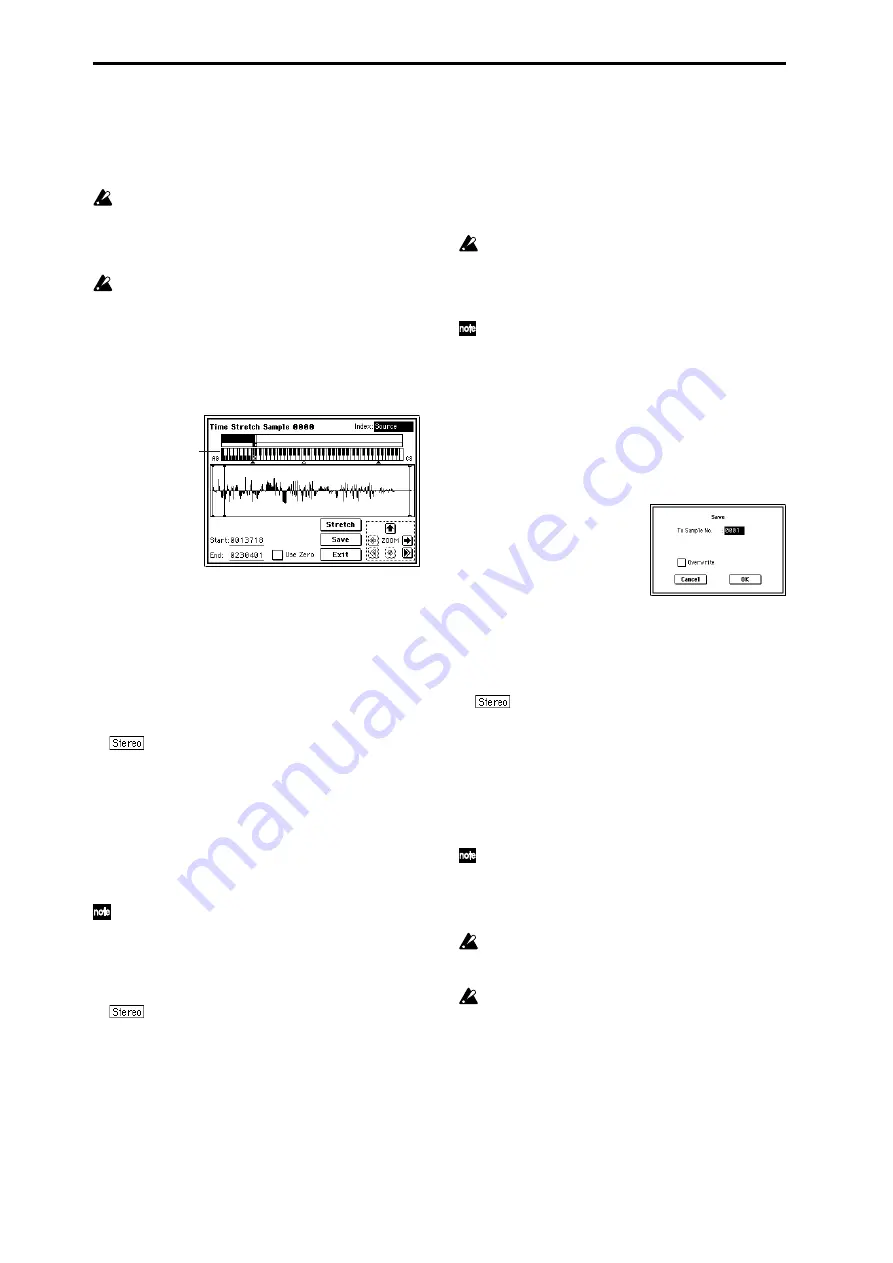
Audition the sample that was created by Time Stretch. 
The sample before being time-stretched is assigned to the 
C2 note of the keyboard, and the sample that was time-
stretched is assigned to C#2. You can change the “Index” 
to check the waveform.

Keyboard & Index

: This shows the multisample that is 

used temporarily in this dialog box.
When you play the keyboard, this multisample will 
sound. It will behave just as in normal pages (e.g., the 
Recording page). (

0–1a)

In the case of a stereo sample, a stereo multisam-

ple will be used temporarily. The sample at each index 
will sound in stereo.

Index

[Source, Result]:

Selects the index for the sample whose waveform you 
wish to display.
If you select Source, the original waveform before time-
stretching will be selected.
If you select Result, the time-stretched sample will be 
selected.

You can also select the index by holding down the 
[ENTER] key and pressing a note on the keyboard. The 
index that includes that note will be selected.

Sample waveform display

: This shows the waveform of 

the selected sample. As in 2–1: Loop Edit, the Start, Loop 
Start, and End addresses are shown by a solid line.

In the case of a stereo sample, the L channel sam-

ple data will be displayed above, and the R channel data 
below.

ZOOM

: This controls horizontal and vertical zoom in/

out for the waveform shown in the “sample waveform 
display.” (

1–1c)

Start:
End

:

Specify the start address and end address of the sample 
for the currently selected index.
When you execute Time Stretch, the addresses will be 
specified automatically, but the playback may be slightly 
skewed due to inaccuracies in the end address, etc. If this 
occurs, you can correct the addresses manually.

When you change the start address, the loop start 
address will also be changed simultaneously. If you 
wish to independently adjust the start address and loop 
start address, save the data in step 

0

, and then make 

settings in the P2: Loop Edit page.

To audition the sound in the specified range, play the 
keyboard or press the SAMPLING [START/STOP] key. 
When you press the SAMPLING [START/STOP] key, 
the sample in the range specified by “Start” and “End” 
will sound at the original key.

Use Zero

: (

1–1c)

9

If you press the Stretch button, the Time Stretch dialog 
box will appear, and you can re-do the time stretch once 
again. Execute Time Stretch as described in step 

6

.

0

Save the sample that you created. Press the Save button
and the Save dialog box will appear.

In “To Sample No.,” specify the save destination sample 
number. By default, an unused sample number will be 
selected. If “Overwrite” is checked, this cannot be 
selected.
The sample number cannot be specified if “Overwrite” is 
checked (

p.119).

 For stereo samples, use “Save to No.(L)” and 

“(R)” to specify the save-destination of the L and R chan-
nels.

To execute the Save operation, press the OK button. To 
cancel without saving press the Cancel button.

A

By repeating steps 

9

0

 you can create more samples as 

desired.

B

Press the Exit button to exit the Time Stretch operation.
The index will specify the last-saved sample number.

If you wish to use the saved sample in Program mode 
or Sequencer mode, you must either execute “Convert 
MS to Program” (

0–1G), or use Program mode “Mul-

tisample Select” (

Program P1–2) to select the multi-

sample and create a program.

Be aware that if you exit Time Stretch without using the 
Save button

 then press the OK button to save the sam-

ple, the sample(s) you created will be lost.

Time Stretch requires vacant samples, multisamples, 
and relative parameters in order to execute. Before you 
execute, make sure that there is sufficient free space. If 
there is not, an error will occur.

Keyboard & 
Index

Summary of Contents for TRITON Extreme

Page 1: ...2 E ...

Page 2: ...xample screens of this manual are only for explanatory purposes and may not necessary match the values that appear in the LCD screen of your instrument MIDI related explanations CC is an abbreviation for Control Change Number In explanations of MIDI messages numbers in square brackets always indicate hexadecimal numbers How to read the Parameter Guide example About this manual Program P5 Edit Comm...

Page 3: ...dit Amp 23 Make amp settings for oscillators 1 and 2 4 1 Amp1 Level Pan Oscillator 1 volume and pan settings 23 4 2 Amp1 Mod Keyboard tracking and controller settings to modulate amp 1 23 4 3 Amp1 EG Amp 1 EG settings 24 4 4 Amp2 Level Pan Oscillator 2 volume and pan settings 26 4 5 Amp2 Mod Keyboard tracking and controller settings to modulate amp 2 26 4 6 Amp2 EG Amp 2 EG settings 26 Program P5 ...

Page 4: ...keys and B mode functions of the REALTIME CONTROLS 1 4 knobs 48 Combination P7 Edit Arp 49 Make settings for arpeggiators A and B 7 1 Setup Assign arpeggiators to each timbre 49 7 2 Arpegg A Select an arpeggio pattern and make settings for arpeggiator A 50 7 3 Arpegg B Select an arpeggio pattern and make settings for arpeggiator B 50 7 4 Scan Zone Specify the ranges of notes and velocities that wi...

Page 5: ...ies sounded by each track 77 4 4 Vel Z 9 16 77 4 5 MOSS 1 8 Displayed if the EXB MOSS option is installed set EXB MOSS parameters 77 4 6 MOSS 9 16 77 4 7 Controller Specify the function of the SW1 and SW2 keys and B mode functions of the REALTIME CONTROLS 1 4 knobs 77 Sequencer P5 Track Edit 78 Perform track editing and step recording and adjust the tone of the program for each track 5 1 Track Edi...

Page 6: ... 3 1 Multisample Edit multisamples 135 3 2 Preference Settings for creating indexes 137 Sampling P4 Controller Setup 137 Make controller settings 4 1 Controller Setup Specify the function of the SW1 and SW2 keys and B mode functions of the REALTIME CONTROLS 1 4 knobs 137 Sampling P5 Audio CD 138 Play back an audio CD and rip samples from an audio CD 5 1 Audio CD Play back an audio CD and rip 138 S...

Page 7: ...n off and make chain settings 153 9 2 MFX 1 Parameter settings for MFX1 153 9 3 MFX 2 Parameter settings for MFX2 153 9 4 Master EQ Parameter settings for master EQ 153 9 5 VALVE FORCE Settings for Valve Force 153 6 Global mode 155 Global P0 Basic Setup 155 Make basic settings that affect the entire TRITON Extreme and make AUDIO INPUT settings for other than Sampling mode 0 1 Basic Master tune key...

Page 8: ... Master Effects via MIDI 213 Master EQ 213 Main Output 214 Individual Outputs 214 Valve Force 214 1 Placement 214 2 In Out 215 Effect Mixer Block Diagram 216 Filter Dynamic 217 Filter and dynamics control effects 000 No Effect 217 001 St Amp Simulation Stereo Amp Simulation 217 002 Stereo Compressor 217 003 Stereo Limiter 217 004 Multiband Limiter 218 005 Stereo Gate 219 006 OD Hi Gain Wah Overdri...

Page 9: ...lay Parametric 4 Band EQ Multitap Delay 249 063 Comp Wah Compressor Wah Auto Wah 250 064 Comp Amp Sim Compressor Amp Simulation 250 065 Comp OD HiGain Compressor Overdrive Hi Gain 250 066 Comp Param4EQ Compressor Parametric 4 Band EQ 251 067 Comp Cho Flng Compressor Chorus Flanger 251 068 Comp Phaser Compressor Phaser 252 069 Comp Mt Delay Compressor Multitap Delay 252 070 Limiter P4EQ Limiter Par...

Page 10: ...lications 288 About MIDI 288 Connecting MIDI devices computers MIDI connectors 288 Messages transmitted and received by the TRITON Extreme 289 TRITON Extreme MIDI IMPLEMENTATION 299 Various messages 302 Data compatibility 309 Media mode information 315 Chunks that are supported 315 About KORG format files 316 About AKAI Program files 318 Option boards Memory Calendar battery 319 Please note when i...

Page 11: ...xii ...

Page 12: ...om a con nected external MIDI device or use a foot switch to select programs Foot SW Assign Global P2 2 1a Foot Switch Assign List p 281 Bank Program Select menu 1 Press the popup button at the left of Program Select to access the Bank Program Select menu 2 Press one of the tabs at left or right to select a specific bank If you select the GM bank the Variation button will be enabled Each time you ...

Page 13: ...owever this setting cannot adjust the pitch higher than 4 feet or lower than 32 feet Pitch Stretch 12 00 12 This simultaneously adjusts the Transpose and Tune of the oscillator This lets you produce a variety of tonal changes and variations without loosing the character of the original sound At the 00 setting the value of the program parameters will be unchanged An adjustment of 01 will lower the ...

Page 14: ... to banks G g d If you have edited a program from banks G g d and wish to write it you must write to banks A E or H N 5 To execute the Write Program operation press the OK button To cancel press the Cancel button You can also press the SEQUENCER REC WRITE to write a program in the same way as Write Program Press the SEQUENCER REC WRITE key to access the dialog box and write the program In this cas...

Page 15: ...ample while you play a program using the TRITON Extreme s filters effects and arpeggiator You can also mix a performance on the TRITON Extreme together with an external audio signal and sample the result QS p 22 OG p 80 Resampling refers to the process of sampling the output of the TRITON Extreme This technique allows you to record a multi timbral performance using multi ple effects and knob tweak...

Page 16: ...utput Select is set to L R the metronome will stop sounding the instant sampling begins Save to RAM MEDIA Specifies the destination to which the data will be written during sampling RAM Sample into sample memory RAM If you sample into sample memory RAM you will be able to immediately hear the sample in Program mode or Sam pling mode Settings for the writing destination RAM Bank and Sample No and s...

Page 17: ...tput but will affect the data that is being sampled This means that the sampled sound may be distorted even if the sound you hear is not dis torted This setting defaults to 12 dB when you turn on the power At a setting of 12 dB CLIP will not appear even if you play the program at its maximum level The 12 dB Sampling P2 2 1c setting is applied to samples that you recorded into sample memory RAM whe...

Page 18: ...te an Index Sampling P0 0 1a with this key as the Top Key Sampling P0 0 1b The Orig Key will incre ment by one after sampling and the next higher note will be assigned the next time you sample 6 Press the OK button to apply the settings you made or press the Cancel button to return to the state prior to accessing this dialog box 0 3D Select Directory This lets you select the disk internal hard dis...

Page 19: ...e the RAM bank into which the data will be sampled when using Save to RAM use the page menu command Select Bank Smpl No 0 3C To change the save destination for WAVE files or when using Save to MEDIA to specify the save destination for WAVE files use the page menu command Select Directory 0 3D d You can use the Trigger setting to change the way in which sampling will be started e If you want to sim...

Page 20: ...r 1 will be assigned a drum kit instead of a multisample In this case the program will nor mally have a maximum of 60 note polyphony If a program draws one multisample from the ROM bank and a second from either the Piano bank or one of the installed EXB boards then in this case a Single pro gram can have a maximum of 120 note polyphony a Double program a maximum of 60 note polyphony and a Drums pr...

Page 21: ...ic music Pythagoras This scale is based on ancient Greek musical theory and is especially effective for playing melodies Werkmeister Werkmeister III This is an equal tempered scale that was used since the later Baroque period Kirnberger Kirnberger III This scale was created in the 18th century and is used mainly to tune harpsichords Slendro This is an Indonesian gamelan scale in which an octave co...

Page 22: ...d as the High MS Bank you can select a multisample from a tabbed list organized by type of instru ment Category ROM Multisample Select menu S Offset High Start Offset Off On This specifies the point at which the multisample will begin sounding For some multisamples this parameter will have no effect On checked The sound will start from the start offset loca tion that is pre determined for each mul...

Page 23: ...ameter to 0 1 2b OSC2 Multisample This will appear when Oscillator Mode 1 1a is set to Double For details on the settings and function of the parameter refer to 1 2a OSC1 Multisample 1 2c Velocity M Sample SW Lo Hi Velocity Multisample Switch Low High OSC1 OSC1 Velocity Switch 1 127 The High and Low multisamples selected for oscillator 1 in OSC 1 Multisample 1 2a will be switched at the veloc ity ...

Page 24: ...d for Fil ter A Resonance 3 1b 3 5 of Filter 1 and 2 Pitch Adjusts the playback pitch in one cent steps A set ting of 12 00 raises the pitch one octave and a setting of 12 00 will lower the pitch one octave This parameter is linked with the Sampling P3 Multi Sample parameter Pitch Sampling P3 3 1b The value that was specified in Sampling mode will be displayed here Attack Adjusts the attack times ...

Page 25: ...Pitch Mod These settings specify how key position note number will affect the pitch of oscillator 1 and select the controllers that will affect the oscillator 1 pitch and specify the depth of con trol Here you can also specify the amount of pitch change produced by the Pitch EG and by LFO1 and LFO2 You can also switch portamento on off and specify how it will apply 2 1a Pitch Pitch Slope 1 0 2 0 N...

Page 26: ...n List p 279 Porta SW 65 Portamento will also be switched when CC 65 Porta mento SW is received Enable Porta Enable Off On On checked Portamento will be applied Off unchecked Portamento will not be applied Fingered Porta Fingered Off On This parameter is available when Enable Porta Enable is checked On checked Portamento will be applied when you con tinue holding the previous note as you press the...

Page 27: ... the time over which the pitch will change after reaching the attack level until it reaches the normal pitch Release Release Time 0 99 Specifies the time over which the pitch will change from note off until it reaches the pitch specified as the release level 2 3b Level Modulation These settings allow the pitch EG Level parameters to be con trolled by alternate modulation AMS1 Level Mod AMS1 Off KT...

Page 28: ...value at the moment that the attack level is reached When this parameter is set to values of 16 33 49 66 82 or 99 the specified EG times will speed up as much as 2 4 8 16 32 or 64 times respectively or slowed down to 1 2 1 4 1 8 1 16 1 32 or 1 64 of the original time For example if AMS Time Mod AMS is set to Velocity increasing the absolute value of Intensity AMS Intensity will allow strongly play...

Page 29: ...sizes the overtone components that lie in the region of the cutoff frequency specified by Frequency A Frequency producing a more distinctive sound Increas ing this value will produce a stronger effect Resonance Mod by AMS Off PEG FEG AEG LFO KT EXT Selects the source that will control the Resonance A Reso nance level AMS List p 272 Intensity AMS Intensity 99 99 Specifies the depth and direction of...

Page 30: ...note How cutoff frequency is affected by keyboard location and the Ramp setting Intensity to A and Intensity to B 50 Intensity to A KBDTrk Int to A 99 99 Specifies the depth and direction of the effect that the key board tracking specified by Key Low KBDTrk Key Low Key High KBDTrk Key High Ramp Low KBDTrk Ramp Low and Ramp High KBDTrk Ramp High will have on filter 1A With positive values the effec...

Page 31: ...te modulation sources can be used to modulate the cutoff frequency of filter 1B Filter A 3 2 Page Menu Command 0 1A Write Program 1 1A Copy Oscillator 1 1B Swap Oscillator 3 3 Filter1 LFO Mod Here you can use the filter 1 LFO to apply cyclic modulation to the cutoff frequency of filter 1 for oscillator 1 to create cyclical changes in tone 3 3a LFO 1 Intensity to A LFO1 Int to A 99 99 Specifies the...

Page 32: ...d Decay Decay Time 00 99 Specifies the time over which the level will change from the attack level to the break point level Slope Slope Time 00 99 Specifies the time over which the level will change after the decay time has elapsed until the sustain level is reached Release Release Time 00 99 Specifies the time over which the level will change after note on occurs until the release level is reache...

Page 33: ...e direction in which AMS1 Time Mod AMS1 will affect the slope time With positive values of Inten sity AMS1 Intensity setting this parameter to will allow AMS1 to lengthen the time and setting this parameter to will allow AMS1 to shorten the time With a setting of 0 there will be no change Rl AMS1 SW Release 0 Specifies the direction in which AMS1 Time Mod AMS1 will affect the release time With pos...

Page 34: ...272 This change will be relative to the Pan Amp1 Pan setting Intensity 99 99 Specifies the depth of the effect produced by AMS Pan AMS For example if Pan Amp1 Pan is set to C064 and AMS Pan AMS is Note Number positive values of this parameter will cause the sound to move toward the right as the note numbers increase beyond the C4 note i e as you play higher and toward the left as the note numbers ...

Page 35: ...ensity 99 99 Specifies the depth and direction of the effect that OSC1 LFO1 will have on the volume of oscillator 1 Negative values will invert the LFO waveform AMS LFO1 AMS Off PEG FEG AEG KT EXT Selects a source that will control the depth by which OSC1 LFO1 will modulate the volume of oscillator 1 AMS List p 272 Intensity AMS Intensity 99 99 As the absolute value of this setting is increased th...

Page 36: ...er to will allow AMS to decrease the EG level With a setting of 0 no change will occur 4 3c Time Modulation These parameters let you use an alternate modulation source to modify the amp 1 EG times that were specified in Amp1 EG 4 3a AMS1 Time Mod AMS1 Off KT EXT Selects the source that will control the Time parameters of the amp 1 EG AMS List p 272 Intensity AMS1 Intensity 99 99 Specifies the dept...

Page 37: ...tting of 99 is the fastest Offset 99 99 Specifies the central value of the LFO waveform For example with a setting of 0 as shown in the following diagram the vibrato that is applied will be centered on the note on pitch With a setting of 99 the vibrato will only raise the pitch above the note on pitch in the way in which vibrato is applied on a guitar When Waveform is set to Guitar the modulation ...

Page 38: ...EG FEG AEG LFO2 KT EXT Intensity AMS2 Intensity 99 99 Make settings for a second alternate modulation source that will adjust the frequency of the oscillator 1 LFO1 AMS1 Freq AMS1 Intensity AMS1 Intensity 5 1c Frequency MIDI Tempo Sync MIDI Tempo Sync Off On On checked The LFO frequency will synchronize to the tempo MIDI Clock In this case the values you specified for Frequency 5 1a and Frequency ...

Page 39: ...rpeggio will depend on the Octave Motion Global P6 6 1b setting Resolution Specifies the timing resolution of the arpeggio The notes of the arpeggio will be played at the interval you specify or The speed of the arpeggio pattern is determined by the Arpeggiator Tempo and the Resolu tion Gate 000 100 Step Specifies the length gate time of each note in the arpeggio 000 100 Each note will be played w...

Page 40: ... arpeggio keyboard 0 2a On checked The notes you play will be sounded on their own in addition to being sounded as part of the arpeggio For example if you simultaneously press two or more notes they will be sounded as usual in addition to being played as arpeggiated notes Off unchecked Only the arpeggiated notes will be heard These parameters can also be set from P0 Play Arpeggio 7 1 Page Menu Com...

Page 41: ...n AMS to control the panning of the oscillator the sound will be output with the panning that was effective at the moment of note on Unlike when you select L R to out put the sound from MAIN L MONO and R the pan ning will not move in realtime while the note is sounding If you wish to adjust the pan in realtime during a note and output the sound from AUDIO OUTPUT INDI VIDUAL 1 2 or 3 4 set BUS Sele...

Page 42: ... size effects can not be used For IFX2 IFX3 and IFX4 you can select from 103 types of effect 000 No Effect 102 Hold Delay If you select a double size effect the insert effect that follows will be unavailable For example if you select a double size effect for IFX2 IFX3 cannot be used Up to two double size effects can be used You can use a normal size effect for IFX1 and double size effects for IFX2...

Page 43: ...el MIDI Channel Global P1 1 1a D mod p 277 For details on the master effects refer to p 205 8 Effect Guide 9 1 Master FX Here you can select the master effect types switch them on off specify chain order and set the master EQ 9 1a MFX1 2 The master effects do not output the direct sound Dry The return level Return1 Return2 sends the effect sound Wet to the L and R bus and this is mixed with the di...

Page 44: ... bus main output L MONO R 9 1c Master EQ Gain dB Sets the gain for the three band EQ located immediately before the sound of the L R bus is sent from the AUDIO OUTPUT MAIN OUT L MONO and R jacks This is linked with the various Gain parameters of Master EQ 9 4 Low 18 0 18 0 Mid 18 0 18 0 High 18 0 18 0 The cutoff frequency for Low Mid and High and the Q of Mid can be adjusted in the Master EQ page ...

Page 45: ...you raise the Ultra Boost value This adjustment also affects the way in which the low fre quencies are output by Ultra Boost and the effect pro duced by the vacuum tubes You can also use the VALVE FORCE INPUT TRIM knob to set this Ultra Boost 000 127 Adjusts the mix level to the Ultra Boost ultra low frequency boost circuit located in the beginning of Valve Force With a setting of 000 the signal w...

Page 46: ...settings You can insert Valve Force at the desired position by setting BUS Select 8 1c or the post IFX BUS Sel 8 2a The output destination from Valve Force is set by Valve Force BUS Sel 9 5a OSC Valve Force audio output BUS Select 3 4 Tube Valve Force BUS Sel L R or 1 2 OSC Valve Force insert effect master effects audio output BUS Select 3 4 Tube Valve Force BUS Sel IFX1 5 Post IFX Send1 or Send2 ...

Page 47: ... Insert Use 3 4 BUS 9 5 Page Menu Command 9 5A Copy Valve Force This command copies Valve Force settings from the desired program combination or song or from Sampling mode or Song Play mode 1 Select Copy Valve Force to access the dialog box 2 Use From to select the copy source mode bank and number 3 Select the parameters that you want to copy If you select Controller only Input Trim Tube Gain Ultr...

Page 48: ...n to cancel your selection Category 00 15 Select the combination category Each combination is assigned to one of 16 categories You can choose a category and select from the combinations included in that category When you press the popup menu button the Category Combination Select menu will appear Category Combination Select menu 1 Press the category popup button located at the top of Combination S...

Page 49: ...imbres will show the Bank Program Program Select Bank as and will transmit the bank number that was specified in Bank Select 2 1b MIDI messages transmitted when you operate the TRI TON Extreme are transmitted on the global MIDI chan nel At the same time timbres whose Status is EXT or EX2 will transmit the same messages on their own MIDI channel If bank select and program change messages are receiv...

Page 50: ...etting BUS Select will be set to DKit if the copy source program s Use DKit Setting is checked In conjunction with this the DrumKit IFX Patch setting will be reset to the default setting If with Effects is checked the BUS Select setting of the copy source program will be copied If the copy destination timbre BUS Select was set to IFX1 IFX5 it will automatically be set to L R If with Effects is unc...

Page 51: ...ing MIDI CC 7 or CC 11 mes sages will control the volume of a timbre However these messages will not affect the setting of this param eter If Status is EXT or EX2 the value of this parameter will be transmitted as MIDI CC 7 when the combina tion is changed However this will not be transmitted by a timbre that is set to the same MIDI channel as the global MIDI channel This message is transmitted on...

Page 52: ...a Input COMBI PROG SEQ S PLAY MEDIA Input Analog S P DIF Input1 Input2 Level 0 127 Pan L000 C064 R127 BUS IFX Indiv Select L R IFX1 5 1 2 3 Tube 4 Tube 1 2 3 4 Tube Off Send1 MFX1 Send2 MFX2 000 127 Specify the input source analog digital audio device and set the input level pan bus and master effect sends Input settings are valid in Combination Program Sequencer Song Play and Media modes Global P...

Page 53: ...dure the parameters that are set and their values refer to Auto Sampling Setup Program 0 3E 1 1 Program Mixer For each timbre 1 8 set the bank program pan and volume 1 1a Combination Name Selected Timbre Information Combination Name This shows the combination bank number and name selected in Combination P0 Play Selected Timbre Information Displays information about the selected timbre 1 8 P0 0 1b ...

Page 54: ...h timbre will be played 2 2a Force OSC Mode OSC Select Portamento Force OSC Mode PRG Poly MN LGT Specifies the Voice Assign Mode Program P1 1 1b of the program selected for each timbre 1 8 PRG The settings of the program will be used Poly The timbre will play polyphonically regardless of the settings of the program MN Mono The timbre will play monophonically regard less of the settings of the prog...

Page 55: ...of pitch change that will occur when the pitch bender is operated in semitone units PRG The pitch range specified by the program will be used 24 24 This setting will be used regardless of the setting in the program The MIDI RPN Pitch Bend Change message can be received to control this and change the setting How ever it will not be received if this parameter is set to PRG This message is received o...

Page 56: ...a will apply the effect of the checked item to the program of the correspond ing timbre The effect dynamic modulation function is not affected by this setting When Status is EXT or EX2 operation of the built in con trollers will transmit MIDI data on that timbre s MIDI chan nel MIDI transmission and reception settings for the entire TRITON Extreme are made in MIDI Filter Global P1 1 1b The Edit MI...

Page 57: ...mode MIDI control message assigned to knob 1 will be transmitted and received Enable Realtime Control Knob 2 Off On Specifies whether or not the A mode MIDI control message CC 71 the TRITON Extreme s low pass filter resonance or high pass filter cutoff frequency and the B mode MIDI con trol message assigned to knob 2 will be transmitted and received Enable Realtime Control Knob 3 Off On Specifies ...

Page 58: ...ached starting from the bottom key 0 The volume will be at the original level from the bottom key 12 The volume will increase gradually as you play upward and will reach the original volume one octave above the bot tom key 60 The volume will increase gradually as you play upward and will reach the original volume five octaves above the bottom key Bottom Key C 1 G9 Specifies the bottom key lower li...

Page 59: ... 4 4 Controller Control Here you can set the Combination mode functions of the SW1 key SW2 key and the B mode functions of REAL TIME CONTROL knobs 1 4 4 4a Panel Switch Assign These settings assign the function of the SW1 and SW2 keys SW1 SW2 Assign List p 279 Since the function assignments of the SW1 and SW2 keys made for the program assigned to each timbre are not valid inside of a combination t...

Page 60: ...rpeggiator from an external sequencer or use an external sequencer to record arpeg gio note data p 297 Example 1 Set the MIDI Channel 2 1b of timbres 1 and 2 to Gch and set Status 0 1c 2 1b to INT Assign arpeg giator A to timbre 1 and arpeggiator B to timbre 2 and check Arpeggiator Run A B 0 3a 7 1b When the ARPEGGIATOR ON OFF key is off timbres 1 and 2 will sound simultaneously layered when you p...

Page 61: ... 3 4 Resolution Gate 000 100 Step Velocity 001 127 Key Step Swing 100 100 Sort Off On Latch Off On Key Sync Off On Keyboard Off On These parameters are the arpeggiator settings for the combi nation Program P7 Edit Arpeggiator These parameters can also be set from 0 3 4 Arpegg A B 7 4 Scan Zone Scan Zone A B These settings specify the note and velocity ranges that will operate arpeggiators A and B ...

Page 62: ... to output the sound from MAIN L MONO and R the pan of a sounding note will not change in realtime If you wish to move the pan of a sounding note in real time and output it from AUDIO OUTPUT INDIVID UAL 1 2 or 3 4 you must set BUS Select to IFX1 or IFX2 IFX5 select 000 No Effect for IFX1 or IFX2 IFX5 8 2 and for the sound that has passed through the IFX set BUS Select 8 2 to either 1 2 or 3 4 Tube...

Page 63: ...These are the parameters for IFX1 2 3 4 and 5 that were selected in the Insert FX page p 217 8 3 7 a Ctrl Ch Ctrl Ch Ch01 16 G ch All Routed This parameter specifies the MIDI channel that will be used to control effect dynamic modulation Dmod pan following the insert effect CC 8 Send 1 and Send 2 The channel number of the timbre routed through this IFX will be followed by a displayed at the right ...

Page 64: ...apped 9 2 MFX 1 9 3 MFX 2 Here you can set the parameters for the MFX 1 and 2 effects that were selected in the Master FX page p 217 9 2 3 a Ctrl Ch Ctrl Ch Ch01 16 G ch This parameter specifies the MIDI channel that will control dynamic modulation Dmod for the master effect G ch The global MIDI channel MIDI Channel Global P1 1 1a will be used for control Normally you will set this to G ch 9 4 Mas...

Page 65: ...re to Valve Force However you can t make Valve Force settings indepen dently for each timbre Timbre Valve Force insert effect master effects audio output BUS Select 3 4 Tube Valve Force BUS Sel IFX1 5 Post IFX Send1 Send2 as desired Post IFX BUS Sel L R or 1 2 Don t set the post IFX BUS Sel to 3 4 Tube since doing will cause a feedback loop that may produce unpleasant distortion Timbre insert effe...

Page 66: ...pecify Finally a song you ve recorded into the sequencer can be resampled to media as a WAVE file and burned to an audio CD using a CD R RW drive connected to the USB A connec tor OG p 123 Your settings and the song data you record are not pre served when you turn off the power If you want to keep your data you must save it to media or a data filer before you power off There will be no song data i...

Page 67: ... can also be created using Event Edit 5 1B or Create Control Data 5 1L If you wish to record only the tempo changes set Recording Setup 0 8a to OverDub and the tempo will be recorded on the master track without being affected by the musical data of Track Select Song Select 000 199 Select the song that you want to record or play back Either select the song name from the popup menu or use numeric ke...

Page 68: ...Track Number to make settings for that track number Category 00 15 The program to be used by the MIDI track can be selected by category All programs are classified into one of sixteen cate gories You can select the desired category and then choose programs from that category When you press the popup button the Category Track Pro gram Select menu will appear Category Program Select menu Program P0 ...

Page 69: ...aracters can be input OG p 115 0 1D Delete Song This command deletes the currently selected song 1 Select Delete Song to access the dialog box 2 If you wish to execute the Delete Song command press the OK button To cancel press the Cancel button When you execute this command the musical data set ting data and patterns etc of the currently selected song will be erased and the memory area allocated ...

Page 70: ...ake sure that MIDI Channel Global P1 MIDI is set to other than 01 Make sure that the global MIDI channel Global P1 MIDI MIDI Channel is set to 01 Depending on the combination settings it may also be necessary to change the track settings as well The preceding illustration shows the example of copying the combination J005 In the Pocket with Auto adjust Arp setting for Multi REC un checked in Copy F...

Page 71: ...n how to copy preset patterns to a song along with the preset template song refer to QS p 24 0 1H Save Template Song Save as User Template Song This command saves the program selections track parame ters and effect settings etc of the current song as a user tem plate song U00 15 The settings you save here can also be loaded in Song Play mode 1 Select Save Template Song to access the dialog box 2 I...

Page 72: ... LOCATE key 3 To execute the settings press the OK button To cancel press the Cancel button When this dialog box is not open you can hold down the ENTER key and press the LOCATE key to set the current location as the Set Location value 0 1K GM Initialize This command transmits a GM System On message to the Sequencer mode resetting all tracks to the GM settings table below 0 1L Copy From Program Th...

Page 73: ...000 127 Sets the volume of MIDI tracks 1 16 When Status 2 1a 2a is INT or BTH CC 7 Volume can be received to control the volume The volume of a track is determined by multiplying the MIDI Volume CC 7 and Expression CC 11 values When you change the song or return to the beginning of the song tracks whose Status is EXT EX2 or BTH will transmit the volume you specify here as a MIDI Volume mes sage 0 ...

Page 74: ... sec Here you can make sampling related settings for Sequencer mode Program P0 0 3 Trigger Sampling START SW Note On Threshold Sequencer START SW Specifies the trigger that will initiate sampling Sampling START SW Program P0 0 3 In Sequencer mode the metronome count in will oper ate according to the Metronome Setup 0 8b setting Note On Program P0 0 3 Threshold Sampling will begin automatically whe...

Page 75: ...rig Key will increment after sampling so that the next sample will be assigned to the next higher key If you check the Seq Event check box a note event will automatically be created in the track specified by Track Note on will occur at the location at which sam pling began and note off will occur at the location at which sampling ended The note event will be created as in Recording Setup Over Dub ...

Page 76: ...e samples will automatically be assigned to C 2 D2 etc If you selected In Track Sampling 1 Use Source Audio to select the external audio input source If you select Analog the analog audio output from an instrument etc connected to AUDIO INPUT 1 2 will be input to the TRITON Extreme If you select S P DIF the digital audio output from an instrument or DAT player etc connected to the S P DIF IN jack ...

Page 77: ...audition the WAVE file you created use the page menu command Select Directory Use the page menu command Select Directory to specify the location in which the new WAVE file will be created Audio Sampling Setup Automatically set parameters and their values Parameter 1 Initialize 2 Resample SEQ Play 3 In Track Sampling 4 2ch Mix to Media Input Input Source Analog S P DIF 1 Analog S P DIF 1 Source Aud...

Page 78: ... for creating drum patterns etc If you select Loop All Tracks the display will indicate M M Loop Start Measure Loop End Measure at the right allowing you to specify the range of measures that will be recorded repeatedly Press the SEQUENCER REC WRITE key and then the SEQUENCER START STOP key and playback will occur until the specified measure is reached Then recording will occur repeatedly over the...

Page 79: ...can freely connect up to 99 songs Each unit in a cue list is called a step and you can specify a song number and a repeat number of repetitions for each step For example you could create each part of a song intro mel ody A melody B break solo backing ending etc as an individual song and use a cue list to play the intro twice melody A four times melody B four times the break twice melody A four tim...

Page 80: ... START STOP key will cause playback to begin from this step Measure indicates the starting measure of each step This cannot be edited Song Cue Edit Song S000 S199 name End Continue to Step01 S000 S199 Specifies a song for each step This cannot be edited during playback End and Continue to Step01 can be specified only for the last step of the cue list End Playback will stop at the last step of the ...

Page 81: ...a song if you wish to write it to a media as SMF data During the conver sion the track and effect settings of the song specified for Step 01 will be copied to the beginning of the resulting song and all track and effect settings of subsequent songs will use the settings of the song for Step 01 1 Select the cue list C00 19 that you want to convert to a song 2 Select Convert to Song to access the di...

Page 82: ...tep 01 Transpose 1 and Step 02 Trans pose 1 the actual note numbers of the Step 02 track note data will be shifted downward by 2 Repeat FS Foot Switch Repeat 1 If Repeat is set to FS Foot Switch it will be converted as Repeat 1 When you execute Convert to Song to convert a cue list to a song the repeat settings within the cue list and the pattern and track play loop settings of the songs used by t...

Page 83: ...s INT the transmit channel when it is EXT or EX2 and the receive transmit channel when it is BTH Tracks set to INT which have the same MIDI channel will sound and be controlled identically when they receive MIDI data or data from the sequencer tracks Bank Select When Status EX2 000 000 127 127 When Status is set to EX2 this sets the bank number that will be transmitted The left value is the MSB an...

Page 84: ... change in semitone steps that will occur when the pitch bender is operated PRG The pitch range specified by the program will be used 24 24 Regardless of the setting of the program pitch bending will use the range you specify here This setting can be controlled and changed by received MIDI RPN Pitch Bend Range messages These mes sages will not be received if the setting is PRG 2 5 Page Menu Comman...

Page 85: ...ch track when the TRITON Extreme s controllers are operated or when MIDI data is received The effect dynamic modulation function is not affected by these set tings Settings that regulate MIDI transmission reception of the TRITON Extreme itself are made in MIDI Filter Glo bal P1 1 1b If the user assignable controllers that can be filtered in the MIDI 3 and MIDI 4 pages are set to MIDI control chang...

Page 86: ...eived 3 5 MIDI 3 1 8 MIDI Filter 3 T01 08 3 6 MIDI 3 9 16 MIDI Filter 3 T09 16 Here you can specify whether the A and B mode effects of the REALTIME CONTROL knobs 1 4 will be transmitted and received The A mode MIDI controller messages for each knob are fixed The B mode messages can be set in P4 Zone Ctrl Controller page 3 5 6 a Enable Realtime Control Knob 1 4 Enable Realtime Control Knob 1 Off O...

Page 87: ...ottom key until the original volume is reached These settings do not affect MIDI transmission recep tion All note data that is received will be recorded into the internal sequencer and all note data from the inter nal sequencer or from the keyboard will be transmitted 4 1a Zone Map This shows the range of notes and velocities that will be sounded by each track 1 16 The note and velocity ranges are...

Page 88: ... 08 4 6 MOSS 9 16 MOSS T09 16 This page is displayed when the EXB MOSS option has been installed EM 4 7 Controller Controller Setup Here you can set the functions that the SW1 key SW2 key and the B mode functions that the REALTIME CONTROL knobs 1 4 will have in Sequencer mode When these switches or knobs are operated during recording the MIDI messages that you assign here will be recorded 4 7a Pan...

Page 89: ... use step recording to input data into a track that already contains sequence data all data will be erased from the From Measure and subsequent measures If after inputting you decide to revert to the prior data use the Compare function To input data with a continuously changing value such as pitch bend it is best to use Create Ctrl Data 5 1L To input individual data events such as program changes ...

Page 90: ... hear sound but the note will not be input Press the PAUSE key once again the LED will go dark to cancel the pause mode and resume input 8 When you are finished with step recording press the Done button If you press the COMPARE key you will return to the condition of before you began step record ing 5 1B Event Edit Here you can edit individual events of MIDI data that were input 1 Use Track Select...

Page 91: ...be erased 4 Press the OK button to execute Erase Track If you decide not to execute press the Cancel button 5 1D Copy Track This command copies musical data from the copy source track to the specified track Be aware that the track data of the copy destination will be erased when you execute the Copy Track operation 1 Use Track Select to select the MIDI track Track 01 16 that you want to copy 2 Sel...

Page 92: ...gining of the sequence 1 Use Track Select to select the MIDI track Track 01 16 that contains the measures you want to delete 2 Select Delete Measure to access the dialog box 3 In From Measure select the first measure that you wish to delete and in To End of Measure select the last mea sure that you wish to delete By default From Measure and To End of Measure will be the range that you specified in...

Page 93: ...result will be that measures 1 4 will be played twice 5 Specify the track s on which you want to execute the command If you execute with All Tracks unchecked the perfor mance data will be inserted into the track you specified in Track Select Be aware that in this case the perfor mance data following the insert position will move back ward i e toward the end of the song by the number of inserted me...

Page 94: ...lect the starting value of the control data In End Value select the ending value of the con trol data By default the Start Value will be set to the value of the existing data at the start location If you wish to create control data that changes smoothly from the starting location you can leave the Start Value unchanged and set only the End Value 6 To execute the Create Control Data command press t...

Page 95: ...r No If you want to quan tize all control changes select All After Touch Quantize both Channel Pressure and Poly phonic Key Pressure messages Pitch Bend Pitch bend data will be quantized Program Change Program change data will be quantized 5 In Resolution specify the timing resolution to which the data will be corrected By setting a lower resolution you can save more memory but the timing of the p...

Page 96: ...whose velocity will be modified 2 Select Modify Velocity to access the dialog box 3 Specify the range in which note velocity will be modified From Measure and To End of Measure specify the measure and Beat Tick specify the beat and clock By default From Measure and To End of Measure will be set to the range that you specified in the Track Edit page 4 Specify the range of notes that will be affecte...

Page 97: ...ency Adjust ing this will vary the brightness of the sound This controls the same parameter as when CC 74 is received p 286 bank F EM p 10 Reso HPF Resonance HPF Cutoff 99 00 99 Adjusts the OSC 1 2 low pass filter resonance level or high pass filter cutoff frequency The setting that will actually be controlled will depend on the filter type specified by the program This controls the same parameter...

Page 98: ...ogram OSC1 This controls the OSC1 Multisample Tune parameter Program P1 1 2a For an bank F program this controls the OSC Basic Transpose and Tune parameters EM p 14 Dtun 2 Detune 2 1200 0000 1200 Adjusts the tuning of program OSC2 This controls the OSC2 Multisample Tune parameter Program P1 1 2a For an bank F program this controls the OSC Basic Transpose and Tune parameters EM p 14 This is valid o...

Page 99: ...or other types of editing Pattern Pattern Bank Preset User Selects the type of pattern If Preset is selected it will not be possible to record You will be able to select and execute the Copy Pattern Bounce Pattern Put to Track and Copy to Track page menu commands Pattern Select P000 149 U00 U99 Selects a pattern User patterns can be renamed in the Pat tern Name page Tempo 040 240 EXT Specifies the...

Page 100: ...will be erased 4 To execute the Erase Pattern command press the OK button To cancel press the Cancel button 6 1E Copy Pattern This command copies the settings and musical data of the selected pattern to another pattern User patterns belong to a particular song but you can use the Copy Pattern command to use the same pattern in another song Also while preset patterns cannot be edited you can copy a...

Page 101: ...control data into the pattern To delete a pattern that has been placed in a track you can use Erase Measure 5 1F specifying the area in which the pattern was put and setting Kind to All 1 Select Put to Track to access the dialog box If you press the SEQUENCER START STOP key while the dialog box is open the selected pattern will play back 2 In Pattern and Pattern Select select the put source patter...

Page 102: ... Select the track that you want to play from the keyboard Tempo 040 240 EXT Specifies the playback tempo of the patterns 0 1a 6 3b Keyboard Assigned drawing This shows the selected key and the keys to which a pattern has been assigned by the RPPR function Assignments are not possible for the keys displayed in gray 6 3c RPPR Setup KEY Key Select C 2 C8 Specifies the key to which you want to assign ...

Page 103: ...irst key i e the first note on that occurs from a condition where no notes of the keyboard are pressed This setting is suitable when you wish to play phrase patterns in unison Measure The pattern will synchronize to the measures of the pattern that was started by the first key This setting is suitable for rhythm bass or drum patterns SEQ The pattern will synchronize to the measures of the sequence...

Page 104: ...A will operate Use the Arpeggiator A page to select the arpeggio pattern and set the parameters B Arpeggiator B will operate Use the Arpeggiator B page to select the arpeggio pattern and set the parameters For tracks that you wish to realtime record select either arpeggiator A or B If you specify an arpeggiator for two or more tracks the arpeggiator will play each of the tracks you specify You can...

Page 105: ...tor Run A B When the ARPEGGIATOR ON OFF key is on the arpeg giator s that are checked here will function for the track s to which they are assigned by Arpeggiator Assign When the arpeggiator is on A and B can be turned on off independently 7 1 Page Menu Command 7 1A Copy Arpeggiator This command copies arpeggiator settings Combination P7 7 1A Copy Arpeggiator 7 3 Arpegg A Arpeggiator A 7 4 Arpegg ...

Page 106: ...off status and chaining The effect type on off and chain settings can be made in the Insert FX page 8 2 8 1 2 b BUS Select IFX Indiv Out BUS Select Send1 MFX1 Send2 MFX2 BUS Select IFX Indiv Out BUS Select DKit L R IFX1 5 1 2 3 Tube 4 Tube 1 2 3 4 Tube Off These settings specify the bus to which the program oscilla tor s of each track 1 16 will be sent The status of the settings can also be viewed...

Page 107: ...to a track as exclusive events You can use this to make the effect settings change during a song OG p 47 When you use MIDI parameter change system exclu sive messages to change effect settings a certain amount of time will be required for the effect to switch Also if a note is sounding the sound may not change smoothly You should take into account the timing of the musical data when you specify th...

Page 108: ...an be received to control the pan following the insert effect send 1 or send 2 respec tively and change their settings When you switch songs or return to the beginning of the song tracks whose Status is BTH EXT or EX2 will transmit these settings via MIDI This data will be transmitted on the MIDI channels specified in the IFX 1 5 pages 8 4 8 8 8 4 IFX 1 8 5 IFX 2 8 6 IFX 3 8 7 IFX 4 8 8 IFX 5 Set ...

Page 109: ...e effect settings change during a song Sequencer P8 8 1D Put Effect Setting to Track 9 2 MFX 1 9 3 MFX 2 Here you can set the parameters of the MFX 1 and 2 effects that were selected in the Master FX page p 217 9 2 3 a Ctrl Ch Ctrl Ch Ch01 16 Gch Specifies the MIDI channel that will control dynamic modulation Dmod for the master effects If Gch is selected the global MIDI channel MIDI Channel Globa...

Page 110: ... Use Valve Force BUS Sel 9 5a to specify the output destination from Valve Force Track Valve Force audio output BUS Select 3 4 Tube Valve Force BUS Sel L R or 1 2 You can send more than one track to Valve Force How ever you can t make Valve Force settings independently for each track Track Valve Force insert effect master effects audio output BUS Select 3 4 Tube Valve Force BUS Sel IFX1 5 Post IFX...

Page 111: ...100 9 5 Page Menu Command 0 1A 0 1I 0 1J Program 9 5A ...

Page 112: ...ck If you want to record such events check only one of these two Enable settings in Global mode MIDI Filter Exclusive events supported in Sequencer mode Front panel Page Parameter Front panel ARPEGGIATOR ON OFF key GATE knob VELOCITY knob REALTIME CONTROLS REALTIME CONTROLS key P0 Play REC Prog 1 8 9 16 Category Program Select PLAY MUTE REC SOLO ON OFF 1 Mixer 1 8 9 16 Pan Volume P2 Trk Param OSC ...

Page 113: ... 8 9 16 Enable JS X as AMS Enable JS Y Enable JS Y Enable Ribbon MIDI 3 1 8 9 16 Enable Realtime Control Knob1 Enable Realtime Control Knob4 MIDI 4 1 8 9 16 Enable SW1 Enable SW2 Enable Foot Pedal Switch Other Control Change P4 Zone Ctrl Key Z 1 8 9 16 Top Key Top Slope Bottom Slope Bottom Key Vel Z 1 8 9 16 Top Velocity Top Slope Bottom Slope Bottom Velocity MOSS 1 8 9 16 Voice Allocation Reserve...

Page 114: ...sting samples and once again sampling them internally You can select either Auto where insert effect processing will be performed automatically on the sample you specify or Manual where you can manu ally apply an insert effect and play the sample manually for resampling Program Combination and Sequencer modes 1 A performance that makes use of the various functions of each mode filters effects arpe...

Page 115: ...tually contain 48 004 samples of data If Auto Optimize RAM Global P0 0 3b is on and the writing destination for sampling data is RAM the sample memory RAM will automatically be opti mized after the data has been written This is turned on by default but you may switch it on off as necessary Optimize RAM 0 1M Here you can set the input level and make other basic set tings for sampling sample recordi...

Page 116: ...o record a sample even when No Assign is displayed In this case a sample number will be selected automatically Even if you record to a sample that already contains data the selected sample will not be overwritten the data will automatically be sampled to a vacant sample and the newly recorded sample will replace the previous sample in the index If you wish to delete a sample execute the Delete Sam...

Page 117: ...andled as a stereo sample 0 1c REC Sample Setup Here you can select the memory bank into which you will sample specify the sampling time and select either mono or stereo sampling Save to RAM MEDIA Specifies the destination to which the data will be written during sampling RAM The sound will be sampled into sample memory RAM A sample written into sample memory can be heard imme diately in Sampling ...

Page 118: ...specify as the Source BUS 0 2b will be sampled L Mono The sound of the internal L channel or internal Indiv 1 channel specified by Source BUS will be sampled in mono R Mono The sound of the internal R channel or internal Indiv 2 channel specified by Source BUS will be sampled in mono Stereo The sound of the internal L and R channels or the internal Indiv 1 and 2 channels specified by Source BUS wi...

Page 119: ...after LEVEL knob has been lowered it is possible that the distortion is being caused by the settings of the internal effect Lower the Input 1 2 Level 0 2a or adjust the effect settings If you have sampled at a low input level you can execute Normalize in Normalize Level Adj 1 1I to amplify the level to the maximum possible without clipping 0 1 Page Menu Command 0 1A Delete Sample This command dele...

Page 120: ...s if you wish to delete all multisamples 4 Delete Samples too Check this if you also wish to delete the samples included in the deleted multisam ple s However samples that are mapped to used by other multisamples or drum kits will not be deleted 5 To execute the Delete Multisample command press the OK button To cancel press the Cancel button Even if you also choose to delete the samples that are i...

Page 121: ...ogram must be Double If you attempt to execute this command when these conditions are not satisfied a message will indicate Oscillator Mode conflicts You will need to change the Oscillator Mode setting of the convert destination program If the selected multisample is stereo the stereo position of the multisample in Sampling mode can be reproduced by setting the convert destination program to the f...

Page 122: ...le to specify the move destination sample number When moving a stereo sample you must move the samples individually If you wish to reassign pack all sample numbers start ing at 0000 check Optimize Empty Sample No 4 If Adjust Sample Assign in Drum Kit is checked and if the samples being moved are mapped to used by a drum kit those sample numbers will also be automati cally modified Normally you wil...

Page 123: ...nd of the filename when it is saved The number will automatically increment each time you sam ple When sampling repeatedly this is convenient since it allows each file to be saved with a different filename If Take No is not checked up to eight character can be entered in the Name field If Take No is checked up to six characters can be entered 5 Press the Done button to complete the settings Playin...

Page 124: ...key to stop sampling Here s how to check the data you just sampled If you specified Save to RAM play the C2 note of the keyboard to hear the sample If you specified Save to MEDIA use the page menu command Select Direc tory 0 1N to hear the sample If you specified Save to RAM and want to change the RAM bank used for sampling change the Bank 0 1c setting If you specified Save to MEDIA and want to ch...

Page 125: ...or DAT etc connected to the S P DIF IN jack can be input to the TRITON Extreme The L channel of the S P DIF input will be input as specified by the Input1 setting below and the R channel as specified by the Input2 setting The S P DIF input output supports only the 48 kHz sample rate If you want to sample via S P DIF you must set Sys tem Clock Global P0 0 2a to S P DIF Input1 Input2 Level 0 127 Spe...

Page 126: ... sample Resampling set Trig ger to Sampling START SW and set Resample 0 2b to Auto Resample Auto Note On Sampling will begin when you play the keyboard after having pressing the SAMPLING REC key and then the SAMPLING START STOP key Sampling will also begin if a MIDI note on is received instead of playing the keyboard 1 Perform steps 1 and 2 above 2 Press the SAMPLING START STOP key 3 When you play...

Page 127: ...a portion of the attack to be lost you can set the Pre Trigger REC parame ter to capture the early attack as well When sampling with Trigger Sampling START SW it is best to use Metronome Precount so that the instrumental performance etc is sampled in tempo If the performance is ahead of the tempo this Pre Trigger REC parameter lets you sample without losing any of it If you increase this setting y...

Page 128: ...an it was during sampling In such cases you can check Auto 12 dB On when you resample so that 12 dB 2 1c will be turned on causing the playback level to be the same as the level during sampling The Auto 12 dB On setting is set separately for each mode Program Combination Sequencer and Sam pling 0 3c Metronome Setup BUS Output Select L R 1 2 3 Tube 4 Tube Specifies the output destination of the met...

Page 129: ...l be displayed in the upper half and the R channel sample data in the lower half Edit Range Start 0000000 Edit Range End 0000000 This specifies the range start address and end address of the sample that will be edited by page menu commands This is shown in sample address units The range you specify here will be highlighted in the sam ple waveform display To audition the selected range press the SA...

Page 130: ...ta in the buffer will be mixed to mono and then inserted mixed or pasted The result is that a mono sample will be created You can also use these commands if you wish to mono mix a stereo sample and use it as a mono sample How ever be aware that once a sample has been mixed to mono it is no longer possible to return it to a stereo sam ple 1 About Overwrite When Overwrite is unchecked When the comma...

Page 131: ...e range to be edited is shown by Range Start and End 4 In Save to No specify the save destination sample number By default an unused sample number will be selected The sample number cannot be specified if Overwrite is checked p 119 For stereo samples use Save to No L and R to specify the save destination of the L and R chan nels 5 To execute the Clear command press the OK button To cancel press th...

Page 132: ...and R chan nels 6 To execute the Mix command press the OK button To cancel press the Cancel button If the buffer into which data was placed by the Copy command contains no data the display will indicate Source sample is empty 1 1G Paste When you execute this command the sample data placed in the buffer by executing Copy in the Sampling mode Sam ple Edit page or the Media mode Edit WAVE page will b...

Page 133: ...ect 1 1b to select the sample that you wish to edit and use Edit Range Start and Edit Range End to specify the editing range You can press the SAMPLING START STOP key to hear the portion that will be normalized or level adjusted 2 Select Normalize Level Adj to access the dialog box 3 The range to be edited is shown by Range Start and End 4 If you check Normalize and execute the data will be normal...

Page 134: ...ardless of the Edit Range Start and Edit Range End settings 1 Use Sample Select 1 1b to select the sample that you wish to edit 2 Select Rate Convert to access the dialog box 3 The sampling rate of the selected sample is shown at the right of Rate At the right of the you can select the desired amount of the sampling rate conversion 2 3 1 2 1 3 1 4 1 6 The sampling rate following conversion will be...

Page 135: ...le Select 1 1b to select the sample that will be placed in front by the Link command 2 Select Link to access the dialog box 3 The sample number selected for Front Sample No Sound A in the above example will be displayed When the command is executed this sample will be placed in front When you press the Play button located beside this parameter the entire sample will be played When the sample has p...

Page 136: ... the OK button To cancel without executing press the Cancel button If you link samples of different sampling rates such as created by Rate Convert 1 1K the newly created sample will have the sampling rate of the Front sam ple One vacant sample is used in order to execute Link Be aware that if there are no vacant samples an error will occur 2 1 Loop Edit Here you can specify the portion of the samp...

Page 137: ...12 dB will be turned off when you load an AKAI AIFF or WAVE format sample in Media mode This parameter is ignored when you use the Media mode page menu command Export Smpl AIF WAV 0 2H to export an AIFF or WAVE format sample file Loop Lock Off On This fixes the length of the loop being edited On checked When the LoopS or End address is edited the End or LoopS will be automatically adjusted so that...

Page 138: ... be specified if Overwrite is checked p 119 For stereo samples use Save to No L and R to specify the save destination of the L and R chan nels 6 To execute the Truncate command press the OK button To cancel press the Cancel button 2 1B Time Slice Time Slice detects the attacks e g kick and snare within a rhythm loop sample a sample that loops a drum pattern etc and automatically divides the sample...

Page 139: ...h If you want to re set Beat and Source BPM after pressing the OK button you can do so in step 9a 5 Listen to the samples that were divided by detecting their attacks The sample before slicing is assigned to the C2 note of the keyboard and the sliced samples are assigned to notes D2 and above When you change the Index the corresponding display will be highlighted allowing you to view the sliced wa...

Page 140: ...another location to slice the sample Modify End or Start to adjust the divided sample Link This joins the sample of the currently selected Index to the sample of the next Index Use this when you wish to merge together two sliced locations Be aware that if you change the Sensitivity after adjusting the slice location the attacks will be re detected and the sample will automatically be sliced again ...

Page 141: ... samples Program If this check box is checked the multisample will be converted to a program when you save it Specify the destination program number In the case of a stereo sample the program pan will automatically be set This allows the stereo position in Sampling mode to be reproduced by the program Seq Event If this check box is checked sequence data to play the sliced samples will automaticall...

Page 142: ...table for sustained sounds such as vocal or instruments Using it to change the tempo of phrases such as guitar or piano will also produce good results Slice This type is suitable for decay type instruments such as drums Using it to change the tempo of drum or percussion loops will produce good results with minimal effect on the attack It is possible to change the pitch when you adjust the tempo of...

Page 143: ... Start End Specify the start address and end address of the sample for the currently selected index When you execute Time Stretch the addresses will be specified automatically but the playback may be slightly skewed due to inaccuracies in the end address etc If this occurs you can correct the addresses manually When you change the start address the loop start address will also be changed simultane...

Page 144: ...To match a desired BPM tempo value Set New BPM to the desired BPM value of the sample that will be created Ratio will automatically be calcu lated from the Source BPM and New BPM values It is not possible to set or display New BPM outside the range of 40 480 It is not possible to set or display Ratio outside the range of 50 00 200 00 7 To execute Time Stretch press the OK button To cancel without ...

Page 145: ...e Convert MS to Program 0 1G or use Program mode High Multisample Low Multisample Program P1 1 2a 2b to select the multisample and create a program Be aware that if you exit Time Stretch without using the Save button then press the OK button to save the sam ple the sample s you created will be lost Before executing the Slice on a long sample you should first divide the sample into measures In some...

Page 146: ...u can create indexes for a multisample and then assign a sample to each index These basic settings can also be performed in P0 Recording page In addition you can delete copy or insert an index and perform detailed editing such as adjusting the level and pitch of the sample for each index 3 1 Multisample 3 1a Multisample MS Keyboard Index Multisample MS 000 999 Select the multisample that you wish ...

Page 147: ...ically be copied or assigned to a different number If it is not possible to create a new index when you exe cute Create or Insert a dialog box will appear If this occurs refer to Create 0 1b If you have not yet executed Cut or Copy such as immediately after power on the new index will be cre ated according to the Create Zone Preference settings 0 3a 3 2a Position Zone Range and Original Key Positi...

Page 148: ...am P1 1 4a 4 1b Realtime Control Knobs B Assign Assigns the B mode functions mainly various types of con trol change for the REALTIME CONTROL knobs 1 4 Realtime Control Knobs B Assign List p 280 The functions you specify here will operate when the REAL TIME CONTROL knobs 1 4 are operated in B mode Knob 1 B Off MIDI CC 95 Knob 2 B Off MIDI CC 95 Knob 3 B Off MIDI CC 95 Knob 4 B Off MIDI CC 95 Progr...

Page 149: ...nput 2 R channel Level Pan and BUS IFX Indiv Select normally set to L R A specified passage of an audio CD can be aquired in its digital state and saved as a sample This method known as ripping will bypass the additional Digital to Analog and Analog to Digital conversion normally required and will preserve the digital signal in its original state Use the page menu command Destination 5 1A to perfo...

Page 150: ...is highlighted pressing the ENTER key once will specify the Range Start and press it once again will specify the Range End If you press the ENTER key three or more times the Range Start and Range End will be set to the locations of the last press and the last but one press Range End 00 00 0 Specifies the ending location of the data that will be ripped When you re select Track or Index this will be...

Page 151: ... routing the name of the specified effect on off and chain are displayed Insert effect type on off and chain settings are made in the P8 Edit Insert Effect Insert FX page 8 1b BUS Select BUS IFX Select L R IFX1 5 1 2 3 Tube 4 Tube 1 2 3 4 Tube Off Selects the bus If you want to apply an effect to a sample multisample that you sampled or loaded select IFX1 5 Resample 0 2b After you resample L R wil...

Page 152: ...ce For details on these parameters refer to Program mode Placement Final Insert User 3 4 BUS Specifies the location of the Valve Force circuit For details on this Final refer to Program mode Insert Use 3 4 BUS This option places the Valve Force cir cuit after the 3 4 output DAC Digital Analog Converter Bus 3 4 will be input to Valve Force The signal will also be output from Individual 3 4 After th...

Page 153: ... so will cause a feedback loop that may pro duce unpleasant distortion You can use Valve Force in conjunction with insert effects even when resampling the playback of a sample As when sampling an audio input use BUS IFX Select 8 1b and post IFX BUS Sel 8 2a to specify the routing 9 1b Post VALVE FORCE Mixer Pan CC 8 L000 C064 R127 BUS Sel L R IFX1 5 1 2 1 2 Off ADC OVERLOAD These parameters specif...

Page 154: ...le select 000 999 From a media select the SMF that you wish to play back You can select SMF files from the currently selected direc tory If you wish to select from another directory use the P3 Select Directory to select the directory When Jukebox is checked you can select SMF files from the jukebox list in the P3 Jukebox This parameter will not be displayed if there are no SMF files in the directo...

Page 155: ... message to Song Play mode resetting all tracks to the GM settings table below In Song Play mode when a GM System On message is received from an external device or if the SMF contains a GM System On message the tone generator will be reset to the GM settings in the same way as when this command is executed However even in these cases the parameters of the P9 Master Effect will not be reset 0 1B So...

Page 156: ... 16 Tracks whose Status 1 1a 2a is INT or BTH can receive MIDI control change CC 7 to control the vol ume The actual volume of a track is determined by multiplying the MIDI volume CC 7 and expression CC 11 values Tracks 1 16 will be controlled by MIDI channels 1 16 respectively 0 5 Preference Here you can make settings for playing SMF files consecu tively and make settings for the metronome 0 5a N...

Page 157: ...ack or oper ate the TRITON Extreme s keyboard or controllers when Play Track Select is set to a track whose setting is EXT MIDI messages will be transmitted to external devices but the TRITON Extreme s internal tone generator will not sound 1 1 2 b Use Program s Scale Scale Use Program s Scale Off On For each track you can specify whether or not the scale spec ified for the program in Scale Progra...

Page 158: ... functions of the program assigned to each track will not be valid you can make new settings here SW1 Off After Touch Lock Toggle Momentary Toggle Momentary SW2 Off After Touch Lock Toggle Momentary Toggle Momentary Program P1 1 4a 2 1b Realtime Control Knobs B Assign Assigns the B mode functions mainly various types of con trol change for the REALTIME CONTROL knobs 1 4 Realtime Control Knobs B As...

Page 159: ...the SMF was saved 3 1c Media Select Media Select CF HDD CDD RDD Name Selects the media from which data will be played back The type of media and the volume label are displayed Media Select Media 0 1c 3 1d Open button Up button Open button When you press the Open button the directory will be opened and the current directory will move one level downward in the directory hierarchy Up button When you ...

Page 160: ...arpeggiator can be synchronized to the start of SMF playback Turn on the arpeggiator and press the SEQUENCER START STOP key and the arpeggiator will synchronize with the playback timing of the SMF If you press the SEQUENCER START STOP key and both the SMF playback and the arpeggiator will stop If you wish to stop only the arpeggiator turn off the ARPEGGIATOR ON OFF key 7 1 Setup 1 8 Setup T01 08 7...

Page 161: ...lect to select Track 02 Arpeggiator B will run and track 2 will be sounded by the arpeggiator Arpeggiator Run A B When the ARPEGGIATOR ON OFF key is on the arpeg giator s you check here will operate for the tracks to which they have been assigned When the arpeggiator key is on A and B can be turned on off independently 7 1 Page Menu Command 7 1A Copy Arpeggiator This command copies arpeggiator set...

Page 162: ...he selected effect the on off sta tus and chaining Effect type on off and chain settings can be made in the Insert FX pages 8 1 2 b IFX Indiv Out BUS Select BUS Select Send1 MFX1 Send2 MFX2 IFX Indiv Out BUS Select BUS Select DKit L R IFX1 5 1 2 3 Tube 4 Tube 1 2 3 4 Tube Off Specify the bus to which the program oscillator of each track 1 16 will be sent The status of these settings can also be vi...

Page 163: ...mode 8 2 Insert Fx However unlike in Program mode Pan CC 8 Send 1 MFX1 and Send 2 MFX2 will be controlled on the MIDI channel specified in each of the IFX1 5 pages The control changes used are the same as in Program mode The pan CC 8 and send 1 and 2 settings you make here are used when you playback from the beginning of the SMF You can change the settings during playback However if the SMF contai...

Page 164: ...ch the global MIDI channel MIDI Channel Global P1 1 1a will be used for control 9 4 Master EQ The master EQ is a three band stereo EQ It is located imme diately before the L R bus is sent from the AUDIO OUTPUT MAIN OUT L MONO and R and is used to apply overall equalization tonal adjustments p 269 9 4a Ctrl Ch Ctrl Ch Ch01 16 Gch Specifies the MIDI channel that will control dynamic modulation Dmod ...

Page 165: ...Force BUS Sel IFX1 5 Post IFX Send1 Send2 as desired Post IFX BUS Sel L R or 1 2 Don t set the post IFX BUS Sel to 3 4 Tube since doing will cause a feedback loop that may produce unpleasant distortion Track insert effect Valve Force master effects audio output BUS Select IFX1 5 Post IFX BUS Sel 3 4 Tube Valve Force BUS Sel L R or 1 2 Valve Force Send1 Send2 as desired Track insert effect Valve Fo...

Page 166: ...une messages will make relative adjustments to the tuning specified by the Master Tune setting MIDI RPN Coarse Tune messages will make relative adjustments to the pitch specified by the Key Trans pose setting In Program mode these messages will be received on the global MIDI channel specified by MIDI Channel 1 1a and in other modes they will be received on the MIDI channel specified for each tim b...

Page 167: ...e 0 1b Effect Global SW IFX1 5 Off Off On On checked All insert effects IFX1 5 will be off Off unchecked The P8 Insert Effect settings for IFX1 On Off IFX5 On Off in Program Combination Sequencer Song Play and Sampling modes will be valid MFX1 Off Off On On checked Master Effect MFX1 will be off Off unchecked The P9 Master Effect setting MFX1 On Off in Program Combination Sequencer and Song Play m...

Page 168: ...cess the dialog box 2 If you wish to change bank references for combinations check Combination If you wish to change bank refer ences for songs check Song 3 In Program Bank specify the replacement for each bank 4 To execute the Change All Bank References command press the OK button To cancel press the Cancel button If you change two or more different banks to the same bank it will not be possible ...

Page 169: ...e clock frequency and that there is no problem with the cable In order for S P DIF input to work correctly make sure that the correct clock is being received and that the error message has disappeared from the status bar Then switch System Clock to Internal and then back to S P DIF once again If the System Clock setting of S P DIF is stored and the correct clock is not being input when the TRITON ...

Page 170: ...checked Data can be written to internal drum kit memory Arpeggio User Pattern Off On This setting protects the internal user arpeggio pattern memory On checked Internal user arpeggio pattern memory will be protected and the following write operations cannot be performed Writing an user arpeggio pattern Loading user arpeggio pattern data from media Loading preload arpeggio pattern data Receiving us...

Page 171: ...om the external audio signal being input specified by Input to the master effects If BUS IFX Select has been set to IFX1 5 the send level to the master effects is specified by Send1 and Send2 Program 8 1d Combination Sequencer Song Play 8 1b after the signal has passed through IFX1 5 2 4 Audio Input S P DIF IN p 209 If BUS IFX Indiv Select is set to other than Off and you raise the Level setting t...

Page 172: ... The TRITON Extreme s keyboard and joystick etc will be disconnected from the internal tone generator This means that operating the TRITON Extreme playing its keyboard and using the joystick or playing back the sequencer will not sound its internal tone generator Uncheck this setting if echo back from an external sequencer causes notes to be sounded in duplicate Even if this setting is unchecked M...

Page 173: ...o be unwantedly reset On checked The above Common messages including Song Select and Realtime messages will be received This parameter cannot be set if MIDI Clock is Inter nal 1 1b MIDI Filter Enable Program Change Off On On checked Program changes will be transmitted and received In Program mode P0 Play the program will be switched when a program change message is received on the global MIDI chan...

Page 174: ... in the form of system exclusive data Select the desired command refer to the following table and a dialog box will appear Select the bank or timbre etc of the data to be dumped Then press the OK button Transmission Do not touch the TRITON Extreme s switches or turn off the power while data is being transmitted Data dump transmission procedure 1 Connect the TRITON Extreme to the device that will r...

Page 175: ...it MIDI exclusive messages connect the computer s USB connec tor to the TRITON Extreme s USB B connector Alterna tively connect the MIDI OUT connector of your computer s MIDI interface to the TRITON Extreme s MIDI IN connector p 288 Some USB MIDI interface devices may not be able to transmit or receive the TRITON Extreme s MIDI exclu sive messages If you are using a MIDI data filer connect the TRI...

Page 176: ... closed type If the polarity does not match operating the pedal switch will not produce the cor rect result If no pedal switch is connected set this to KORG Standard 3 1 User Scale Here you can make settings for sixteen different User Octave Scales and one User All Notes scale The user scales you cre ate here can be selected from the following pages Program P1 Edit Basic Program Basic page Combina...

Page 177: ...h cannot be selected if To is User All Notes Scale 3 In To selects the copy destination scale 4 To execute the Copy Scale command press the OK but ton To cancel press the Cancel button 4 1 Program Cat 4 2 Comb Cat When you write from the Write Program dialog box Pro gram P0 0 1A or Write Combination dialog box Combina tion P0 0 1A one of the category names you edit here can be assigned to the prog...

Page 178: ...kit that is used by a program it is a good idea to use the page menu command Copy Drum Kit to copy it to an unused number in 112 N 143 User and 016 H 111 M and then edit the copy If you want to edit the name of the drum kit execute the page menu command Rename Drum Kit KEY C 1 G9 Selects the key to which the drum sample and its settings will be assigned Use the VALUE controller to specify the key ...

Page 179: ...ck direction of a sample for which Rev Sampling P2 2 1c is checked Level 99 99 Specifies the volume Keys for which a value of 99 is specified will sound at a volume twice as high as the amp level of the program which uses that drum kit Keys for which a value of 0 is specified will sound at the volume of the amp level of the program which uses that drum kit Keys for which a value of 99 is specified...

Page 180: ...You can also copy settings from two or more contiguous keys at once 1 Select Copy Key Setup to access the dialog box 2 In From Key select the range of keys that you wish to copy 3 In To Key select the copy destination key If you selected two or more keys in From Key their settings will be copied to the keys starting at To Key and con tinuing upward 4 To execute the Copy Key Setup command press the...

Page 181: ...gio pattern that is selected by the program Even if you moved from a program in which the arpeggiator is turned off it can be turned on by the ARPEGGIATOR ON OFF key If you entered Global mode from Combination mode Your editing will apply to the arpeggio pattern that is selected by the combination Even if you moved from a com bination in which the arpeggiator is turned off it can be turned on by t...

Page 182: ...s you specify for the Tones Note numbers from the keyboard will only control the trigger timing of the arpeggiator Fixed Note mode is ideal for arpeggio patterns that you are using as drum pat terns In the P6 User Arpeggio Pattern Edit page the Tone indica tors will be when Normal is selected here or when Fixed Note is selected Arpeggio Type As Played Up Down Specifies the relationship between the...

Page 183: ... source arpeggio pattern From 3 To execute the Copy Arpeggio Pattern command press the OK button To cancel without executing press the Cancel button Be aware that when you execute Copy Arpeggio Pat tern all settings of the currently selected arpeggio pat tern will be overwritten 6 2 Pattern Edit Here you can input Tones 0 11 for each step 01 to 48 Step can be a maximum of 48 steps and Tone corresp...

Page 184: ...es to a full state 3 To execute the Initialize Steps operation press the OK button To cancel press the Cancel button 6 2B Copy Step This command copies the settings of a specific step The set tings of two or more adjacent steps can also be copied together 1 Select Copy Step to access the dialog box 2 In From Step select the range of steps that you wish to copy 3 In To Step select the copy destinat...

Page 185: ...174 ...

Page 186: ... be added automatically according to the type of data If these filename extensions are modified on a computer the file will be treated as an undefined file when it is reloaded back into the TRITON Extreme and will be han dled as a Standard MIDI File Files handled by the TRITON Extreme have the shown in the structure Since PCG and SNG files can be opened to divide their contents they are displayed ...

Page 187: ...rg multisample parame ter file or KSF Korg sample file that is loaded will be replaced in the display by the multisample name or sample name that was specified in Sampling mode b3 Size This is the size of the file in bytes Save date and time This is the date and time at which the file was saved From the left this is the day month year hour minute and sec ond The TRITON Extreme contains a calendar ...

Page 188: ... directory that contains the file indicated by Where is a If the specified file is located on another media exchange media Then press the directory win dow in the LCD screen to make the TRITON Extreme rec ognize the media and select the appropriate directory It is not possible to open PCG or SNG files in the Where is a dialog box The Open button cannot be used for PCG or SNG files 2 Press the Sele...

Page 189: ...SC Allocation is valid if Load KSC too has been checked You can specify how the multisamples and samples in the KSC file will be loaded Append Samples will be loaded starting at the first unoccupied number following the last multisample or sample that currently exists in memory i e by having been sampled or loaded At this time only the valid multisamples or samples will be loaded and they will be ...

Page 190: ...cted bank will be loaded into the bank you specify 1 In To specify the loading destination bank 2 To load the data press the OK button To cancel without loading press the Cancel button 7 Load a Combination selected icon The combination you select will be loaded into the loading destination combination number you specify 1 If you wish to load a combination other than the one already selected use Co...

Page 191: ...user arpeggio pattern to be loaded p 176 2 In To Arp Pattern lower line specify the loading desti nation user arpeggio pattern 3 To load the data press the OK button To cancel without loading press the Cancel button 14 Load Global Setting selected icon Global setting data in the PCG file will be loaded This includes Global mode parameters other than drum kits and user arpeggio patterns Memory prot...

Page 192: ... data will not be loaded If this is On checked system exclusive messages and universal exclusive messages included in the SMF data will be loaded as exclusive events The TRITON Extreme does not support all of the GS XG sound maps or messages Depending on the content of the data it may not play back correctly but the data itself will be maintained if Exclusive is On checked 3 To load the data press...

Page 193: ...e extension of KSF Korg Sample File contain the parameters and waveform data which make up a single sample A KSF file can be used as one of the sam ples used by a multisample A KSF file can also be selected and used as a drum sample for a drum kit Loading multiple files You can use wild cards to specify multiple KMP KSF AIF WAV AKAI Program and AKAI Sample files and load them simultaneously This c...

Page 194: ...ing press the Cancel button If the KSF files used by the KMP file are not in the cur rent directory or below it a dialog box will appear allow ing you to specify the directory Use the procedure If a file to be loaded cannot be found p 177 to load the required KSF files Since overflow checking of sample memory RAM is performed when loading each individual KSF file it is possible that an overflow ma...

Page 195: ...data that is loaded as a sample contains a loop point you can set S Offset Program P1 1 2a on the TRITON Extreme so that the sound will begin from the loop point If the end 11th and 12th characters of the sample name is L and R the L and R will automatically be moved to the end of the TRITON Extreme s sample name 15th and 16th characters When you load two files whose sample names are iden tical ex...

Page 196: ...s from the Program file will be loaded to create a multisample p 318 About AKAI Program files 5 If you checked Advanced Conversion Load use Append to Combination to specify the destination bank and number of the combination that will be created by the convert load operation When you execute the command the combinations that are created will be loaded starting at the bank and number you specify her...

Page 197: ...ogether with the RAM based programs Choose this setting if the combinations or songs being loaded use user programs as well as the preloaded programs All ROM based programs used by the loaded combina tions and songs will be loaded Bank F program data will not be loaded If you leave this unchecked only RAM using programs in the PCG file combinations and SNG file songs will be loaded Normally you wi...

Page 198: ... power is on will cause malfunctions 1 To save the data as a divided file across two or more vol umes of media make sure that you have the required number of discs and then press the OK button in the No space available on medium dialog box Saving will begin If you decide that you don t want to save a divided file press the Cancel button and save your data to media that has more available space 2 W...

Page 199: ...ess the OK button To cancel without saving press the Cancel button 0 2C Save PCG This command saves all internal memory programs combi nations drum kits user arpeggio patterns and global set tings as a PCG file This command is valid only when the current directory is a DOS directory 1 Select Save PCG to access the dialog box 2 Use the text edit button to move to the text input dialog box and speci...

Page 200: ...files on media 0 2F Save to Std MIDI File Save Song as Standard MIDI File This command saves the selected song from internal mem ory to storage media as a MID file Standard MIDI File This command is valid only when the current directory is a DOS directory 1 Select Save to Std MIDI File to access the dialog box 2 In Song so the song that you wish to save 3 If Exclusive is On checked system exclusiv...

Page 201: ...MS All samples used by the selected multisample will be exported Only five characters of the filename can be specified The five character filename the index number 001 128 in the multisample will be assigned automatically Initially the filename will automatically be set to the first five characters uppercase of the sixteen character multi sample name Examples 000 NewMS___000 Sample selected for in...

Page 202: ...not be copied 4 Use the Open button and Up button to select the copy destination directory If you wish to specify a different USB device use Media Select 0 1c to select it 5 If you wish to copy the file or directory with a different name use the text edit button in the lower line to access the text input dialog box and specify the name with which the file or directory will be copied If you are usi...

Page 203: ...ted or if you want to format media that has been UDF formatted by the TRITON Extreme Since only the system area of the media need be format ted this will require less time Full Format Select this when formatting media that has not been physically formatted or media CD RW that has not been UDF formatted Normally it is not necessary to perform a Full Format on media that has been physically formatte...

Page 204: ... or press the Cancel button to cancel 5 When checking has been completed the recovered con tent will be displayed If you want to stop the checking process before it has been completed press the Abort button Checking will require approximately 80 minutes for 5 Gbyte FAT32 media but the time required will vary depending on the media capacity and on the number of errors that are found 0 3J USB Storag...

Page 205: ... the trash or select the Special menu command Eject Press the EXIT button to close the dialog box When you ve exited USB Storage mode disconnect the USB cable from the TRITON Extreme Here you can use a CD R RW drive connected to the USB A connector to create an audio CD Wave files created by resa mpling the TRITON Extreme s sequencer playback can be burned to an audio CD Use the Insert button and ...

Page 206: ...g the file you want to add use the Open button and Up button to navigate to the appropriate directory and select the Wave file 0 1c 0 1d Insert Adds the selected highlighted WAVE file Insert All Adds all WAVE files in the selected directory whose sampling frequency is 44 1 kHz or 48 kHz The files will be added in the order in which they are displayed When you execute Insert or Insert All the WAVE ...

Page 207: ... tracks have been written to it If Execute finalize too is checked the disc will be final ized If this is not checked the disc will not be finalized If you want only to finalize the disc use Finalize Audio CD 0 4C 5 Press the OK button to execute writing or test writing to the CD R RW media or press the Cancel button to can cel without executing WAVE files with a 48 kHz sampling frequency will be ...

Page 208: ...selected Track 01 Selects the audio CD track that will be played Index 01 Specifies the index of the audio CD that will be played This is valid only if you have selected a track that has index data In the case of some CD R RW drives index informa tion cannot be obtained Volume 0 127 Specifies the volume of the audio output from the CD R RW drive Since some CD R RW drives do not support this the vo...

Page 209: ...e region specified by Edit Range Start and Edit Range End Only 44 1 kHz or 48 kHz WAVE files can be played back using the SAMPLING START STOP key Use Zero Off On On checked When you set Edit Range Start Edit Range End LoopS or End you will only be able to select zero cross points i e addresses at which the wave form level is at the center zero line When you operate the VALUE slider VALUE dial or k...

Page 210: ...ou have edited the WAVE parameters These settings are valid only when the WAVE file is loaded into a device e g application that uses these parameters 1 After editing the WAVE parameters select Save WAVE Parameter to open the dialog box 2 If you want to create a new Wave file uncheck Over write WAV If this is unchecked a new Wave file will be created in the same directory as the original file If y...

Page 211: ... refer to Sampling P1 1 1H Insert Zero For details on Overwrite WAV and Name refer to 0 6A Save WAVE Parameter steps 2 and 3 0 6J Normalize Level Adj This command uniformly adjusts the data values volume of the Edit Range Start Edit Range End region Nor malize will boost the volume of the region as high as possi ble without causing clipping distortion By executing Normalize on data that was sample...

Page 212: ...e BPM value will change automatically p 131 You cannot make settings that would cause Source BPM or New BPM to exceed a range of 40 480 You cannot make settings that would cause Ratio to exceed a range of 50 00 200 00 Depending on how the data is processed the resulting length may not be exactly as you specified 6 To execute the Time Stretch command press the OK but ton The Time Stretch dialog box...

Page 213: ... for Program and assigned to the song track you specified in Song and Track Then the appropriate note data will be automat ically created in the track If a L ch or R ch exceeds 16 Mbytes the WAVE file will automatically be divided 0 6O Mono to Stere This command performs on a Wave file the same function as performed by the Sampling mode P0 Recording page menu command Sample Mono To Stereo For deta...

Page 214: ...rotect status of the media This will indicate On if protected or Off if not protected Supports Removable This will indicate Yes if the media of the selected device can be removed e g CompactFlash CD R RW disc MO disc removable hard disk If the media is fixed this will be No Media Select Selects the media 0 1c 0 7 Page Menu Command 0 7A Scan USB device This command mounts a USB device 1 Select Scan...

Page 215: ...204 ...

Page 216: ...k can be processed by the TRITON Extreme s effects and sampled or the TRITON Extreme can be used as a 4 in AUDIO INPUT 1 2 and S P DIF IN L R 6 out effect processor The TRITON Extreme can also be used as a vocoder effect 093 Vocoder that uses external mic input to control internal sounds When effects are applied to the external input sound from the AUDIO INPUT 1 2 and S P DIF IN jacks cer tain eff...

Page 217: ... IFX1 5 off separately from the setting of the ON OFF button by receiving MIDI control change message CC 92 Value 0 will turn them off and value 1 127 will turn them on You can also use Effect Global SW Global P0 0 1b to turn IFX1 5 on and off This MIDI control is performed on MIDI Global Channel MIDI Channel Global P1 1 1a Double size effects Double size effects 090 102 use twice the area of what...

Page 218: ... Send2 parameters for the post IFX5 signal will be used Settings for drum programs If you have selected Drums for Oscillator Mode Pro gram P1 1 1a of a Program the Use DKit Setting box Program P8 8 1b becomes available If you check this box BUS Select Global P5 5 2b for each key of the selected DrumKit becomes effective For example you can send a snare sound to IFX1 to apply the Gate effect a kick...

Page 219: ...firm the setting If you wish to restore the original DrumKit setting set IFX1 to IFX1 IFX2 to IFX2 IFX3 to IFX3 IFX4 to IFX4 and IFX5 to IFX5 In the following example Drum Program is assigned to Tim bre 1 and normal Programs are assigned to Timbres 2 and 3 BUS Select is set to DKit for Timbre 1 IFX1 for Timbre 2 and IFX2 for Timbre 3 With Timbre 1 the BUS Select Glo bal P5 5 2b for DrumKit setting...

Page 220: ...io input signal can be used to play back an audio CD In these modes you can also use the TRITON Extreme as a 4 in 6 out effect processor to modify the external audio input or use the external audio in conjunction with the internal sounds For example in Program mode or Combination mode you can route the incoming signal from AUDIO INPUTs 1 and 2 and the oscillator sound to Insert Effect 093 Vocoder ...

Page 221: ...e option from Ch01 16 Gch and All Routed Ch01 16 Select this when you want to control each insert effect from a different channel An symbol will be dis played at the right of the MIDI channel Ch01 16 of the tim bre that is routed to each insert effect If the routed timbres have different MIDI channel settings this parameter is used to specify the channel that will control the insert effect Gch Sel...

Page 222: ...Channel Global P1 1 1a Double size effects You cannot select double size effects for Master Effects MFX1 and MFX2 2 Routing You can use up to two channels MFX1 and 2 for the Master Effects in any mode other than in Sampling mode You can not use the Master Effects in Sampling mode If you are not using any Insert Effects in any mode the Master Effects send levels are determined by the Send1 MFX1 and...

Page 223: ... Timbre 1 is routed to IFX1 Timbre 2 to IFX2 Timbre 3 to IFX3 Timbre 4 to IFX4 Timbres 5 and 6 to IFX5 and Timbres 7 and 8 to L R In this case use Send1 and Send2 for the post IFX1 001 St Amp Simulation signal to set the send level of the Tim bre 1 routed to the Master Effect In this example they are set to 032 and 127 In the same way use Send1 and Send2 for the post IFX2 3 and 4 signals to set th...

Page 224: ... or R Only will cause only one channel of stereo out puts from MFX1 to be input to MFX2 This setting is suitable for a chain connection of a reverb effect and a modulation effect such as 016 Stereo Chorus 3 5 Chain Level This parameter determines the level of signals routed from one MFX to the other MFX in a chain connection 3 6 Master EQ Gain dB These parameters are used to set the gain of the Lo...

Page 225: ...ts the level after the signal has passed through Valve Force This placement sends the final signal of the program combi nation song or sample playback through Valve Force add ing the rich overtones and smooth distortion typical of a vacuum tube and unifying the sound If Placement is set to Insert Use 3 4 BUS the Valve Force circuit will be placed after conversion to an analog signal by the Indiv O...

Page 226: ...put Setup page to 3 4 Tube 3 Tube or 4 Tube To send the signal first through an insert effect and then into Valve Force set the post IFX BUS Sel Insert FX page to 3 4 Tube 3 Tube or 4 Tube To send a multisample through Valve Force and resample it set BUS IFX Select Routing page to 3 4 Tube 3 Tube or 4 Tube Use BUS Sel Valve Force page to make settings for the output from Valve Force Send the signa...

Page 227: ...e Track 2 Timbre Track 3 BUS Select Off Timbre Track 4 BUS Select 1 2 Timbre Track 8 BUS Select 3 4 Track 16 BUS Select L R IFX Indiv Out BUS Select stereo Insert Effects Post IFX Pan CC 8 BUS Select Select from L R 1 2 3 4 1 2 3 4 Off Send2 stereo Master Effects AUDIO OUTPUT INDIVIDUAL 1 2 3 4 L R BUS stereo mono x 4 mono x 4 BUS Select IFX3 BUS Select IFX1 stereo stereo stereo stereo stereo Chai...

Page 228: ...ect allowing you to set any band width to be covered This effect is a stereo limiter You can link left and right channels or use each chan nel individually Filter Dynamic a Amplifier Type Selects the type of guitar amplifier SS EL84 6L6 b Wet Dry Dry 1 99 99 1 Wet Sets the balance between the effect and dry sounds Src Off Tempo Selects the modulation source of the effect balance Amt Sets the modul...

Page 229: ...Threshold dB 40 0dB Sets the level above which the compressor is applied d Attack Sets the attack time 1 100 Release Sets the release time 1 100 e Gain Adjust dB Sets the output gain Inf 38 24dB Src Selects the modulation source for the output gain Off Tempo Amt Sets the modulation amount of the output gain 63 63 f Side PEQ Insert Toggles between on off of the trigger signal s EQ Off On Trigger Mo...

Page 230: ...simulation will allow you to create versatile distor tion sounds This effect is suitable for guitar and organ sounds i Wet Dry Dry 1 99 99 1 Wet Sets the balance between the effect and dry sounds Src Off Tempo Selects the modulation source of the effect balance Amt Sets the modulation amount of the effect balance 100 100 a Envelope Select D mod L R Mix L Only R Only Selects from Control via the mo...

Page 231: ...helving type Gain dB Sets the gain of Low EQ 18 18dB g Mid1 Cutoff Hz 300 10 00kHz Sets the center frequency for Mid High EQ 1 peaking type Q Sets the band width of Mid High EQ 1 0 5 10 0 Gain dB Sets the gain of Mid High EQ 1 18 18dB h Mid2 Cutoff Hz 500 20 00kHz Sets the center frequency for Mid High EQ 2 peaking type Q Sets the band width of Mid High EQ 2 0 5 10 0 Gain dB Sets the gain of Mid H...

Page 232: ...the modulation amount of the effect balance 100 100 Band2 Cutoff Band2 Cutoff 0dB 6dB 15dB Band2 Gain dB 6 0 Band2 Dynamic Gain Amt dB 9 0 D mod 0dB 6dB 9dB Band2 Gain dB 6 0 Band2 Dynamic Gain Amt dB 15 0 D mod Parametric 4EQ Band2 Dynamic Gain Control Left Right Wet Dry Wet Dry Stereo In Stereo Out Band1 Band2 Band3 Band4 Trim Trim Band5 Band6 Band7 Band1 Band2 Band3 Band4 Band5 Band6 Band7 a Fr...

Page 233: ...e LFO Step Freq parameter enables you to adjust the width of the steps Frequency Bottom 25 Top 75 Higher Max Zero Higher D mod Frequency Bottom 60 Top 30 Higher Max Zero Higher D mod Sweep Mode D mod Frequency Bottom 25 Top 75 Higher Frequency Bottom 75 Top 25 Higher Sweep Mode Auto Envelope Envelope Time Wah Woo Woo Woo Envelope Wah Wah Time Woo Woo Wah Wah Time Level Envelope value 0 100 value 0...

Page 234: ... a Exciter Blend Sets the intensity depth of the Exciter effect 100 100 Src Off Tempo Selects the modulation source of the Exciter intensity Amt 100 100 Sets the modulation amount of the Exciter intensity b Emphatic Point Sets the frequency to be emphasized 0 70 Src Off Tempo Selects the modulation source of the frequency to be emphasized Amt 70 70 Sets the amount of modulation of the frequency to...

Page 235: ...ation amount when OSC Mode Fixed d Envelope Pre LPF 1 100 Sets the upper limit of the frequency range for which very low har monics are added e Envelope Sens Envelope Sensitivity 0 100 Sets the sensitivity with which very low harmonics are added Envelope Shape Sets the oscillator s volume envelope curve 100 100 f Wet Dry Dry 1 99 99 1 Wet Sets the balance between the effect and dry sounds Src Off ...

Page 236: ...0Hz Src Selects the modulation source of LFO speed Off Tempo Amt 20 00 20 00Hz Sets the modulation amount of LFO speed d Depth 0 100 Sets the depth of the sampling frequency LFO modulation Src Off Tempo Selects the LFO modulation source of the sampling frequency Amt 100 100 Sets the LFO modulation amount of the sampling frequency e Resolution Sets the data bit length 4 24 f Output Level Sets the o...

Page 237: ...dB j Wet Dry Wet 1 99 Dry 1 99 Wet Sets the balance between the effect and dry sounds Fx 010 Src Off Tempo Selects the modulation source of the effect balance Amt Sets the modulation amount of the effect balance 100 100 Chorus Chorus Left Right LFO Phase Wet Dry Wet Dry Stereo In Stereo Out EQ Trim EQ Trim LEQ HEQ LEQ HEQ LFO Tri Sine a LFO Waveform Selects LFO Waveform Triangle Sine b LFO Phase d...

Page 238: ...ap3 LFO phase 90 degrees delay time Depth Sets the Tap3 chorus depth 0 30 Level Sets the Tap3 output level 0 30 Pan L6 L1 C R1 R6 Sets the Tap3 stereo image e Tap4 270 msec 0 570msec Sets the Tap4 LFO phase 270 degrees delay time Depth Sets the Tap4 chorus depth 0 30 Level Sets the Tap4 output level 0 30 Pan L6 L1 C R1 R6 Sets the Tap4 stereo image f Tap1 Feedback Sets the Tap1 feedback amount 100...

Page 239: ...High Damp 0 100 Sets the feedback damping amount in the high range h Wet Dry Wet 1 99 Dry 1 99 Wet Sets the balance between the effect and dry sounds Fx 010 Src Off Tempo Selects the modulation source of the effect balance Amt Sets the modulation amount of the effect balance 100 100 Flanger Flanger Left Right Feedback LFO Shape LFO Phase LFO Tri Sine Wet Dry Wet Dry High Damp Stereo In Stereo Out ...

Page 240: ...elay Top 0 0 50 0msec Sets the upper limit of the delay time on the right channel Fx 009 c Sweep Mode EG D mod Determines whether the flanger is controlled by the envelope gener ator or by the modulation source Src Off Tempo Selects the modulation source that triggers the EG when EG is selected for Sweep Mode or modulation source that causes the flanger to sweep when D mod is selected for Sweep Mo...

Page 241: ...s the resonance damping amount in the high range Fx 023 j Wet Dry Wet 1 99 Dry 1 99 Wet Sets the balance between the effect and dry sounds Fx 010 023 Src Off Tempo Selects the modulation source of the effect balance Amt Sets the modulation amount of the effect balance 100 100 LFO Step Tri Random Left Right Resonance LFO Phase Wet Dry Wet Dry High Damp Stereo In Stereo Out Phaser Phaser a L Manu Bo...

Page 242: ...he left channel 0 0 50 0msec Fx 016 h R Pre Delay msec Sets the delay time for the right channel 0 0 50 0msec Fx 016 i Feedback Sets the feedback amount 100 100 Fx 017 High Damp Sets the damping amount in the high range 0 100 j Wet Dry Wet 1 99 Dry 1 99 Wet Sets the balance between the effect and dry sounds Fx 010 Src Off Tempo Selects the modulation source of the effect balance Amt Sets the modul...

Page 243: ...req Mod AUTOFADE Amt 3 0 LFO Frequency 1 0 3 0 4 0Hz LFO Frequency 1 0Hz Gate1 Signal AUTOFADE Fade In Dealy AutoFade LFO Frequency Wet Dry Delay Delay Left Right Feedback LFO Shape LFO Phase LFO Tri Sine Wet Dry Wet Dry High Damp Stereo In Stereo Out h Feedback Sets the feedback amount 100 100 Fx 020 High Damp 0 100 Sets the feedback damping amount in the high range Fx 020 i Wet Dry Mod D mod AUT...

Page 244: ...maller than 64 and the effect is on when the value is 64 or higher The Doppler effect is triggered when the value changes from 63 or smaller to 64 or higher e Pitch Depth With the Doppler effect the pitch is raised when the sound approaches and the pitch is lowered when the sound goes away This parameter sets this pitch variation f Pan Depth This parameter sets the width of the stereo image of the...

Page 245: ...y output With Always Off dry sounds are not output With Cross Fade a dry sound is usually output and it is muted only when scratching Set Wet Dry to Wet to use this parameter effectively a Scratch Source Off Tempo Selects the modulation source for simulation control b Response 0 100 Sets the speed of the response to the Scratch Source c Envelope Select D mod Input Selects whether the start and end...

Page 246: ...rc Selects the modulation source of LFO speed Off Tempo Amt 20 00 20 00Hz Sets the modulation amount of LFO speed d BPM MIDI Sync Off On Switches between using the frequency of the LFO speed and using the tempo and notes Fx 009 BPM Selects MIDI Clock and assigns tempo MIDI 40 240 Fx 009 Base Note Selects the type of notes that specify the LFO speed Fx 009 Times x1 x16 Sets the number of notes that...

Page 247: ...ource of the depth of modulation Amt 100 100 Sets the modulation amount of the depth of modulation f Wet Dry Dry 1 99 99 1 Wet Sets the balance between the effect and dry sounds Src Off Tempo Selects the modulation source of the effect balance Amt Sets the modulation amount of the effect balance 100 100 Level Louder Time Shimmer LFO Frequency Hz 8 0 Envelope Amount Hz 7 0Hz Depth 100 Envelope Amou...

Page 248: ... 100 Sets the modulation amount of the tremolo modulation depth i Wet Dry Dry 1 99 99 1 Wet Sets the balance between the effect and dry sounds Src Off Tempo Selects the modulation source of the effect balance Amt Sets the modulation amount of the effect balance 100 100 a Pre LPF 0 100 Sets the damping amount of the high range input to the ring modula tor b OSC Mode Fixed Note Key Follow Switching ...

Page 249: ...the modulation source of the pitch shift Off Tempo Amt Sets the modulation amount of the pitch shift 100 100cent b Delay Time msec Sets the delay time 0 1000msec c Feedback Sets the feedback amount 100 100 High Damp Sets the damping amount in the high range 0 100 d Input Level Dmod Sets the modulation amount of the input level 100 100 Src Selects the modulation source for the input level Off Tempo...

Page 250: ...nd and dry sound separately g Wet Dry Dry 1 99 99 1 Wet Sets the balance between the effect and dry sounds Src Off Tempo Selects the modulation source of the effect balance Amt Sets the modulation amount of the effect balance 100 100 Left Right Wet Dry Wet Dry Wet Mono In Stereo Out Dry Stereo In Stereo Out LFO Tri Sqr Pitch Shifter Pan Pitch Higher Pitch Shift Mod Pitch Shift Depth Lower Original...

Page 251: ...r sets the speed at which the rotation is accelerated or decelerated g Mic Distance g Mic Spread This is a simulation of stereo microphone settings Early reflection and delay effects 041 Early Reflections This effect is only the early reflection part of a reverberation sound and adds presence to the sound You can select one of the four decay curves a Type This parameter selects the decay curve for...

Page 252: ...ether the start and end of recording is controlled via the modulation source or the input signal level Src Off Tempo Selects the modulation source that controls recording when Enve lope Select is set to D mod d Threshold 0 100 Sets the recording start level when Envelope Select is set to Input e Response 0 100 Sets the speed of the response to the end of recording Fx 031 f Direct Mix Always On Alw...

Page 253: ...Sets the width of the stereo image of the effect sound Fx 043 j Wet Dry Dry 1 99 99 1 Wet Sets the balance between the effect and dry sounds Src Off Tempo Selects the modulation source of the effect balance Amt Sets the modulation amount of the effect balance 100 100 Delay Delay Stereo Cross Left Right Feedback Wet Dry Wet Dry Stereo In Stereo Out Input Level D mod Input Level D mod High Damp Low ...

Page 254: ...z e LFO Sync Switches LFO reset off on Off On Src Off Tempo Selects the modulation source that resets the LFO f L LFO Phase degree 180 180 Sets the phase obtained when the left LFO is reset R LFO Phase degree 180 180 Sets the phase obtained when the right LFO is reset g L Depth Sets the depth of the left LFO modulation 0 200 R Depth Sets the depth of the right LFO modulation 0 200 h L Delay Time m...

Page 255: ...pe 100 100 Determines how much the LFO waveform is changed Fx 020 e LFO Phase degree 180 180 Sets the LFO phase difference between the left and right Fx 034 Dynamic Delay Threshold Dry Envelope Wet Control Target Out Polarity Wet Control Target Out Polarity Delay Time Time Ducking Delay Release Attack Level Left Right Wet Dry Wet Dry Stereo In Stereo Out LFO Phase LFO Shape Pan Pan LFO Tri Sin Dep...

Page 256: ...otes to specify the left channel delay time Fx 049 Times x1 x16 Sets the number of notes to specify the left channel delay time Fx 049 Adjust Fine adjust the left channel delay time 2 50 2 50 c R Delay Base Note Selects the type of notes to specify the right channel delay time Fx 049 Times x1 x16 Sets the number of notes to specify the right channel delay time Fx 049 Adjust Fine adjust the right c...

Page 257: ...he damping amount in the high range 0 100 Fx 043 Low Damp Sets the damping amount in the low range 0 100 Fx 043 f Input Level Dmod 100 100 Sets the modulation amount of the input level Fx 037 Src Selects the modulation source for the input level Off Tempo Fx 037 g Wet Dry Dry 1 99 99 1 Wet Sets the balance between the effect and dry sounds Src Off Tempo Selects the modulation source of the effect ...

Page 258: ...ffect and dry sounds Src Off Tempo Selects the modulation source of the effect balance Amt Sets the modulation amount of the effect balance 100 100 Left Right Wet Dry Wet Dry Wet Mono In Stereo Out Dry Stereo In Stereo Out EQ Trim EQ Trim LEQ HEQ Pre Delay Reverb Reverb Level ER Level ER Level Pre Delay Thru ERs ERs Reverb Room Type Time Level Louder ER Early Reflections Dry Reverb Pre Delay Thru ...

Page 259: ...Off On i Routing PEQ WAH WAH PEQ Changes the order of the parametric equalizer and wah connection j Wet Dry Dry 1 99 99 1 Wet Sets the balance between the effect and dry sounds Src Off Tempo Selects the modulation source of the effect balance Amt Sets the modulation amount of the effect balance 100 100 Left Right Wet Dry Wet Dry Wet Mono In Mono Out Dry Stereo In Stereo Out Trim Parametric 4Band E...

Page 260: ...odulation source of the effect balance Amt Sets the modulation amount of the effect balance 100 100 Left Right Wet Dry Wet Dry Wet Mono In Stereo Out Dry Stereo In Stereo Out Trim Parametric 4Band EQ Phaser Phaser Resonance LFO Tri Sine Phaser Wet Dry Normal Wet Invert Output Mode a E Trim Sets the parametric EQ input level 0 100 b E Band1 Cutoff Hz Sets the center frequency of Band 1 20 1 00kHz Q...

Page 261: ...lects the modulation source of the effect balance Amt Sets the modulation amount of the effect balance 100 100 Left Right Wet Dry Wet Dry Wet Mono In Mono Out Dry Stereo In Stereo Out Compressor Routing Wah Auto Wah Wah D mod Envelope Sweep Mode D mod Auto LFO LFO LEQ HEQ EQ Trim Comp Output Level Envelope Control a C Sensitivity Sets the sensitivity 1 100 Fx 002 b C Attack Sets the attack level 1...

Page 262: ...requency of Band 2 50 5 00kHz Q Sets the bandwidth of Band 2 0 5 10 0 Fx 006 Gain dB Sets the gain of Band 2 18 18dB Left Right Wet Dry Wet Dry Wet Mono In Mono Out Dry Stereo In Stereo Out Routing Compressor Trim Parametric 4Band EQ Output Level Envelope Control Comp f E Band3 Cutoff Hz Sets the center frequency for Band 3 300 10 00kHz Q Sets the bandwidth of Band 3 0 5 10 0 Fx 006 Gain dB Sets t...

Page 263: ...23 Output Mode Normal Wet Invert Selects the phaser output mode Fx 067 i Routing CMP PHS PHS CMP Switches the order of the compressor and phaser connection Fx 067 j Wet Dry Dry 1 99 99 1 Wet Sets the balance between the effect and dry sounds Src Off Tempo Selects the modulation source of the effect balance Amt Sets the modulation amount of the effect balance 100 100 Left Right Wet Dry Wet Dry Wet ...

Page 264: ...empo Selects the modulation source of the effect balance Amt Sets the modulation amount of the effect balance 100 100 Left Right Wet Dry Wet Dry Wet Mono In Mono Out Dry Stereo In Stereo Out Routing Limiter Trim Parametric 4Band EQ Limiter Gain Adjust Envelope Control a L Ratio 1 0 1 50 0 1 Inf 1 Sets the signal compression ratio Fx 003 Threshold dB 40 0dB Sets the level above which the compressor...

Page 265: ... effect balance Amt Sets the modulation amount of the effect balance 100 100 Left Right Wet Dry Wet Dry Wet Mono In Stereo Out Dry Stereo In Stereo Out Routing Limiter Limiter Gain Adjust Envelope Control Phaser Phaser Resonance LFO Tri Sine Phaser Wet Dry Normal Wet Invert Output Mode a L Ratio 1 0 1 50 0 1 Inf 1 Sets the signal compression ratio Fx 003 Threshold dB 40 0dB Sets the level above wh...

Page 266: ...citer Exciter Left Right Wet Dry Wet Dry Wet Mono In Mono Out Dry Stereo In Stereo Out Routing LEQ HEQ EQ Trim Exciter Exciter Limiter Limiter Gain Adjust Envelope Control f L Threshold dB 40 0dB Sets the level above which the compressor is applied Fx 003 g L Attack Sets the attack time 1 100 Fx 003 Release Sets the release time 1 100 Fx 003 h L Gain Adjust dB Sets the limiter output gain Inf 38 2...

Page 267: ...odulation amount of the effect balance 100 100 Left Right Wet Dry Wet Dry Wet Mono In Stereo Out Dry Stereo In Stereo Out LEQ HEQ EQ Trim Exciter Exciter Phaser Phaser Resonance LFO Tri Sine Phaser Wet Dry Normal Wet Invert Output Mode a X Exciter Blend Sets the intensity depth of the Exciter effect 100 100 Fx 011 b X Emphatic Point Sets the frequency range to be emphasized 0 70 Fx 011 c X EQ Trim...

Page 268: ...erdrive Hi Gain 3 Band PEQ Output Level Mode Overdrive Hi Gain Drive Driver a O Drive Mode Overdrive Hi Gain Switches between overdrive and high gain distortion Drive Sets the degree of distortion 1 100 Fx 006 b O Output Level 0 50 Sets the overdrive output level Fx 006 Src Off Tempo Selects the modulation source for the overdrive output level Amt 50 50 Sets the modulation amount of the overdrive ...

Page 269: ...ts the modulation source of the effect balance Amt Sets the modulation amount of the effect balance 100 100 Left Right Wet Dry Wet Dry Wet Mono In Stereo Out Dry Stereo In Stereo Out Routing Overdrive Hi Gain 3 Band PEQ Output Level Mode Overdrive Hi Gain Drive Driver Phaser Phaser Resonance LFO Tri Sine Phaser Wet Dry Normal Wet Invert Output Mode a O Drive Mode Overdrive Hi Gain Switches between...

Page 270: ...Amp Simulation Filter Wah Auto Wah Wah D mod Envelope Sweep Mode D mod Auto LFO LFO Left Right Wet Dry Wet Dry Wet Mono In Mono Out Dry Stereo In Stereo Out Decimator Routing Amp Simulation Amp Simulation Filter Pre LPF High Damp Output Level Decimator Resolution b D Sampling Freq Frequency Hz Sets the sampling frequency 1 00k 48 00kHz Resolution Sets the data bit length 4 24 Fx 014 c D Output Lev...

Page 271: ...ts the LFO speed 0 02 20 00Hz LFO Waveform Selects LFO Waveform Triangle Sine c F Depth Sets the depth of LFO modulation 0 100 Feedback Sets the feedback amount 100 100 Fx 020 d F EQ Trim Sets the EQ input level 0 100 e F Pre LEQ Gain dB Sets the gain of Low EQ 15 15dB Pre HEQ Gain dB Sets the gain of High EQ 15 15dB f F Cho Flng Wet Dry Wet 2 98 Dry 2 98 Wet Sets the effect balance of the chorus ...

Page 272: ...e chorus flanger Fx 010 020 Output Mode Normal Wet Invert Selects the output mode for the chorus flanger Fx 060 i Wet Dry Dry 1 99 99 1 Wet Sets the balance between the effect and dry sounds Src Off Tempo Selects the modulation source of the effect balance Amt Sets the modulation amount of the effect balance 100 100 Left Right Wet Dry Wet Dry Wet Mono In Stereo Out Dry Stereo In Stereo Out Chorus ...

Page 273: ...nal quality of effect sound 1 100 d Mid Shape Sets the mid range of tonal quality 0 36 e Tune Fine tuning 50 50 f Wet Dry Dry 1 99 99 1 Wet Sets the balance between the effect and dry sounds Src Off Tempo Selects the modulation source of the effect balance Amt Sets the modulation amount of the effect balance 100 100 Left Right Wet Dry Wet Dry Wet Mono In Stereo Out Dry Stereo In Stereo Out D mod P...

Page 274: ...1 120 Fx 006 Pre Low cut 0 10 Sets the low range cut amount of the distortion input Fx 006 e Output Level 0 50 Sets the output level Fx 006 Src Selects the modulation source for the output level Off Tempo Amt Sets the modulation amount of the output level 50 50 f Low Cutoff Hz 20 1 00kHz Sets the center frequency for Low EQ shelving type Gain dB Sets the gain of Low EQ 18 18dB g Mid1 Cutoff Hz 300...

Page 275: ...f On dm Selects on off or modulation source for the control of Tap4 output f Tap5 120 msec 0 570msec Sets the Tap5 LFO phase 120 degrees delay time Depth Sets the Tap5 chorus depth 0 30 Status Always On Always Off On Off dm Off On dm Selects on off or modulation source for the control of Tap5 output g Tap6 300 msec 0 570msec Sets the Tap6 LFO phase 300 degrees delay time Depth Sets the Tap6 chorus...

Page 276: ...Sets the tonal quality of overdrive 0 15 Speaker Simulator Switches speaker simulation on off Off On d Mode Switch Switches between speaker rotation and stop Rotate Stop Src Off Tempo Selects the modulation source that toggles between rotation and stop Sw Toggle Moment Selects the switching mode of the modulation source that toggles between rotation and stop Fx 040 e Speed Switch Slow Fast Switche...

Page 277: ...ions LEQ HEQ C Delay R Delay Left Right Feedback Spread Wet Dry Wet Dry Wet Mono In Stereo Out Dry Stereo In Stereo Out Input Level D mod High Damp Low Damp L Delay Input Level D mod Level Level Level e High Damp Sets the damping amount in the high range 0 100 Fx 043 Low Damp Sets the damping amount in the low range 0 100 Fx 043 f Input Level Dmod 100 100 Sets the modulation amount of the input le...

Page 278: ... stereo image of the effect sound Fx 043 i Wet Dry Dry 1 99 99 1 Wet Sets the balance between the effect and dry sounds Src Off Tempo Selects the modulation source of the effect balance Amt Sets the modulation amount of the effect balance 100 100 C Delay R Delay Left Right Feedback Spread Wet Dry Wet Dry Wet Mono In Stereo Out Dry Stereo In Stereo Out Input Level D mod High Damp Low Damp L Delay I...

Page 279: ...ed while Reset is On 2 Manual RST Control Off Reset is cancelled and the unit enters Rec ready mode 3 Push the joystick in the Y direction forward and play a phrase you wish to hold When you pull the joystick to its original position the recording will be finished and the phrase you just played will be held Loop Time is automatically set only for the first recording after resetting If the time len...

Page 280: ...m 18dB to 18dB during per formance using the Realtime Control knob At this time set Knob 2 B to Knob Mod2 CC 19 for Realtime Control Knob B Assign Program P1 1 4b Combination P4 4 4b Sequencer P4 4 7b Song Play P2 2 1b The 12 o clock position of the knob cor responds to the High Gain value here Master EQ a Low Cutoff Hz 20 1 00K Sets the cutoff frequency of Low EQ shelving type Gain dB 18 0 18 0 0...

Page 281: ...270 ...

Page 282: ...h as using the joystick X to control pitch are provided as special parameters so it is not necessary to use Alternate Modulation to accomplish this Different types of Alternate Modulation are used to control the bank F programs which can be used when the EXB MOSS option is installed EM Alternate Modulation Source AMS OSC1 Filter1 A Filter1 B Amp 1 Pitch EG Level Mod 1 Level Mod 2 Time Mod Intensit...

Page 283: ... axis EXT JS Y CC 01 Joy Stick Y CC 01 joystick Y Vertical upward direction CC 01 EXT JS Y CC 02 Joy Stick Y CC 02 joystick Y Vertical downward direction CC 02 EXT JS Y AT 2 Joy Stick Y After Touch 2 joystick Y Vertical upward direction and after touch p 273 EXT JS Y AT 2 Joy Stick Y After Touch 2 joystick Y Vertical downward direction and after touch p 273 EXT Pedal CC 04 Foot Pedal CC 04 assigna...

Page 284: ...KnobMod1 CC 17 Knob2 B to KnobMod2 CC 19 Knob3 B to KnobMod3 CC 20 and Knob4 B to KnobMod4 CC 21 Knob1 4 B Assign for each program combi nation song or for Song Play mode When you set REALTIME CONTROLS to B mode and oper ate knobs 1 4 the specified modulation will apply If AMS intensity is set to a positive value moving the knob to the 12 o clock position will produce an AMS effect of 0 Rotating t...

Page 285: ...s and example applications Pitch Program P2 2 1a Pitch can be controlled by the filter amp EG controllers or tempo etc If you select Filter EG or Amp EG as the AMS and set Intensity to 12 00 the pitch will change up to 1 octave in synchronization with the EG If you select Tempo as the AMS and set Intensity to 12 00 doubling the tempo based on 120 will raise the pitch one octave and halving the tem...

Page 286: ... allow you to increase the volume to a maximum of eight times that of the current volume If an EG LFO or controller that changes with a value Pitch EG Filter EG LFO KT EXT is selected as the AMS setting the Intensity to 99 will allow you to increase the volume to a maximum of eight times that of the current volume for positive changes of the AMS or to decrease the volume to zero for negative chang...

Page 287: ...t to a value of 16 33 49 66 82 or 99 the corresponding frequency can be multiplied by a maximum of 2 4 8 16 32 or 64 times or divided by 1 2 1 4 1 8 1 16 1 32 1 64 Select JS Y CC 01 for AMS and set Intensity to 16 When you move the joystick in the Y direction the LFO frequency will be increased by a maximum of 2 times If you set Intensity to 16 and move the joystick in the Y direction the LFO freq...

Page 288: ...ed Gate1 note on off p 277 Gate1 Dmpr Gate1 Damper note on damper on off p 277 Gate2 note on off retrigger p 277 Gate2 Dmpr Gate2 Damper note on damper on off retrigger p 277 Note Number note number Velocity Velocity After Touch after touch Channel After Touch JS X Joy Stick X joystick X horizontal direction JS Y CC 01 Joy Stick Y CC 01 joystick Y Vertical upward direction CC 01 JS Y CC 02 Joy Sti...

Page 289: ...of the internal clock or the external MIDI clock This means that when is 127 BPM it will have the same result as the maximum value 127 of other modulation sources About the BPM MIDI SYNC function BPM MIDI SYNC can be used for most effects that have an LFO such as 009 St Wah Auto Wah and for some delay type effects such as 049 L C R BPM Delay You can apply modulation that is synchronized to the tem...

Page 290: ...ent position of that controller If Lock is turned on for the ribbon controller the effect at that time will be held even after you release your finger from the ribbon controller If Lock is off releas ing your finger from the ribbon controller will reset the effect to the center position For example if you select JS Y Lock move the joystick away from yourself and then turn Lock on the operation pro...

Page 291: ...smitted FX Control 2 CC 13 Control Effect Dynamic Modulation When controlling this set Dmod Src to FXCtrl2 13 Simultaneously CC 13 will be transmitted LFP Cutoff CC 74 Control the cutoff frequency of the filter low pass filter Simultaneously CC 74 will be transmitted Resonance HPF CC 71 Control the resonance of the filter or the cutoff frequency of the high pass filter If the program s Filter Type...

Page 292: ... Effect Dynamic Modulation can be controlled To control these set AMS or Dmod Src to Foot SW 82 Portamento SW CC 65 Control portamento on off Sostenuto CC 66 Control the sostenuto effect which holds only the keys Note No that were being held at the moment that the pedal switch was turned on Soft CC 67 Turn the soft pedal effect on off Arpeggio SW Turn the arpeggiator on off The NRPN message Bn 63 ...

Page 293: ...f the output from Valve Force Pan CC 10 Control the pan of a Program of a timbre in a Combination or of a track in Sequencer Song Play modes Expression CC 11 Control the volume of a Program of a timbre in a Combination or of a track in Sequencer Song Play modes Expression is multiplied with the Volume value to determine the actual volume level FX Control 1 CC 12 Control Effect Dynamic Modulation T...

Page 294: ...r P2 2 1a 2 2a of the track selected by Track Select is EXT EX2 or BTH a control change message will be transmitted on the MIDI channel specified by MIDI Channel Sequencer P2 2 1a 2a If the Status is INT or BTH operating one of the TRITON Extreme s controllers will affect only that track Simulta neously the same effect will also apply to any track with the same MIDI Channel setting In the case of ...

Page 295: ...on 4 22 31 32 Bank select LSB 33 37 38 Data entry LSB 39 63 64 Damper 65 Portamento On Off 66 Sostenuto On Off 67 Soft 68 69 70 Sustain level 71 Filter resonance level High pass filter cutoff frequency Knob2 72 Release time Knob4 73 Attack time 74 Low pass filter cutoff frequency Knob1 75 Decay time 76 LFO1 speed 77 LFO1 depth pitch 78 LFO1 delay 79 Filter EG intensity Knob3 80 SW1 modulation On O...

Page 296: ...SB 0 127 LSB of RPN or NRPN data 2 64 Damper 0 127 Damper effect 65 Portamento On Off 0 63 Off 64 127 On Turn the portamento effect on off 66 Sostenuto On Off 0 63 Off 64 127 On Turn the sostenuto effect on off 67 Soft 0 127 Soft pedal effect 70 Sustain level 0 127 Sustain levels of the filter EG and amp EG 4 71 Filter resonance level High pass filter cutoff frequency 0 127 0 127 Resonance level o...

Page 297: ... high pass filter will be controlled 4 5 CC 70 79 correspond to the following program parame ters of the TRITON Extreme In Program mode when CC 70 79 is received on the glo bal MIDI channel MIDI Channel Global P1 1 1a or when a REALTIME CONTROLS 1 4 knob is operated in A mode or in B mode when the function is assigned to CC 70 79 the corresponding program parameter will be edited temporarily You c...

Page 298: ...ntry can be used to control the following parameters Arpeggiator on off Bn 63 00 Bn 62 02 Bn 06 nn nn 00 3F off 40 7F on Arpeggiator gate control Bn 63 00 Bn 62 0A Bn 06 nn nn 00 7F Arpeggiator velocity control Bn 63 00 Bn 62 0B Bn 06 nn nn 00 7F Valve Force on off Bn 63 00 Bn 62 10 Bn 06 nn nn 00 3F off 40 7F on Valve Force INPUT TRIM Bn 63 00 Bn 62 11 Bn 06 nn nn 00 7F Valve Force ULTRA BOOST Bn...

Page 299: ...cer and on the MIDI data that is transmitted and received will depend on Convert Position Global P1 1 1a setting If you want to control an external MIDI tone generator from the TRITON Extreme set Convert Position to PreMIDI The various settings listed above will be reflected in the MIDI data that is transmitted These settings will also be reflected in the data that is recorded on the internal sequ...

Page 300: ...sixteen channels numbered 1 16 The way in which channels are handled will differ depending on the mode Program mode and Sampling mode Transmission reception is performed on the global MIDI channel The global MIDI channel is the basic channel that the TRITON Extreme uses for MIDI transmission reception and is set by MIDI Channel Global P1 1 1a Combination mode The global MIDI channel is used to tra...

Page 301: ...er Global P1 1 1b As needed you can independently turn all program changes on off specify whether or not incoming messages will be able to change combinations and turn reception transmis sion of bank select messages on off If Enable Combination Change Global P1 1 1b is unchecked the combination will not change even if a program change on the global MIDI channel is received in Combination P0 Play I...

Page 302: ...ng of a measure p 72 Controlling the volume Volume CC 07 Bn 07 vv When the above CC is assigned to the ASSIGNABLE PEDAL or as the B mode function of a REALTIME CON TROL knob 1 4 operating that controller will transmit Volume messages and the volume will change When this message is received the result will be the same as when the controller is operated Expression CC 11 Bn 0B vv When the above CC is...

Page 303: ...or Send 2 MFX2 Sequencer Song Play P8 8 3 in Sequencer mode or Song Play mode or when you re select a song or return to the beginning of the measure in Sequencer mode Send 1 2 will be transmitted by each track whose Status is BTH EXT or EX2 p 97 152 Effect 2 depth IFX1 5 on off CC 92 Bn 5C vv Effect 4 depth MFX1 on off CC 94 Bn 5E vv Effect 5 depth MFX2 on off CC 95 Bn 5F vv Separately from the ef...

Page 304: ... 49 vv Decay time CC 75 Bn 4B vv LFO 1 speed CC 76 Bn 4C vv LFO 1 depth pitch CC 77 Bn 4D vv LFO 1 delay CC 78 Bn 4E vv These messages are transmitted when assign the above CC to the REALTIME CONTROLS 1 4 knobs and operate them When you operate these the corresponding program parameters will be controlled and the sound and envelope will change When these messages are received the result will be th...

Page 305: ...hannel mm rr upper and lower bytes of the parameter number to specify the parameter NRPN arpeggiator on off Bn 63 00 Bn 62 02 Bn 06 mm This message will be transmitted when you press the ARPEGGIATOR ON OFF key When the switch is turned ON the data will be mm 127 7F and when turned OFF the data will be mm 0 00 and the arpeggiator will be turned on off accordingly This can also be specified as a fun...

Page 306: ...nspose Global P0 0 1a parameter will be set Transmitting sound settings data Data Dump Data for programs combinations drum kits user arpeggio patterns global settings and sequencer data can be trans mitted as MIDI exclusive messages The operation of send ing this system exclusive data to an external device is called a data dump By performing a data dump you can store the TRITON Extreme s sounds an...

Page 307: ... make the TRITON Extreme playback a song set MIDI Clock to External MIDI or External USB and run the TRITON Extreme s sequencer Synchronizing the playback of the arpeggiator or sequencer You can change the overall settings programs levels effects by using song select messages to switch songs Synchronizing the playback of the arpeg giator or sequencer The choice of whether the TRITON Extreme will b...

Page 308: ...function on an external MIDI sequencer computer When the arpeggiator is on playing the keyboard or operat ing the controllers of the TRITON Extreme will operate and control the arpeggiator The arpeggiator will operate and be controlled in the same way in response to MIDI messages received at MIDI IN The MIDI messages generated from the arpeggiator will be transmitted from MIDI OUT according to the...

Page 309: ...ta will be played back as it is being read and does not need to be loaded into memory If the SMF data contains a GM System On message the TRITON Extreme will be initialized for GM playback GM Initialize Song Play P0 0 1A Sequencer mode In Media mode when you convert a song into a Standard MIDI File and save it you can choose either format 0 or for mat 1 If TRITON Extreme song data that was saved a...

Page 310: ...obal Channel When in Combination Sequencer Song Play mode each timbre s track s channel Status EXT EX2 or BTH g Always Global Channel No 0 15 ENA A Always Enabled C Enabled when Enable Control Change in Global mode is checked P Enabled when Enable Program Change in Global mode is checked PB Enabled when Enable Program and Bank Change in Global mode is checked T Enabled when Enable After Touch in G...

Page 311: ...ound Off C Bn 79 121 00 00 Reset All Controllers C Bn 7A 122 00 7F 00 127 Local Control Off On A Bn 7B 123 00 00 All Notes Off A Bn 7C 124 00 00 Omni Mode Off as All Notes Off A Bn 7D 125 00 00 Omni Mode On as All Notes Off A Bn 7E 126 10 16 Mono Mode On as All Notes Off A Bn 7F 127 00 00 Poly mode On as All Notes Off A Cn pp pp Program Change for Prog Combi change 1 P Dn vv vv Channel Pressure as...

Page 312: ...B Continue Seq Continue start Arpeggiator Control 6 FC Stop Seq Stop Arpeggiator Control 6 FE Active Sensing MIDI Connect check 5 Receive when MIDI Clock in Global mode is External MIDI or External USB 6 Receive when MIDI Clock in Global mode is External MIDI or External USB and Receive Ext Realtime Commands in Global mode is checked 2 4 SYSTEM EXCLUSIVE 2 4 1 UNIVERSAL SYSTEM EXCLUSIVE MESSAGE NO...

Page 313: ... inserted in the CF card slot copy the file to a different folder and then execute the operation again Meaning Calibration could not be performed correctly Action Try again Meaning When copying or swapping an insertion effect you attempted to place a double size effect in IFX1 or IFX5 Action Modify your settings so that a double size effect is not moved to IFX1 or 5 and execute again Meaning When ...

Page 314: ...se of MS DOS format media execute the Media mode Utility page menu command Check Medium Meaning During execution of Advanced Conversion Load the maximum number of eight programs was exceeded Depending on the structure of the AKAI Program it may be convert loaded as mul tiple programs and one combination In this case the number of TRITON Extreme programs result ing from the conversion is limited to...

Page 315: ...n the media Action Media that was formatted or written by a device other than the TRITON Extreme may be impossi ble for the TRITON Extreme to convert into ISO9660 format To perform the conversion use the packet writing software that was used to for mat or write the media Meaning When sampling into RAM in Combination Pro gram or Sequencer mode there are too many indexes to be simultaneously convert...

Page 316: ... REC Action Set the desired tracks for recording to REC Meaning When you attempted to save or copy a file or to create a directory there was not enough free space on the media Action Either delete an existing file or exchange the medium with one that has sufficient free space Meaning When saving a PCG or KSF file there was insuf ficient free space on the media Please specify whether you want to sa...

Page 317: ... Action Open the pattern Meaning When moving a measure the edit operation could not be executed because a pattern had been put in the destination end measure or the source start measure and had not been opened Action Open the pattern Meaning A pattern has been placed in the track that you specified as a destination or source for editing If you wish to open the pattern and execute the events of the...

Page 318: ...Clock was set to S P DIF the clock could not be detected correctly Action Check whether the digital output from the exter nal device is being output correctly Sampling fre quencies of 48 kHz can be input to the TRITON Extreme Also check whether there is a problem with the optical cable Meaning Either the file size is 0 or the file does not contain data that can be accessed by the load or open oper...

Page 319: ...ted If you wish to keep the data that was just recorded or edited press the OK button If you wish to return to the previous data i e to delete the data that was just recorded or edited press the Cancel button Meaning When editing in Sequencer mode memory area for Undo Compare function cannot be allocated If you wish to execute the edit press the OK but ton It will not be possible to return to the ...

Page 320: ...ile or perform a MIDI data dump the data will be output with the settings that were loaded or received TRITON Extreme TRITON Rack PCG file load MIDI data dump MIDI parameter change C mode settings will be used 2 Parameters that are valid on the TRITON Extreme and TRITON STUDIO but invalid on the TRITON 2 1 Arpeggio pattern settings in Program Combination and Sequencer modes TRITON Extreme TRITON S...

Page 321: ...N STUDIO TRITON Extreme PCG file load This parameter setting will not be loaded by the TRITON Extreme 4 Parameters that are valid on the TRITON Rack but invalid on the TRITON Extreme TRITON STUDIO and TRITON 4 1 Program mode Audition Riff and Transpose settings TRITON Rack TRITON Extreme TRITON STUDIO or TRITON PCG file load MIDI data dump MIDI parameter change The parameter settings will be saved...

Page 322: ... INT E INT E E F INT F INT F F G g 1 g d G g 1 g d G g 1 g d G g 1 g d H EXT A EXT A I EXT B EXT B J EXT C EXT C K EXT D EXT D L EXT E EXT E M EXT F EXT F N EXT G EXT G EXT H TRITON Extreme TRITON STUDIO TRITON Rack TRITON Combination Combination Combination Combination A INT A INT A A B INT B INT B B C INT C INT C C D INT D INT D D E INT E INT E H EXT A EXT A I EXT B EXT B J EXT C EXT C K EXT D E...

Page 323: ...ution regarding the fol lowing parameters and data Meter Tempo Mode Track1 16 PLAY MUTE Track Play Loop Track Play Loop Start Measure Track Play Loop End Measure Play Intro TRITON Extreme TRITON STUDIO or TRITON TRITON Rack SNG file load MIDI data dump These parameter settings are maintained by the TRITON Rack as internal data but are ignored When the TRI TON Rack saves this state as a PCG SNG fil...

Page 324: ...for H N Dump Combination TRITON All Banks TRITON STUDIO TRITON Extreme for H N Dump Combination TRITON 1Bank TRITON STUDIO 5 for EXT A EXT G TRITON Rack for EXT H for EXT H 5 for EXT A EXT H TRITON Extreme 5 for H N Dump Combination TRITON 1Combination TRITON STUDIO for EXT A EXT G TRITON Rack for EXT H for EXT H for EXT A EXT H TRITON Extreme 5 for H N Dump Drum Kit TRITON All Kits TRITON STUDIO ...

Page 325: ...gn settings of KARMA Latch On Off KARMA RTC Knob 1 KARMA Chord Trigger 4 only in KARMA system version 2 0 settings will be set to Off Foot Pedal Assign settings of KARMA RTC Knob 1 KARMA RTC Knob 8 only in KARMA system version 2 0 settings will be set to Off The Auto KARMA Program setting will be used as the Auto Arpeggiator Program parameter The Auto KARMA Combi setting will be used as the Auto A...

Page 326: ...orted Sample sizes of 1 16 bits are supported If the sample data is 8 bits or less it will be loaded as 16 bit data with the lower 8 bits always at 0 Sample Chunk Only the loop data is referenced If there is multiple loop data the loop with the greatest number of loop playback times Play Count will be used Even if the Type is Alternat ing or Backward it will be handled as Forward Loop Wave data Th...

Page 327: ...le Filename chunk and Sample Number chunk SMP1 SMD1 SMF1 SNO1 The latter structure is in the case where the sample data of the Sample chunk is empty and uses the sample data of the KSF file specified by the Sample Filename chunk shared sample data If the data does not fit on a single volume when saving to media you can automatically divide the file and continue saving When a KSF file is created in...

Page 328: ...3 7418 7350 7111 7055 6945 6534 6000 5953 5564 5513 5333 5291 5208 4945 4900 4741 4703 4630 4356 4000 3968 3906 3709 3675 3556 3527 3472 3267 3000 2976 2782 2756 2667 2646 2604 2473 2450 2370 2352 2315 2178 2000 1984 1855 1838 Hz Attributes 1 byte Loop tune 99 99 cents 1 byte Number of channels 1 1 byte Sample size 8 16 1 byte Number of samples 4 bytes Sample data variable length Chunk ID SNO1 4 b...

Page 329: ... the numerals 1 2 and 3 will be appended to each multisample name At this time the top key will be determined by the bottom key of the sample that is assigned at the right and if the bottom key is the same key groups 1 and 2 in the diagram the higher numbered key group will be used If you load with Advanced Conversion Load checked Program file parameters such as key group key group zone oscillator...

Page 330: ... boards memory Dropping them or applying pressure to them may damage the components Avoid touching exposed metal edges of the circuit board or portions that need not be handled during installation Be careful not to lose the screws and washers that you remove Do not use screws other than those that are installed in the option board memory and the TRITON Extreme Using screws of a different shape or ...

Page 331: ...g points Types of DRAM SIMM modules that can be used on the TRITON Extreme 72 pin 16 Mbytes or 32 Mbytes Access time of 60 ns or less Address input 11 bit A0 A10 Power supply voltage 5 V DRAM SIMM modules that meet the above requirements can be used If you have any questions regarding the type of DRAM SIMM modules that can be used please contact your local Korg distributor Calendar battery This ba...

Page 332: ...ou apply excessive pressure the cover may come off and be dam aged 88 key model 1 Use a coin or similar object to turn the screw counter clockwise until the sample memory RAM slot cover lifts up Turn counter clockwise to loosen the screw or clockwise to tighten it 2 Raise the sample memory RAM slot cover to the angle shown in the diagram and remove it When you open the sample memory RAM slot cover...

Page 333: ...te when installing an option board memory While performing the installation be careful of any sharp or pointed edges of the TRITON Extreme or the option board You must leave the AC power cable disconnected until you have completed all steps of installing the option board 1 You will need a plus screwdriver and some maga zines or other material to prevent damage to the joystick and knobs etc see dia...

Page 334: ...onnector as shown in the dia gram Press the cable firmly in until it stops Do not touch any part of the circuit board other than the connector in which the cable is being inserted A Reversing the procedure by which you removed the EXB MOSS cover reattach the cover B When all steps have been completed turn on the power and make sure that the EXB MOSS has been installed correctly Checking after inst...

Page 335: ... below to release the catch of the battery holder and then lift up and remove the battery Be careful not to drop the battery into the interior of the TRITON Extreme 4 Install the new battery With the side of the calendar battery facing upward insert it into the battery holder at an angle and press it into place 5 Reversing the procedure described in steps 1 5 of Installing the EXB MOSS reattach th...

Page 336: ...d to use the appropriate power adaptor for your external USB device If the connected USB devices consume more electrical current than the hub can supply the TRITON Extreme will not be able to detect the USB devices correctly An error message of USB Hub Power Exceeded will blink in the status bar For details on the electrical current used by a device refer to the owner s manual of the device 2 Exec...

Page 337: ...driver due to its lack of a digital signature Allowing installation of an unsigned driver p 328 The driver must be installed separately for each USB port you use If you connect the TRITON Extreme to a USB port different than the one you used when install ing the Korg USB MIDI Driver for Windows you will need to reinstall the Korg USB MIDI driver using the same procedure 1 Use a USB cable to connec...

Page 338: ...ntains the KORG USB MIDI driver and click the OK button The above example is for when your CD ROM drive is drive D You will need to change this as appropriate for your computer system for example if your CD ROM drive is drive E then replace D with E in the folder name you type 8 Make sure that KORG TRITON Extreme is displayed as the Model and click Next to begin installing the driver 9 If a dialog...

Page 339: ...the OK button Allowing installation of an unsigned driver If your computer has been set so that drivers without a digi tal signature cannot be installed you will not be able to install the Korg USB MIDI Driver Use the following proce dure to change your settings so that you can install the driver 1 On the taskbar click the Start button and then Control Panel to open the Control Panel From the Cont...

Page 340: ...me is displayed About the ports of the Mac OS X default MIDI driver Port 1 of the driver computer corresponds to the TRITON Extreme s KEYBOARD and SOUND ports Input port settings in your application About the TRITON Extreme and driver ports KEYBOARD device Applications on your computer use this port to receive MIDI messages from the TRITON Extreme data from the key board controllers and sequencer ...

Page 341: ...e merely makes the file appear as if it had been deleted and will not increase the free area Also each time a file is updated a new file is added and pro cessing is performed to make it appear as though the file had been overwritten 2 For a CD RW Deleting a file will increase the free area Also updating a file will overwrite the file over the previous location 3 About writing data Using packet wri...

Page 342: ...d by devices that do not sup port loading of divided files such as the TRITON and some computers In the case of a computer this CD R data can be read if you can install ISO9660 level 3 com patible reader software or packet writing software ...

Page 343: ...ow Drumsample Bank 168 Program Bank Bank Select 1 Bank Program Select 1 High MS Bank 11 Load Program Bank 179 Low MS Bank 12 Select Bank Smpl No 6 Sampling Bank RAM Bank 106 Sequencer Bank Select When Status EX2 72 Bank Track Program Select 57 Pattern Pattern Bank 88 91 Program Select Bank Program 57 Select Bank Smpl No 63 Song Play Program Select Bank Program 144 Bank select 290 Base key 105 Beep...

Page 344: ...8 152 153 210 213 276 283 Cue List 68 Convert 70 Load 178 180 Save 188 Current directory 148 176 Cut Cut Audio track 195 Cut Cue List 70 Cut Event Edit 79 Cut Index 136 Cut Multisample 136 Cut Sample 120 Cut Step Cue List 70 Cutoff frequency 18 Alternate Modulation 274 Cutoff Drumsample 168 Cutoff Sample Parameters 13 Realtime Control Knobs B Assign 280 D Damper pedal 262 AMS 272 Damper Polarity 1...

Page 345: ... 156 IFX Balance 3 ISO9660 192 J JKB file 149 175 Joystick 290 291 AMS 272 AMS Cutoff frequency 20 Dmod 276 Effect 220 240 265 268 Joystick lock 279 LFO speed 27 LFO Cutoff frequency 21 MIDI Filter 46 74 Pitch 14 16 Pitch modulation 16 Jukebox 149 K KCD file 175 185 190 KEY Drum Kit 167 Resampling 115 RPPR 91 Key Split 47 Key Sync Arpeggiator 4 29 41 50 94 150 171 LFO 27 Key Transpose 155 Key Zone...

Page 346: ...r Write Over Write Sequencer 67 Overwrite Sampling 119 P Packet write 330 Pan Pan 282 291 Combination 40 42 Drum Kit 170 Play Audio CD 197 Program 23 26 275 280 Sequencer 62 Song Play 145 Use DKit Setting 23 Pan CC 8 IFX 209 280 282 Combination 52 54 Program 31 35 207 Sampling 140 142 Sequencer 97 99 Song Play 152 154 Pan INPUT Combination 41 Global 160 Program 4 Sampling 115 Sequencer 63 Paste Sa...

Page 347: ...mory RAM 5 106 Optimize RAM 6 112 160 Sampling 4 41 63 103 159 Save 187 No space available on medium 187 Save Jukebox List 149 Save Template Song 60 145 Save to 5 41 63 106 Scale Combination 45 Program 10 Sequencer 74 Song Play 146 User All Notes Scale 166 User Octave Scale 165 Scan Zone 29 50 94 150 Select Bank Smpl No 6 63 Send 207 210 Combination 41 51 52 207 212 215 Drum Kit 151 Play Audio CD ...

Page 348: ... Scale 166 User Arpeggio 170 User arpeggio pattern 28 170 User drum kit 12 167 User Octave Scale 165 User pattern 88 User Scale 165 User template song 60 144 145 V VALUE slider AMS 273 Valve Force 34 54 99 141 153 214 Velocity AMS 272 Convert Position 161 288 Scan Zone Arpeggiator 29 50 95 151 Velocity Cross fade 47 Velocity Curve 155 Velocity Intensity Amp Mod 24 Velocity M Sample SW Lo Hi 12 Vel...

Page 349: ...338 ...

Page 350: ...339 ...

Page 351: ...340 ...

Page 352: ...341 ...

Page 353: ...342 ...

Page 354: ...e used If you have purchased this product via the internet through mail order and or via a telephone sale you must verify that this product is intended to be used in the country in which you reside WARNING Use of this product in any country other than that for which it is intended could be dangerous and could invalidate the manufacturer s or distributor s warranty Please also retain your receipt a...

Reviews: