Konica Minolta FK-116 User Manual Download Page 141

Enhanced Utility Functions

5-26

  4 PROGRAM DIAL

- SELECT REGIST. KEY-

    PROGRAM DIAL 27

    FUNCTION

     SEL.1/2/3/6/7

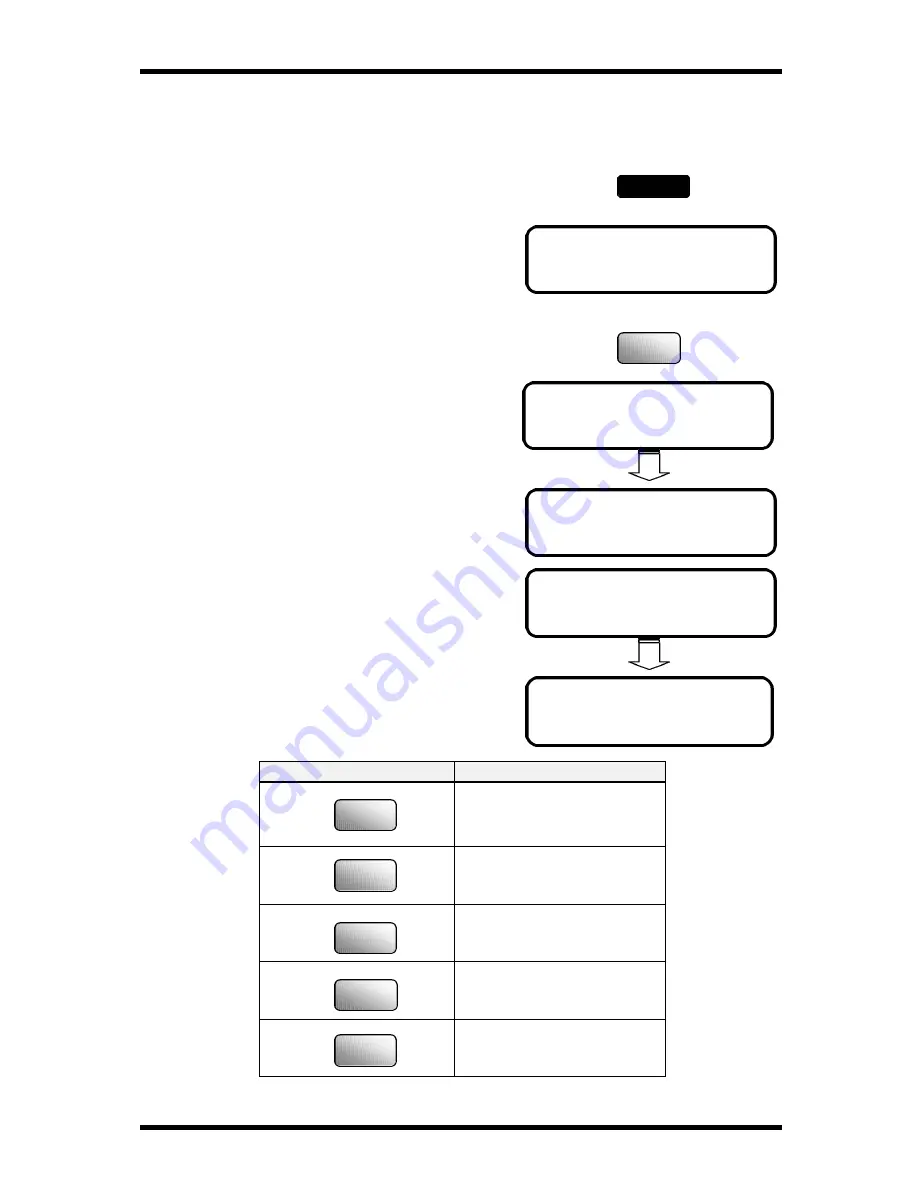
Program a registered Dial

1.


Press the Utility key 3 times.

The display appears the message “DIAL
REGISTRATION’.

2.


 Press ‘4’ from the Numeric keys.

3.


Press a desired One Touch key (24, 25, 26,
or 27) in which you want to program the
function.

For example: Using One Touch key 27

4.


Using the following chart, press the
Numeric key number corresponding to the
desired transmission function. Enter the
necessary data for the function selected.

Numeric key

Transmission function

BROADCAST

TIMER TX

MAILBOX TX

POLLING RX

RELAY INITIATE

DIAL REGISTRATION?

  OK=YES / or 1-5

Utility

x 3

4

GHI

1

2

3

6

7

Summary of Contents for FK-116

Page 1: ...FK 116 F a x o p e r a t i o n User s Guide...

Page 2: ...everse compile the Software except as permitted by law or iii Sublicense rent lease or distribute the Software or any copy thereof 2 You shall not export or re export the Software in any form under vi...

Page 3: ...chnologies Inc has made every effort to ensure that the information in this manual is complete and accurate However constant efforts are also being made to improve and update the product Therefore Kon...

Page 4: ...instruction manual may cause harmful interference to radio communications Operation of this equipment in a residential area is likely to cause harmful interference in which case the user will be requ...

Page 5: ...to give you an opportunity to maintain uninterrupted service If you experience trouble with this equipment please contact the Konica dealer where you purchased this equipment The telephone company may...

Page 6: ...ce facility designated by the supplier Any repairs or alterations made by the user to this equipment or equipment malfunctions may give the telecommunications company cause to request the user to disc...

Page 7: ...g the One Touch Dial Function 2 9 Using the Speed Dial Function 2 10 Using the Combination Dial Function 2 12 Using the Phone Book Function 2 15 How to Receive a Document Basics 2 18 Select the Printi...

Page 8: ...of the Function Utilities 4 1 Broadcast 4 4 Timer TX 4 11 Mailbox TX 4 13 Print Mailbox RX 4 15 Polling TX 4 19 Polling RX 4 21 Relay Initiate 4 23 Cancel Reserve 4 26 5 ENHANCED UTILITY FUNCTIONS Us...

Page 9: ...Density 6 14 Automatic Manual density adjustment choice 6 15 Manual density adjustment 6 15 2in1 function 6 16 Sort function 6 18 Copy Setting 6 19 Setting DENSITY PHOTO 6 19 Setting AUTO DENSITY 6 2...

Page 10: ...to replace the supply unit 9 5 How to replenish the paper trays 9 7 For Paper Tray TRAY 1 9 7 For Paper Feed Unit TRAY 2 9 8 Clearing paper misfeeds 9 9 Paper Tray misfeed 9 9 Paper Feed Unit misfeed...

Page 11: ...1 About Your Machine...

Page 12: ...on When the machine is turned ON the message PLEASE WAIT appears on the Message Display The machine is ready for transmitting or receiving documents now Half Tone Resolution Super Fine Standard Auto R...

Page 13: ...volume display on the Message Display shows 100 If the percentage shown is less than 100 it means that there are documents stored in memory which have not been transmitted In this case perform the fo...

Page 14: ...rs depending on LCD message 2 Stop key Cancel copying Cancel transmission or reception 3 Panel Reset key Return to the initial setting copy screen Number of Copies 1 Zoom ratio Equal Copy Function Ini...

Page 15: ...hen setting the zoom ratio decrease the ratio by 0 01 Display items or contents by rotation When inputting number or character insert a space at the cursor 15 right arrow key When adjusting the manual...

Page 16: ...Fax communication function 28 Redial Pause key Call the previously dialed number When inputting the dial number insert pause at the cursor 29 Speaker key Off hook for manual TX RX More about keys 1 Nu...

Page 17: ...Char One Touch Key Char One Touch Key Char 1 A 8 H 15 O 22 V 2 B 9 I 16 P 23 W 3 C 10 J 17 Q 24 X 4 D 11 K 18 R 25 Y 5 E 12 L 19 S 26 Z 6 F 13 M 20 T 27 symbols 7 G 14 N 21 U See below 3 One Touch Ke...

Page 18: ...transmission or reception operation is available Lights orange when the transmission reservation is not available B Copy Lights in Copy screen C Fax Lights in Fax screen D 2in1 copy Lights when 2in1...

Page 19: ...n half tone mode J Memory TX Lights when memory TX is selected K Auto RX Lights when auto RX is selected L PC Blinks when the machine receives data from PC and prints PC data M Error Lights when any e...

Page 20: ...splays Paper Displays A4 A4 Letter LT Legal LG Tray 1 Plain paper A5 A5 Half letter HL A4 A4 Letter LT A5 A5 Legal LG B5 B5 Half letter HL B6 B6 Free size Plain paper Free size OHP A4 A4 OHP Letter LT...

Page 21: ...ception Fax The machine calls the transmission Fax The machine is sending the fax data Fax The machine is receiving the fax data Fax functions Fax Err Some error which is concern with fax function hap...

Page 22: ...or key to scroll through the function selection For example Press the key scroll to the COPY SETTING 2 Press the Yes key into this item Press the Yes key the display appears the message 1 AUTO RESET a...

Page 23: ...hen the Paper Tray is selected Paper Feed Unit Tray 2 When the Paper Feed Unit is selected Manual Bypass tray When the Manual Bypass Tray is selected Custom size for bypass copy When the size of copy...

Page 24: ...Input Fax number Number of scanning pages Memory TX during scanning and when the scanning and TX are completed ADF TX Manual TX during TX When TX is completed Auto density Manual density The further l...

Page 25: ...ess When key is pressed in inputting Fax number followed External Internal When key is pressed first when inputting Fax number followed Tone When key is pressed first when inputting Fax number followe...

Page 26: ...Selective Polling NOTE If the message display is too light or too dark you can adjust it by using the Utility functions to adjust it Please refer Setting LCD CONTRAST P 5 8 Initial User Data The data...

Page 27: ...xample 8 00 AM If a wrong time has been entered press the key the cursor position moves back one position Enter the correct time again 3 In the same way enter the current year month and date For examp...

Page 28: ...mber For example 03 5423 7801 If a wrong number has been entered press the key The cursor position moves back one position Enter the correct number again 3 Check your setting and press Yes key if it i...

Page 29: ...pressing the corresponding One Touch keys and some functions keys How to input characters I want Use which key Letters ABCDEFGHIJ XYZ One Touch keys 1 26 P 1 6 Symbols One Touch key 27 P 1 6 European...

Page 30: ...reen Copy screen Fax screen Connecting to the Telephone Line Arrangement NOTE 1 Connection should be done by a service technician 2 Telephone cord accessories will vary Type A Type B Type C Type D dep...

Page 31: ...Connect to Private Branch Exchange PBX When dialing an outside number via a PBX it may take some time to be connected to the outside line after dialing out In such a case if you enter all the numbers...

Page 32: ...when connect to the PSTN line 3 Use the Numeric keys to input the number you want to dial For example 54321 If you have entered the wrong number press the key The cursor position moves back one posit...

Page 33: ...2 Basic FAX Operations...

Page 34: ...communication transmission or reception of a document is unavailable when there is not enough memory for the document Features of memory communication Since the machine scans the contents of all page...

Page 35: ...f Tone mode Suitable for documents with half tone photo illustrations and for colored documents The Half Tone setting is not mutually exclusive of Standard or Fine resolutions Resolution can be set in...

Page 36: ...he desired resolution Each time the key is pressed a new resolution is selected 3 When the document has been transmitted the initial setting of Standard is automatically reset to the default resolutio...

Page 37: ...aper with a coated surface Heat or pressure sensitive paper Glossy paper Loading the Document Documents Suitable for Transmission Type Sheet 1 sided only Standard A4 Letter Legal Government Legal Widt...

Page 38: ...lti page document the machine scans from the top down A document placed in the feeder arranged in sequential order of pagination will be sent in the same order Document ejecting style is straight ahea...

Page 39: ...moving these items can cause misfeeds or damage to the machine 4 The Message Display now prompts you to enter the fax number Dialing the Number Transmitting the Document Using the Numeric keys Manual...

Page 40: ...haracters can be entered for a Fax number Example 123456 If you want to correct the entered number press the No Clear key then it appears as below 4 To access to a PC that is connected to the destinat...

Page 41: ...example 0 06 532 3276 if access number 0 When the transmission is completed a buzzer sounds and the message TX COMPLETE is shown for 2 sec indicating that the document has been successfully transmitte...

Page 42: ...cular party by pressing one of the One Touch Keys that has previously been programmed with that party s information To use this function you must have previously programmed the One Touch keys with the...

Page 43: ...initial screen reappears To obtain detailed results of the transmission print the Activity Report P 8 11 Using the Speed Dial Function The Speed Dial function allows you to transmit a document to a p...

Page 44: ...which you are going to transmit a document Then press the Start key Example Speed dial NO 38 BOSTON 5 The machine now starts dialing the fax number and starts feeding the document If you want to stop...

Page 45: ...et a Combination dial To register One Touch Dial No or Speed Dial No as a Combination Dial enter the symbol One Touch Dial key 27 after One Touch Dial number or Speed Dial number For example register...

Page 46: ...splay appears a message to confirm the Speed Dial have registered as shown 7 Press the Panel Reset key to resume the initial state For details about registering procedure see Dial Registration P 5 13...

Page 47: ...d to the Combination Dial or when the total number of digits in a fax number exceeds 30 If you use the combination dial inputting SUB or SUB registers in One touch dial or Speed Dial will not be valid...

Page 48: ...use the Phone Book you must first program the fax numbers and other data for the destinations to which you will transmit a document by One Touch Dial or Speed Dial P 5 14 Up to 27 different parties c...

Page 49: ...r 2 sec indicating that the document has been successfully transmitted to the other party Then the initial screen reappears If you want to know the result of the transmission check it either by using...

Page 50: ...want to search Example Search for the destination name having NEW YORK at the beginning of the name Selecting Characters Enter the characters of the name or beginning of the name by pressing the corre...

Page 51: ...ory function memory reception see Printing the Document of Received by Memory RX mode P 2 31 Before receiving a document the following functions must be set Reception Mode P 2 19 This determines the m...

Page 52: ...d selection is made press the Yes key to validate it 5 Press the No Clear key to exit from the RX OPERATION mode Then the initial screen reappears Selecting the Reception Mode Setting RX Mode 1 Overvi...

Page 53: ...he Utility key 5 times into the RX OPERATION 2 Press 7 from the Numeric keys to show 7 RX Mode on the Message Display 3 Press the or key to select AUTO RX or MANUAL RX 4 Then press the Yes key 5 The m...

Page 54: ...ng in 2 Lift the telephone handset This stops the machine ringing 3 If you hear a fax signal press the Start key to begin reception then put down the telephone handset 4 The document is received and o...

Page 55: ...one handset as usual Receiving a Telephone Call 1 When the telephone rings indicating that a call is coming in lift the telephone Start talking the phone to the calling party 2 Once a voice call has b...

Page 56: ...Utility key 4 times then the display appears the message TX OPERATION 2 Press 2 from the Numeric keys The following message appears briefly to confirm your selection 3 Press or key to select the desi...

Page 57: ...ess the Utility key 4 times then the display appears the message TX OPERATION 2 Press 3 from the Numeric keys The following message appears briefly to confirm your selection 3 Press or key to select O...

Page 58: ...ess the Start key to perform transmitting Before dialing the number the machine scanning the documents into memory and counted the pages For example The remote Fax number is 12345 If the page count is...

Page 59: ...ic keys The display changes to the Closed Network TX mode 3 Press the or key to select ON or OFF for the Closed Network then press the Yes key 4 This completes the setting for Closed Network TX Press...

Page 60: ...ADF TX as the default setting Then press the Yes key 4 Press the No Clear key to restore the initial state Setting HEADER Header prints information on the paper at the receiving end to identify that y...

Page 61: ...PERATION 2 Press 6 from the Numeric keys The display now changes to the Header mode 3 Press the or key to select ON or OFF for the Header function then press the Yes key 4 This completes the Header se...

Page 62: ...s not printed unless the machine receives a print out command This feature provides a means of controlling the documents received through fax The print command may be a timer or password The print tim...

Page 63: ...ting print timer Using the Numeric keys enter the ON time 24 hour system at which you want to receive into memory For example 3 05 p m NOTE If you do not want to set the print timer press the Yes key...

Page 64: ...ON OK YES or 1 8 7 Setting the password Using the Numeric keys enter the password for Memory RX printout A password is a 4 digit number ranging between 0000 and 9999 For example 6237 Note If ON time i...

Page 65: ...ception When printing out the document by direct reception if a printing problem occurs during reception such as a paper empty or a paper jam reception is automatically changed from direct reception t...

Page 66: ...Two page Print function Two Page Print automatically prints two copies of a document received If you frequently make copies of documents received it s a good idea to turn this feature ON Two sub featu...

Page 67: ...hat the correct setting has been made then press the Yes key Setting CLOSED NETWORK RX If Closed Network RX is set to ON you only can receive a document from a party registered in One Touch Dial Speed...

Page 68: ...ottom of the printed page By printing an Activity Report using the session number you can identify the origin of the document when it came in and how many pages it contained The footer appears at the...

Page 69: ...k that the setting has been made correctly then press the Yes key 5 This completes the setting for Footer Press the Panel Reset key to restore the initial screen Communication Settings This section de...

Page 70: ...according to the telephone system connection to your fax 5 Check the settings you have made If they are correct press Yes key to validate the settings and the display of Comm Setting appears again IF...

Page 71: ...Utility key 6 times the display shows the message COMM SETTING 2 Press 2 from the Numeric keys The following message appears briefly to confirm your selection 3 Press or key to select either HIGH LOW...

Page 72: ...e monitor is HIGH or LOW In the other hand line monitor just available in Fax screen Setting PSTN PBX 1 Press Utility key 6 times 2 Press 3 of the Numeric keys The following message appears briefly to...

Page 73: ...BX mode press key causes the machine to dial the programmed access number s If you are dialing within a PBX then the symbol is displayed Phone Line Telephone Number LCD Display Dialing Access Line PBX...

Page 74: ...3 Enhanced FAX Operations...

Page 75: ...emory TX function is selected otherwise the Direct Transmission is selected This function is used to set the TX mode of the machine Two options are available Choices Available Description Memory TX Wh...

Page 76: ...als are depending on the country in which the machine is used Consult your Tech Rep for more details NOTE When transmitting a document using the Direct TX mode and the line is busy the LCD will displa...

Page 77: ...destination is what you want press the Start key to start transmission The machine starts to feed the documents and redialing this fax number When the line is connected the machine start the transmiss...

Page 78: ...ll print the TX RESULT REPORT 4 When the transmission is complete the display appears the message as shown And then appear the initial screen Verifying Audible Signal Before TX Manual Communication Th...

Page 79: ...line is connected the dial tone changes to a calling tone 4 When you hear a fax answer tone press the Start key The fax then starts feeding the document for transmission If you want to stop the transm...

Page 80: ...phone the telephone rings indicating that a call has been received 2 Pick up the telephone and listen for the answer tone 3 Press the Start key and you can hang up the handset now The machine starts t...

Page 81: ...ansmission Polling and Relay Broadcast 1 Press the Book TX key 2 Input the remote destination number or use the FUNCTION For example One Touch key 01 3 Here we use the numeric key to input the destina...

Page 82: ...ning change the book page and press the Yes key If you want to change the original document size press the No key Do this procedure until all pages you want to transmit are scanned 9 After you scanned...

Page 83: ...conformance with your PC The machine end 9 pin D SUB male 2 Installing the TWAIN Driver Insert the driver disk in the disk drive then click setup exe to start the installation Follow the step by step...

Page 84: ...ng process Close Click this button to close the scanner control panel 4 How to make scanning 1 In the PC software program Imaging Photoshop etc click File 2 Click Select Source 3 Choose KONICA 7415 Sc...

Page 85: ...1 interface A serial port RS232C connection is required for this to work PC end in conformance with your PC Machine end 9 pin D SUB male 2 Setting up Class 1 To ensure your machine can work with the...

Page 86: ...4 Utility Functions...

Page 87: ...s entered P 4 15 5 POLLING TX Scans the document into memory and after the machine upon receiving a polling transmission command from the other party the machine transmits the documents to them P 4 19...

Page 88: ...method to select the Function utilities 1 Press the Numeric keys Key Function BROADCAST TIMER TX MAILBOX TX PRINT MAILBOX RX POLLING TX POLLING RX RELAY INITIATE CANCEL RESERV For example when you pre...

Page 89: ...press the Function key or press the and key Here is the procedure of these operations 1 BROADCAST 2 TIMER TX 3 MAILBOX TX 4 PRINT MAILBOX RX 5 POLLING TX 6 POLLING RX 7 RELAY INITIATE 8 CANCEL RESERV...

Page 90: ...ty It also can reduce the wear made by feeding the document since the machine needs to scan it once only How to use the Broadcast function 1 Put the original document face up into the document feeding...

Page 91: ...nt to continue selecting the receiving destinations using the One Touch keys repeat steps 1 to 2 2 Using the Speed Dial to specify the destinations 1 Press the Speed Dial key 2 From the Numeric keys e...

Page 92: ...d Dial repeat steps 2 and 3 3 Using the Phone Book List to specify the destinations 1 Press the Phone Book key 2 Press the or key to select LIST then press the Yes key 3 Using the or key search for th...

Page 93: ...ch to specify the destinations 1 Press the Phone Book key the display appears as below 2 Press the key to select the SEARCH 3 Press the Yes key 4 Using the One Touch keys and Numeric keys enter the na...

Page 94: ...next receiving destination If you select an incorrect destination pressing the No Clear key will cancel the inclusion of this destination in the broadcast The previous screen will reappear If you want...

Page 95: ...eration of step 1 and 2 4 When all the receiving parties have been selected for a broadcast press the Start key Checking the Selected Destinations The receiving parties you have selected can now be ch...

Page 96: ...ected destinations press the Start key to begin the Broadcast transmission 6 The document in the document feeding Tray is scanned into the memory of the fax If the Reserv Report available from the REP...

Page 97: ...cation costs The timer can be set for up to 24 hours in advance How to use the Timer TX function 1 Put the original document face up into the document feeding tray 2 Press the Function key 3 Press 2 f...

Page 98: ...nt Only the following three features can be used together with Timer TX Broadcast P 4 4 Mailbox TX P 4 13 Polling RX P 4 21 When using the FUNCTION utilities in combination with Timer TX see the relev...

Page 99: ...tered on the transmitting end matches the mailbox ID on the receiving end This ensures that a confidential document will not be transmitted to the wrong person The transmitted document is stored in th...

Page 100: ...registered for the mailbox of the receiving fax machine For example Mailbox ID Press 3 8 5 and 0 in order If you have entered the wrong number press the No Clear key The ID you inputted would be canc...

Page 101: ...u confidentially by Mailbox TX This is convenient when you want to receive a confidential or private document from a particular person without any other people read it Mailbox transmission can begin o...

Page 102: ...the mailbox you want to program for example press 9 to assign the mailbox to number 9 4 The display prompts you to input the ID of Mailbox 9 For example 1234 If you want to correct this entry press t...

Page 103: ...to delete For example Delete the ID of Mailbox number 9 4 Then the message appears as below 5 Press the No Clear key to delete the registered ID then the display appears the message as below 6 Use the...

Page 104: ...splay returns to the display of step 5 8 If you had complete this operation exit this setting by the flowing procedure Press the No Clear key Press the Yes key Press the No Clear key then the display...

Page 105: ...to validate the mailbox ID If the ID you entered is correct then printing of the document will begin Polling TX Overview of the Polling TX function Polling TX allows you to place a document into your...

Page 106: ...osed network setting FUNCTION SEL 1 8 or FUNCTION 5 POLLING TX POLLING ID _ OK YES POLLING ID 1234 OK YES How to use the Polling TX function 1 Put the original document face up into the document feedi...

Page 107: ...ment in the ready state at the other end enabling you to receive that document at your end The other party must be ready for polling transmission before you can receive a document by Polling RX To rec...

Page 108: ...ling ID For example 1234 If you input a wrong number press the No Clear key to clear this entry and input the ID again 5 Press the Yes key Then the message appears to ask for the next polling RX desti...

Page 109: ...Press Yes key to accept this entry then the display shows the next destination If you want to delete this destination press the No Clear key Do it until all entries have been checked Then press the S...

Page 110: ...elay station 04 03 02 01 19 S T 20 10 J A K 11 B U 21 V 22 L 12 C M 13 D 08 06 07 05 23 W X 24 14 N E O 15 F Y 25 Z 26 P 16 G Q 17 H 09 27 R 18 I For example We press the One Touch key 01 registered a...

Page 111: ...two digit One Touch number of the remote fax machine that serves to represent all the end locations which will to receive your transmitted document You can set 01 64 For example Group No 25 7 Press th...

Page 112: ...nsmission 1 Press the Confirm key 3 times The message PRINT REPORT appears 2 Press the Yes key 3 Press the Confirm key 3 times The message MEMORY DATA LIST appears 4 Press the Yes key The machine prin...

Page 113: ...a display consists of the following five items 1 Session number 2 Communication start time 3 Function TIMER POLL TX B CAST MEMORY Memory reservation M B TX RELAY POLL RX 4 Press Yes to delete this tra...

Page 114: ...LL TX DEL YES CONF 03 23 20 POLL TX CANCELED FUNCTION SEL 1 8 or FUNCTION 3 Press the or key to select the item you want to cancel 4 Then press the Yes key If the document is not what you want to canc...

Page 115: ...5 Enhanced Utility Functions...

Page 116: ...LG HL P 5 10 1 MACHINE SETTING 9 PAPER SOURCE Select paper source P 5 11 1 DENSITY PHOTO Auto Manual Photo P 6 19 2 AUTO DENSITY Dark to Light 3 step P 6 20 3 MANUAL DENSITY Dark to Light 9 step P 6...

Page 117: ...sily by pressing the Speed Dial key and entering the Speed Dial number from the numeric keys 3 GROUP DIAL Destinations registered in One Touch Dial keys Speed Dial keys and the Phone Book can be regis...

Page 118: ...to start printing the document stored in memory when the specified time arrives The password print command prompts the machine to start printing when a password is input This feature provides a means...

Page 119: ...ATION 5 RX OPERATION 6 COMM SETTING 7 REPORT 8 INITIAL USER DATA For example Select the TX OPERATION Press the Utility key 4 times 2 Using the Numeric keys select the feature you want to set 1 SCAN CO...

Page 120: ...rs 2 Press 1 from the Numeric keys The following message appears briefly to confirm your selection 3 Press or key to select ON or OFF as the default setting and press the Yes key If you select ON the...

Page 121: ...briefly to confirm your selection The setting of POWER SAVE OFF would make the different message appears P 5 7 For DISABLE For ENABLE Press the or key to select Power Save Mode ON or OFF Then press th...

Page 122: ...umeric keys The following message appears briefly to confirm your selection 3 Press or key to select Disable or Enable as the default setting Then press the Yes key 4 Press the No Clear key to restore...

Page 123: ...y to restore the initial state Setting LCD CONTRAST Set the LCD contrast display according to your needs There are four density levels ranging from Light to Dark 1 Press the Utility key Then the messa...

Page 124: ...c keys The following message appears briefly to confirm your selection 3 Press or key to select either HIGH LOW or OFF then press the Yes key 4 Press the No Clear key to restore the initial state Choi...

Page 125: ...ection 3 Press or key to select ON or OFF as the default setting then press the Yes key 4 The message prompt you to enter the 4 digit password For example 1234 5 Press the No Clear key to restore the...

Page 126: ...Press or key to select Letter Legal or Half Letter as the default setting Half Letter is available when Tray 2 is installed Press the Yes key 4 Press the No Clear key to restore the initial state Sett...

Page 127: ...next selection allows you to specify the paper source 4 Press or key to select Tray 1 or Tray 2 as the paper source for COPY and FAX operation For PRINTER operation the following selections are avail...

Page 128: ...Tray TRAY 1 is A4 Letter Then press the Yes key 6 Press the No Clear key to restore the initial state Dial Registrations If you want to use the One Touch Dial or Speed Dial functions to transmit your...

Page 129: ...To register data for One Touch Dial press the One Touch key for which you want to register information For example Using One Touch key 15 If this One Touch key has been registered then the message is...

Page 130: ...he Yes key to go to the next procedure Set the Name P 5 17 2 For SPEED DIAL 1 Press the Utility key 3 times scroll to the DIAL REGISTRATION 2 Press 2 from the Numeric keys to select the SPEED DIAL reg...

Page 131: ...DIT or DELETE EDIT To edit the setting select EDIT then press the Yes key DELETE If you want to delete the registered contents select DELETE then press the Yes key The destination registered for this...

Page 132: ...you need to reset each function again with the updated destination information For example At 12 00 you register a Group dial contain One Touch Dial 01 02 03 At 15 00 you register the One Touch Dial...

Page 133: ...ation In this case use or key to select 33 6Kbps 14 4Kbps or 9 6Kbps 2 Check the setting If it is correct press Yes key to validate the modem speed setting 3 Now you have already completed the registr...

Page 134: ...ed as a Group in a Group Dial key Up to 27 Groups can be registered Each Group can contain up to 50 destinations For this registration Combination Dial can be used If you frequently send the same docu...

Page 135: ...can consist of up to 20 characters 7 If a wrong character has been entered press key to move the cursor position back one position Enter the correct character again 8 Check the group name entered and...

Page 136: ...been correctly selected The Message Display now prompts you to select the next party If you want to continue selecting destinations for Group Dial using Speed Dial repeat steps 12 and 13 14 Selecting...

Page 137: ...e or initial by pressing the corresponding Numeric keys and One Touch keys the required number of times Do the same for the destination for which you want to search 22 If a wrong character has been en...

Page 138: ...Enhanced Utility Functions 5 23...

Page 139: ...l appear Using the Group Dial 1 Place the document face up on the Document Feeding Tray 2 Press the One Touch key in which the desired Group Dial has been registered For example One Touch key 17 USA g...

Page 140: ...termittently for 2 sec the Error indicator lights up The TX RX Result Report prints automatically For details see TX RX Result Report Up to 9 redial attempts will be made to these locations Program Di...

Page 141: ...keys 3 Press a desired One Touch key 24 25 26 or 27 in which you want to program the function For example Using One Touch key 27 4 Using the following chart press the Numeric key number corresponding...

Page 142: ...ress Yes key Use the numeric keys to input the Fax number and then press Yes key Or use Function utilities 6 This completes the programming procedure for Program Dial 7 To exit from the registering of...

Page 143: ...Using Batch TX Overview of the BATCH TX function You can program your single location one touch keys to batch documents automatically By assigning a batch time to a programmed one touch key you can el...

Page 144: ...Enhanced Utility Functions 5 29 TX TIME _ DELETE BATCH YES If you want to cancel Batch TX press the No Clear key Then press the Yes key DIAL REGISTRATION OK YES or 1 5 Yes C No...

Page 145: ...6 How To Make Copies...

Page 146: ...ault paper tray zoom ratio and auto exposure settings are automatically selected in the Initial state How to operation 1 Be sure that the message display is in copy screen as blow shown Metric Inch If...

Page 147: ...sired level of density For example press the key to select the lighter density Press the Auto Photo Exposure Mode Key to specify the desired level of density 6 Select the 2in1 function P 6 16 7 Select...

Page 148: ...lf Letter L Originals that are not compatible with the Automatic Document Feeder G Typing paper paraffin paper and other thin paper types G Thick paper G Sizes that are larger than Legal L or smaller...

Page 149: ...machine Do not place documents that exceed 3kg onto the Original Glass Do not lean heavily upon original documents once they have been placed on top of the Original Glass as damage may result A bright...

Page 150: ...ll display on the message display as below If Letter size paper Selected tray display Paper Tray Tray 1 Paper Feed Unit Tray 2 Manual Bypass Tray Useful Tips The Paper Tray is prioritized when the Ini...

Page 151: ...transparencies and post cards Paper Size Maximum 216mm 356mm Minimum 86 mm 148mm How to operate 1 Loading the paper of standard size A4 Letter When setting documents of plain or thick paper types 1 S...

Page 152: ...or Metric For Inch 1 Initiate screen 2 Press the Paper key 3 The display appears as below 4 Press the Yes key to accept the standard paper size used for Manual Bypass Tray 5 The display appears the Ma...

Page 153: ...uide Plates to the original document Insert the record paper face up into the tray until it stops 3 Select the Manual Bypass Tray For Metric For Inch 1 Initial screen 2 Press the Paper key switch to M...

Page 154: ...ress the Yes key to accept the selection 8 The display appears the selection of paper size selection meaning LT Letter LG Legal HL Half Legal 10 Use the or key to select the paper size standard you wa...

Page 155: ...T OHP CARD A4 CARD CARD LT CARD B For select the Free size 1 After you press the No key the display appears as below 2 Use the numeric keys to input the x direction length of paper ABC DEF JKL MNO WXY...

Page 156: ...value you inputted 4 As previous you input the x direction length of paper here you input the y direction length of paper again 5 After you press the Yes key the display appears as below OK Display of...

Page 157: ...generated Specify the copy quantity by using the Numeric Keys Example Specifying 23 copies 1 Be sure the display is appears as the Copy screen as shown If not press the Copy Fax Key to switch 2 Press...

Page 158: ...Ratio message 1 00 none 1 00 none 1 15 B5 A4 1 29 HL LT 1 41 A5 A4 1 54 HL LG 0 70 A4 A5 0 64 LT HL 0 81 B5 A5 0 78 LG LT _ _ _ 0 5 2 0 _ _ _ 0 5 2 0 Specified the Customer Zoom Ratio Use the and key...

Page 159: ...0 Use the numeric keys Example Specify a zoom ratio of 1 23 1 Press the Zoom key as many times until the Zoom ratio appears on the display change to _ as shown 2 Use the numeric keys press number 1 2...

Page 160: ...darker setting adjustments are possible vThe Auto Photo Mode is a default setting for the Initial state The Manual Text Photo Mode can be specified through the Utility key P 6 20 Manual density adjus...

Page 161: ...and reduced then rotated Installation of the expansion memory is required Turn ON OFF of 2in1 function by press the 2in1 key if 2in1 function is turned to ON then the 2in1 indicator would lights up T...

Page 162: ...ations are 0 7 times in Metric classification and 0 64 times in Inch classification 2 Put the original document onto the ADF 3 Press the Start key to perform the 2in1 copy 2 For plate scanning 1 Turn...

Page 163: ...the last 2in1 page Sort function Overview of Sort function When multi copy with ADF scanning is executed it can be print with Sort function in a good order Installation of the Automatic Document Feed...

Page 164: ...ribes the choices available in the COPY SETTING menu Setting DENSITY PHOTO Set the initial value of adjustment way of copy density 1 Press the Utility key 2 times then the message COPY SETTING appears...

Page 165: ...desired density as the default setting then press the Yes key 4 Press the No Clear key to restore the initial state Setting MANUAL DENSITY Set the initial value of the manual density level 1 Press the...

Page 166: ...on Default MODE 1 When the standard original text original is used MODE 2 To give better reproduction of a faint original 1 Press the Utility key 2 times then the display appears the message COPY SETT...

Page 167: ...briefly to confirm your selection 3 Press or key to select ON or OFF as the default setting then press the Yes key 4 Press the No Clear key to restore the initial state Setting SORT MODE NOTE This fun...

Page 168: ...Press 6 from the Numeric keys The following message appears briefly to confirm your selection 3 Press the or key to select SORT or NON SORT as the default setting Then press the Yes key 4 Press the N...

Page 169: ...7 Using The Confirm Utilities...

Page 170: ...e previous communication record and the key to display the next communication record For example Press the key to display previous communication report The display would switch between these two appea...

Page 171: ...ick up mistake is not counted Separator Jam and Fuser Jam are counted TX PAGES Total transmitted pages since the fax kit option has been installed are counted RX PAGES Total received pages since the f...

Page 172: ...s occur during reception Activity Report Prints a list of results of the last 60 communications Memory Data List Prints a list of the documents to be transmitted or Polling RX Memory Image Print Print...

Page 173: ...nt Activity Report 1 Press the Confirm key repeatedly to scroll through the menus until you reach the PRINT REPORT 2 Press the Yes key to access this function The first display is TX RESULT REPORT 3 P...

Page 174: ...8 Printing Reports...

Page 175: ...t a list of the results when receiving a confidential or multi polling document or when errors occur during reception m m m m Activity Report P 8 11 Prints a list of results of the last 60 communicati...

Page 176: ...ONE TOUCH LIST NAME JONES TEL 886 3 4733507 DATE DEC 20 2000 15 00 OT NO DESTINATION STATION DESTINATION NUMBER BATCH TIME SPEED SET DATE OT 01 TECOGER 002 44 3 5416789 16 00 14 4 JAN 20 2000 OT 02 JO...

Page 177: ...tered 2 Not to report blank number following last registered number SPEED DIAL LIST NAME JONES TEL 886 3 4733507 DATE APR 10 2000 12 00 SP No DESTINATION STATION DESTINATION NUMBER SPEED SET DATE SP O...

Page 178: ...ON Function name as below BROADCAST TIMER TX MAILBOX TX POLLING RX RELAY INITIATE 4 No Location number sequence 5 DESTINATION STATION Destination name destination number NAME JONES TEL 3 4733507 DATE...

Page 179: ...ARK LIGHT BUZZER VOLUME LOW REMOTE MONITOR OFF TRAY1 PAPER SIZE LETTER COPY PAPER SOURCE TRAY1 CONTINUOUS FAX PAPER SOURCE TRAY1 FIXED PRINTER PAPER SOURCE AUTO COPY SETTING 2 DENSITY PHOTO AUTO AUTO...

Page 180: ...TONE LINE MONITOR LOW PSTN PBX PSTN REPORTING 7 ACTIVITY REPORT ON RESERVATION REPORT OFF TX RESULT REPORT OFF RX RESULT REPORT OFF INITIAL USER DATA 8 SET DATE JAN 30 2000 23 01 USER FAX NO USER NAME...

Page 181: ...ch tries 4 Print out format ADF Report without image appended at the report page MEMORY Print 1st page at upper half page with vertical reduction followed by reports Please reference Memory Image Prin...

Page 182: ...ATE APR 10 2000 12 00 SESSION FUNCTION No DESTINATION STATION DATE TIME PAGE DURATION MODE RESULT 001 JONES TAIPEI 2 4231236 APR 18 20 02 003 00h02min21s ECM OK 002 JONES TAOYUAN 3 4211232 APR 18 20 0...

Page 183: ...M mode or communication speed 9 RESULT Communication result This items same as TX result report 1 RX COMPLETELE REPOERT NAME JONES TEL 2770777 DATE DEC 10 2000 12 00 SESSION FUNCTION No DESTINATION ST...

Page 184: ...NAME JONES TEL 886 3 4733507 DATE APR 10 2000 12 00 SESSION FUNCTION No DESTINATION STATION DATE TIME PAGE DURATION MODE RESULT 0001 RX 01 JONES TAIPEI APR 18 18 00 010 00h02min21s ECM NG NG PAGE 1 3...

Page 185: ...ESULT Communication result NAME JONES TEL 886 3 4733507 DATE APR 10 2000 12 00 No SESSION DATE TIME TX RX DESTINATION STATION PAGE DURATION MODE RESEUL T 01 0001 SEP 17 07 23 TX JONES BOSTON 886 3 473...

Page 186: ...N FUNCTION NO DESTINATION STATION DATE TIME PAGE 001 OT 01 JONES TAIPEI 2 4543298 002 OT 02 JONES USA 00214089450587 003 0T 03 JONES NEW YORK 002 81 3 4321325 004 OT 04 MLT OASAKA 002 81 2 34528951 00...

Page 187: ...eported for polling operation NOTE This report is not printed when no job in memory display NONE on LCD NAME JONES TEL 886 3 4733507 DATE APR 10 2000 12 00 SESSION FUNCTION TIME No DESTINATION STATION...

Page 188: ...on The reduction ratio is base on document length II Report items 1 SESSION Session number 2 FUNCTION Function 3 No Total location number for this session 4 DESTINATION STATION Destination name teleph...

Page 189: ...APR 12 2000 21 04 SESSION FUNCTION No DESTINATION STATION DATE TIME PAGE 001 OT 01 JONES TAIPEI 886 2 3456305 4569 002 OT 03 JONES TAINAN 03 4733495 0001 BROADCAST 003 OT 04 NBC 02 9945762 OCT 26 20 0...

Page 190: ...ing Reports 8 16 WHEN FUNCTION IS POLLING TX NAME JONES TEL 886 3 4733507 DATE APR 12 2000 21 04 SESSION FUNCTION NO POLLING ID DATE PAGE 8001 POLLING TX 001 1234 OCT 26 003 8 MEMORY IMAGE PRINT Image...

Page 191: ...RMAL DENSITY ADF MODE 1 2in1 MODE OFF COPY SETTING DATA SORT MODE SORT ONE TOUCH DIAL BATCH TX LOST SPEED DIAL LOST DIAL REGISTRATION PROGRAM DIAL LOST SCAN CONTRAST NORMAL RESOLUTION STARDARD PAGE CO...

Page 192: ...r you turn on the machine it will print out RX Lost Report for data lost the print out formats as same as Activity Report P 8 11 1 Lost Report for TX LOST REPORT WARNING MESSAGE System power off time...

Page 193: ...rt ok or NG low line report error code INITIATE STATION NAME TECO TEL 886 3 4733509 RELAY STATION NAME TECO TEL 886 3 4733509 DATE APR 10 2000 12 00 SESSION FUNCTION No DESTINATION STATION DATE TIME P...

Page 194: ...sult Report Prints a list of the result of a transmission after it has been completed RX Result Report Prints out a list of the results when receiving a confidential or multi polling document or when...

Page 195: ...efly to confirm your selection 3 Press or key to select ON as the default setting then press the Yes key 4 Press the Panel Reset key to restore the initial state Manual print report The Confirm utilit...

Page 196: ...9 Troubleshooting...

Page 197: ...the telephone connected with the machine MEMORY SET DOC FACE UP No documents have been placed enter the fax number for transmission Place the documents MEM FULL TX CANCEL Memory is full Send fewer do...

Page 198: ...the Stop key then try another transmission sequence At transmission Press the Stop key and then the Yes key Then try another transmission sequence COMM ERROR An error has occurred and communication wa...

Page 199: ...retry the transmission Or ask the party to cancel Mailbox TX and retry transmission MAILBOX ID IS USED The message is shown in setting Mailbox RX of Utility function When the specified ID is already...

Page 200: ...document is a second generation copy or an OHP transparency or other translucent media etc Set a blank sheet of paper over the original document The copy has unintended specks or spots Image from the...

Page 201: ...obstruction on the original glass when using the Automatic Document Feeder Remove the obstruction and wipe the original glass clean with a soft cloth How to replace the supply unit When the following...

Page 202: ...new supply unit into machine Useful Tip The supply unit can easily be installed by aligning the front of the unit with the marker provided inside the machine 6 Gently swing down and lock the Upper Ha...

Page 203: ...the following message appears OR 1 Remove the Manual Bypass Tray 2 Open the Document Guide Plates 3 Set the paper into the tray so that its front side is facing up NOTE The paper should be loaded no...

Page 204: ...t you press the Start key to resume the machine For Paper Feed Unit TRAY 2 When the following message appears OR 1 Slide out the Paper Drawer and press down the Paper Lifting Plate 2 Load the paper st...

Page 205: ...or on the Edge Guide 3 Gently slide the Paper Drawer back in 4 Then the message appears prompt you press the Start key to resume the machine Clearing paper misfeeds Paper Tray misfeed When the followi...

Page 206: ...ME 2 Remove the paper and reset it back into the Paper Tray 3 Return the Manual Bypass Tray 4 Pull the Lock Release Lever to open and close the Upper Half of the Machine 5 Then the message prompt you...

Page 207: ...Unit misfeed When the following message appears 1 Press in the tray stoppers and then remove the Paper Drawer 2 Remove the misfeed sheet of paper 3 Make sure that the paper is correctly loaded in the...

Page 208: ...prompt you press the Start key to resume the machine Separator Jam Fuser Jam When the following message appears For Separator Jam For Fuser Jam 1 Pull the Lock Release Lever and fold open the upper ha...

Page 209: ...eet of paper b For Fuser Jam Remove the paper jammed in the Transport Section by pulling it from the bottom of the Fusing Unit 4 Re install the supply unit Useful Tip The supply unit can easily bye in...

Page 210: ...ess the Start key to resume the machine Original Document Jam When the message appears 1 Remove the original document from the Document Feed Tray 2 Open the Paper Misfeed Guide and gently remove the p...

Page 211: ...r misfeed 4 Close the paper misfeed guide 5 Place the original document that was removed in step 1 into the Automatic Document Feeder again When PAPER SIZE ERROR occurs 1 During copying When the messa...

Page 212: ...e machine Return the last scanned document into ADF again Then press the Start key to resume the machine If you want to cancel the copy procedure press the Stop key 3 The machine continues to perform...

Page 213: ...lity function P 5 10 2 Then the machine resume the printing automatically Without press the Start key How to reset the machine NOTE Should a CXXXX trouble code continue to appear in the display after...

Page 214: ...10 Specifications...

Page 215: ...T No 1 33 6k with JBIG 143 locations per session Function Location One touch Key 27 Speed Dial 100 On the fly Ten key 16 Broadcasting Total 143 Memory TX Yes Quick memory TX Yes ADF TX Yes Manual TX Y...

Page 216: ...ination dial Yes Phone Book Yes On hook Dial Yes Reports TX confirmation report Yes TX error report Yes RX Result report Yes Activity report Yes Memory data list Yes Key setting list Yes Broadcast Res...

Reviews: