background image

284

Scan Timing

U8552 and LR8532

The following diagrams provide examples of typical scan timing for the U8552 and LR8532 when 

using from 16 to 30 channels. If the number of channels in use is 15 or less, the scan timing is the 

same as for the U8550, U8551, LR8530, and LR8531.

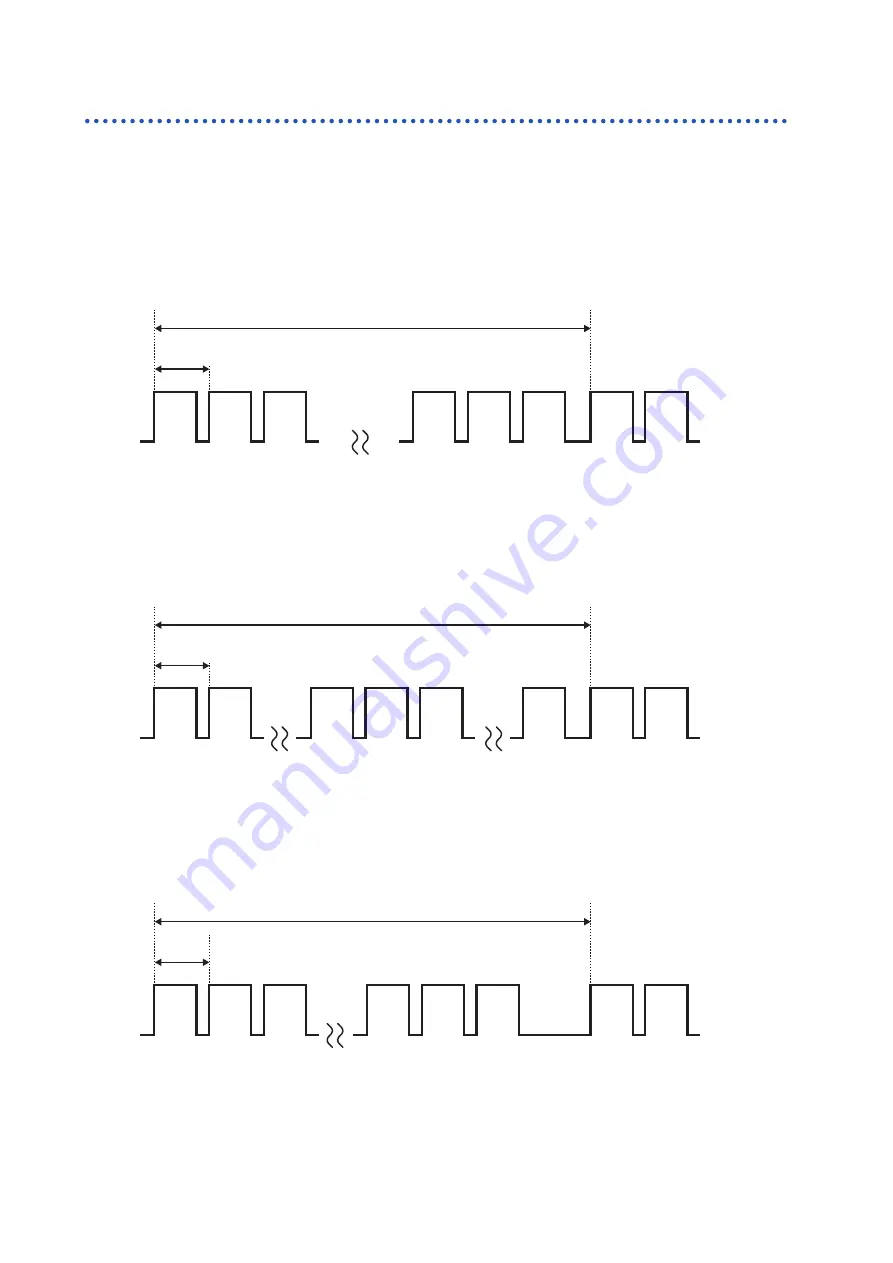
Example:  Data refresh interval of 20 ms, measurement on for all 30 channels, wire 

break detection off

Channels 1 to 30 are scanned with a duration of approximately 0.5 ms per channel.

Data refresh interval: 20 ms

About 0.5 ms

CH1

CH2

CH3

CH28

CH29

CH1

CH2

CH30

Example:  Data refresh interval of 20 ms; measurement on for CH1 to CH10 and 

CH21 to CH30; wire break detection off

Only channels for which measurement is enabled are scanned; channels for which measurement is 

disabled are not scanned.

Data refresh interval: 20 ms

About 0.5 ms

CH1

CH2

CH10

CH21

CH1

CH2

CH22

CH30

Example:  Data refresh interval of 5 s, measurement on for all 30 channels, wire 

break detection off

Channels 1 to 30 are scanned with a duration of approximately 90 ms or 105 ms per channel, 

depending on the power supply frequency filter setting.

Data refresh interval: 5 s

About 105 ms (power supply frequency filter: 50 Hz)

CH1

CH2

CH3

CH28

CH29

CH1

CH2

CH30

About 90 ms (power supply frequency filter: 60 Hz)

Summary of Contents for LR8450

Page 1: ...R8450 01 Instruction Manual MEMORY HiLOGGER EN Feb 2020 Edition 1 LR8450A964 00 20 02H 99 Washington Street Melrose MA 02176 Phone 781 665 1400 Toll Free 1 800 517 8431 Visit us at www TestEquipmentDe...

Page 2: ...ns Used in This Manual 2 How to Use This Manual 4 1 Settings and Operation 5 1 1 Performing Basic Operations 6 Instructions 6 Value entry method 7 Text entry method 8 1 2 Setting Measurement Condition...

Page 3: ...erver settings 211 Configuring automatic sending of data 225 Sending a test file 227 Checking FTP communications status 228 9 8 Controlling the Instrument with Communication Commands 229 4 Alarm Alarm...

Page 4: ...ring resistance 274 Correcting for gage factor 274 11 3 Digital filter characteristics 275 11 4 Noise Countermeasures 276 Noise contamination mechanisms 276 Example noise countermeasures 278 11 5 Scan...

Page 5: ...mation about how to install and use the computer application Communications Commands 2 User Manual Explanation of communications commands for controlling the instrument 1 For information about how to...

Page 6: ...t from the standpoint of operating or maintaining the instrument Indicates a high voltage hazard Failure to verify safety or improper handling of the instrument could lead to electric shock burns or d...

Page 7: ...ent will revert to this value p Indicates the page number to reference Bold The names of control keys are printed in bold The names of user interface elements on the screen are enclosed in brackets Wi...

Page 8: ...to open screens SET key Main tab Sub tab Step number Numbers are the same as those used in the instructions Selections and explanations Indicates the selections that can be made by pressing the ENTER...

Page 9: ...ranges 1 1 Performing Basic Operations p 6 1 2 Setting Measurement Conditions p 10 1 3 Configuring Input Channels p 16 1 4 Configuring the Waveform Display p 36 1 5 Using the Scaling Function p 42 1 6...

Page 10: ...sub tab whose settings you wish to configure with the Up Arrow and Down Arrow keys You can move the focus to the settings area by pressing the ENTER key You can return the focus to the sub tab by pres...

Page 11: ...ight one digit OK Accepts the value Cancel Closes the window without entering a value 1 Select the desired value with the Left Arrow Right Arrow Up Arrow and Down Arrow keys and then press the ENTER k...

Page 12: ...2 1 1 2 2 1 Select a character with the Left Arrow Right Arrow Up Arrow and Down Arrow keys and press the ENTER key 2 Press the START key OK Alternatively or press the ENTER key while OK is selected...

Page 13: ...You can also use the corresponding key to perform the same operation Operation on screen Corresponding key Description OK START Accepts the character Cancel ESC Closes the window without entering any...

Page 14: ...topped with a trigger See Stop triggers p 84 Time specified recording Sets the recording time setting to Specified time The setting indicates the amount of time for which to record the recording lengt...

Page 15: ...capture interval Example Choosing 10 ms will cause data to be captured at a 10 ms interval 100 times per second 1 ms 1 2 ms 1 5 ms 1 10 ms 20 ms 50 ms 100 ms 200 ms 500 ms 1 s 2 s 5 s 10 s 20 s 30 s...

Page 16: ...uffer memory is exceeded It is recommended to use auto saving since deleted data cannot be restored See Auto save real time save p 106 6 Under Alarm source choose whether to record the alarm source ch...

Page 17: ...shortest data refresh interval will be set for each module based on the recording interval The available data refresh interval settings vary with the modules in use and the wire break detection settin...

Page 18: ...ture If the data refresh interval and recording interval are short For the U8550 to U8553 and LR8530 to LR8533 modules the longer the data refresh interval the lower the digital filter cutoff frequenc...

Page 19: ...t s recording interval to 1 ms reflecting the shortest data refresh interval The instrument will record data from modules 1 through 3 every 1 ms If the instrument s recording interval is shorter than...

Page 20: ...channels Setting method 1 Set the main tab to Channel 2 Select the settings screen on the sub tab Individual Configure the settings on the individual settings screen for each channel Unit n n 1 2 Con...

Page 21: ...settings screen will be displayed for each channel Under Channel select the module and channel to configure Configure the range and display for the selected channel A waveform monitor is shown on the...

Page 22: ...on the settings list screen Measurement on off Waveform display colors Input display scaling comment and numerical value calculation settings Available settings depend on the type of module Zero adjus...

Page 23: ...r channels whose checkboxes are not selected 2 Select the waveform display color OFF 24 colors Select if you wish to measure the channel but not to display its waveform or numerical values on the scre...

Page 24: ...minals See Connecting voltage cables and thermocouples in the Quick Start Manual The 1 5 V range is convenient when measuring output from 4 20 mA instrumentation devices The 1 5 V range is a range in...

Page 25: ...ckbox Measurement will not be performed for channels whose checkboxes are not selected 2 Select the waveform display color OFF 24 colors Select if you wish to measure the channel but not to display it...

Page 26: ...Use this setting when the thermocouple or compensation lead wire is connected directly to the instrument The measurement accuracy is determined by adding the temperature measurement accuracy to the re...

Page 27: ...ss effective noise rejection since it results in a cutoff frequency that is higher than the OFF setting Check Digital filter of each module in 10 2 Plug in Module Specifications p 243 for the cutoff f...

Page 28: ...heckboxes are not selected 2 Select the waveform display color OFF 24 colors Select if you wish to measure the channel but not to display its waveform or numerical values on the screen 3 Set the input...

Page 29: ...modules U8550 U8551 U8552 LR8531 Applicable sensor Z2000 Humidity Sensor 3 3 1 1 2 2 1 Select the module Unit and channel to configure and select the checkbox Measurement will not be performed for ch...

Page 30: ...not selected 2 Select the waveform display color OFF 24 colors Select if you wish to measure the channel but not to display its waveform or numerical values on the screen 3 Set the input type to Resi...

Page 31: ...Using the Scaling Function p 42 Connecting a strain gage or strain gage type converter See Connecting a strain gage or strain gage type converter in the Quick Start Manual 3 3 1 1 4 4 5 5 2 2 1 Select...

Page 32: ...o balancing cannot be performed while measurement is in progress Key operations are ignored while auto balancing is in progress Auto balancing can also be performed using the Auto balance button on th...

Page 33: ...nels whose checkboxes are not selected 2 Select the waveform display color OFF 24 colors Select if you wish to measure the channel but not to display its waveform or numerical values on the screen 3 S...

Page 34: ...count to zero at the start of measurement Trigger Resets the count to zero at the start of measurement and at which a trigger activates The values acquired before the reset are recorded for the trigge...

Page 35: ...ls whose checkboxes are not selected 2 Select the waveform display color OFF 24 colors Select if you wish to measure the channel but not to display its waveform or numerical values on the screen 3 Set...

Page 36: ...s set to 1 s The rotational speed at time t s is calculated by dividing the pulse count from t 1 to t s by the number of pulses per revolution r r s Integrated pulse count at t s integrated pulse coun...

Page 37: ...tional speed however t0 is equal to or more than 2 s If an unintentional trigger activates set the smoothing time at 1 s Example when t0 5 s The rotational speed recorded value will spend t0 s from th...

Page 38: ...m display color OFF 24 colors Select if you wish to measure the channel but not to display its waveform on the screen 3 Set the input type to Logic 4 Under Threshold select the level to count 1 V Trea...

Page 39: ...alues in saved data and calculation results is described in 11 13 Data Handling p 302 The screen will display a waveform saturated by the value described in 11 13 Data Handling p 302 1000 400 0 200 10...

Page 40: ...lay position Setting the zoom factor and zero position Setting upper and lower limit values Setting the zoom factor and zero position Set the waveform display position by specifying the zoom factor an...

Page 41: ...ertical axis zoom factor of 1 Down to 50 Screen The range of available zero position settings will depend on the zoom factor 4 When using scaling or when Number display format is set to a value other...

Page 42: ...position of 50 With zero position of 50 With zero position of 100 With zero position of 100 With zero position of 150 With zero position of 150 Screen 100 Off screen Off screen Off screen 1 1 1 1 150...

Page 43: ...nce you can specify any desired range you can enlarge the waveform to show only the necessary portion Setting upper and lower limit values is also useful when using the scaling function 10 10 0 5 5 0...

Page 44: ...shorter time enlarges the waveform Setting a longer time shrinks the waveform Since the time assigned to 1 division is a display setting the recording interval and data refresh interval are unaffected...

Page 45: ...also applies when displaying time values for waveform data saved in the CSV format 3 Under Number display format select the display format to use for measured values vertical axis values Standard Disp...

Page 46: ...cimal Displays converted values as decimals Exponent Displays converted values as exponents 2 Select the scaling conversion method Ratio Sets the physical quantity conversion ratio per 1 V of input si...

Page 47: ...rsion values in Convert 1 and Convert 2 respectively Select the numerical value entry item and press the ENTER key to display the numerical value setting window 9 9999e 29 to 9 9999e 29 Example settin...

Page 48: ...Unit G Capacity 20 Output 1000 displayed as 1k You can use Scaling on the settings list screen to configure the settings See 1 7 Configuring Channels in a List p 50 Setting the display position upper...

Page 49: ...d the result The pulse output device will have predetermined physical quantity that corresponds to 1 pulse or a number of pulses that corresponds to a value of one in the basic units for example 1 kWh...

Page 50: ...ue setting window The settings that define the physical property per pulse and the number of pulses corresponding to a value of one in the basic units are linked Example setting When connecting a watt...

Page 51: ...Up to 40 single byte characters See Text entry method p 8 Title comments are displayed at the top of the waveform screen You can use title comments to identify measurement based on image data when di...

Page 52: ...Wave Value Channel comments allow you to identify channels when measuring numerous channels 1 1 1 Select Comment with the Left Arrow Right Arrow Up Arrow and Down Arrow keys and press the ENTER key T...

Page 53: ...16 single byte characters See Text entry method p 8 You can use module identifiers to identify modules when using multiple modules 1 1 1 Select Unit identifier with the Left Arrow Right Arrow Up Arrow...

Page 54: ...he module whose settings you wish to display in the list 2 Select the item to display Input Display Scaling Comment Numerical calc Settings list screen Display See 1 4 Configuring the Waveform Display...

Page 55: ...is selected to display CH16 to CH30 Press the ENTER key while 1 15 is selected to display CH1 to CH15 4 Select a channel number and press the ENTER key The individual settings window will open allowin...

Page 56: ...time 4 4 Integration mode When the input type is Count Integration method Pulse count When the input type is RevSpd Number of pulses per revolution 5 5 Slope Slope at which to count 6 6 Threshold val...

Page 57: ...rm display zoom factor Upper limit value When the display setting is Up Low Lim Screen upper limit value 3 3 Zero position When the display setting is Position Waveform zero position 0 V 0 C etc Lower...

Page 58: ...annels Settings list screen Numerical calc 1 1 1 1 Threshold value Threshold value for numerical calculations Availability ON time OFF time ON count OFF count Threshold values will be used for numeric...

Page 59: ...2 2 3 3 1 1 1 Press the ENTER key while Copy is selected The settings window will open 2 Select the checkbox for the module to which you wish to copy the settings the target module The source module...

Page 60: ...l channels on a module Unit n n 1 2 2 2 1 1 1 Select the measurement ON OFF checkbox and press the ENTER key Each time you press the ENTER key the measurement setting for all channels will toggle betw...

Page 61: ...ero adjustment values are reset when a system reset is performed Zero adjustment cannot be performed while measurement is in progress The internal temperature of the instrument and modules will stabil...

Page 62: ...Horizontal axis select the time per division p 40 2 Selecting the module to display Waveforms for up to 166 channels can be displayed Maximum number of channels 120 analog 8 pulse 8 alarm and 30 wavef...

Page 63: ...ording time See 1 2 Setting Measurement Conditions p 10 You can prevent misoperation of the START and STOP keys See 7 1 Configuring Settings p 164 You can start recording operation when specific condi...

Page 64: ...6 5 5 12 12 8 8 27 27 23 23 No Name Description Reference page 1 1 Recording interval Allows you to select the interval at which the instrument captures data from the measurement module p 11 2 2 Horiz...

Page 65: ...hannels and modules displayed using gage B p 65 21 21 Gage A Indicates the channels and modules displayed using gage A p 65 22 22 Trigger time Indicates the time and date at which the trigger was acti...

Page 66: ...method used to display measured waveforms Under Display select the waveform display method Wave Set Wave Wave Value Value Alarm You can also select the display method with the WAVE key Each time you p...

Page 67: ...63 Observing Waveforms Unit Measure Channel Trigger Alarm Calculation System Wave Value Value 1 Settings and Operation...

Page 68: ...64 Observing Waveforms Alarm...

Page 69: ...B can be displayed You can choose the channels for which to display a gage The gage will be shown in the same color as the selected channel 2 2 4 4 3 3 1 1 1 Under Display set the display to Wave Set...

Page 70: ...m value MAX from the start of measurement to the current time Minimum Minimum value MIN from the start of measurement to the current time Average Average value AVE from the start of measurement to the...

Page 71: ...tem Wave Value screen You can choose any of three types of information to display on the right side of the screen 1 Instantaneous Measured values most recently obtained or shown on the right portion o...

Page 72: ...68 Observing Waveforms 3 Numerical calculation Numerical calculation results...

Page 73: ...rd the most recent data Switches the SCROLL CURSOR keys function waveform movement or A B cursor movement Screen Past Most recent If you wish to move to the most recent waveform Screen Past Most recen...

Page 74: ...croll icon see 1 11 Observing Waveforms p 60 3 Press the SCROLL CURSOR keys to move the waveform Key operation Moves the waveform left a large amount 10 divisions at a time Moves the waveform right a...

Page 75: ...dth shown on the scroll bar varies with the recording time and horizontal axis display settings Overall waveform Screen display range Enlarging and shrinking the waveform horizontally You can enlarge...

Page 76: ...ccurs Minimum Searches for the point at which the minimum value occurs Maximal Searches for points at which local maximums occur Minimal Searches for points at which local minimums occur 3 Under Area...

Page 77: ...S mark will appear at points returned by the search You can delete the search results by pressing the ENTER key while CLR search is selected You can move the A cursor or B cursor position to an S mark...

Page 78: ...oll bar 3 Move the arrow to the position you wish to display using the Left Arrow and Right Arrow keys 4 Press the ENTER key The display will move to the specified location You can also change the dis...

Page 79: ...cursor settings The A B cursors will be displayed on the screen When the Cursor icon is displayed pressing the any one of the SCROLL CURSOR keys will automatically change the setting to ON even with t...

Page 80: ...You can change the displayed channel by pressing the ENTER key while or is selected 8 Press the SELECT key to display the Cursor icon Each time you press the SELECT key the display will switch betwee...

Page 81: ...g settings allow you to specify the range Manual saving Under Range select the range of data to save p 113 Selective save operation Under Range select the range of data to save p 115 Numerical calcula...

Page 82: ...l connection guide Strain gage connection diagram 1 1 1 Select Strain gauge connection guide 2 Press the ENTER key A strain gage connection guide will be displayed 4 4 3 3 3 Select the connection meth...

Page 83: ...lation System External control terminal pin names 1 1 1 Select External connection guide 2 Press the ENTER key A list of external control terminal pin names will be displayed 3 3 3 Press the ENTER key...

Page 84: ...ified by the mark When a trigger activates you can start or stop recording Trigger sources can be selected from among the following Analog triggers level window Pulse level window Logic triggers condi...

Page 85: ...gger Applies the trigger at a set interval Example Record data at one hour intervals p 95 Trigger activation conditions You can set the conditions under which the trigger will activate Select AND OR o...

Page 86: ...As well the trigger activates when the waveform equals the upper limit value while falling and the lower limit value while rising OUT Upper limit value Lower limit value Activates when the waveform e...

Page 87: ...Starts recording when the start trigger condition is satisfied and stops recording when the stop trigger condition is satisfied during recording Example Starts recording when the temperature reaches...

Page 88: ...at did not satisfy the trigger conditions have just satisfied Example To apply the trigger when the waveform crosses 0 V from below to above Trigger Level trigger Level 0 V Slope AND Measurement start...

Page 89: ...pre trigger Measurement will stop when the trigger activates Pre trigger 15 min Recording time 10 min Measurement start If the recording time is longer than the pre trigger Data will be measured befo...

Page 90: ...els or waveform calculation channels The following triggers are available Level triggers Window triggers Unit n n 1 2 Pulse or Waveform calculation 2 2 3 3 1 1 1 On the sub tab Unit n Pulse or Wave ca...

Page 91: ...trigger function settings You can also configure settings on the list screen without opening the settings window When Timing is set to Start a Start trigger will be set When Timing is set to Stop a St...

Page 92: ...el is crossed in the set direction Activates the trigger when the level is crossed the specified level from below Rising Activates the trigger will activate when the level is crossed the specified lev...

Page 93: ...0 1 mV 200 mV f s 0 2 mV 1 V f s 0 001 V 2 V f s 0 002 V 10 V f s 0 01 V 20 V f s 0 02 V 100 V f s 0 1 V 1 to 5 V f s 0 01 V Temperature for both thermocouples and resistance temperature detectors 10...

Page 94: ...w OUT Unit n n 1 2 2 2 3 3 1 1 1 1 1 Under Type for Start or Stop set the trigger type to Window A window trigger will be used 2 Choose between IN and OUT for the waveform IN Activates the trigger whe...

Page 95: ...the ENTER key while Logic is selected The logic trigger settings window will open 2 2 3 3 2 Under Condition select the pattern for activating the trigger OFF Does not use a pattern trigger OR Activate...

Page 96: ...l Trigger Alarm Calculation System 3 Select the P1 to P8 trigger pattern 0 Activates the trigger when the signal is 0 low 1 Activates the trigger when the signal is 1 high X Excludes from the trigger...

Page 97: ...l I O 3 to activate triggers 1 1 1 Under External trigger set the external trigger function to ON OFF ON The external trigger function will be enabled allowing you to activate triggers based on signal...

Page 98: ...l trigger select the interval trigger conditions If you wish to give priority to the interval trigger use the OR setting p 96 If you wish to give priority to other triggers use the AND setting p 96 OF...

Page 99: ...nterval time Measurement start AND Measurement start Interval time Interval time The trigger will not activate There is one enabled trigger during the interval The trigger will not activate if it does...

Page 100: ...e CH1 measured temperature reaches or exceeds 500 C capture data repeatedly until the temperature falls below 300 C No 7 Once the CH1 measured temperature reaches or exceeds 500 C capture data for the...

Page 101: ...rding time File splitting Trigger function Timing Trigger conditions Pre trigger Start trigger Stop trigger 8 OFF Specified time 0 hr 1 min 0 s OFF ON Start Start OR Condition level Level 500 C 9 OFF...

Page 102: ...ormatting Media p 103 3 3 Saving Data p 105 Auto save real time save p 106 Manual saving selective saving immediate saving p 112 Selective save operation p 114 3 4 Loading Data p 117 3 5 Managing Data...

Page 103: ...r containing waveform data Folder containing numerical calculation results SCR00001 PNG PICTURE Folder containing screen images 1 When the calculation range is set to Enable under Time split calculati...

Page 104: ...ter the scaling conversion to be displayed You can review the pre conversion waveforms if you turn off the scaling setting 2 There is a limit on the number of rows that can be loaded at once when load...

Page 105: ...er from the AC Adapter is interrupted In this way measurement can be continued without losing any data If the battery s remaining charge declines the instrument will not be able to save or load data S...

Page 106: ...SB Drive for the first time format the media 1 Press the FILE key A screen listing the files on the SD Memory Card or USB Drive will be displayed 2 Press the FILE key to select the media to be formatt...

Page 107: ...Memory Card and USB Drive with the instrument before the first use of them Using those formatted with a computer could prevent the real time saving from keeping up with measurement When formatting an...

Page 108: ...can set the type of data to save and then save it There is no need to configure settings before saving p 112 Insert an SD Memory Card or USB Drive Set SAVE key settings to Select Save p 112 Press the...

Page 109: ...be saved in the CSV format while measurement continues Although the data can be loaded using spreadsheet software it cannot be loaded by the instrument or the Logger Utility Numerical calculation res...

Page 110: ...s without specifying a filename p 100 Under Add trigger date time select whether to add date and time to the filename Adds the date and time at which the trigger activated to the waveform data filenam...

Page 111: ...Under Folder splitting select the timing at which to segment data as necessary The folders in which data is saved can be segmented based on the set period of time Disable Saves in a single folder such...

Page 112: ...ves all numerical calculation results in one file Individual calc Creates files segmented by calculation item in addition to the file containing all of the calculations together A calculation number i...

Page 113: ...treated as comments by spreadsheet software yyyy MM dd hh mm ss ms Outputs the date using the following format and treats time data less than 1 s unit ms as separate data YEAR MONTH DAY HOURS MINUTES...

Page 114: ...ard and a USB Drive are inserted ejecting the media containing data will switch the save destination over to the other media 4 Insert formatted media When you insert media into the instrument the inst...

Page 115: ...select the operation to perform when the SAVE key is pressed Select Save Displays the settings window when the SAVE key is pressed Data will be saved after you select what to save Quick save Saves dat...

Page 116: ...ed length without regard to the A B cursors A B Saves the waveform between the A and B cursors Start A Saves the waveform from the beginning to the A cursor Start B Saves the waveform from the beginni...

Page 117: ...red a file name ending in a number the trailing number will increase in increments of one for the subsequent files Example Filename ABC100 Format binary ABC100 MEM ABC101 MEM ABC102 MEM If you do not...

Page 118: ...rm between the A and B cursors Start A Saves the waveform from the beginning to the A cursor Start B Saves the waveform from the beginning to the B cursor A End Saves the waveform from the A cursor to...

Page 119: ...ot Saves the screen at the time the SAVE key is pressed PNG format Calc results Saves numerical calculation results This setting is available only when performing numerical calculations 5 When Type is...

Page 120: ...V format 1 Press the FILE key The file list screen will be displayed The file list screen provides a list of folders and files 2 2 3 3 2 Select the media on which the file you wish to load is stored w...

Page 121: ...memory specify the start point of the waveform data to load The system will load the data containing the number of data points specified in Readable data num starting at the specified point File mode...

Page 122: ...Sorting files p 124 Switching media drives This section describes how to select the media SD Memory Card or USB Drive on which to perform file operations If an SD Memory Card is inserted into the ins...

Page 123: ...ithin folders or to the next higher level 1 Press the Up Arrow and Down Arrow keys to select the folder to which you wish to move 2 Press the Right Arrow key The system will move to that folder 3 Pres...

Page 124: ...ress the SELECT key The file operations window will be displayed 2 Press the ENTER key while Delete is selected A confirmation window will be displayed 3 Press the ENTER key The file or folder will be...

Page 125: ...r folder you wish to rename with the Up Arrow and Down Arrow keys and then press the SELECT key The file operations window will be displayed 2 Press the ENTER key while Rename is selected A text entry...

Page 126: ...isplayed 2 Press the ENTER key while Copy is selected The copy destination window will be displayed 3 Select the copy destination media and folder and press the ENTER key A confirmation window will be...

Page 127: ...ed 2 Press the ENTER key while Sort is selected A window will be displayed 3 3 4 4 5 5 3 Select the sort method Name Sorts based on filename Size Sorts based on file size Type Sorts based on file type...

Page 128: ...operating systems Windows 7 Windows 8 and Windows 10 NOTICE Do not unplug the SD Memory Card or USB cable while data is being transferred Doing so may prevent the data from being properly transferred...

Page 129: ...drive mode in order to communicate with a computer via USB 2 2 1 Connect the USB cable 2 Press the ENTER key while Execute under USB drive mode is selected The instrument will switch to USB drive mod...

Page 130: ...ling USB drive mode This section describes how to cancel USB drive mode 2 2 1 Click the USB icon shown on the computer s task tray Safely Remove Hardware and Eject Media 2 Click Eject USB Drive 3 Afte...

Page 131: ...128 Acquiring Data with a Computer PC...

Page 132: ...See 8 External Control EXT I O p 173 If an alarm condition is satisfied when measurement starts the alarm will be output immediately 4 1 Configuring Alarms p 130 Setting shared alarm conditions for a...

Page 133: ...atisfied Use this setting when you wish to output an alarm only while the alarm condition is satisfied ON Once an alarm is output maintains continue the alarm output until measurement stops Use this s...

Page 134: ...This type of alarm is output without regard to other alarm conditions AND OR logic OFF ON 7 Under Wireless err for each alarm output ALM1 to ALM8 select whether to output an alarm when communication...

Page 135: ...he waveform display color OFF 24 colors 2 Under Filter select the number of data points The system will output an alarm if the alarm state continues for the set number of data points OFF 2 5 10 20 50...

Page 136: ...ngs This section describes how to configure alarm functionality for individual channels Unit n n 1 2 Settings list screen 1 1 1 Press the ENTER key while Un m m 1 2 for the channel you wish to set is...

Page 137: ...m when the measurement data falls inside the specified range As well an alarm is outputted when the waveform equals the upper limit while falling and the lower limit while rising Upper and lower limit...

Page 138: ...gic signal is 0 low High Low X Not used in alarm judgments Ignores the signal 1 1 8 8 7 7 6 6 5 5 4 4 3 3 2 2 1 1 Alarm type 5 5 Upper limit value for Alarm Window 2 2 Slope for Alarm Level 6 6 Lower...

Page 139: ...attern 3 When Logic has been set for PULSE 1 to PULSE 8 Under Conditions select the condition for activating the alarm OFF Does not use alarms based on logic signals OR Outputs an alarm when any of th...

Page 140: ...occurred 7 7 Time of cancellation Time at which the alarm was cleared The alarm memory stores up to 100 alarms The communication interruption log event record is maintained regardless of alarm settin...

Page 141: ...m With Alarm hold is set to ON press the ENTER key while Clear is selected Alarms cannot be cleared while the associated alarm conditions remain satisfied For more information about the Alarm Alarm ho...

Page 142: ...hods Pressing the START key during measurement Tapping the Mark button on the screen during measurement Inputting a signal to external control terminal I O 1 to I O 3 during measurement Configuring th...

Page 143: ...t the marks and numbers will appear on the top of the screen You can assign up to 1000 event marks for a measurement process When another measurement process starts the event numbers will be reset The...

Page 144: ...nal input 3 select Event input 2 Under Start select the slope at which to assign the event mark Assigns the event mark at the pulse s rising edge Assigns the event mark at the pulse s falling edge 3 I...

Page 145: ...bes how to assign event marks when alarms occur This function must be configured before measurement begins 1 1 1 Under Event mark select whether to add an event mark when an alarm occurs OFF ON If you...

Page 146: ...ent mark settings will be displayed 3 Under Move No specify the number of the event mark to which you wish to jump 4 Press the ENTER key while Move is selected The display will move to the event mark...

Page 147: ...5 Reviewing Events in CSV Data When you save waveform data in CSV text format with the instrument event numbers will be included next to the measurement data You can review which events were associat...

Page 148: ...functionality allows you to perform calculations on waveforms for example by adding or multiplying waveforms from different channels 6 1 Performing Numerical Calculations p 146 Configuring numerical c...

Page 149: ...recent calculated values on the waveform screen Wave Value display You can also save calculated values for each interval in text CSV format Observe data Performing calculations after measurement Manu...

Page 150: ...ed every 10 min When Time split calculation is set to Enable Under Split time set the time interval at which to perform the calculation 0 Days 00 01 to 30 Days 23 59 If Time split calculation is set t...

Page 151: ...e measured value crosses the threshold value in the rising direction OFF count Calculates the number of times the measured value crosses the threshold value in the falling direction Calculates the tim...

Page 152: ...and the part of the signal waveform where its amplitude is negative Positive Calculates the integration or area enclosed by the zero position and the part of the signal waveform where its amplitude i...

Page 153: ...lts will be displayed allowing you to review the calculation results at any given point in time 5 Select a numerical calculation of which you wish to display the result You can select a numerical calc...

Page 154: ...urement completes configure the numerical calculation See Configuring numerical calculations p 147 3 Press the WAVE key to display the Wave Value screen 3 3 4 4 5 5 4 Set the numerical display on the...

Page 155: ...l be displayed 3 Select the range over which to perform the calculation All Performs the calculation using the waveforms for the entire recorded length without regard to the A B cursors A B Performs t...

Page 156: ...um value Time to min Calculates how long s it took for the waveform to reach the minimum value from the start of recording If the minimum value occurs at 2 or more points the first time the waveform t...

Page 157: ...ates the integration between the cursors S Integral value n Total number of data points di ith data point for channel t Sampling period di t S i 1 n di 0 Only the area where the amplitude is positive...

Page 158: ...arithmetic operations integration simple average moving average and integral Calculations are performed in real time while measurement continues and post calculation waveforms are displayed Waveform c...

Page 159: ...o perform calculations 4 Select the waveform display color OFF 24 colors Select if you wish to perform the waveform calculation but not to display the waveform on the screen 5 Select a calculation cha...

Page 160: ...total Set the channel Reset start time and Reset time 8 When Four arithmetic is selected Specify constants target channels and operators Calculation expression A CHa B CHb C CHc D CHd E A B C D E User...

Page 161: ...results when a trigger activates 10 When Type is set to Aggregation Simple average or Integration Under Reset time select when to perform reset operation Disable Does not reset calculation results En...

Page 162: ...n 3 3 Num of decimal places Number of decimal places for measured values This setting is not displayed when Number display format is set to Standard 4 4 Unit Unit for waveform calculation results 5 5...

Page 163: ...en Calculation list screen Formula 3 3 2 2 1 1 1 Set the display to Formula Formula Display Comment Numerical calc 2 You can cycle through the calculation channel to display Press the ENTER key while...

Page 164: ...the other calculation channels W2 to W30 2 2 3 3 1 1 1 Press the ENTER key while Copy is selected The settings window will open 2 Select the checkbox for the Copy to The source cannot be changed from...

Page 165: ...ings for all waveform calculations 2 2 1 1 1 Select the waveform calculation ON OFF checkbox and press the ENTER key Each time you press the ENTER key all calculation channels will toggle between ON a...

Page 166: ...em screen provides the functionality described below 7 1 Configuring Settings p 164 7 2 Controlling the System p 167 Setting the time p 167 Synchronizing the time p 168 Initializing resetting the syst...

Page 167: ...ile in the start retention state data that was stored in the instrument s internal buffer memory before the power outage will be deleted 2 Under Backlight saver select how long to wait after the last...

Page 168: ...le soon 5 Under Waveform background color select the background color for the waveform screen Dark Light Dark Light 6 Under Beep sound select whether to beep when a warning or error occurs ON OFF 7 Un...

Page 169: ...select the same frequency 50 Hz or 60 Hz as the power supply frequency in the region where the instrument is being used When using the U8550 to U8553 modules power supply noise can be rejected by usin...

Page 170: ...Set the time if the displayed time diverges from the actual time The time is used when starting measurement start trigger time and in file information 1 1 2 2 4 4 3 3 1 Press the ENTER key while Clock...

Page 171: ...e NTP server and set the time OFF Does not set the time Every hour Sets the time once an hour Every day Sets the time once a day 4 Under Sync before start select whether to connect to the NTP server a...

Page 172: ...all non LAN settings to their default values Unit registration information Deletes information for all registered wireless modules Waveform data Deletes waveform data Communication Resets LAN settings...

Page 173: ...and Right Arrow keys Main Model The instrument s model number LR8450 or LR8450 01 Serial No The instrument s serial number Main version The instrument s software version Unit Unit No Measurement modul...

Page 174: ...been checked You can force quit the self check in the event of a malfunction by pressing the ESC key twice LCD Checks the screen display The screen will cycle through the following colors and then ret...

Page 175: ...172 Controlling the System...

Page 176: ...on the System External settings screen The external control terminals are not isolated they use the same ground as the instrument For more information about how to connect signals to the external con...

Page 177: ...tage Output Connections in the Quick Start Manual 1 1 1 Under Voltage output 1 and Voltage output 2 select the voltage OFF Does not generate voltage output 5 V Outputs 5 V DC 12 V Outputs 12 V DC 24 V...

Page 178: ...putting an alarm Low Outputs the alarm at low level 0 V to 0 5 V High Outputs the alarm at high level 4 0 V to 5 0 V Alarm output terminal specifications Output type Open drain output with 5 V voltage...

Page 179: ...with the contact configuration to perform the desired operation The example connection illustrates a circuit in which the relay will operate when the alarm output is low VOUTPUT Max 200 mA Max 100 mA...

Page 180: ...measurement Same operation as the START key This setting is not available for External input 3 Stop Stops measurement Same operation as the STOP key This setting is not available for External input 3...

Page 181: ...ng or falling edge depending on the edge setting High 2 5 V to 10 V Low 0 V to 0 8 V 2 5 ms or greater 2 5 ms or greater 100 k GND 2200 pF 5 V 10 k 5 V I O 3 I O 2 I O 1 External output terminal I O 4...

Page 182: ...set the terminal functionality to Trigger input When External trigger is set to ON the parameter will be set to Trigger input See 2 5 Applying Triggers Based on External Sources p 94 2 Select the edge...

Page 183: ...when a trigger activates You can use this capability to notify another device that the instrument has started recording The external output I O 4 terminal is used for this functionality 1 1 1 Under E...

Page 184: ...will switch to non active when measurement stops Stop Measurement start Stop trigger activated Acquisition complete To next measurement Minimum pulse width Trigger output waveform 10 ms or greater Tri...

Page 185: ...84 Set External trigger to ON for all the instruments p 94 Set External input 3 to Trigger input and the edge to for all the instruments p 179 Set External output to Trigger output for all the instrum...

Page 186: ...the Logger Utility p 185 9 2 Configuring and Establishing a USB Connection p 186 9 3 Configuring and Establishing a LAN Connection p 189 9 4 Exporting Acquired Data to a Computer Over Wireless LAN p...

Page 187: ...programs written in languages such as Visual Basic 2 p 229 1 Not available during measurement using programs written in languages such as Visual Basic 2 Real time data cannot be acquired at a recordin...

Page 188: ...h the instrument You can analyze measurement data You can convert measurement data from binary format to CSV format Supported models LR8450 LR8450 01 LR8400 LR8401 LR8402 LR8410 LR8416 LR8431 LR8432 8...

Page 189: ...ndows 7 or Windows 8 Run DriverSetupWin7Win8 msi on the CD If you have already installed the Logger Utility you can run the file from the following location c Program Files x86 HIOKI LoggerUtility Dri...

Page 190: ...ontinue will be displayed Click Yes to continue A dialog box asking for permission to install the software will be displayed Select the Always trust software from HIOKI E E CORPORATION checkbox and cl...

Page 191: ...function or damage it Ensure the instrument and computer are grounded at the same potential Connecting the USB cable while the ground potentials differ between the instrument and computer could cause...

Page 192: ...r device on the LAN or incorrect address data to be sent to the network Checking settings before connecting the instrument Different settings are used depending on whether you wish to connect the inst...

Page 193: ...e set automatically Subnet mask Divides the IP address into one part that indicates the network and another that indicates the instrument Use the same setting as other devices that are connected to th...

Page 194: ...8 1 0 24 network address or 192 168 1 1 private IP address Subnet mask 255 255 255 0 The IP address can be set as desired but use of a private IP address is recommended Windows 7 Windows 8 or Windows...

Page 195: ...Connection Configuring the instrument s LAN settings 1 1 2 2 1 Configure the settings See Configuring LAN settings p 194 2 Press the ENTER key while Apply is selected The LAN connection will be enable...

Page 196: ...nd connect to the network The instrument will connect to the network using the previously configured IP address When the instrument has been assigned a name Host name Settings if on same network DHCP...

Page 197: ...ER IP address Set the instrument s IP address _ _ _ _ _ 0 to 255 example 192 168 1 2 Subnet mask _ _ _ _ _ 0 to 255 example 255 255 255 0 Port number Set the number of the TCP IP port used by the inst...

Page 198: ...er via a hub This section describes how to connect the instrument to a local network without any external connections It is recommended to use a private IP address Configure the settings as follows so...

Page 199: ...could cause the instrument to malfunction or damage it Connect the LAN cable securely Failure to do so could cause the instrument to malfunction or damage it If routing the LAN cable outdoors or over...

Page 200: ...ble to the LAN connector on the instrument 2 Connect the other end of the cable to the computer s LAN connector 9642 LAN Cable Connecting multiple instruments to a computer via a hub You will need 964...

Page 201: ...the R key at the same time The Run dialog box will be displayed 2 Enter CMD and press the ENTER key The CMD exe window will open 3 Once the cursor starts flashing enter ping XXX XXX X X using the IP...

Page 202: ...atures that take advantage of wireless LAN communications When you select the station function the following functions will be enabled Setting configuration and recording control using communication c...

Page 203: ...cess point Press the ENTER key while Search is selected to search wireless equipment close to the instrument for their SSIDs Choose the SSID you wish to connect to 5 Under Security select an encryptio...

Page 204: ...program written in a language such as Visual Basic Connecting to the HTTP server This section describes how to connect to the HTTP server using a computer 2 2 1 Launch Internet Explorer on the compute...

Page 205: ...TTP1 1 through proxy connections 3 Under LAN settings on the Connections tab disable the Proxy server setting Check whether you can communicate with the instrument over the LAN connection See Troubles...

Page 206: ...lock pressing and holding the ESC key are ignored 3 3 Screen refresh time 4 4 2 2 1 Launch Internet Explorer on the computer 2 Enter the instrument s address into the address bar for example 3 Click...

Page 207: ...r 3 3 5 5 4 4 6 6 2 2 1 Launch Internet Explorer on the computer 2 Enter the instrument s address into the address bar for example 3 Click START STOP The START STOP screen will be displayed 4 Click ST...

Page 208: ...or which to display comments and click SETTING Channel comments for the selected module will be displayed 5 Enter a title comment and click TITLE COMMENT SET The title comment entered in the browser w...

Page 209: ...a network You can use an FTP client on a computer to download files from an SD Memory Card or USB Drive connected to the instrument You ll connect to the HTTP server from a computer 3 3 4 4 2 2 1 Laun...

Page 210: ...FTP authentication p 208 If connection limits have been set to OFF under the instrument s FTP HTTP authentication settings setting you cannot perform any file operation including deletion of files but...

Page 211: ...TP server connection limitations FTP authentication This section describes how to impose limitations on FTP HTTP server connections Ordinarily all devices on the network can access the instrument s FT...

Page 212: ...d Password used when connecting to the instrument from an FTP client or HTTP user agent String of up to 12 single byte characters The password will be displayed as 4 Under Time difference correction s...

Page 213: ...Under Format in the Waveform data area set the auto saving type to Binary or Text Under Format in the Numerical calculation results area set the auto saving type to Text To send data at a regular int...

Page 214: ...rn Windows features on or off The Windows Features dialog box will be displayed 3 Click on the left side of Internet Information Services to expand the view Click on the left side of FTP Server to exp...

Page 215: ...212 Sending Data Using the FTP Client Configuring FTP Windows 7 1 Click Control Panel System and Security 2 Click Administrative Tools 3 Double click Internet Information Services IIS Manager...

Page 216: ...ocked depending on how any security software for example a firewall has been configured 5 Enter the FTP site name Example ftp In Physical path under Content Directory specify the location where data f...

Page 217: ...4 Sending Data Using the FTP Client 7 Set Authentication and Authorization Information as follows Authentication Select Basic Authorization All users Permissions Select both Read and Write Click Finis...

Page 218: ...ent Unit Measure Channel Trigger Alarm Calculation System Enabling FTP traffic with the firewall Windows 7 1 Click Control Panel System and Security 2 Click Windows Firewall 3 Click Advanced settings...

Page 219: ...ght click FTP server FTP Traffic In and click Properties in the shortcut menu The FTP Server FTP Traffic In Properties dialog box will be displayed 5 Select Enables on the General tab and then click O...

Page 220: ...ulation System Configuring accessing users Windows 7 1 Click Control Panel System and Security Administrative Tools 2 Double click Computer Management 3 Right click Users under Local Users and Groups...

Page 221: ...the username in the User name and Full name fields and the password in the Password and Confirm password fields Select the Password never expires checkbox Click Create 5 Verify that the set username h...

Page 222: ...en 2 Select Users under Group or user names on the Security tab and click Edit The Permissions for ftproot dialog box will open 3 Select Allow for Full control under Permisisons for Users and click OK...

Page 223: ...he left side of Internet Information Services to expand the view Click on the left side of FTP Server to expand the view and select FTP Service Click on the left side of Web Management Tools to expand...

Page 224: ...nel 2 Click Administrative Tools 3 Double click Internet Information Services IIS Manager 4 Right click the item displayed under Connections on the left side of the screen and click Add FTP Site on th...

Page 225: ...ion where data from FTP clients should be saved Click Next 6 Set Binding and SSL as follows IP Address All Unassigned Port 21 Start FTP site automatically Select SSL No SSL Click Next 7 Set Authentica...

Page 226: ...elds on the instrument s FTP client settings screen See 2 Configure the settings p 226 1 Select Computer Management from Administrative Tools in Step 5 p 221 2 Right click Users under Local Users and...

Page 227: ...der System and Security in step 1 p 221 5 Select FTP Server Select whether you are using a private or public connection to the instrument Restarting the FTP server Restart Microsoft FTP Service under...

Page 228: ...atically on instrument media to an FTP server on a computer Instructions This examples describes how to send data to an FTP server with the IP address 192 168 1 1 Instrument Example 192 168 1 2 Comput...

Page 229: ...aracters example LOGGER The password will be displayed as Save directory Specify the directory on the FTP server in which to save data Default setting serial number of the instrument String of up to 3...

Page 230: ...identifiers whose checkboxes are selected under Filename identifier will be added to the filename 2 Press the ENTER key while Send test is selected The test file FTP_TEST TXT will be sent to C Intpub...

Page 231: ...section describes how to check the FTP communications status You can display the number of files sent by FTP the number of transmission errors and other statistics 1 1 2 2 1 Press the ENTER key while...

Page 232: ...cable p 188 See Connecting the instrument to a computer with a LAN cable p 196 The instrument must be configured in order to control it using communication commands 2 2 3 3 4 4 1 1 1 Press the ENTER k...

Page 233: ...230 Controlling the Instrument with Communication Commands...

Page 234: ...24 hour clock Clock precision Precision of clock displayed by instrument as well as start stop times 1 0 s day at 23 C Time can be synchronized with an NTP server to which instrument is connected Time...

Page 235: ...AC Adapter rated power supply frequency 50 Hz 60 Hz Battery LR8450 accommodates 2 batteries Z1007 Battery Pack When used with AC Adapter AC Adapter has priority Li ion 7 2 V 2170 mAh External power su...

Page 236: ...LAN IEEE 802 11b g n Communications range 30 m line of sight Encryption function WPA PSK WPA2 PSK TKIP AES Usable channels 1 to 11 Auto connect function Wireless LAN function can be toggled on and of...

Page 237: ...od 2 5 ms or greater Functionality Choose from off start stop start stop trigger input event input Output Output format Open drain output with 5 V voltage output Output voltage High level 4 0 V to 5 0...

Page 238: ...ous Specified time The recording time is set in days hours minutes and seconds The time can be set up to the maximum capacity of the internal buffer memory total of 256 M data points Continuous Record...

Page 239: ...of decimal places to display can be set values will then be rounded to the set number of places Waveform colors 24 colors Zooming in and out on the waveform display Horizontal axis 2 ms 5 ms 10 ms 20...

Page 240: ...ed in its own file starting with the start of measurement Segmentation time Day hour or minute user selectable External media eject SD Memory Card USB Drive External media can be ejected during real t...

Page 241: ...ecording has stopped Calculations performed for all data in the internal buffer memory or for data in a calculation range specified by the A B cursors on the vertical axis Time segmentation calculatio...

Page 242: ...er activated when patterns of 1 0 X match where X indicates either Interval triggers Trigger activated for set recording interval after setting days hours minutes seconds External triggers Trigger act...

Page 243: ...ither Alarm filter Apply a filter to the results of AND OR operations performed on alarm sources Set based on sample count Off 2 to 1000 The system will output an alarm if the alarm state continues fo...

Page 244: ...er selectable Pulse integration Set by physical value per pulse or number of pulses per physical value user selectable Pulse rotational speed Set by conversion rate or by 2 points user selectable Temp...

Page 245: ...filter off 200 s or greater 100 s or greater during high and low interval With filter on 100 ms or greater 50 ms or greater during high and low interval Slope Set rising falling for each channel Meas...

Page 246: ...134W 70H 63D mm 5 28 W 2 76 H 2 48 D including cover Mass Approx 345 g 12 2 oz Product warranty period 3 years Accessories Instruction Manual Installation screws 2 Options Z2000 Humidity Sensor 2 Inpu...

Page 247: ...y is automatically set as described in the following table according to the data refresh interval Wire break detection setting and power supply frequency filter setting Setting not available Power sup...

Page 248: ...Greater than or equal to 200 C and less than 100 C 1 4 C Greater than or equal to 100 C and less than 0 C 0 7 C Greater than or equal to 0 C and less than or equal to 500 C 0 5 C 2000 C f s 0 1 C Gre...

Page 249: ...7 C Greater than or equal to 0 C and less than or equal to 100 C 0 5 C 500 C f s 0 05 C Greater than or equal to 200 C and less than 100 C 1 4 C Greater than or equal to 100 C and less than 0 C 0 7 C...

Page 250: ...han or equal to 1700 C 2 2 C S 100 C f s 0 01 C 0 C to 100 C 4 4 C 500 C f s 0 05 C Greater than or equal to 0 C and less than 100 C 4 4 C Greater than or equal to 100 C and less than 300 C 2 9 C Grea...

Page 251: ...dB or greater With 50 Hz input power supply frequency filter of 50 Hz and a data refresh interval of 5 s With 60 Hz input power supply frequency filter of 60 Hz and a data refresh interval of 5 s With...

Page 252: ...Humidity Sensor 2 Input output and measurement specifications 1 Basic specifications Number of input channels 15 Set voltage thermocouple humidity resistance temperature detector or resistor for each...

Page 253: ...sabled and not set for Pt1000 measurement 2 Setting available when not set for Pt1000 measurement Digital filters The digital filter cutoff frequency is automatically set as described in the following...

Page 254: ...Greater than or equal to 200 C and less than 100 C 1 4 C Greater than or equal to 100 C and less than 0 C 0 7 C Greater than or equal to 0 C and less than or equal to 500 C 0 5 C 2000 C f s 0 1 C Gre...

Page 255: ...7 C Greater than or equal to 0 C and less than or equal to 100 C 0 5 C 500 C f s 0 05 C Greater than or equal to 200 C and less than 100 C 1 4 C Greater than or equal to 100 C and less than 0 C 0 7 C...

Page 256: ...Greater than or equal to 100 C and less than 300 C 2 9 C Greater than or equal to 300 C and less than or equal to 500 C 2 2 C 2000 C f s 0 1 C Greater than or equal to 0 C and less than 100 C 4 4 C Gr...

Page 257: ...ree for humidity see humidity accuracy table Normal mode rejection ratio 50 dB or greater With 50 Hz input power supply frequency filter of 50 Hz and a data refresh interval of 5 s With 60 Hz input po...

Page 258: ...on Manual Installation screws 2 Options Z2000 Humidity Sensor 2 Input output and measurement specifications 1 Basic specifications Number of input channels 30 Set voltage thermocouple or humidity for...

Page 259: ...is enabled and the number of channels in use ranges from 1 to 15 Digital filters The digital filter cutoff frequency is automatically set as described in the following table according to the number of...

Page 260: ...1 year Accuracy guarantee temperature and humidity range 23 C 5 C 73 F 9 F 80 RH or less Warm up time At least 30 min after connecting to the LR8450 LR8450 01 Memory HiLogger and turning on the instru...

Page 261: ...s 0 05 C Greater than or equal to 200 C and less than 100 C 1 4 C Greater than or equal to 100 C and less than 0 C 0 7 C Greater than or equal to 0 C and less than or equal to 500 C 0 5 C 2000 C f s...

Page 262: ...er than or equal to 0 C and less than or equal to 100 C 0 5 C 500 C f s 0 05 C Greater than or equal to 200 C and less than 100 C 1 4 C Greater than or equal to 100 C and less than 0 C 0 7 C Greater t...

Page 263: ...1700 C 2 2 C S 100 C f s 0 01 C Greater than or equal to 0 C and less than or equal to 100 C 4 4 C 500 C f s 0 05 C Greater than or equal to 0 C and less than 100 C 4 4 C Greater than or equal to 100...

Page 264: ...ly frequency filter of 50 Hz and a data refresh interval of 5 s With 60 Hz input power supply frequency filter of 60 Hz and a data refresh interval of 5 s With thermocouple wire break detection disabl...

Page 265: ...cover Mass Approx 237 g 8 4 oz Product warranty period 3 years Accessories Instruction Manual Installation screws 2 2 Input and measurement specifications 1 Basic specifications Number of input chann...

Page 266: ...l filters p 263 Measurement range maximum resolution measurable range and measurement accuracy figures Measurement target Type Range Maximum resolution Measurable range Measurement accuracy Voltage 10...

Page 267: ...fect of radiated radio frequency electromagnetic field 5 f s 80 MHz to 1 GHz 10 V m 1 GHz to 6 GHz 3 V m in the 10 V f s voltage range Effect of conducted radio frequency electromagnetic field 5 f s a...

Page 268: ...t output and measurement specifications 1 Basic specifications Number of input channels 5 Set voltage or strain for each channel Input terminals Push button type terminal block 5 terminals per channel...

Page 269: ...in the following table based on the set data refresh interval Data refresh interval 1 ms 2 ms 5 ms 10 ms 20 ms 50 ms 100 ms 200 ms 500 ms 1 s 2 s 5 s 10 s 120 Hz 60 Hz 30 Hz 15 Hz 8 Hz 4 Hz 4 Hz 4 Hz...

Page 270: ...000 to 20 000 100 50 000 f s 2 5 50 000 to 50 000 250 100 000 f s 5 100 000 to 100 000 500 200 000 f s 10 200 000 to 200 000 1000 Temperature characteristics Gain 0 05 f s per C Zero position Voltage...

Page 271: ...268 Plug in Module Specifications...

Page 272: ...otive force increases gradually from 250 C to 600 C producing a large error in a comparatively short period of time 1 hr or less This unavoidable phenomenon is caused by the device s physical characte...

Page 273: ...his connection method a reference strain gage is affixed to a specimen made of the same material as the measurement target that is not being subjected to stress Apparent strain resulting from temperat...

Page 274: ...re method i True strain value Strain value measured by instrument i 2 000 000 4 000 000 2 2 000 000 100 000 4 000 000 2 100 000 200 000 106 3 800 000 52632 Example waveform calculation settings For fo...

Page 275: ...ffected by temperature changes of the measurement target or tension compression bending strain Use a scaling conversion ratio slope of 1 4 Even in measurements that are affected by temperature you can...

Page 276: ...unit gf mm2 Set the scaling conversion ratio s slope to this value See 1 5 Using the Scaling Function p 42 Mechanical properties of industrial materials Material Longitudinal elasticity modulus Young...

Page 277: ...5 120 120 35 120 1 003 i True strain value Strain value measured by instrument Set the scaling conversion ratio s slope to 1 003 See 1 5 Using the Scaling Function p 42 If the instrument LR8450 01 an...

Page 278: ...ine frequency you can obtain a high level of noise rejection performance by setting the cutoff frequency so that it matches the power supply s line frequency For more information about the cutoff freq...

Page 279: ...ks to input signal lines Routes by which an alternating field is coupled to a loop in the input signal line by the power supply line current Routes created by coupling due to capacitance between the i...

Page 280: ...alternating field generated by an inverter or commercial power line is coupled with an instrument s input line loop Electrostatic induction noise caused by capacitive coupling between wires Capacitiv...

Page 281: ...ding electrode Ensure the measurement target s chassis is grounded reliably Ensure the measurement target s chassis is reliably connected to a suitable ground Measurement module Z2 Z1 Vin Device under...

Page 282: ...se current i1 i2 The effect on measured values will be reduced since normal mode voltage is limited Blocking external noise Keep signal lines away from noise sources Keep input signal lines thermocoup...

Page 283: ...from the enclosure and from each other You can measure a conductor with a potential by directly affixing a thermocouple up to the maximum rated terminal to ground voltage Effective methods for dealing...

Page 284: ...ut of the device s internal circuitry Use a capacitor whose rated voltage is greater than the voltage being input Since the filter is applied before channels are scanned there are no limitations on th...

Page 285: ...le LR8533 Wireless High Speed Voltage Module All input channels are scanned within the set data refresh interval Scanning starts with CH1 and then proceeds in order through all channels for which meas...

Page 286: ...refresh interval of 10 ms measurement on for CH1 CH5 and CH15 wire break detection off Only channels for which measurement is enabled are scanned channels for which measurement is disabled are not sc...

Page 287: ...CH2 CH30 Example Data refresh interval of 20 ms measurement on for CH1 to CH10 and CH21 to CH30 wire break detection off Only channels for which measurement is enabled are scanned channels for which...

Page 288: ...ms CH1 CH2 CH3 CH4 CH5 CH1 Example Data refresh interval of 1 ms measurement on for CH1 and CH5 Only channels for which measurement is enabled are scanned channels for which measurement is disabled a...

Page 289: ...reated automatically In delete and save operation the oldest waveform files are deleted first Once all of the waveform files in the dated folder have been deleted the folder will be automatically rena...

Page 290: ...M2 ALM SOURCE 1 A1 ALM SOURCE 2 A1 W1 V Event 12 0 000000000E 00 3 3250000000E 02 0 0 6 6500000000E 02 0 13 1 000000000E 01 2 8500000000E 02 1 0 80000000H 5 7000000000E 02 0 2 000000000E 01 9 60000000...

Page 291: ...t and logic output are represented by two characters 8 bits The letter H is added at the end Example When U1 1 issues an alarm the alarm source output is represented by 0x80000000H Logic When a channe...

Page 292: ...tion channels 7 number of alarm headers 1 1 If alarms are enabled 16 if not 0 Binary header size 512 1609 number of alarm headers 2 2 If alarms are enabled 176 if not 0 Data size Number of measurement...

Page 293: ...Continuous Alarm source OFF Auto save File name Add trigger date time OFF Media SD card Waveform data Format OFF Downsampling OFF Deleting OFF Folder splitting Disable File splitting Disable Numerica...

Page 294: ...F Stop OFF Alarm Common Alarm OFF Alarm hold OFF Alarm buzzer OFF Event mark OFF Alarm 1 8 ALM1 to ALM8 Filter OFF Comment Module ALM OFF Calculation Numerical Numerical calculation OFF Waveform Wavef...

Page 295: ...r memory 256 Mwords 512 1024 1024 2 Data size as described in 11 8 File Size p 289 Maximum recording times rough estimates Example Measuring 30 analog channels with 2 modules no alarm output no wavefo...

Page 296: ...able and a 250 shunt resistor Instructions 1 Connect the input cable and the 250 shunt resistor to the channel being measured Connect the shunt resistor between the positive and negative input termina...

Page 297: ...follows Media SD card Format Waveform data Binary Format Numerical calculation results Text 6 On the Calculation Numerical screen configure the settings as follows Numerical calculation ON Time split...

Page 298: ...nge in which the 10 V range s display range lower and upper limits are set to 1 V and 5 V respectively If you wish to change the upper and lower limit values use 10 V range 5 V 1 V 8 Press the START k...

Page 299: ...measuring the pulse output from a watt hour meter 50 000 pulses per kWh and recording the power consumption every 30 min and every month 30 days on the SD Memory Card You will need An input cable Ins...

Page 300: ...297 Application Measurement 3 3 3 3 3 Configure the settings as follows Media SD card Format Binary 11 Knowledge and Information...

Page 301: ...of watt meter 5 5 Filter ON 6 6 Scaling Decimal 1 kWh 5000 5 k Unit kWh To prevent false counting caused by chatter You can use the scaling function to convert the pulse count to energy kWh 10000 kW...

Page 302: ...52 LR8530 LR8531 LR8532 Voltage 10 mV f s to 2 V f s ranges thermocouple Channel switching relay Voltage 10 V f s to 100 V f s ranges 1 5 V f s range humidity Channel switching relay 1 M Resistance te...

Page 303: ...el switching relay Constant current circuit Constant current circuit SoL terminal is common to all channels Analog input circuit U8553 LR8533 Voltage 100 mV f s to 2 V f s ranges Channel switching rel...

Page 304: ...8554 LR8534 1 M 1 M 120 120 120 1 2 V 0 8 V 3 1 2 2 5 V 2 2 V 2 5 V 2 2 V Pulse input circuit 100 k Example connection to PLC output negative common output 5 V 5 V 1 1 M 22 pF If the chatter preventio...

Page 305: ...00 mV 0 163835 0 16384 0 163825 200 mV 0 32767 0 32768 0 32765 1 V 1 63835 1 6384 1 63825 2 V 3 2767 3 2768 3 2765 10 V 16 3835 16 384 16 3825 20 V 32 767 32 768 32 765 100 V 163 835 163 84 163 825 1...

Page 306: ...n performing calculations the values in the table above are treated as follows Included in calculation Not included in calculation Calculation type OVER OVER NO DATA Wire break detection Numerical cal...

Page 307: ...how to display the certification number built into the instrument Instructions 1 Press and hold the QUICK SET key for at least 3 s and release The certification number will be displayed The instrument...

Page 308: ...ion 106 Data refresh interval 13 Date format 110 Decimal symbol 109 Delete 121 Deleting delete and save 108 Delimiter 109 Digital filter characteristics 275 Display colors 19 21 Downsampling thin and...

Page 309: ...SOR key 69 Scroll icon 61 Scrolling 69 Search 72 Searching waveforms 72 Selective save 105 114 SELECT key 70 121 Self check 171 Serial No 170 Quick Setting measurement conditions 10 Settings at once 5...

Page 310: ...em 163 System configuration 170 System reset initializing the system 169 290 T Temperature measurement 269 Temperature resistance temperature detector 24 Temperature thermocouple 21 Text 106 287 Text...

Reviews: