Chapter 7 Setting Robots
80
3.
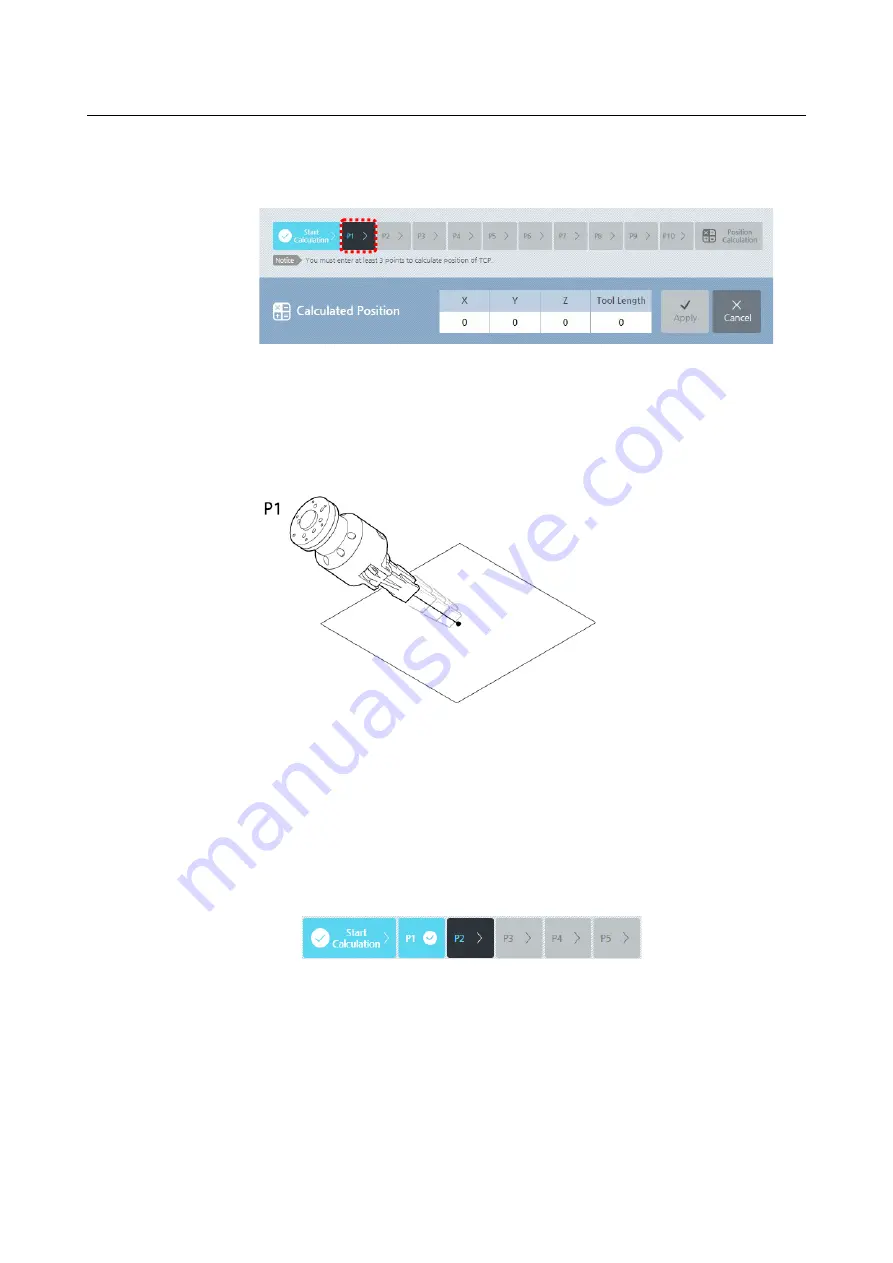
Press the
P1
button when it is activated.
If you press the
P1
button, the
Manual Move
screen will appear.
4.
While pressing down the
Direct Teaching
button in the
Manual Move
screen,
move the robot arm to place the tip of the tool right at the reference point.
For more descriptions on the
Manual Move
screen, refer to 5.3 Manual Move
Screen.
5.
In the
Manual Move
screen, press the
OK
button.
6.
When the
P2
button is activated, repeat steps 3 through 5.
An error will occur if the previously inputted coordinate and the currently
inputted coordinate do no differ by more than 10
°
. The point button with errors
will be marked in red. If an error occurs, then you need to change and reset the
angle for that point.
The more the point data is, the more accurate the calculation result becomes.
You can set the maximum 10 points.
Summary of Contents for HCR-5
Page 1: ...HCR 5 Collaborative Robot User Manual Aug 2019 V 2 001 ...
Page 2: ......
Page 14: ......
Page 96: ...Chapter 8 Safety Settings 96 ...
Page 101: ...Chapter 8 Safety Settings 101 3 Press the OK button ...
Page 188: ...Chapter 15 Maintenance 188 4 When the confirmation window appears press YES ...
Page 192: ...192 Appendix B Certification Safety ...
Page 193: ...193 ...
Page 194: ...194 MD Machinery Directive ...
Page 195: ...195 LVD Low Voltage Directive ...
Page 196: ...196 EMC Electro Magnetic Compatibility ...
Page 197: ...197 Cleanroom Body ...
Page 198: ...198 Cleanroom Controller ...
Page 199: ...199 Appendix C Dimensions for Installation ...
Page 205: ......


