


3
How
to
Read/Refer
to
This
manual
Easy
Search/Contents/
Precautions
73
R
in
g
V
o
lu
m
e
M
a
k
in
g
C
a
lls
/R
e
c
e
iv
in
g
C
a
lls
Use
to adjust the volume
・
Step ······················The ring tone is silent for about three seconds, and then the volume steps up
every three seconds, from Level 1 through Level 6.
・
Levels 1 to 6 ········Level 1 is the weakest volume and Level 6 the loudest.
・
Silent ····················The ring tone does not sound.
●
Following icons are displayed while the ring volume is set to “Silent”:
: The ring volume for voice calls or video-phone calls is “Silent”.
: The ring volume for mail, chat mail or Messages R/F is “Silent”.
: The ring volume for voice calls, video-phone calls, mail, chat mail, and Messages R/F is
“Silent”.
2
●
You cannot adjust the ring volume during ringing.
●
Even if the ring volume for mail, chat mail, or Messages (R/F) is set to other than “Silent”, “
” is displayed and the ring tone does
not sound while “Mail/Msg. ring time” (see page 116) is set to “OFF”.
You can adjust the ring volume for incoming calls and mail.
Incoming call Ring volume Select an item to be set
・
Phone (Voice call)
・
Video-phone
・
Mail (the ring volume for incoming i-mode mail and SMS messages.)
・
Chat mail
・
MessageR
・
MessageF
1
<Ring Volume> Menu 50
Adjusting Ring Volume
Information
Setting at purchase
Level 4
During ringing
●
The FOMA phone makes three rapid beeps for confirmation and the incoming call is put on
hold.
●
The confirmation tone does not sound when “Phone” of “Ring volume” is “Silent” or while
Manner Mode is activated.
●
The other party hears the hold tone set for “On hold tone” of “Call response setting”.
For video-phone calls, the still image set for “On hold” of “Select image” is displayed.
Press
to release hold and answer the call.
●
If a voice call is on hold, you can release hold also by pressing
.
●
If “Answer setting” is set to “Any key answer”, you can release hold by pressing any key of
through
,
,
,
,
,
,
,
,
and
.
1
●
If you press
or the caller on hold hangs up during answer-hold, the call will be disconnected.
●
The caller is charged for the call even during answer-hold.
●
If you have set “Open phone” to “Answer”, you cannot put an incoming call on hold while the FOMA phone is closed.
<On Hold>
Putting an Incoming Call on Hold
Information
57
In
te
rn
a
tio
n
a
l
D
ia
l
S
e
tti
n
g
M
a
k
in
g
C
a
lls
/R
e
c
e
iv
in
g
C
a
lls
You can store up to three country codes.
Other settings Int’l dial setting Country Code setting
Select <Not recorded>
(
)
●
To edit the stored country name, select it.
●
Select a stored item from the display on the left and press
; then its contents are dis-
played.
1
Enter a country name
Enter a country code
●
You can enter up to 8 full-pitch or 16 half-pitch characters for a country name.
●
You can enter up to 5 digits for a country code. But you cannot use #,
, and +.
2
Storing/Editing Country Code
Setting at purchase
アメリカ
(U.S.A.), +1
Operations
Enter a country name
Enter a country code
YES
※
Enter your Terminal Security Code
YES
※
While a country code setting item is displayed
(
)
Select and operate each function below.
1
Function menu
Edit
Delete this
Delete all
Explanation
●
You can enter up to 8 full-pitch or 16 half-pitch
characters for a country name.
●
You can enter up to 5 digits for a country
name. But you cannot use #,
, and +.
●
You cannot delete the country code set by
“Auto assist setting”.
Other settings Int’l dial setting Country Code setting
Select a country name
1
Confirming Country Code
※
To cancel: “NO”
Function Menu while Country Code Setting is Displayed
You can make a call by replacing the “+” in the phone number with the international access code.
This setting is valid only when the “+” is at the beginning or the phone number begins with “31#+” or
“#31#+”*.
When you are entering a phone number for dialing or storing it in the Phonebook, press and hold
for at least one second to enter “+”.
Enter a phone number,
or bring up a Phonebook entry, redial item, dialed call record, or received call record.
1
(
) International dial
●
Press
(
) or
to make an international call (or video-phone call).
2
Next Page
282
i-
α
p
p
li
L
a
u
n
c
h
i-
α
p
p
li
Software list
(
) Select
and operate
below.
each function
1
You can set whether to launch the i-
α
ppli from sites or mail.
You can set this for each software program.
Put a check mark for the items to be set
・
Site ”i
α
ppli To”
・
Mail ”i
α
ppli To”
・
Ir ”i
α
ppli To”
●
“
” and “
” switch each time you press
.
●
Some items might not be set depending on the software.
(
)
⇒
See page 291
You can set the software as the i-
α
ppli Stand-by display.
⇒
See page 292
You can set whether to go online while the i-
α
ppli is running.
Network set Select following
・
ON
・
OFF
・
Check every start
(
)
You can set whether to go online while the i-
α
ppli Stand-by
display is running.
⇒
See page 293
You can set whether to enable the i-
α
ppli to use information of
the icons for the i-mode mail, SMS messages, Messages R/F,
battery level, Manner Mode and for service area/out of service
area.
Icon info Select following
・
ON
・
OFF
(
)
You can set whether to enable the i-
α
ppli to change the setting
for ring tones or the Stand-by display. This function is available
only for i-
α
ppli DX.
Change mld./img. Select following
・
ON
・
OFF
・
Check every change
(
)
2
1
Software setting (Change mld./img.)
2
1
Software setting (Icon info)
Software setting (Stand-by net)
2
1
Software setting (Network set)
Software setting (Stand-by set)
Auto start time
2
1
Set i
α
ppli To
You can set whether to permit the i-
α
ppli to refer to the
Phonebook, Redial, and Received Calls.
This function is available only for i-
α
ppli DX.
See P.book/hist. Select following
・
ON
・
OFF
(
)
You can display the software name and version of the i-
α
ppli.
●
Use
to scroll the display.
YES
You can upgrade the version of the software.
●
To cancel : “NO”
⇒
See page 132
YES
●
A confirmation display appears for the software that has
been set as the Stand-by display or set for Auto Start.
Select “YES” and press
; the software program is
deleted.
●
To cancel : “NO”
Put a check mark for the software programs to be
deleted
●
“
” and “
” switch each time you press
.
You can check or uncheck all items by pressing
(
) and selecting “Select all/Release all”.
●
If there is the software that has been set as the Stand-by
display or set for Auto Start, a confirmation display
appears. Select “YES” and press
; the software
programs are deleted.
(
) YES
●
To cancel : “NO”
Enter your Terminal Security Code
YES
●
If there is the software that has been set as the Stand-by
display or set for Auto Start, a confirmation display appears.
Select “YES” and press
; all the software programs are
deleted.
●
To cancel : “NO”
●
Terminal Security Code
⇒
See page 138
Delete all
2
1
Delete selected
Delete
Add desktop icon
Upgrade
Software desc.
2
1
Software setting (See P.book/hist.)
<Software setting (Icon info)>
●
When you set “Software setting (Icon info)” to “ON” for the i-
α
ppli Stand-by display, the icon information for unread
mail/message, battery level, Manner Mode, radio wave
strength and being out of the service area can be sent to the
IP (Information Provider) over the Internet in the same way
Information
Function Menu of the Software List
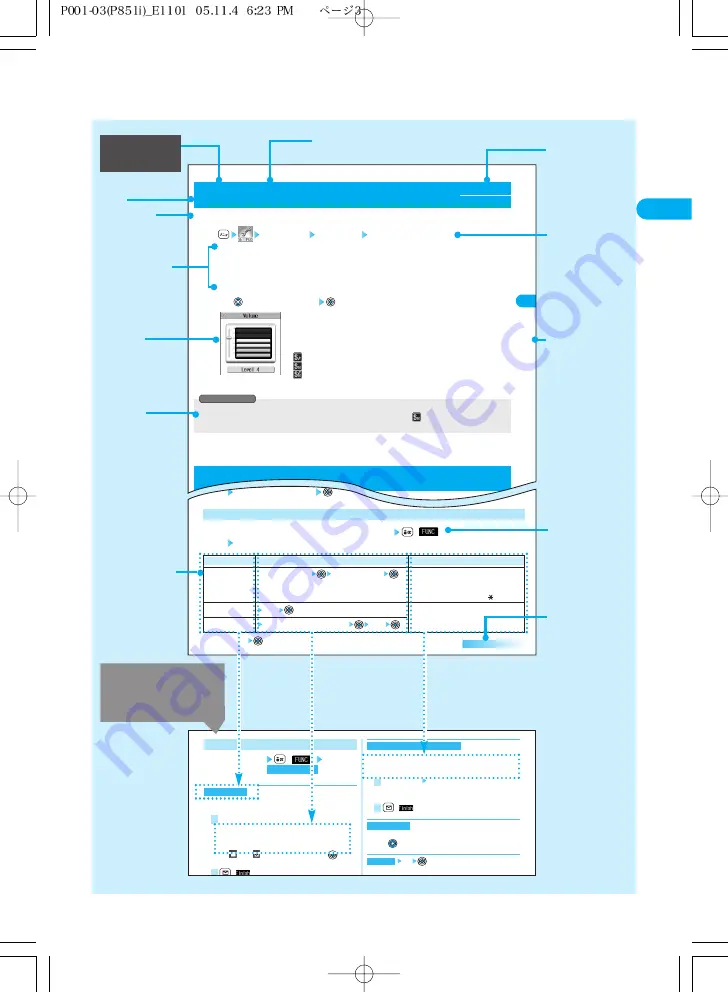
Describes
information related
to the function,
cautions and
limitations, etc.
Title
Explains the
function outline.
Shows an
important display
for operating the
step.
Describes the
names of the
items on the
display and their
explanations.
Describes the setting
at purchase. The
“Function List” also
lists the settings at
purchase.
⇒
See page 430
You can search
for chapters from
the tabs.
Shows each
operating
procedure.
⇒
See page 37
Indicates that the
operation
procedure
continues.
Note: The above page is a sample.
Describes the
preparative steps
to set the
functions in the
table.
Function
name
Some pages describe
operations of the
function menu in the
following way.
Indicates the menu
number.
⇒
P.35
Shows the names
of the items
displayed on the
display. Some
items may not be
available,
depending on the
operation.
●
The page number is
displayed on the
bottom left or bottom
right of the page.
Summary of Contents for prosolid II foma P851i
Page 156: ...154...
Page 296: ...294...
Page 297: ...i channel What is i channel 296 Using i channel 298 Using Detailed Functions 298 295...
Page 430: ...428...


