


14
5
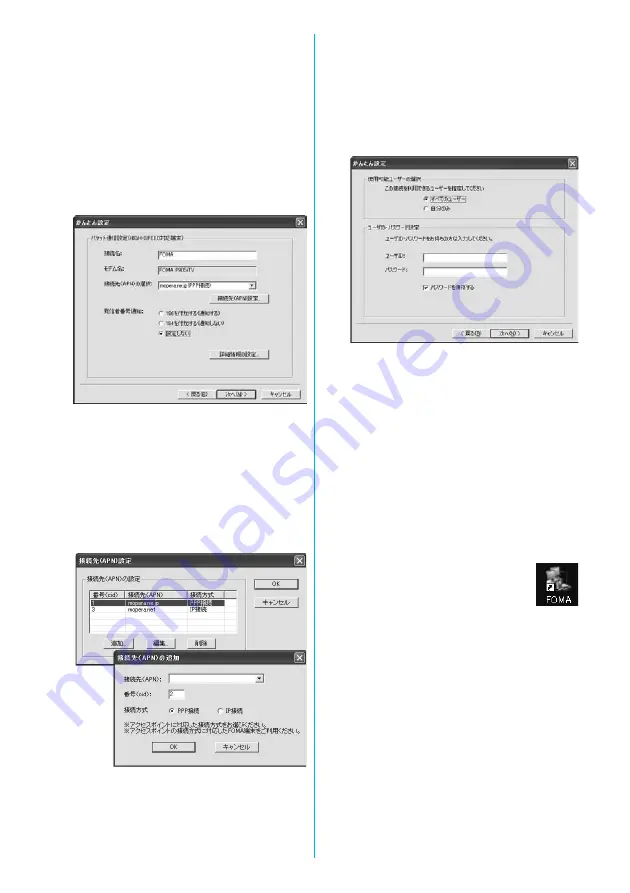
Enter an access point name.
You can specify any name for the currently created connection.
Enter a plain name in the “
接続名
(Access point name)” field.
≥
You cannot enter the following half-pitch characters:
¥, /, :,
¢
, ?, !, <, >, |, and ”.
≥
In the “
接続先 (
APN
) の選択
[Select an access point name (APN)]”
field, “mopera.ne.jp (PPP
接続
) [mopera.ne.jp (PPP connection)]”
is displayed as the default. Go to the “
接続先 (
APN
) 設定
[Set an
access point name (APN)]” display.
≥
When connecting wirelessly using Bluetooth, “
モデム名
(Modem
name)” becomes the name of the in-use Bluetooth-linked standard
modem or Bluetooth modem provided by a Bluetooth device
maker.
≥
For the setting of “
発信者番号通知
(caller ID notification)”, follow the
information from the provider and others. For overseas use, select
“
設定しない
(Not set)”.
6
Click “
接続先
(APN)
設定
[Set an access point
name (APN)]”.
“mopera.ne.jp” is registered in “cid1” and “mopera.net” is registered in
“cid3” by default. Click “
追加
(Add)”, then enter the correct access
point name (APN) for FOMA packet communication on the “
接続先
(APN)
の追加
[Add an access point name (APN)]” display. Click “OK”.
The “
パケット通信設定
(Packet communication setting)” display
returns. Select the access point name (APN) you specified newly. If it
is ok, click “OK”.
≥
For a provider access point name (APN) or supported connection
types, contact your provider.
7
Click “
詳細情報の設定
(Set detailed information)”.
The display for specifying “
IPアドレス
(IP address)” and “
ネーム
サーバ ー
(name server)” appears. When entering dial-up
information for the provider you have subscribed or Intranet LAN
system, specify addresses according to the entry instruction
information, then click “OK”.
8
Click “
次へ
(Next)”.
9
Specify “
ユーザー名
(User name)” and “
パス
ワ ード
(Password)”, then click “
次へ
(Next)”.
When specifying the user name and password, correctly enter the
information supplied from your Internet service provider, taking care
of uppercase and lowercase letters and so on.
≥
Select a user optionally.
10
Put a check mark for “
最適化を行う
(Optimize)”, then click “
次へ
(Next)”.
The confirmation display appears asking whether to optimize all the
communication settings for the FOMA HIGH-SPEED compatible
terminal, then click “
はい
(Yes)”.
≥
If optimized already, the confirmation display to optimize does not
appear.
11
Confirm the set information, then click “
完了
(Complete)”.
The set contents are listed on the display. Confirm that there is no
problem on the set contents, then click “
完了
(Complete)”.
≥
To change the set contents, click “
戻る
(Back)”.
≥
If “
デスクトップにダイヤルアップのショートカットを作成する
(Create a dial-up shortcut on the desktop)” is checked, a dial-up
shortcut will be created on the desktop.
12
Click “OK”.
The setting is completed.
Open the dial-up shortcut icon automatically created
on the desktop; then the connection display for
starting communications appears. After confirming that the
connection starts, you can start the Internet browser or mail browser
for communication. (See page 16)
≥
To make the optimization valid, you need to restart the personal
computer.
Summary of Contents for FOMA P905ITV
Page 50: ...48...
Page 90: ...88...
Page 106: ...104...
Page 128: ...126...
Page 142: ...140...
Page 190: ...188...
Page 300: ...298...
Page 436: ...434...
Page 511: ...509 Index Quick Manual Index 510 Quick Manual 518...
Page 592: ...Kuten Code List...


