Installing the SA7x
3.5 Installing an Add-On SA7x Enclosure in an SA900 Storage Array
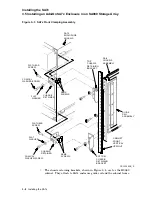
Figure 3–4 SA900 and SA7x Chassis Retaining Brackets
SHORT SEMS
PAN-HEAD
SCREWS
CHASSIS RETAINING
BRACKET
CXO-3939A-MC
TB1
ATTACH
RIGHT
OCP
ATTACH
LEFT
OCP
3.6 Preparing the SA900 Cabinet
Each SA7x enclosure is mounted in the cabinet with one guide rail plate assembly
as shown in Figure 3–5. The guide rail plate is attached to the cabinet’s internal
vertical uprights, and it supports the enclosure from one side. Grooves machined
into the side of the enclosure mate with flanges along the sides of the chassis
rail, allowing the enclosure to slide onto the guide rail plate from the front of the
cabinet.
On one end of the guide rail plate is an adjustable mounting bracket. The
mounting bracket has four screws that when loosened, allow the guide rail plate
to be placed into the cabinet and then extended to make a secure fit.
Installing the SA7x 3–9


