Installing the SA7x
3.11 Installing the SA7X Enclosure
a. Check that the three enclosure connector (TB1) mounting screws are
tight.
b. Align the OCP with the TB1 and push until the OCP is secure.
4. Install the OCP for a SA900 cabinet right side installation.
a. Loosen the two outer screws on TB1.
b. Remove the center screw under Attach Left Control Panel on TB1 and
slide TB1 to the left.
c. Insert and tighten the center screw under Attach Right Control Panel on
TB1.
d. Tighten the two outer screws on TB1.
CAUTION
Do not bend the alignment or connector pins when installing the OCP.
The panel should fit without being forced.
e. Align the OCP with the TB1 and push until the OCP is secure.
The SA900 storage array is shipped with internal cables and power cords
for storage devices installed at the factory. However, when you install SA7x
enclosures, you must install the internal SDI cables and connect the power cords.
If external SDI cables are required, they are ordered separately and shipped at
the same time the add-on is shipped. Table 3–2 lists the external SDI cables.
Table 3–2 H9A00 External SDI Cables
External SDI Cables
Standard
Part Number
Fire Code
Part Number
3.7 m (12 ft) cable
BC26V–12 or BC26G–12
BC26J–12
7.6 m (25 ft) cable
BC26V–25 or BC26G–25
BC26J–25
15.2 m (50 ft) cable
BC26V–50 or BC26G–50
BC26J–50
24.4 m (80 ft) cable
BC26V–80 or BC26G–80
BC26J–80
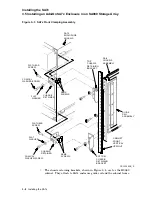
The H9A00 cabinet includes a left and a right vertical I/O bulkhead. (Refer to
Figure 3–8.) Storage devices are connected by SDI cables to one of the five sets
of eight connectors on each bulkhead. A total of ten devices can be connected to
the I/O bulkheads. The RA9x disk drive uses two SDI cables; the SA7x enclosure
uses two special one-to-four cables. Each cable terminates with four connectors.
The SA900 storage array can accommodate a maximum of ten RA9x disk drives,
or ten SA7x enclosures, or 80 ports.
Use the following procedure to install and connect SDI cables and power cords:
1. Ensure that the Line Voltage Selector switch is in the proper position and the
Master On/Off switch on the enclosure is off.
Installing the SA7x 3–17

