Installing the SA7x
3.11 Installing the SA7X Enclosure
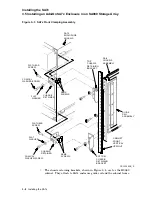
3. Connect SDI cable connectors to the Port A and Port B connections on the
rear of the SA7x enclosure. Connect the other end of the cable connectors
to the vertical I/O bulkhead. (The top four ports in each group of eight
correspond to Port A, and the bottom four ports in each group of eight
correspond to Port B.)
4. Connect the power cords to the rear of the SA7x enclosure, as shown in
Figure 3–9.
5. Route the power cords from the storage devices on the right side of the
cabinet down the right vertical I/O bulkhead.
6. Route the power cords from the storage devices on the left side of the cabinet
down the left vertical I/O bulkhead.
7. Connect the power cord to the power controller connector shown in
Figure 3–9.
8. Coil any excess power cord in front of the power controller.
9. Connect the external SDI cables in the SA900 storage array. Be sure to
tighten the captive screws when connecting the external cables to the
bulkhead.
10. Slide the external SDI cables through the appropriate slot on the filler panel.
If necessary, remove the cable retainers on the filler panel to more easily
access the slot. Then, replace the cable retainers.
3.11.1 Completing the Installation
Complete the installation as follows:
1. Restore power to the cabinet.
2. Turn on all storage devices in the cabinet. Spin up all drives and place them
on line. Check out all storage devices as described in the component user
guide or service manual.
3. Ensure that the rear panel will clear the external cables. If necessary, adjust
the side panels to provide additional clearance.
4. Replace the rear panel and close the front panel.
Installing the SA7x 3–19


