Installing the SA7x
3.4 Setting Drive Unit Numbers
3. Repeat Steps 1 and 2 until all drive unit numbers have been set.
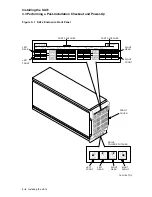
4. Restore the OCP to normal operation by pressing the Unit Select switch.
5. When you are changing the address to correct an error condition that caused
the unit select numbers to flash, you must press the drive dc power switch to
turn the drive off. After the drive has spun down, press the drive dc power
switch to spin up the drive and place it on line.
3.5 Installing an Add-On SA7x Enclosure in an SA900 Storage
Array
WARNING
To maintain cabinet stability, always install components in the order
shown in Figure 3–2.
3.5.1 General Installation Considerations
Internal SDI cables and power cords are installed in SA900 storage arrays only
when a storage device is installed. The internal SDI cables and power cords are
shipped with each add-on and you must install them. The contents of the SA7x
add-on kit are:
• SA7x enclosure
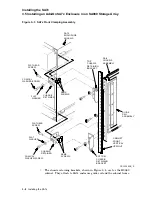
• Guide rail plate assembly
• Hardware mounting kit
• Internal SDI cables
• Power cord
3–6 Installing the SA7x


