Installing the SA7x
3.10 Preparing the SA7X Enclosure
f. Install the rear cover and insert and tighten the two rear cover captive
screws (or two screws).
3. Position the guide rail inserts for a SA900 cabinet right side installation.
a. Loosen the two power supply captive screws and remove the power supply.
b. Remove the two lower left chassis retainer screws and remove the
retainer bracket.
c. Slide the lower left insert out the rear of the enclosure.
d. Slide the insert into the lower right side of the enclosure.
e. Install the retainer bracket and insert and tighten the two chassis
retainer screws.
f. Install the power supply and tighten the two captive screws.
3.11 Installing the SA7X Enclosure
Use the following procedure to install the SA7X enclosure into a SA900 cabinet:
WARNING
The fully-populated enclosure, with four disk drives and a power supply,
weighs up to 40 kilograms (88 pounds) and can cause serious injury
if lifted improperly. If a lifting device is not available, two people are
required to lift and install the enclosure. One person can install the
enclosure if the disk drives and power supply are removed to lighten the
load. (Refer to the
SA7x Enclosure Service Manual
for instructions.)
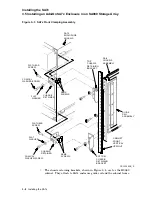
1. Lift the SA7x enclosure to the installation position (see Figure 3–7).
a. Lift the enclosure to the front of the cabinet with the aid of a Digital-
approved lifting device or with two people.
b. Turn the enclosure so its side grooves are facing toward the cabinet rails.
(Refer to Figure 3–7.)
2. Seat the enclosure into the cabinet.
a. Slide the enclosure side grooves into the cabinet guide rails as shown in
Figure 3–7, and push the enclosure all the way to the rear of the cabinet.
b. Remove the lifting device.
c. Using the two 10-32 x 1/2-inch screws that came with the enclosure,
connect the two chassis retaining brackets (mounted on the side of the
enclosure) to the cabinet. Tighten them securely. The recommended
torque is 8 to 10 inch-pounds. (Refer to Figure 3–7).
3. Install the OCP for a SA900 cabinet left side installation.
Note
If the installation is a SA900 cabinet right side installation proceed to
step 4.
Installing the SA7x 3–15


