Replacing RA7x Disk Drives
6.1 Installing and Removing an RA7x Disk Drive
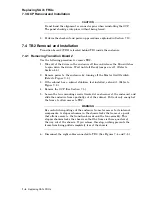
Figure 6–3 Reversing the RA7x Shoe Plate
SHOE
PLATE
RA70
CHASSIS
SHOE
PLATE
SHOE PLATE
RETAINING TAB
CONNECTOR
END
SCREW
SCREW
CXO-2610A
RA70
CHASSIS
CONNECTOR
END
FACTORY SHOE PLATE ORIENTATION
SA70 SHOE PLATE ORIENTATION
SHOE PLATE
RETAINING TAB
4. Grasp the shoe plate and pull upward to free it from the chassis. Hold the
drive down with the hand wearing the ESD strap.
5. Turn the plate around to orient the shoe plate tab at the connector end of the
drive. Replace the plate on the chassis.
Replacing RA7x Disk Drives 6–5


