Replacing SA7x FRUs
7.2 Power Supply Removal and Installation
7.2 Power Supply Removal and Installation
The power supply is accessible through the rear of the SA7x enclosure.
7.2.1 Removing the Power Supply
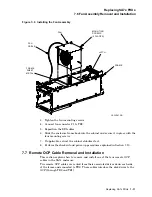
Use the following procedure to remove the power supply from the SA7x enclosure.
(See Figure 7–3.)
1. Take all of the drives in the enclosure off line to spin down the drives. (See
Section 4.4.)
2. Remove power to the enclosure by turning off the Master On/Off switch and
disconnecting the power cord. (See the appropriate storage array guide for
complete information about how the enclosure power supply power cord is
routed through the cabinet and connects to the cabinet power controller.)
3. Loosen the two mounting screws that secure the power supply to the
enclosure, as shown in Figure 7–3.
4. Grasp the power supply by its handle and pull straight back until the supply
is halfway out. Stop and note the set of tabs on each side of the power supply
case that slide on extruded rails in the SA7x chassis.
5. Remove the power supply from the enclosure.
6. Inspect the power supply recess in the enclosure chassis to verify there are no
loose wires or broken connector pins.
7.2.2 Installing the Power Supply
Use the following procedure to install the power supply:
1. Fit the tabs on the replacement power supply between the rails in the
enclosure and slide the power supply into the enclosure. Gently press the
power supply to seat it in its connector.
2. Tighten the two mounting screws. Do not use excessive force or you may strip
the threads in the chassis.
3. Perform the checkout and power-up procedures listed in Section 7.10.
7.3 OCP Removal and Installation
The OCP plugs into TB1 through the top of the enclosure’s front panel. (Refer to
Figure 7–1.)
7.3.1 Removing the OCP
Use the following procedure to remove the OCP.
1. Take all of the drives in the enclosure off line and release the Run switches to
spin down the drives. (See Section 4.4.)
2. Remove power to the enclosure by turning off the Master On/Off switch.
3. Grasp the OCP firmly in one hand and pull it straight out. The OCP is held
in place with two clip fasteners on TB1. Do not pry the OCP; the panel can
be removed easily if you pull it straight out.
7–4 Replacing SA7x FRUs


