Chapter 2
2-20
address settings, and check with the system administrator to see if the
assigned IP address is a valid one.
- The connection of the network PCB may be wrong: Check the
connection of the network PCB once again.
- The network PCB may be faulty. Try replacing it.
If the message is "Response from host", suspect a problem in the user's
network environment. Report to the system administrator for appropriate
action.
2.5 Relocating the Machine
2.5.1 Operation for Moving the Machine
0016-9364
iR5065 / iR 5055 / iR5075 / iR5075N / iR5065N / iR5055N
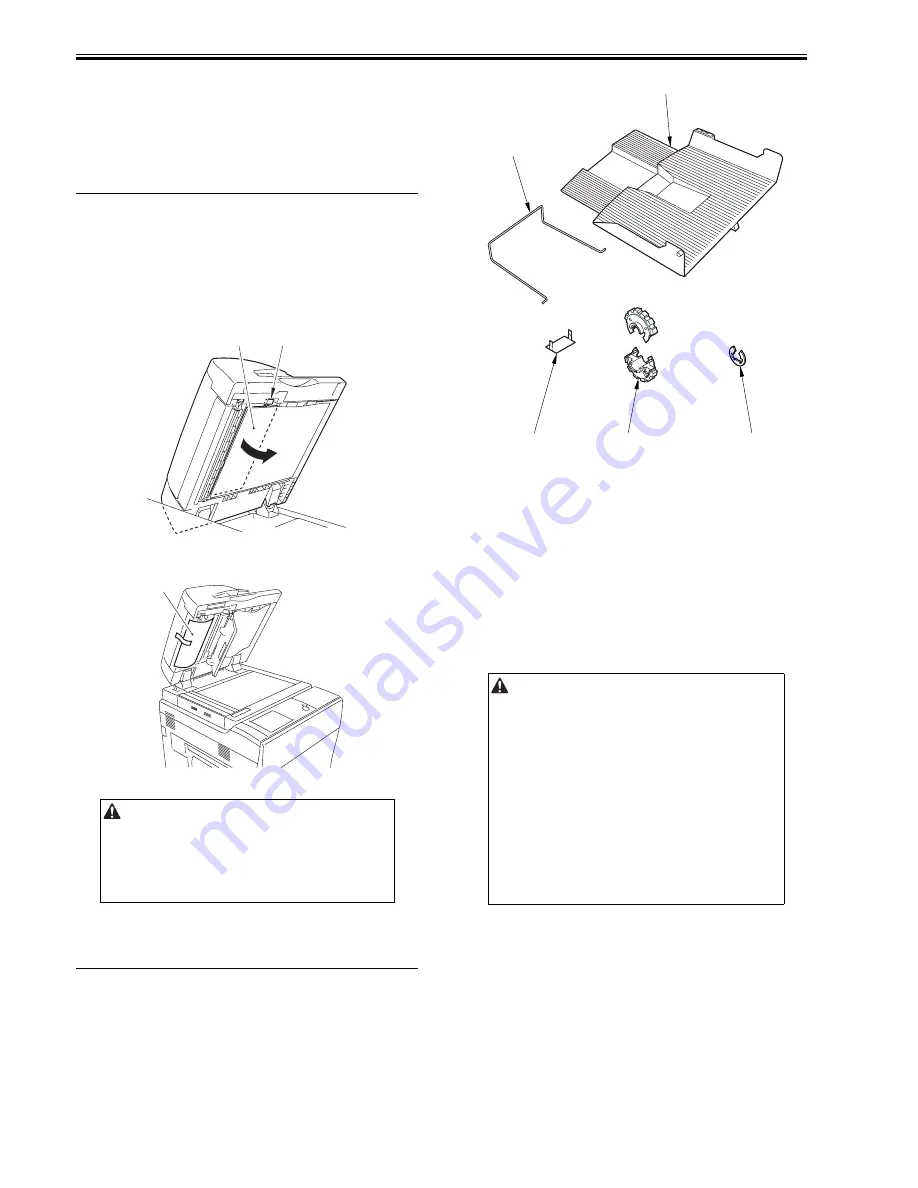
After installing the host machine, when moving it to the other place,
execute the following operation to prevent the scanning glass from getting
scratched.
1) Open the DADF.
2) Pull the release lever [1] and open the white sheet [2] in the direction of
the arrow [A].
F-2-74
3) Attach the protective sheet [1].
F-2-75
4) Close the white sheet.
5) Close the DADF.
2.6 Installing the Copy Tray
2.6.1 Confirming the contents
0015-4767
iR5065 / iR 5055 / iR5075 / iR5075N / iR5065N / iR5055N
<Copy Tray L1>
F-2-76
2.6.2 Power off of the host machine
0015-4768
iR5065 / iR 5055 / iR5075 / iR5075N / iR5065N / iR5055N
2.6.3 Installation procedure
0015-4769
iR5065 / iR 5055 / iR5075 / iR5075N / iR5065N / iR5055N
Be sure to attach the protective sheet.
Otherwise, it may affect the guality of image,
[1]
[2]
[A]
[1]
[1]
Delivery Bar
1 pc.
[2]
Delivery Tray
1 pc.
[3]
Magnet plate
1 pc.
[4]
Delivery roll
2 pc.
[5]
E ring
1 pc.
How to turn off the main power
When turn off the main power, implement the following steps to protect
the hard disk of this product.
1) Push the control panel power switch for 3 sec or more.
2) Operate the touch panel following the instruction on the screen of
shutdown sequence in order to be ready to turn off the main power switch.
3) Turn off the main power switch.
4) Unplug the power cable (for the outlet).
[1]
[2]
[4]
[5]
[3]
Summary of Contents for iR5055
Page 1: ...Feb 29 2008 Service Manual iR5075 5065 5055 Series ...
Page 2: ......
Page 6: ......
Page 27: ...Contents 19 1 2 List of Solvents Oils 19 2 ...
Page 28: ...Contents ...
Page 29: ...Chapter 1 Introduction ...
Page 30: ......
Page 32: ......
Page 59: ...Chapter 2 Installation ...
Page 60: ......
Page 104: ...Chapter 2 2 42 F 2 156 2 1 ...
Page 105: ...Chapter 3 Basic Operation ...
Page 106: ......
Page 108: ......
Page 115: ...Chapter 4 Main Controller ...
Page 116: ......
Page 118: ......
Page 135: ...Chapter 5 Original Exposure System ...
Page 136: ......
Page 169: ...Chapter 6 Laser Exposure ...
Page 170: ......
Page 172: ......
Page 178: ......
Page 179: ...Chapter 7 Image Formation ...
Page 180: ......
Page 184: ......
Page 217: ...Chapter 8 Pickup Feeding System ...
Page 218: ......
Page 274: ......
Page 275: ...Chapter 9 Fixing System ...
Page 276: ......
Page 280: ......
Page 320: ......
Page 321: ...Chapter 10 External and Controls ...
Page 322: ......
Page 326: ......
Page 336: ...Chapter 10 10 10 F 10 7 2 Remove the check mark from SNMP Status Enabled ...
Page 337: ...Chapter 10 10 11 F 10 8 ...
Page 361: ...Chapter 11 MEAP ...
Page 362: ......
Page 364: ......
Page 409: ...Chapter 12 e maintenance imageWARE Remote ...
Page 410: ......
Page 412: ......
Page 421: ...Chapter 13 Maintenance and Inspection ...
Page 422: ......
Page 424: ......
Page 433: ...Chapter 14 Standards and Adjustments ...
Page 434: ......
Page 464: ......
Page 465: ...Chapter 15 Correcting Faulty Images ...
Page 466: ......
Page 468: ......
Page 496: ......
Page 497: ...Chapter 16 Self Diagnosis ...
Page 498: ......
Page 500: ......
Page 528: ......
Page 529: ...Chapter 17 Service Mode ...
Page 530: ......
Page 532: ......
Page 600: ......
Page 601: ...Chapter 18 Upgrading ...
Page 602: ......
Page 604: ......
Page 636: ...Chapter 18 18 32 F 18 59 2 Select the data to download F 18 60 3 Click Start ...
Page 638: ......
Page 639: ...Chapter 19 Service Tools ...
Page 640: ......
Page 642: ......
Page 645: ...Feb 29 2008 ...
Page 646: ......


