41
Ch. 3 Functions
Functions
Size (
)
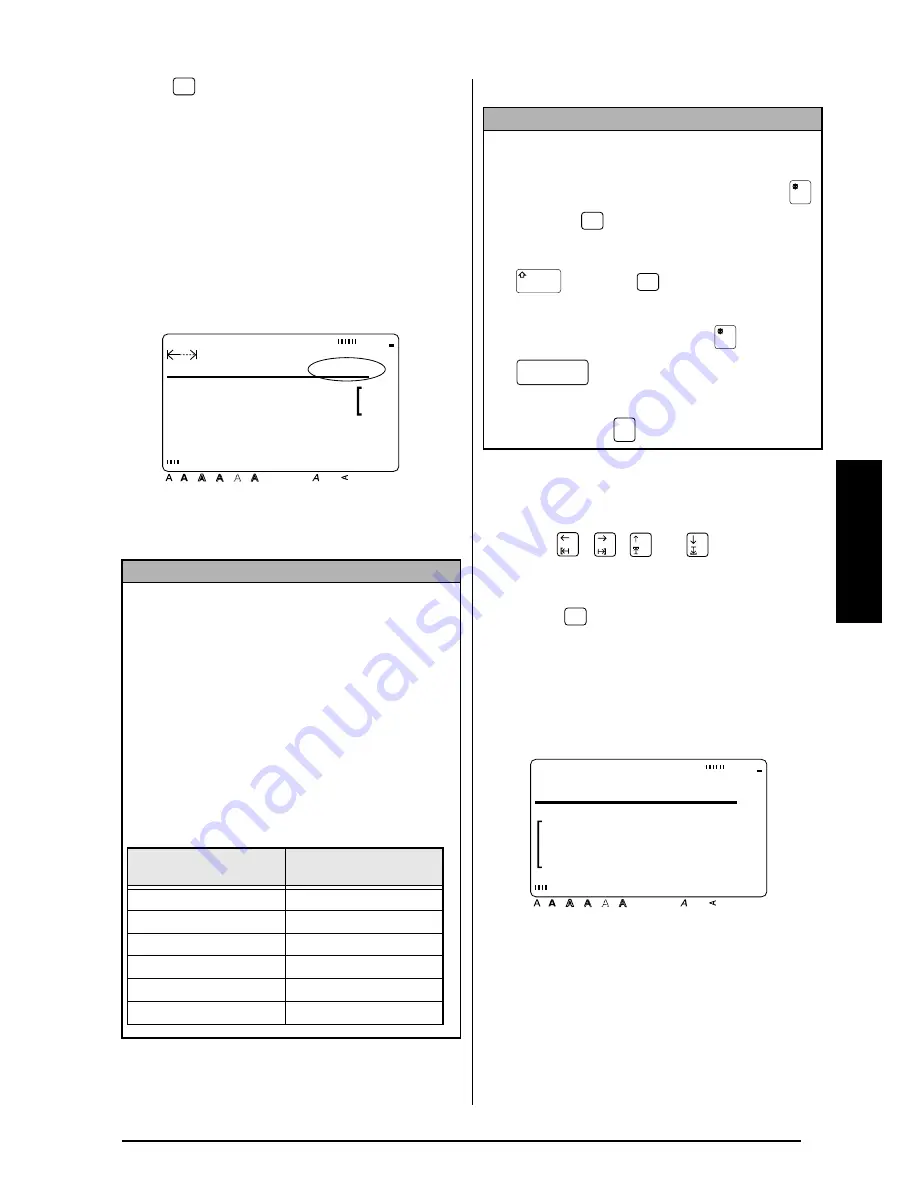
The character size can be adjusted using the
Size function. With the AUTO setting, the
machine compares your text with the width of
the installed tape and automatically adjusts the
characters to the largest possible size. Refer to
page 99 for examples of the Size settings. The
size of the text at the cursor’s current position is
shown at the right end of the second line in the
top of the display.
To change the text size before entering the
text:
1
Press
,
,
, or
until the cursor
is moved to the point where you want to
begin using a different text size.
2
Press
until the desired text size is
selected. The current setting is shown
below SIZE at the top of the display and a
sample (
A
) can be seen to the right of the
cursor.
3
Type in the new text.
NOTE
☞
With the AUTO setting selected and 12 mm, 18
mm, 24 mm or 36 mm-wide tape installed, the
size of text with just one line and not containing
lowercase letters or certain symbols is printed
slightly larger.
☞
If a very small text size is selected, the text may
not be readable in WYSIWYG mode. When
editing such small text, turn on the Zoom mode.
For more details, refer to page 36.
☞
Since the text sizes that can be printed depends
on the width of the tape, the following table
shows the maximum text size that can be used
with each tape width.
Size
MARGIN:WIDE AUTO
13.5cm HELSI
e r t B e c k e r
T r a n s p o r t
Style
Italic Vertical
Caps
Alt Template Zoom
Back
ground
Half
Cut
36mm
24mm
18mm
12mm
9mm
6mm
A
Tape widths
Maximum text size
(in points)
6 mm
12
9 mm
18
12 mm
24
18 mm
36
24 mm
60
36 mm
72
NOTE
While selecting a Size setting, the following opera-
tions may be used:
☞
To display the previous setting, hold down
and press
.
☞
To select the default setting (AUTO), hold down
and press
.
☞
To return all text formatting functions to their
default settings, hold down
and press
(space bar).
☞
To return to the text without making any
changes, press
.
Size
Size
Cancel
Size
A
48pt
SIZE
Style
Italic Vertical
Caps
Alt Template Zoom
Back
ground
Half
Cut
36mm
24mm
18mm
12mm
9mm
6mm
A
Summary of Contents for P-touch 9400
Page 3: ......
Page 10: ...1 Ch 1 Before You Start Before You Start Chapter 1 Before You Start ...
Page 16: ...7 Ch 2 Getting Started Getting Started Chapter 2 Getting Started ...
Page 31: ...22 Ch 2 Getting Started Getting Started ...
Page 32: ...23 Ch 3 Functions Functions Chapter 3 Functions ...
Page 84: ...75 Ch 4 Using Labels and Stamps Using Labels and Stamps Chapter 4 Using Labels and Stamps ...
Page 101: ...92 MACHINE SPECIFICATIONS ...
Page 102: ...93 Appendix Appendix Appendix ...
Page 125: ...116 ...
Page 126: ...Printed in Japan UT1533001 A ...


