background image

94

Appendix

Appendix

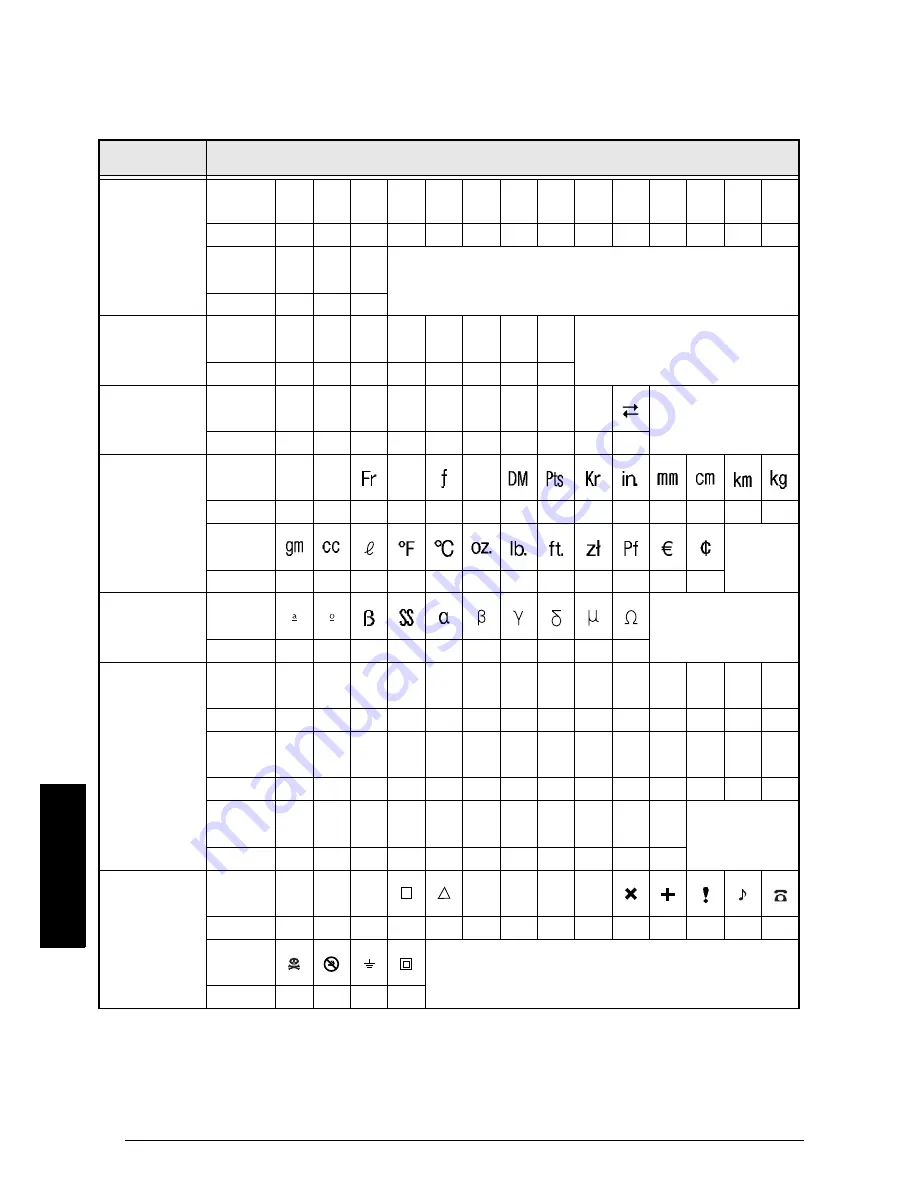
Symbols 

 p. 27

The following symbols are available.

Category

PUNCTUATION

Symbol

+

×

÷

±

=

\

§

¿

¡

Number

1

2

3

4

5

6

7

8

9

10

11

12

13

14

Symbol

@

#

&

Number

15

16

17

BRACKET

Symbol

[

]

{

}

<

>

«

»

Number

18

19

20

21

22

23

24

25

ARROW

Symbol

Î

Í

Ï

Ð

Number

26

27

28

29

30

31

32

33

34

35

UNIT

Symbol

°

$

¥

£

Number

36

37

38

39

40

41

42

43

44

45

46

47

48

49

Symbol

Number

50

51

52

53

54

55

56

57

58

59

60

61

LETTER

Symbol

Number

62

63

64

65

66

67

68

69

70

71

NUMBER

Symbol

1/2

1/3

1/4

1

2

3

4

5

6

7

8

9

0

±

Number

72

73

74

75

76

77

78

79

80

81

82

83

84

85

Symbol

-

+

0

1

2

3

4

5

6

7

8

9

±

-

Number

86

87

88

89

90

91

92

93

94

95

96

97

98

99

Symbol

+

0

1

2

3

4

5

6

7

8

9

Number

100

101

102

103

104

105

106

107

108

109

110

PICTOGRAPH

Symbol

O

Number

111

112

113

114

115

116

117

118

119

120

121

122

123

124

Symbol

Number

125

126

127

128

Summary of Contents for P-touch 9400

Page 1: ...USER S GUIDE Read this User s Guide before you start using your P touch Keep this User s Guide in a handy place for future reference ...

Page 2: ...ly practical machine to meet all your labelling needs Although this P touch is easy to use we suggest that you read this User s Guide carefully before starting Keep this manual nearby for future reference Declaration of Conformity We Brother International Europe Ltd Brother House 1 Tame Street Audenshaw Manchester M34 5JE U K declare that this product conforms with the following normative document...

Page 3: ......

Page 4: ...UTIONS 8 Connecting the power supply cord 9 Installing a TZ tape cassette 11 Connecting to the computer 12 Turning on off the P touch 12 Installing P touch Editor 13 Using P touch Editor 18 Reading the User s Guide 21 Chapter 3 Functions 23 Performing basic operations 24 Entering text 25 Editing text 36 Formatting 40 Storing and recalling files 61 Printing 64 Setting display features 73 CONTENTS ...

Page 5: ...mp film 78 ERROR MESSAGE LIST 81 TROUBLESHOOTING 88 MACHINE SPECIFICATIONS 91 Appendix 93 Symbols 94 Special barcode characters 98 Fonts 98 Sizes and widths 99 Type styles 100 Framing and shading patterns 101 Background designs 102 Pre set templates 103 Template text styles 107 Text transformation styles 108 INDEX 109 ACCESSORIES 112 ...

Page 6: ...al character Changing a barcode parameter or to select parameter or to select setting Editing text Zooming in and out Deleting text Clearing all of the text and formats or to select TEXT FORMATS Clearing only the text or to select TEXT ONLY Selecting an area of the text or to select text Selecting all of the text Copying text or to select text Pasting text Copy text or to position cursor or to sel...

Page 7: ...ng a template Creating a label or stamp from a template a or to select CATALOGUE NO or to select or type template number Type line of text and Continue with 1 2 3 4 or 5 b or to select template category or to select template number Type line of text and Continue with 1 2 3 4 or 5 1 Changing the style of the template or to select CHANGE STYLE or to select setting 2 Editing the template text or to s...

Page 8: ...ously saved file a or to select OPEN or to select file number b or to select OPEN Type file name or to select file Deleting a previously saved file a or to select DELETE or to select file number or to select OK b or to select DELETE Type file name or to select file Printing text Previewing the label appearance Feeding and cutting 25 mm of tape Printing using the cur rent print options or to select...

Page 9: ...elect MIRROR or to select ON 9 Inverting the printed and unprinted areas or to select INVERT or to select ON 0 Changing the shape of the text or to select TRANSFORM or to select setting A Changing how labels are cut or to select CUT or to select setting B Enlarging text and printing it on 2 3 or 4 labels or to select SPLIT or to select setting New Block New Block New Block New Block New Block New ...

Page 10: ...1 Ch 1 Before You Start Before You Start Chapter 1 Before You Start ...

Page 11: ...ch label You can also invert the printing to make the light parts dark and the dark parts light p 68 With the New Block function p 27 your labels can contain sections with dif ferent numbers of lines In this label part of the text was formatted using a different font p 40 and a different style p 43 In addition the Barcode function makes creating and printing barcodes easy Decorate your text using ...

Page 12: ...rning symbol was added Symbol function p 27 and the entire text was framed using the Frame Shading function p 47 In addition the label was printed vertically using the Vertical function p 46 Create a table using the Frame Shading function p 47 to put a box around each line of each block in the text Then use the Area func tion p 38 to format the headings of the table Create larger labels by enlargi...

Page 13: ...Before You Start Before You Start GENERAL DESCRIPTION Features Cover release button Tape compartment cover LCD display Keyboard Tape exit slot Handle Lettering stick Power supply connector Interface connector ...

Page 14: ...UND OFF SMALL LARGE PARQUET METAL MOSAIC CHANGE SETTINGS Style Italic Vertical Caps Alt Template Zoom Back ground Half Cut 36mm 24mm 18mm 12mm 9mm 6mm A OPTION COPIES 1 NUMBER OFF MIRROR OFF INVERT OFF TRANS FORM ABC The colour of the arrows on the ends of the scroll bar shows whether or not more settings are available When the arrows are light and no more settings are available When the arrows ar...

Page 15: ...e key p 12 M enter key p 24 27 0 Currency conversion key p 31 New Block function p 27 A Font key p 40 N Cursor keys p 24 B Size key p 41 O Symbol key p 27 C Width key p 42 P Space bar p 25 D Style key p 43 Q Code key p 24 E Italic key p 44 R Cancel key p 24 F line effects key p 45 S Shift key p 25 G Vert vertical key p 46 T Caps key p 25 U Alt key p 25 Print Clear 1 2 3 4 56 7 8 A B C D EF G H I J...

Page 16: ...7 Ch 2 Getting Started Getting Started Chapter 2 Getting Started ...

Page 17: ...for an extended period of time Doing so may cause staining Do not clean the machine with alcohol or other organic solvents Only use a soft dry cloth Do not put any foreign objects into or heavy objects on the machine To avoid injuries do not touch the cutter s edge Use only the power supply cord designed exclusively for this machine Use of any other cord will void the warranty When the machine is ...

Page 18: ...et is available 1 Insert the plug on the end of the power supply cord into the power supply connector on the back of the P touch 2 Insert the pronged plug on the other end of the power supply cord into an AC outlet For the UK and Ireland For continental Europe NOTE Only use the power supply cord designed exclusively for this machine ...

Page 19: ...n Live The colours of the wiring in the power lead of this product may not correspond with the markings which identify the terminals in your plug If you need to fit a different plug pro ceed as follows Remove a length of the cord s outer sheath taking care not to damage the coloured insula tion of the wires inside Cut each of the three wires to the appropriate length If the construction of the plu...

Page 20: ... to wind the toothed wheel in the direction of the arrow on the cassette until there is no slack in the ribbon Also make sure that the end of the tape feeds under the tape guides 4 Insert the tape cassette firmly into the com partment making sure that the entire back of the cassette touches the bottom of the compartment 5 Close the compartment cover and press the power supply key to turn on the ma...

Page 21: ... computer and tighten the screws to lock it into place 4 Turn on the P touch and then start up the computer 5 Press on the P touch to enter Interface mode Turning on off the P touch The power supply key is located in the top right corner of the machine s keyboard This P touch will automatically turn off if no key is pressed or no operation is performed for 30 minutes In addition if it has remained...

Page 22: ...ed 5 Click the top button to start up the InstallShield Wizard for installing the P touch Editor software and the PT 9400 printer driver 6 Click the Next button to display the User Information dialogue box 7 Type your name and company s name into the appropriate boxes to personalise your copy of the P touch Editor software 8 Click the Next button to enter the informa tion A dialogue box asking for...

Page 23: ... dialogue box that allows you to select whether to install or uninstall the application is displayed C Select Install and then click the Next but ton For Windows 95 98 A dialogue box that allows you to select the PTCOM port where the PT 9400 is con nected appears For Windows NT 4 0 A dialogue box that allows you to add a PTCOM port appears NOTE If you chose Custom click the Next button to display ...

Page 24: ...s up H Select the serial port where the PT 9400 is connected and then click the Next button I Select the desired baud rate and then click the Next button A dialogue box confirming the settings appears J Click the Next button to enter the settings A dialogue box appears showing that the baud rate has been set to the selected rate K Click the Finish button A dialogue box appears showing that install...

Page 25: ...ls all options or the Custom Install button allows you to select which options to install 6 In the dialogue box that appears when installation is completed click the Quit but ton A dialogue box which allows you to restart your computer appears 7 Click the Restart button NOTE Only the US English version of the P touch Editor software for the Mac is available NOTE A few hundred megabytes of addition...

Page 26: ...or icon Double click the P touch Editor 3 icon in the P touch Editor 3 group window With the Start button 1 Click the Start button in the taskbar to dis play the Start menu 2 Select Programs 3 Select P touch Editor 3 4 Click P touch Editor 3 With Windows Explorer 1 Start up Windows Explorer 2 Select the drive and directory where P touch Editor is installed 3 Double click Ptedit3 exe After P touch ...

Page 27: ...ng the Auto Format template that you wish to use As an example let s select NAMEPLT 3 Click the Next button 4 In the Template list view select the tem plate that you wish to use Here let s select the one named NAMEPLT2 LBL 5 Click the Next button 6 Click the Next or the Previous buttons until the text that you wish to change appears in the Input edit box 7 Change the text so that the desired text ...

Page 28: ...appears in the Input edit box Here the first line of text that we wish to change CAMERA is already displayed 6 Change the text so that the desired text is entered We can start by changing the prod uct name to VCR 7 Repeat steps 5 and 6 until all of the text is entered in the way that you want and then click the Next button Let s finish editing the text by changing the original price to 415 and the...

Page 29: ...Insert the P touch Editor CD ROM into the CD ROM drive A dialogue box that allows you to select the language of the pro gramme appears 2 Select the desired language and then click the OK button A dialogue box that allows you to select what to install is displayed 3 Click the bottom button to start up the Inter net Explorer 4 01 Installer On a Macintosh computer 1 Insert the P touch Editor CD ROM i...

Page 30: ...ide PT 9200PC With Windows Explorer a Start up Windows Explorer b Select the CD ROM drive if the User s Guide is not installed on the hard disk or select the drive and directory where P touch Editor is installed if the User s Guide is installed on the hard disk c Double click Main htm in the Man ual folder On a Macintosh computer Double click Main htm in the User s Guide folder of the CD ROM s P t...

Page 31: ...22 Ch 2 Getting Started Getting Started ...

Page 32: ...23 Ch 3 Functions Functions Chapter 3 Functions ...

Page 33: ...cursor to the beginning of the next text block hold down and press To select the item on the right in a list press left To move the cursor one space or character to the left press once If the cursor is at the beginning of a line when this key is pressed the cursor moves to the end of the previous line To move the cursor to the beginning of the current line of text hold down and press To move the c...

Page 34: ... be added to the text using the Alt mode Alt mode can be turned on or off by pressing When Alt mode is on the Alt indicator lights up The following table shows the available charac ters NOTE When a number key is pressed the number not the symbol above it is typed in unless is held down To type lowercase letters while the Caps mode is on hold down while pressing the key of the desired character MAR...

Page 35: ...ss to turn on Caps mode before pressing a letter key Pressing a key that has an accented character on the right side of the key displays the corre sponding list of accented characters with the one on the key selected To turn off the Alt mode without adding a char acter to the text press or at any time Alt Cancel Alt uffl ë Style Italic Vertical Caps Alt Template Zoom Back ground 36mm 24mm 18mm 12m...

Page 36: ...e before press ing the letter key NOTE A single block of text can only contain the maxi mum number of lines shown in the table below If the block already contains the maximum number of lines when you press the error message LINE LIMIT will appear A maximum of three lines can be printed when instant lettering tape or iron on tape is used NOTE A single label can only contain a maximum of five blocks...

Page 37: ...ent category hold down and press or To select the first symbol press space bar or hold down and press To select the last symbol hold down and press PUNCTUATION INPUT NO 1 Style Italic Vertical Caps Alt Template Zoom Back ground 36mm 24mm 18mm 12mm 9mm 6mm A Half Cut NOTE To enter a series of symbols hold down before pressing Then continue add ing characters by selecting them as explained in steps ...

Page 38: ...e able to read the labels Barcodes should be printed on white labels with black ink It is recommended that barcodes be printed with the MARGIN function FORMAT menu set to WIDE and the barcode WIDTH parame ter set to WIDE otherwise barcodes may be difficult to read NOTE To change the data or parameters of a barcode that has already been added to the text position the cursor in the middle of the bar...

Page 39: ...pecial charac ter is added to the barcode data NOTE To select the default setting press space bar CONFIRM Style Italic Vertical Caps Alt Template Zoom Back ground Half Cut 36mm 24mm 18mm 12mm 9mm 6mm A TYPE CODABAR EAN128 CODE128 ISBN 5 ISBN 2 New Block New Block TYPE CODABAR Style Italic Vertical Caps Alt Template Zoom Back ground Half Cut 36mm 24mm 18mm 12mm 9mm 6mm A FORMAT PARAMETER SYMBOL SPE...

Page 40: ...wn and press 2 Since 9 is already beside 1ST CURRENCY press NOTE To delete a barcode move the cursor to the centre or to the right of the barcode and press When the message OK TO CLEAR BARCODE appears press or until 9 moves beside OK and then press To return to the text without deleting the barcode press or move 9 beside CANCEL and then press New Block Clear New Block Cancel New Block MARGIN WIDE ...

Page 41: ... 6mm A EURO ATS BEF DEM ESP FIM Half Cut CONFIRM 1ST CURRENCY Style Italic Vertical Caps Alt Template Zoom Back ground 36mm 24mm 18mm 12mm 9mm 6mm A EURO ATS BEF DEM ESP FIM Half Cut CONFIRM 1ST CURRENCY Cancel NOTE When setting the parameters for the second cur rency 2ND will be displayed instead of 1ST NOTE The first layout selected is the default layout for the selected currency Each X represen...

Page 42: ...peat steps 3 through C until the 2ND CURRENCY 2ND LAYOUT 2ND D POINT and 2ND DIVIDER parameters are set New Block CONFIRM Style Italic Vertical Caps Alt Template Zoom Back ground Half Cut 36mm 24mm 18mm 12mm 9mm 6mm A 1ST D POINT PERIOD COMMA New Block CONFIRM Style Italic Vertical Caps Alt Template Zoom Back ground Half Cut 36mm 24mm 18mm 12mm 9mm 6mm A 1ST DIVIDER COMMA PERIOD BULLET SPACE APOST...

Page 43: ...t how the currencies are printed U Press or until Î moves beside ORIENTATION NOTE Entering an exchange rate based on the euro makes it possible to convert automatically between the new currency ANY and any of the other preset currencies NOTE Up to 10 digits and a decimal point can be entered for the exchange rate If a currency symbol was typed in the 2ND LAYOUT setting in step 8 that symbol is dis...

Page 44: ...E To return to the previous screen without keep ing any changes press To return to the previous screen with the new setting press CONFIRM Style Italic Vertical Caps Alt Template Zoom Back ground Half Cut 36mm 24mm 18mm 12mm 9mm 6mm A ORIENTATION HORIZONTAL Cancel New Block CONFIRM Style Italic Vertical Caps Alt Template Zoom Back ground Half Cut 36mm 24mm 18mm 12mm 9mm 6mm A SEPARATOR SPACE New Bl...

Page 45: ...FORMAT menu displays an enlargement of the character above the cursor This allows you to view sym bols which appear on the display as NOTE The preset currencies are calculated based on the following rates New Block Cur rency Conversion rate 1 Cur rency Conversion rate 1 EURO 1 FRF 6 55957 ATS 13 7603 IEP 0 787564 BEF 40 3399 ITL 1936 27 DEM 1 95583 LUF 40 3399 ESP 166 386 NLG 2 20371 FIM 5 94573 P...

Page 46: ... is erased and all of the format functions are reset to their default settings To erase only the text 1 Hold down and press 2 Press or until 9 moves beside TEXT ONLY NOTE The cursor can be located anywhere in the text NOTE To return to the text without erasing anything press or move 9 beside CANCEL and press Style Italic Vertical Caps Alt Template Zoom Back ground Half Cut 36mm 24mm 18mm 12mm 9mm ...

Page 47: ...tted using the Area function After all of the text was typed in sec tion 123 456 7890 was selected and given a smaller character size To select an area of the text 1 Press or until the cursor is beside the first character that you want to select 2 Press The first character is highlighted 3 Press or until all of the characters that you want to select are high lighted OK TO CLEAR Style Italic Vertic...

Page 48: ...and paste using either the AREA function see page 38 or the ALL function see page 39 2 Press The selected characters are cop ied but not removed from the text 3 Press or until the cursor is positioned where you want to add the copied text 4 Press 5 Press or until 9 moves beside OK 6 Press The text is added at the cur sor s location NOTE To deselect the text press or To delete the selected characte...

Page 49: ...e A can be seen to the right of the cursor 3 Type in the new text To change the font of the text in a selected area 1 Hold down and press to select all of the text or press and use or to select only a part of it 2 Press until the text is displayed in the desired font The current setting is shown below FONT at the top of the display 3 Press The selected text is displayed in the desired font NOTE Wh...

Page 50: ... lowercase letters or certain symbols is printed slightly larger If a very small text size is selected the text may not be readable in WYSIWYG mode When editing such small text turn on the Zoom mode For more details refer to page 36 Since the text sizes that can be printed depends on the width of the tape the following table shows the maximum text size that can be used with each tape width Size MA...

Page 51: ...fferent text width 2 Press until the desired width is selected The current setting is shown below WIDTH at the top of the display and a sample A can be seen to the right of the cursor 3 Type in the new text Area All Area All Size 24pt SIZE R o b e r t B e c k e r A B C T r a n s p o r t Style Italic Vertical Caps Alt Template Zoom Back ground Half Cut 36mm 24mm 18mm 12mm 9mm 6mm A New Block NOTE W...

Page 52: ...moved to the point where you want to begin using a different text style 2 Press until the desired style is selected The current setting is shown below STYLE at the top of the display and a sample A can be seen to the right of the cursor Area All Area All Width WIDE WIDTH e c k e r s p o r t Style Italic Vertical Caps Alt Template Zoom Back ground Half Cut 36mm 24mm 18mm 12mm 9mm 6mm A New Block NO...

Page 53: ...he cursor is moved to the point where you want to begin using a different Italic setting 2 Press to select either ON or OFF The current setting is shown below ITALIC at the top of the display and a sample A can be seen to the right of the cursor OUTLINE STYLE Style Italic Vertical Caps Alt Template Zoom Back ground Half Cut 36mm 24mm 18mm 12mm 9mm 6mm A Area All Area All Style OUTLINE STYLE Style ...

Page 54: ...elected The current setting is shown below LINE EFFECTS at the top of the dis play and a sample A can be seen to the right of the cursor 3 Type in the new text A ON ITALIC Style Italic Vertical Caps Alt Template Zoom Back ground Half Cut 36mm 24mm 18mm 12mm 9mm 6mm A Area All Area All Italic ON ITALIC e r t B e c k e r T r a n s p o r t Style Italic Vertical Caps Alt Template Zoom Back ground Half...

Page 55: ...cator at the bottom of the display lights up To change the Vertical setting before entering the text 1 Press or until the cursor is moved to the point where you want to begin using a different Vertical setting Area All Area All UNDERLINE LINE EFFECTS e r t B e c k e r T r a n s p o r t Style Italic Vertical Caps Alt Template Zoom Back ground Half Cut 36mm 24mm 18mm 12mm 9mm 6mm A New Block NOTE Wh...

Page 56: ...samples of the frames and shadings on page 101 To apply a frame or shading to all of the text 1 Press 2 Press or until 9 moves beside the desired setting 3 Press Vert A ON VERTICAL Style Italic Vertical Caps Alt Template Zoom Back ground Half Cut 36mm 24mm 18mm 12mm 9mm 6mm A Area All Area All Vert ON VERTICAL B e c k e r Style Italic Vertical Caps Alt Template Zoom Back ground Half Cut 36mm 24mm ...

Page 57: ...out adding a frame or shading press at any time NOTE To select the first setting in a menu press space bar To return to the previous screen without keep ing any changes press New Block CONFIRM Style Italic Vertical Caps Alt Template Zoom Back ground Half Cut 36mm 24mm 18mm 12mm 9mm 6mm A SHADING OFF New Block Cancel CONFIRM Style Italic Vertical Caps Alt Template Zoom Back ground Half Cut 36mm 24m...

Page 58: ...f Cut 36mm 24mm 18mm 12mm 9mm 6mm A A1 SET END POINT A B C T r 1 M a i n L o n d o n New Block CONFIRM Style Italic Vertical Caps Alt Template Zoom Back ground Half Cut 36mm 24mm 18mm 12mm 9mm 6mm A SHADING OFF NOTE To delete the frame or shading position the cursor on the left side of the frame shading that you wish to delete and then press When the mes sage OK TO CLEAR FRAME SHADING appears pres...

Page 59: ...aps Alt Template Zoom Back ground Half Cut 36mm 24mm 18mm 12mm 9mm 6mm A SHADING ALL BLOCK LINE CHARACTER New Block Style Italic Vertical Caps Alt Template Zoom Back ground Half Cut 36mm 24mm 18mm 12mm 9mm 6mm A A1 A B C T r 1 M a i n L o n d o n SET START POINT New Block Style Italic Vertical Caps Alt Template Zoom Back ground Half Cut 36mm 24mm 18mm 12mm 9mm 6mm A A1 A B C T r 1 M a i n L o n d ...

Page 60: ...Template Zoom Back ground Half Cut 36mm 24mm 18mm 12mm 9mm 6mm A FRAME SHADING FRAME SHADING New Block CONFIRM Style Italic Vertical Caps Alt Template Zoom Back ground Half Cut 36mm 24mm 18mm 12mm 9mm 6mm A SHADING ALL BLOCK LINE CHARACTER New Block e r t B e c k e r T r a n s p o r t Style Italic Vertical Caps Alt Template Zoom Back ground Half Cut 36mm 24mm 18mm 12mm 9mm 6mm A SET START POINT Ne...

Page 61: ... confirm the setting and return to the FORMAT menu 5 Press again to apply the setting NOTE To return to the text without making any changes press at any time To return all functions in the FORMAT menu to their default settings hold down and press space bar Format MARGIN WIDE AUTO 0 0cm HELSI Style Italic Vertical Caps Alt Template Zoom Back ground Half Cut 36mm 24mm 18mm 12mm 9mm 6mm A Format Form...

Page 62: ...unctions in the FORMAT menu to their default settings hold down and press space bar ABC 25 mm 25 mm WIDE ABC ABC 4 mm 4 mm NONE ABC ABC 8 mm 8 mm NARROW ABC ABC 12 mm 12 mm MEDIUM ABC MARGIN WIDE AUTO 0 0cm HELSI Style Italic Vertical Caps Alt Template Zoom Back ground Half Cut 36mm 24mm 18mm 12mm 9mm 6mm A Format Format NOTE To select the default setting WIDE press space bar To return to the prev...

Page 63: ...their default settings hold down and press space bar ABC LEFT ABC CENTRE ABC RIGHT ABC JUSTIFY Format Format CHANGE SETTINGS Style Italic Vertical Caps Alt Template Zoom Back ground Half Cut 36mm 24mm 18mm 12mm 9mm 6mm A FORMAT LENGTH AUTO MARGIN WIDE H ALI LEFT PITCH PS BACK OFF NOTE To select the default setting press space bar To return to the previous screen without keep ing any changes press ...

Page 64: ...ons in the FORMAT menu to their default settings hold down and press space bar HIHIHI H I H I H I Format Format CHANGE SETTINGS Style Italic Vertical Caps Alt Template Zoom Back ground Half Cut 36mm 24mm 18mm 12mm 9mm 6mm A FORMAT LENGTH AUTO MARGIN WIDE H ALI LEFT PITCH PS BACK OFF NOTE To select the default setting PS press space bar To return to the previous screen without keep ing any changes ...

Page 65: ...ng press or CHANGE SETTINGS Style Italic Vertical Caps Alt Template Zoom Back ground Half Cut 36mm 24mm 18mm 12mm 9mm 6mm A FORMAT LENGTH AUTO MARGIN WIDE H ALI LEFT PITCH PS BACK OFF CONFIRM Style Italic Vertical Caps Alt Template Zoom Back ground Half Cut 36mm 24mm 18mm 12mm 9mm 6mm A BACKGROUND OFF SMALL LARGE PARQUET METAL MOSAIC Cancel New Block NOTE Up to 20 characters can be entered Symbols...

Page 66: ...e is shown in the second line at the top of the display If a category was selected Press or until the desired tem plate is displayed The number and name of the current template are dis played at the top of the display and the dimensions are shown below it NOTE If there was text in the display when the Tem plate function was started the message OK TO CLEAR TEXT BUFFER appears To delete the text pre...

Page 67: ... different line of text press or To quit using the current template and return to step 2 press When the message OK TO CONTINUE TEMPLATE appears press or move 9 beside CANCEL and then press To continue using the current tem plate press or until 9 moves beside OK and then press New Block Style Italic Vertical Caps Alt Template Zoom Back ground Half Cut 36mm 24mm 18mm 12mm 9mm 6mm A EDIT TEXT Smith s...

Page 68: ...te other than one from the STAMP category was used the following display appears If a template from the STAMP category was used the following display appears CONFIRM Style Italic Vertical Caps Alt Template Zoom Back ground Half Cut 36mm 24mm 18mm 12mm 9mm 6mm A CHAR ORIGINAL ITALIC DYNAMIC ARTISTIC FORMAL ELEGANT New Block New Block New Block NOTE Be sure that the correct tape cassette is installe...

Page 69: ...s If the file has not been saved before select SAVE AS If the file has been saved before select SAVE L Type in the desired file name M Press The text is saved under the selected number with the entered file name To create another label or stamp using a differ ent template N Press or until 9 moves beside FILE NOTE Use 12 mm wide tape to make an identification label for a stamp with a STAMP M size a...

Page 70: ...previously saved file with the new edited one When a file is no longer needed or more space is necessary the DELETE function can be used to delete it To save a file that has not been saved before 1 Press 2 Since 9 is already beside SAVE AS press NOTE To return to the FILE menu without erasing the edited template press or move 9 beside CANCEL and then press New Block CONFIRM Style Italic Vertical C...

Page 71: ...nly be up to 10 characters long 0 FILE DESCRIPTION Robert Beck ABC Transp Style Italic Vertical Caps Alt Template Zoom Back ground Half Cut 36mm 24mm 18mm 12mm 9mm 6mm A New Block File CONFIRM Style Italic Vertical Caps Alt Template Zoom Back ground Half Cut 36mm 24mm 18mm 12mm 9mm 6mm A FILE NEW SAVE AS SAVE OPEN DELETE NOTE To return to the previous screen without making any changes press NOTE A...

Page 72: ...e func tion was started the message OK TO CLEAR TEXT BUFFER appears To delete the text press or until 9 moves beside OK and then press To return to the FILE menu without deleting the text in the display press or move 9 beside CANCEL and then press Cancel New Block New Block Cancel New Block Rober t Beck ABC T ransp Style Italic Vertical Caps Alt Template Zoom Back ground Half Cut 36mm 24mm 18mm 12...

Page 73: ...s Press this key to feed out any leftover printed tape after pressing to quit printing Print After you have typed in your text and chosen all of the text and label formats that you want to use you can print it out A few additional set tings can be selected before printing out your label To print a label using the current print settings 1 Press The message OK TO PRINT appears NOTE To select all of ...

Page 74: ...s NOTE To quit printing press Be sure to press once before printing the next label NOTE To return to the text without making any changes press at any time NOTE To display the OPTION menu quickly hold down and press To return to the previous screen without keep ing any changes press To return all functions in the OPTION menu to their default settings hold down and press space bar New Block Cancel F...

Page 75: ...hen the labels are printed or just one label will be printed if the field only contains a non alphanumeric character Print OK TO PRINT Style Italic Vertical Caps Alt Template Zoom Back ground Half Cut 36mm 24mm 18mm 12mm 9mm 6mm A OK OPTION CANCEL NOTE To return to the text without making any changes press at any time NOTE To display the OPTION menu quickly hold down and press To return to the pre...

Page 76: ...Press or to move 9 beside OPTION NOTE If a barcode was selected in step 6 this step is skipped A numbering field must be located entirely within one line of text of a single block The maximum number of characters in a num bering field is five If you try to choose more than five characters the error message INCORRECT OPERATION FOR NUMBERING FUNCTION will appear New Block SET END POINT Style Italic ...

Page 77: ...o their default settings hold down and press space bar New Block Print Cancel CHANGE SETTINGS Style Italic Vertical Caps Alt Template Zoom Back ground Half Cut 36mm 24mm 18mm 12mm 9mm 6mm A OPTION COPIES 1 NUMBER OFF MIRROR OFF INVERT OFF TRANS FORM ABC CONFIRM Style Italic Vertical Caps Alt Template Zoom Back ground Half Cut 36mm 24mm 18mm 12mm 9mm 6mm A MIRROR A B C OFF ON ABC NOTE To select the...

Page 78: ...ace bar NOTE To select the default setting OFF press space bar New Block Print Cancel CHANGE SETTINGS Style Italic Vertical Caps Alt Template Zoom Back ground Half Cut 36mm 24mm 18mm 12mm 9mm 6mm A OPTION COPIES 1 NUMBER OFF MIRROR OFF INVERT OFF TRANS FORM ABC CONFIRM Style Italic Vertical Caps Alt Tempalte t Zoom Back ground Half Cut 36mm 24mm 18mm 12mm 9mm 6mm A INVERT ABC OFF ON ABC ABC NOTE T...

Page 79: ...o select the default setting OFF press space bar CHANGE SETTINGS Style Italic Vertical Caps Alt Template Zoom Back ground Half Cut 36mm 24mm 18mm 12mm 9mm 6mm A OPTION COPIES 1 NUMBER OFF MIRROR OFF INVERT OFF TRANS FORM ABC CONFIRM Style Italic Vertical Caps Alt Template Zoom Back ground Half Cut 36mm 24mm 18mm 12mm 9mm 6mm A TRANSFORMATION OFF ABC ABC ABC ABC New Block FULL HALF both full and ha...

Page 80: ...es press To return all functions in the OPTION menu to their default settings hold down and press space bar NOTE To select the default setting FULL HALF press space bar New Block Print Cancel CHANGE SETTINGS Style Italic Vertical Caps Alt Template Zoom Back ground Half Cut 36mm 24mm 18mm 12mm 9mm 6mm A OPTION COPIES 1 NUMBER OFF MIRROR OFF INVERT OFF TRANS FORM ABC CONFIRM Style Italic Vertical Ca...

Page 81: ... press To return all functions in the OPTION menu to their default settings hold down and press space bar NOTE To select the default setting OFF press space bar New Block Print Cancel CHANGE SETTINGS Style Italic Vertical Caps Alt Template Zoom Back ground Half Cut 36mm 24mm 18mm 12mm 9mm 6mm A OPTION COPIES 1 NUMBER OFF MIRROR OFF INVERT OFF TRANS FORM ABC CONFIRM Style Italic Vertical Caps Alt T...

Page 82: ...ion enables you to make the LCD display lighter or darker 1 Press 2 Press or to move Î beside CON TRAST 3 Press NOTE To return all functions in the SETUP menu to their default settings hold down and press space bar Setup Setup Setup CHANGE SETTINGS Style Italic Vertical Caps Alt Template Zoom Back ground Half Cut 36mm 24mm 18mm 12mm 9mm 6mm A SETUP LINE NO ON CONTRAST 0 BAUD RATE 57600 bps CONFIRM...

Page 83: ...enu 6 Press again to apply the setting NOTE To select the default setting press space bar NOTE To return all functions in the SETUP menu to their default settings hold down and press space bar CONFIRM Style Italic Vertical Caps Alt Template Zoom Back ground Half Cut 36mm 24mm 18mm 12mm 9mm 6mm A CONTRAST 2 1 0 1 2 New Block New Block Setup NOTE To select the default setting press space bar CHANGE ...

Page 84: ...75 Ch 4 Using Labels and Stamps Using Labels and Stamps Chapter 4 Using Labels and Stamps ...

Page 85: ...the stick three quarters of a turn towards you and pull the stick away from you as shown below 4 Peel off the label backing Non laminated tape 5 Slightly fold labels printed on non lami nated tape in half so that the inside edges of the two backing pieces come off the label enabling them to be peeled off easily Instant lettering tape By printing your text on instant lettering tape rub on transfers...

Page 86: ...tore iron on transfer tape cassettes in areas exposed to direct sunlight high humidity or dust NOTE White garments made from 100 cotton with a plain smooth surface are best for making iron on transfers You can also make transfers to garments made from 100 linen or cotton polyester blends as long as they have a plain smooth surface The iron on will not adhere properly to any cloth with a rough surf...

Page 87: ...m holder 1 Install a stamp film cassette and enter text into a pre formatted stamp template Refer to pages 57 through 61 for more details on using templates 2 Print out the stamp stencil and remove its backing paper 3 Remove the frame from around the stamp holder ink pad one end at a time and then remove the protective seal covering the ink pad P TOUCH NOTE If the stamp holder already contains a s...

Page 88: ... it in place with your finger 7 Fit the frame over the stamp film and then push the frame into place 8 Insert the stamp holder straight into the cap Tape end Glossy side Slit Fold over Guides NOTE Be sure that the cap correctly covers the stamp in order to prevent ink spills When the stamp is not being used firmly cover it with the cap and always store it standing up with the stamp facing downward...

Page 89: ...vary depending on the size and thickness of the char acters whether a shading pattern is used etc NOTE Use 12 mm wide tape to make an identification label for an M size stamp and use 18 mm wide tape to make a label for an L size stamp OK TO PRINT Style Italic Vertical Caps Alt Template Zoom Back ground Half Cut 36mm 24mm 18mm 12mm 9mm 6mm A PRINT STAMP PRINT LABEL CANCEL NOTE After stamping wait u...

Page 90: ...dy been entered in a block of text when you press or try to add currency conversion text This message appears if you press to delete text causing the number of lines in a block to exceed the ten line limit Limit the number of lines in the text block to ten or hold down and press to create a new block Adjust the number of lines so that the block will not have more than ten lines 30 CHARACTER LIMIT ...

Page 91: ... the text before trying to change the text format CAN T FIND FILE This message appears if a file with the entered file name cannot be found Search for a different file name CLOSE CASSETTE COVER This message appears if the tape compartment cover is open Close the compartment cover CUTTER ERROR TURN POWER OFF THEN ON AGAIN This message appears if the cutter did not operate correctly Turn off the P t...

Page 92: ...ld Limit the numbering field to five characters INSERT CASSETTE This message appears if no tape cassette is installed when you try to print text Install a tape cassette and try again INTERFACE MODE INTERFACE ERROR This message appears if an error occurs while receiving data This message appears if the size of the data being sent is larger than the width of the installed tape cas sette Cancel the p...

Page 93: ...rs if you try to recall a text file from the memory causing the text to exceed the 1 2 metre limit Delete some of the text or reduce the character size before trying to add more text Delete some of the text before trying to change the label or text formats Delete some of the text or reduce the character size Delete some of the text or reduce the character size Delete some of the text before recall...

Page 94: ...or the new one MEMORY FULL DELETE SOME FILES TRY AGAIN This message appears if there are no empty files available when NEW or SAVE AS FILE menu is selected Delete any unwanted files to make space for new ones NO FILES This message appears if no files are stored in the memory when you try to recall or delete one Store a text file before try ing to recall or delete one OVERFLOW This message appears ...

Page 95: ...when printing a stamp created using a template for L size stamp film Install an L size stamp film cassette SET STAMP M This message appears if an M size stamp film cassette is not installed when printing a stamp created using a template for M size stamp film Install an M size stamp film cassette SYSTEM ERROR This message appears if there is a problem with the machine s soft ware Contact your servi...

Page 96: ...ABLE TO PERFORM THIS OPERATION HERE This message appears if the cursor is located in a barcode mark when you try to paste in text or add a character a space a new line a new block a symbol a diacritical mark an accented character or currency conversion text This message appears if the cursor is located in a barcode mark when you press or Move the cursor or delete the barcode before trying to add a...

Page 97: ... display and all text files stored in the memory are erased 2 The text shown in the display cannot be read Use the Zoom mode to zoom in on the text Refer to page 36 3 The machine does not print or the printed characters are blurred Check that the tape cassette has been inserted properly If the tape cassette is empty replace it with a new one Make sure that the tape compartment cover has been close...

Page 98: ...to gently wipe up and down along the print head Rollers Use a dry cotton swab to wipe up and down along each roller while rotating them with your finger 4 Install a tape cassette close the tape com partment cover and then try printing again 5 If a blank streak still appears in the printed label repeat steps 2 through 4 using a cotton swab dipped in isopropyl rubbing alcohol If none of the above wo...

Page 99: ...e cutter 7 The machine has locked up i e noth ing happens when a key is pressed Reset the machine by turning it off and while holding down and turn ing the machine back on All text and formats in the display and in the memory will be erased 8 After turning on the P touch the message BACKUP MEMORY CLEARED appears and all of the files in the memory are lost The internal backup battery is low Con tac...

Page 100: ...n Tape cutter Auto full cutter Auto half cutter Dimensions 335 312 101 mm Weight 2 5 kg Character fonts 10 built in fonts Helsinki Brussels Calgary US San Diego Florida Brunei Bold Los Angeles Bermuda Script and Istanbul Character sizes AUTO plus 9 point sizes 6 9 12 18 24 36 48 60 and 72 points Character styles 9 built in type styles Normal Bold Outline Solid Shadow Out line Shadow Stripe Italic ...

Page 101: ...92 MACHINE SPECIFICATIONS ...

Page 102: ...93 Appendix Appendix Appendix ...

Page 103: ...39 40 41 42 43 44 45 46 47 48 49 Symbol Number 50 51 52 53 54 55 56 57 58 59 60 61 LETTER Symbol Number 62 63 64 65 66 67 68 69 70 71 NUMBER Symbol 1 2 1 3 1 4 1 2 3 4 5 6 7 8 9 0 Number 72 73 74 75 76 77 78 79 80 81 82 83 84 85 Symbol 0 1 2 3 4 5 6 7 8 9 Number 86 87 88 89 90 91 92 93 94 95 96 97 98 99 Symbol 0 1 2 3 4 5 6 7 8 9 Number 100 101 102 103 104 105 106 107 108 109 110 PICTOGRAPH Symbol...

Page 104: ...0 191 192 193 194 195 196 197 198 199 200 Symbol Number 201 202 203 204 205 WARNING 3 Symbol Number 206 207 208 209 210 211 212 213 214 215 216 217 218 219 Symbol Number 220 221 222 223 224 225 226 227 228 229 230 231 232 233 Symbol Number 234 235 236 237 238 239 240 241 242 243 244 245 246 INFORMATION Symbol Number 247 248 249 250 251 252 253 254 255 256 257 258 259 260 Symbol Number 261 262 263 ...

Page 105: ...349 350 351 352 ANIMALS Symbol Number 353 354 355 356 357 358 359 360 361 362 363 364 FLORAL Symbol Number 365 366 367 368 FOOD DRINK Symbol Number 369 370 371 372 373 374 375 376 377 378 379 380 381 382 Symbol Number 383 384 385 386 OFFICE Symbol Number 387 388 389 390 391 392 393 394 395 396 397 398 399 400 Symbol Number 401 402 403 404 405 406 407 408 409 410 411 412 413 414 Symbol Number 415 4...

Page 106: ...mber 441 442 443 444 TOOLS Symbol Number 445 446 447 448 ASTROLOGY Symbol Number 449 450 451 452 POINTERS Symbol Number 453 454 455 456 457 458 459 460 FISH Symbol Number 461 462 INSECTS Symbol Number 463 464 465 466 VIDEO Symbol Number 467 468 469 470 471 472 473 474 475 Category ...

Page 107: ...tocols CODE39 or CODABAR Fonts p 40 The following fonts are available Value Character Value Character Value Character 3 69 ENQ 87 ETB 4 70 ACK 88 CAN 11 71 BEL 89 EM 28 72 BS 90 SUB 29 73 HT 91 ESC 30 74 LF 91 32 75 VT 92 FS 59 76 FF 92 60 77 CR 93 GS 61 78 SO 93 62 79 SI 94 RS 63 _ 80 DLE 94 64 NUL 81 DC1 95 US 64 82 DC2 95 DEL 65 SOH 83 DC3 96 FNC3 66 STX 84 DC4 97 FNC2 67 ETX 85 NAK 100 FNC4 68...

Page 108: ...99 Appendix Appendix Sizes and widths pp 41 42 Samples of the available text sizes and widths are shown below Width Size Wide Medium Narrow 72pt 60pt 48pt 36pt 24pt 18pt 12pt 9pt 6pt ...

Page 109: ...100 Appendix Appendix Type styles p 43 Normal Bold Outline Solid Shadow Outline Shadow Stripe Helsinki Brussels US San Diego Florida Calgary Brunei Bold Los Angeles Bermuda Script Istanbul ...

Page 110: ...101 Appendix Appendix Framing and shading patterns p 47 The following frame and shading patterns are available Frame Shading ...

Page 111: ...Appendix Appendix Background designs p 55 Samples of the available background designs are shown below OFF TILES SMALL TARTAN LARGE TRIANGLE PARQUET FLORAL METAL GEOMETRY MOSAIC GRADUATE 1 MARBLES GRADUATE 2 ...

Page 112: ... Template name Tape width Label length Sample 1 ADDRESS ADDRESS 1 24 mm 8 0 cm 2 ADDRESS 2 24 mm 7 8 cm 3 ADDRESS 3 24 mm 10 4 cm 4 ADDRESS 4 36 mm 8 6 cm 5 EQUIPMENT EQUIPMENT 24 mm 8 4 cm 6 PLATE PLATE 36 mm 18 6 cm 7 NAMEPLATE NAMEPLATE 1 18 mm 8 6 cm 8 NAMEPLATE 2 36 mm 9 8 cm 9 NAMEPLATE 3 18 mm 5 2 cm ...

Page 113: ...ALE 36 mm 24 6 cm 11 PRICE 1 24 mm 5 7 cm 12 PRICE 2 24 mm 11 0 cm 13 SIGN SIGN 36 mm 11 4 cm 14 FLOPPY FLOPPY 1 24 mm 7 0 cm 15 FLOPPY 2 24 mm 7 0 cm 16 FLOPPY 3 36 mm 7 0 cm No Category Template name Tape width Label length Sample ...

Page 114: ...19 8mm 1 9 mm 7 3 cm 20 8mm 2 12 mm 9 2 cm 21 VHSC 18 mm 8 1 cm 22 AUDIO AUDIO 1 9 mm 8 9 cm 23 AUDIO 2 9 mm 8 9 cm 24 AUDIO 3 9 mm 8 9 cm 25 SLIDE SLIDE 12 mm 4 2 cm 26 FILE FILE 1 36 mm 20 0 cm 27 FILE 2 24 mm 19 0 cm No Category Template name Tape width Label length Sample ...

Page 115: ...9 NORMAL M STAMP M 10 2 cm 30 FRAMED L STAMP L 11 2 cm 31 FRAMED M STAMP M 10 2 cm 32 2LINE L STAMP L 11 2 cm 33 2LINE FRAME L STAMP L 11 2 cm 34 VERTICAL L STAMP L 11 2 cm 35 VERTICAL M STAMP M 10 2 cm No Category Template name Tape width Label length Sample ...

Page 116: ...xt styles are shown below CHAR style Sample Font Style Italic ORIGINAL Template default ITALIC Template default ON DYNAMIC ISTANBUL SOLID OFF ARTISTIC FLORIDA OUTLINE OFF FORMAL BRUSSELS NORMAL ON ELEGANT US NORMAL OFF FREE BERMUDA SCRIPT OUTLINE SHADOW OFF NATURAL SAN DIEGO NORMAL OFF ...

Page 117: ...108 Appendix Appendix Text transformation styles p 69 Samples of the text transformation shapes are shown below OFF ABC ABC ABC ABC ABC ABC ...

Page 118: ...or keys 24 CUT function 70 Cutting tape 64 70 D Default settings BACK background function 56 Font function 40 H ALI horizontal alignment function 54 Italic function 44 LENGTH function 52 Line effects function 45 MARGIN function 53 PITCH function 55 Size function 41 Style function 43 Vertical function 46 Width function 42 Deleting Display 37 Files 63 Text 37 Diacritical marks 26 Display settings 73...

Page 119: ...5 Power supply cord 9 Power supply key 12 Previewing 64 PRINT FORMAT menu 34 Print key 64 Printing Identification labels 59 Stamps 59 Template labels 59 PROTOCOL menu 29 P touch Editor Installation 13 Operation 17 User s Guide 20 Punctuation marks 26 27 94 R Recalling Template text 63 Text 62 Reversing Print 68 Text 67 S Saving Template text 60 Text 61 Selecting Functions 24 Settings 24 Text 38 39...

Page 120: ...111 TRANSFORMATION function 69 TYPE parameter 29 U UNDER parameter 29 Underlining 45 Uppercase letters 25 V Vertical function 46 W Width function 42 WIDTH parameter 29 WYSIWYG mode 25 Z Zoom key 36 ...

Page 121: ...adhesive TZ M51 Black characters on clear mat adhesive TZ 251 Black characters on white adhesive TZ 451 Black characters on red adhesive TZ 551 Black characters on blue adhesive TZ 651 Black characters on yellow adhesive TZ 751 Black characters on green adhesive TZ C51 Black characters on fluorescent yellow adhesive TZ B51 Black characters on fluorescent orange adhesive TZ D51 Black characters on ...

Page 122: ... characters on clear adhesive TZ 231 Black characters on white adhesive TZ 232 Red characters on white adhesive TZ 233 Blue characters on white adhesive TZ 334 Gold characters on black adhesive TZ 335 White characters on black adhesive TZ 431 Black characters on red adhesive TZ 435 White characters on red adhesive TZ 531 Black characters on blue adhesive TZ 535 White characters on blue adhesive TZ...

Page 123: ...hesive TZ 211 Black characters on white adhesive TZ 315 White characters on black adhesive TZ 611 Black characters on yellow adhesive 24 mm non laminated tapes TZ N251 Black characters on white adhesive 18 mm non laminated tapes TZ N241 Black characters on white adhesive TZ N242 Red characters on white adhesive TZ N243 Blue characters on white adhesive TZ N541 Black characters on blue adhesive TZ ...

Page 124: ... TZ N221 Black characters on white adhesive 6 mm non laminated tapes TZ N211 Black characters on white adhesive Stock No Description TZ L041 18 mm instant lettering tape TZ IY41 18 mm iron on transfer tape TZ SE4 18 mm security tape TZ FA3 12 mm fabric tape Stock No Description TZ T240 White tape TZ R041 Black ink ribbon TZ R042 Red ink ribbon TZ R043 Blue ink ribbon Stock No Description SH LB Sta...

Page 125: ...116 ...

Page 126: ...Printed in Japan UT1533001 A ...

Reviews: