


Scan Using the Scan Button on Your Brother Machine
> Set up a Scan to Network Profile
Set up a Scan to Network Profile
Set up a Scan to Network Profile to scan and upload scanned data directly to a folder on a CIFS server.
•
We recommend Microsoft
®
Internet Explorer
®
8/11 and Microsoft Edge
™
for Windows
®
. Make sure
JavaScript and Cookies are always enabled in whichever browser you use. If a different web browser is
used, make sure it is compatible with HTTP 1.0 and HTTP 1.1.
1. Start your web browser.
Type "http://machine's IP address" in your browser's address bar (where "machine's IP address" is the IP
address of the machine or the print server name). For example: http://192.168.1.2
No password is required by default. If you have previously set a password, type it, and then click .
2. Click the
Scan
tab.
3. Click the
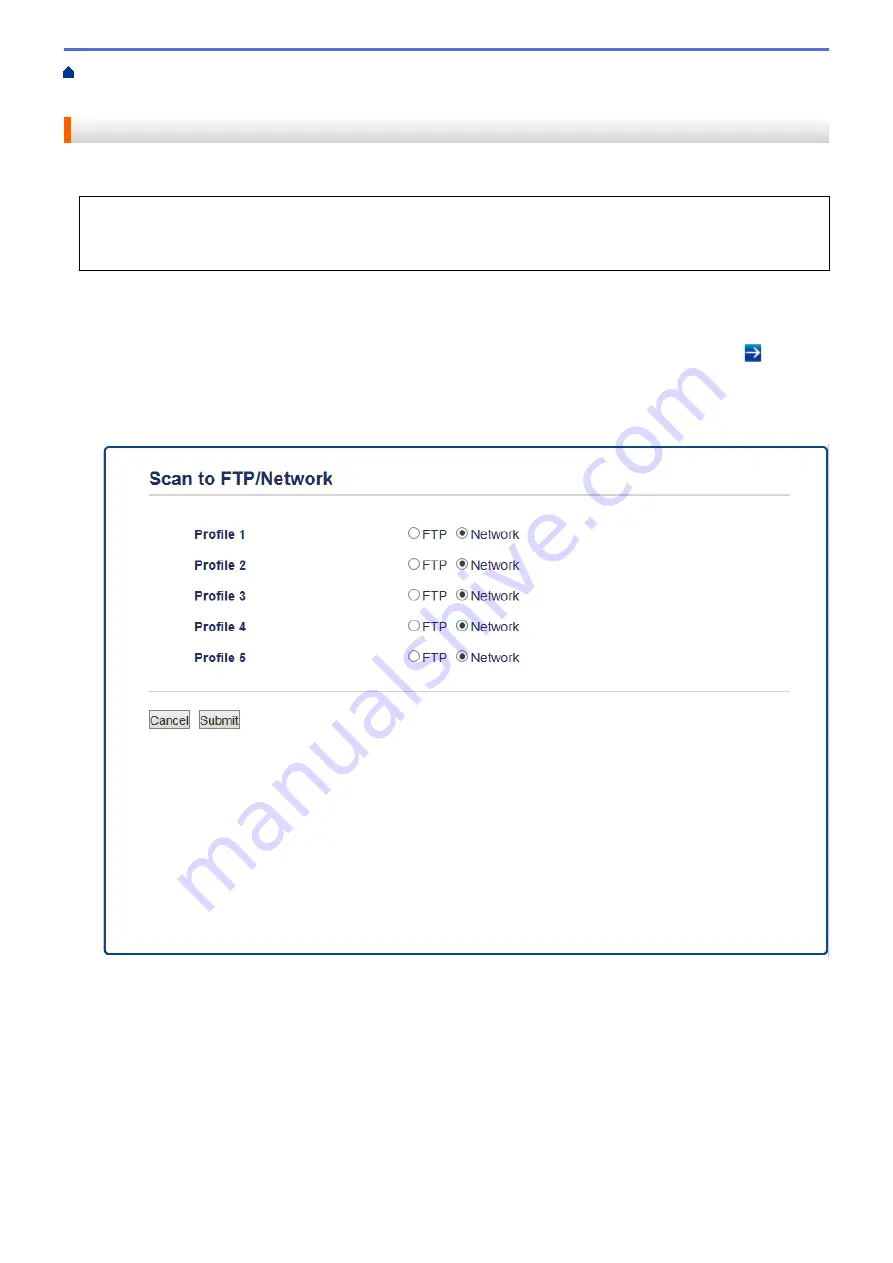
Scan to FTP/Network
menu in the left navigation bar.
4. Select the
Network
option, and then click
Submit
.
5. Click the
Scan to FTP/Network Profile
menu in the left navigation bar.
6. Select the profile you want to set up or change.
7. In the
Profile Name
field, type a name for this server profile (up to 15 alphanumeric characters). The
machine will display this name on the LCD.
8. In the
Network Folder Path
field, type the path to the folder on the CIFS server where you want to send your
scanned data.
9. Click the
File Name
drop-down list, and then select a file name from the preset names provided, or from
user-defined names. You can set the user-defined names and file name style in the
Scan File Name
menu in
the left navigation bar.
10. Click the
Quality
drop-down list, and then select a quality setting. If you choose the
User Select
option, the
machine will prompt users to select a setting each time they use the scan profile.
164
Summary of Contents for MFC-J5330DW
Page 25: ... Use the Ledger Copy Shortcuts Error and Maintenance Messages 18 ...
Page 27: ...Related Information Touchscreen LCD Overview 20 ...
Page 32: ...Related Information Introduction to Your Brother Machine 25 ...
Page 37: ...Home Paper Handling Paper Handling Load Paper Load Documents 30 ...
Page 44: ... Choose the Right Print Media Change the Paper Size and Paper Type 37 ...
Page 174: ...Related Information Set up a Scan to Network Profile 167 ...
Page 190: ...Related Information Scan Using the Scan Button on Your Brother Machine 183 ...
Page 256: ... TWAIN Driver Settings Macintosh 249 ...
Page 281: ... Important Note 274 ...
Page 294: ...Related Information Send a Fax Fax Options 287 ...
Page 300: ... Set up Groups for Broadcasting Enter Text on Your Brother Machine 293 ...
Page 329: ...Related Information Memory Receive Options 322 ...
Page 359: ...Related Information Store Fax Numbers 352 ...
Page 361: ... Store Address Book Numbers 354 ...
Page 389: ... Set the Machine to Power Off Automatically 382 ...
Page 390: ...Home Fax PC FAX PC FAX PC FAX for Windows PC FAX for Macintosh 383 ...
Page 445: ... Wi Fi Direct Network Configuration Overview 438 ...
Page 454: ...Related Information Configure Your Brother Machine for Email or I Fax 447 ...
Page 540: ...Related Information Set Up Brother Web Connect 533 ...
Page 544: ...Related Information Set Up Brother Web Connect 537 ...
Page 579: ...4 Press OK The machine scans the document Related Information NotePrint and NoteScan 572 ...
Page 689: ... My Brother Machine Cannot Print Scan or PC FAX Receive over the Network 682 ...
Page 705: ... Clean the Print Head from Your Brother Machine 698 ...
Page 819: ...Home Appendix Appendix Specifications Enter Text on Your Brother Machine 812 ...
Page 830: ...USA CAN Version 0 ...


