Fabric OS Administrator’s Guide
503
53-1001763-02
Fabric configurations for interconnectivity
A
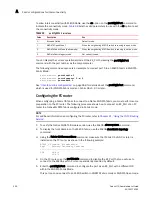
6. Connect to the switch and configure the connection to capture console output.
7. Enter the supportShow (or supportSave if available) command, and save the output.
8. If the fabric does not appear:
a. Disable the EX_Port on the connected fabric.
b. Enter the portLogClear command for the port.
c. Enable the port on the FC router.
d. Enter the portLogDump command for the port, capturing the output.
Use the portLogDump tool to troubleshoot the problem, using the command output.
If an EX_Port connecting an FC router and an edge fabric is disabled due to an error, the error
causing that port's most recent disabled state appears in the switchShow command output.
This error appears until that port comes back online, even after the cables have been
detached from the port.
To remove the error listing in the switchShow output, reboot the FC router. An example of the
type of error displayed is ‘Incompatible port mode’.
Completing the configuration
After you prepare the M-EOS switch and the FC router for use, complete the configuration using the
following procedure.
1. Physically connect the EX_Port that you configured for the Fabric OS switch to the FC router.
2. Log in to the Fabric OS switch as an admin.
3. Physically connect the configured FC router EX_Port to the M-EOS switch, and issue the
switchShow command on the Brocade FC router.
New domains should be visible for each IFL (front domain) that connects the Fabric OS switch
to the FC router and one domain for the translate domain.
4. Start DCFM and select the fabric for the M-EOS switch.
5. View the fabric topology.
New domains should be visible for each FC router connected to the M-EOS switch. Multiple
connections from the same FC router appear as only a single domain. New domains also
appear for every translate domain that was created to import a remote device.
In DCFM, the M-EOS switch should appear green. Tab to Zone and verify that the zone set
configuration is correct: a blue icon beside each entry indicates that the devices are logged in
to the fabric.
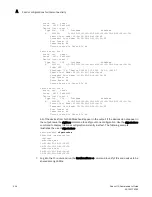
6. Log in to the Fabric OS edge fabric switch and enter the nsAllShow or the nsCamShow
command.
edgeswitch:admin>
nsallshow
{
010e00 020000 03f001 04f002
4 Nx_Ports in the Fabric }
edgeswitch:admin>
nscamshow
nscam show for remote switches:
Switch entry for 1
Summary of Contents for 53-1001763-02
Page 1: ...53 1001763 02 13 September 2010 Fabric OS Administrator s Guide Supporting Fabric OS v6 4 0 ...
Page 4: ...iv Fabric OS Administrator s Guide 53 1001763 02 ...
Page 24: ...xxiv Fabric OS Administrator s Guide 53 1001763 02 ...
Page 28: ...xxviii Fabric OS Administrator s Guide 53 1001763 02 ...
Page 32: ...xxxii Fabric OS Administrator s Guide 53 1001763 02 ...
Page 40: ...xl Fabric OS Administrator s Guide 53 1001763 02 ...
Page 42: ...2 Fabric OS Administrator s Guide 53 1001763 02 ...
Page 54: ...14 Fabric OS Administrator s Guide 53 1001763 02 High availability of daemon processes 1 ...
Page 74: ...34 Fabric OS Administrator s Guide 53 1001763 02 Basic connections 2 ...
Page 102: ...62 Fabric OS Administrator s Guide 53 1001763 02 Audit log configuration 3 ...
Page 214: ...174 Fabric OS Administrator s Guide 53 1001763 02 Management interface security 7 ...
Page 228: ...188 Fabric OS Administrator s Guide 53 1001763 02 Brocade configuration form 8 ...
Page 276: ...236 Fabric OS Administrator s Guide 53 1001763 02 Creating a logical fabric using XISLs 10 ...
Page 404: ...364 Fabric OS Administrator s Guide 53 1001763 02 ...
Page 440: ...400 Fabric OS Administrator s Guide 53 1001763 02 Performance data collection 17 ...
Page 480: ...440 Fabric OS Administrator s Guide 53 1001763 02 F_Port masterless trunking 19 ...
Page 494: ...454 Fabric OS Administrator s Guide 53 1001763 02 Buffer credit recovery 20 ...
Page 574: ...534 Fabric OS Administrator s Guide 53 1001763 02 Hexadecimal overview E ...

