Configuration
9
© 2006 Vision Engraving Systems
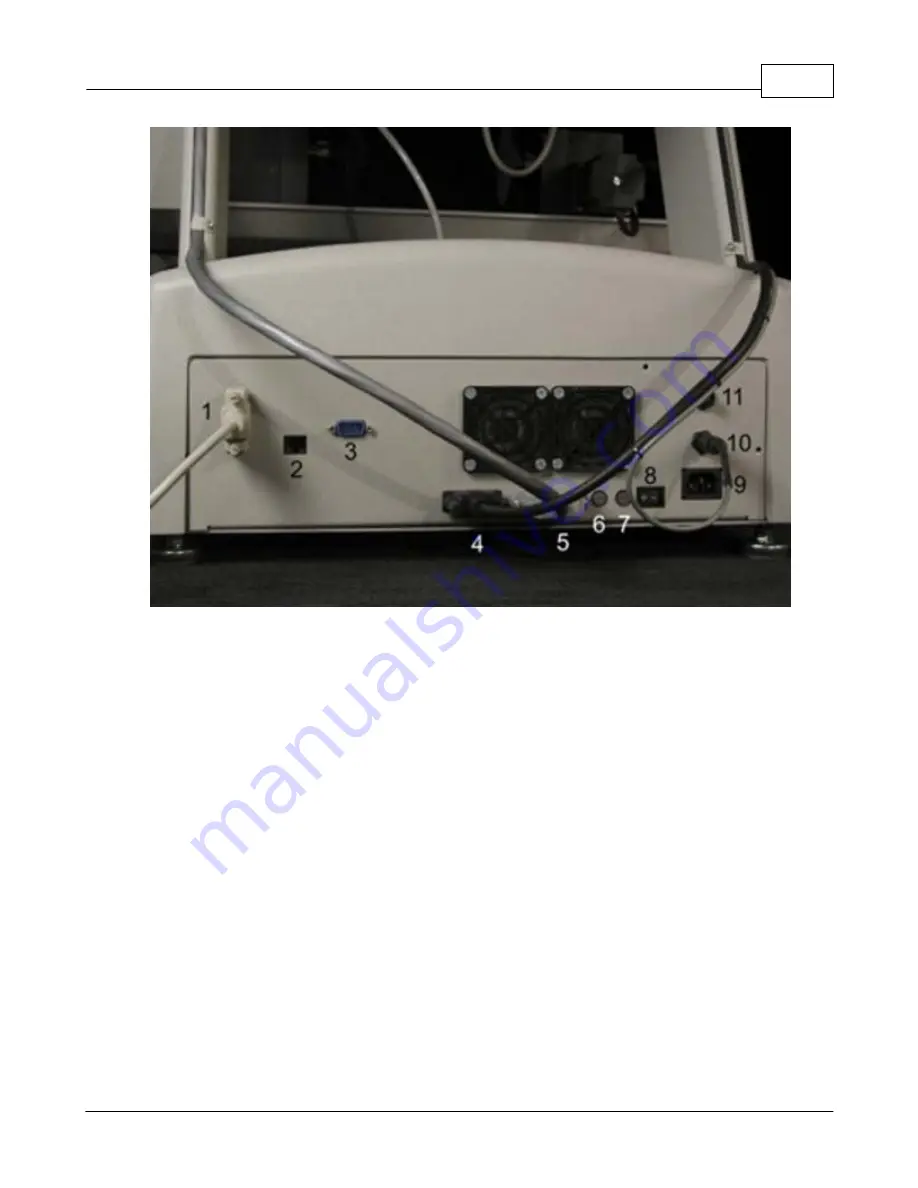
1. Connect the hand held pendant cable to the position labeled 1 in figure 2.2. Make sure to
tighten both screws in the plug securely.
2. Connect the supplied network cable to the plug labeled 2 in figure 2.2 Please see the
next section in this manual labeled ‘Using a network connection’ for information on how to
connect the other end of this cable to your PC.
3. Plug 3 in figure 2.2 is used only in the event that no network connection is available to use
the engraver with. In this case, use the supplied 9 pin female to 9 pin female null modem
cable to connect from the MaxPro to your computers serial port. Note: This is only used if
you are NOT using the network connection on the MaxPro.
4. Looking from the back side of the machine, plug in the large cable from the right upright
into the plug labeled 4 in figure 2.2. This is used for the rotary axis motor and vice motor.
Make sure to tighten both screws in the plug securely.
5. Connect the 25-pin cable to the plug labeled 5 in figure 2.2. This cable connects the
entire head of the machine to the electronics tray. Make sure to tighten both screws in
the plug securely.
6. Number 6 in figure 2.2 is the DC fuse holder. If this fuse were to blow, replace it with an 8
amp fuse.
7. Number 7 in figure 2.2 is the AC fuse holder. If this fuse were to blow, replace it with a 10
amp slow blow fuse.
8. Number 8 in figure 2.2 is the on/off power switch.
Содержание MaxPro
Страница 5: ...Chapter I ...
Страница 11: ...Chapter II ...
Страница 23: ...Configuration 19 2006 Vision Engraving Systems 3 Click on the IP Address tab ...
Страница 60: ......
Страница 61: ...Chapter III ...
Страница 100: ...Vision MaxPro 96 2006 Vision Engraving Systems Mounting the item to be engraved ...
Страница 114: ...Vision MaxPro 110 2006 Vision Engraving Systems Select Finish The Plate Size screen will appear ...
Страница 137: ...Operations 133 2006 Vision Engraving Systems If No is clicked the program returns to the Flat plate dimension screen ...
Страница 179: ...Operations 175 2006 Vision Engraving Systems The Plot screen below will appear ...
Страница 182: ......
Страница 183: ...Chapter IV ...
Страница 191: ...Chapter V ...
Страница 202: ...Vision MaxPro 198 2006 Vision Engraving Systems W Windows 2000 15 Windows 98 18 Windows XP 12 ...
Страница 203: ......


