BASIC SYSTEM FEATURES
Section 6-6
operly. Contact the Technical Support Department if you have any
ou need to have the Honeycomb Cutting Table installed in the PLS to activate the FOCUS
er engraving. For more information about the rotary read the
e has
the user once the Z-Axis menu is entered or if the Auto-Focus button is pressed on the PLS keypad.
ation
alling the Technical
igh setting is being used and the firmware
e Keypad/Display on the laser system.
stem.
s above the recommended temperature or if the
gered an
alarm will sound and shut down your laser system.
FIXTURES indicate if a cutting table or rotary is installed and properly working.
the focus lens to the top surface of a table by clicking the red CALIBRATE button, otherwise the PLS
will not focus the laser beam pr
question about lens calibration.
•
The ALIGNMENT Launch button opens the Alignment Mode window.
•
CUTTING TABLE allows you to calibrate a new Z-height to the top surface of Honeycomb Cutting
Table. Y
button.
•
ROTARY is activated once the rotary accessory is installed. Rotary calibration should be done once
when the rotary is installed for prop
Accessories section on this manual.
•
If the SOUNDS box is checked the computer will play the sound shown indicated once the fil
finished engraving. Be sure that your computer speakers are on and at an appropriate volume.
•
MANUAL FOCUS POSITION automatically moves the focus carriage to the coordinates entered by
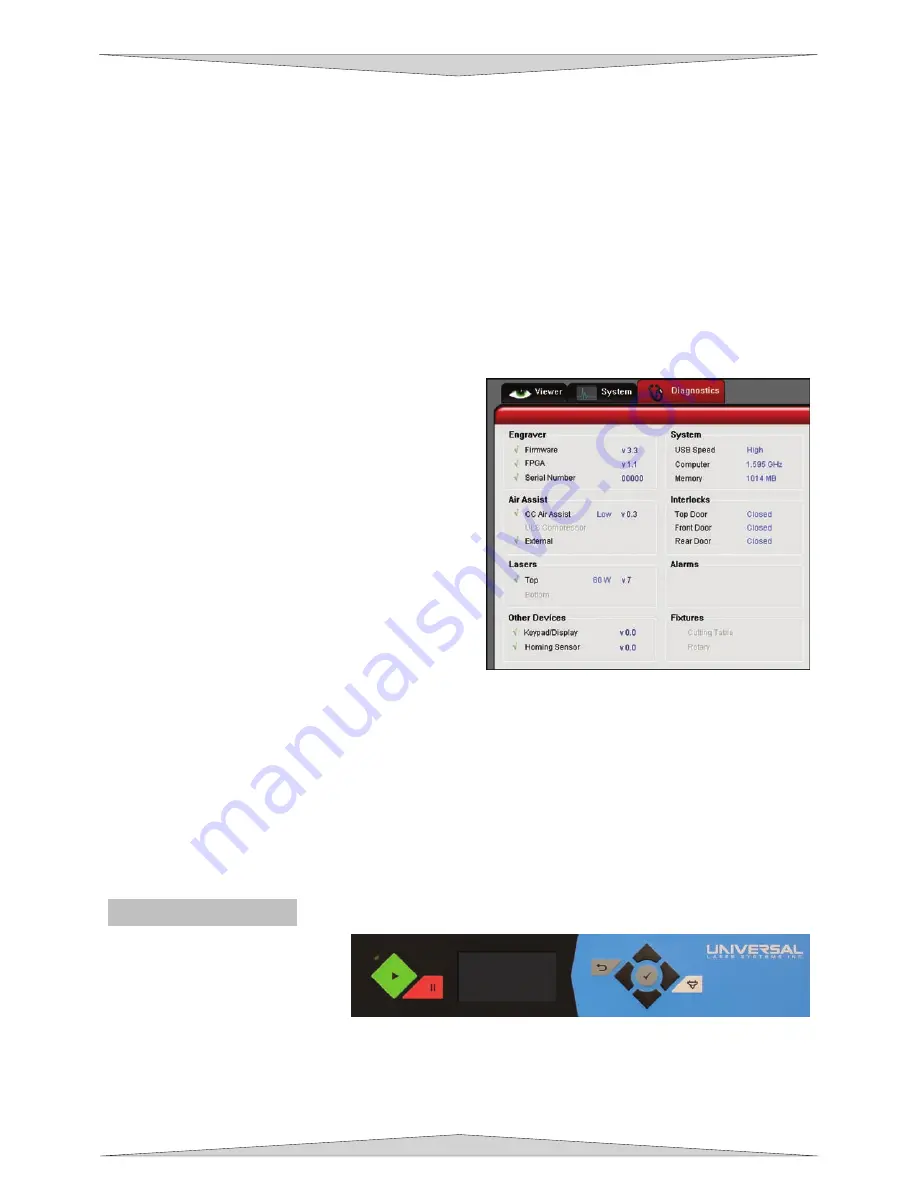
Diagnostics Tab
The Diagnostics Tab displays important inform
about your laser system and personal computer.
•
ENGRAVER shows the current Firmware and
FPGA version being used. It also displays the
Serial Number of your laser system. The Serial
Number is needed when c
Support Department at ULS.
•
AIR ASSIST displays the current device being
used, shown by a green check mark, to supply
compressed air to the laser system. According to
the Air Assist device being used it may show if a
Low or H
version.
•
LASERS displays if the Top or Bottom laser tube
(if applicable) is being used and the watts being
produced by the laser. It also displays the current
version being used. If a red ‘x’ appears this
indicates that the laser tube is not functioning
properly or a door is opened on the laser system.
•
OTHER DEVICES displays the current firmware version of th
It also displays the current firmware version of the Homing Sensor on the laser sy
•
SYSTEM displays information about your personal computer.
•
INTERLOCKS show you if the Top, Front, or Rear Doors are Opened or Closed.
•
ALARMS alert you if the inside the laser system i
Thermal Sensor battery is low in power. If the Thermal Sensor inside the laser system is trig
•
The PLS Keypad
The Keypad on the laser system
provides limited access to controls
necessary for cutting and
engraving operations. When the
laser system has finished
initializing and homing, and if all
he Red LED (Light Emitting Diode) will act differently depending on the current state of the laser system.
lease refer to the chart below.
the doors are closed, the red light on the keypad will be illuminated and ready to run a file.
T
P
Содержание PLS3.60
Страница 8: ......
Страница 20: ...SAFETY Section 1 12 ...
Страница 21: ...Part 1 Initial Setup ...
Страница 22: ......
Страница 30: ...INSTALLATION Section 2 10 ...
Страница 44: ...GRAPHICS SOFTWARE SETUP Section 3 14 ...
Страница 58: ...MAKING A SAMPLE Section 5 4 ...
Страница 59: ...Part 2 Laser System Essentials ...
Страница 60: ......
Страница 70: ...BASIC SYSTEM FEATURES Section 6 12 ...
Страница 76: ...BASIC MAINTENANCE Section 7 6 ...
Страница 77: ...Part 3 Accessories ...
Страница 78: ......
Страница 95: ...Part 4 Advanced User ...
Страница 96: ......
Страница 116: ...ADVANCED SYSTEM OPERATION Section 9 22 ...


