MAKING A SAMPLE
Section 5-2
Step 3 – Printing to the Laser System (Materials Database Tab)
The following steps assume that CorelDraw X3 is
being used as your graphics software and using the
Materials Database Tab in the printer driver. Other
graphic software programs may differ.
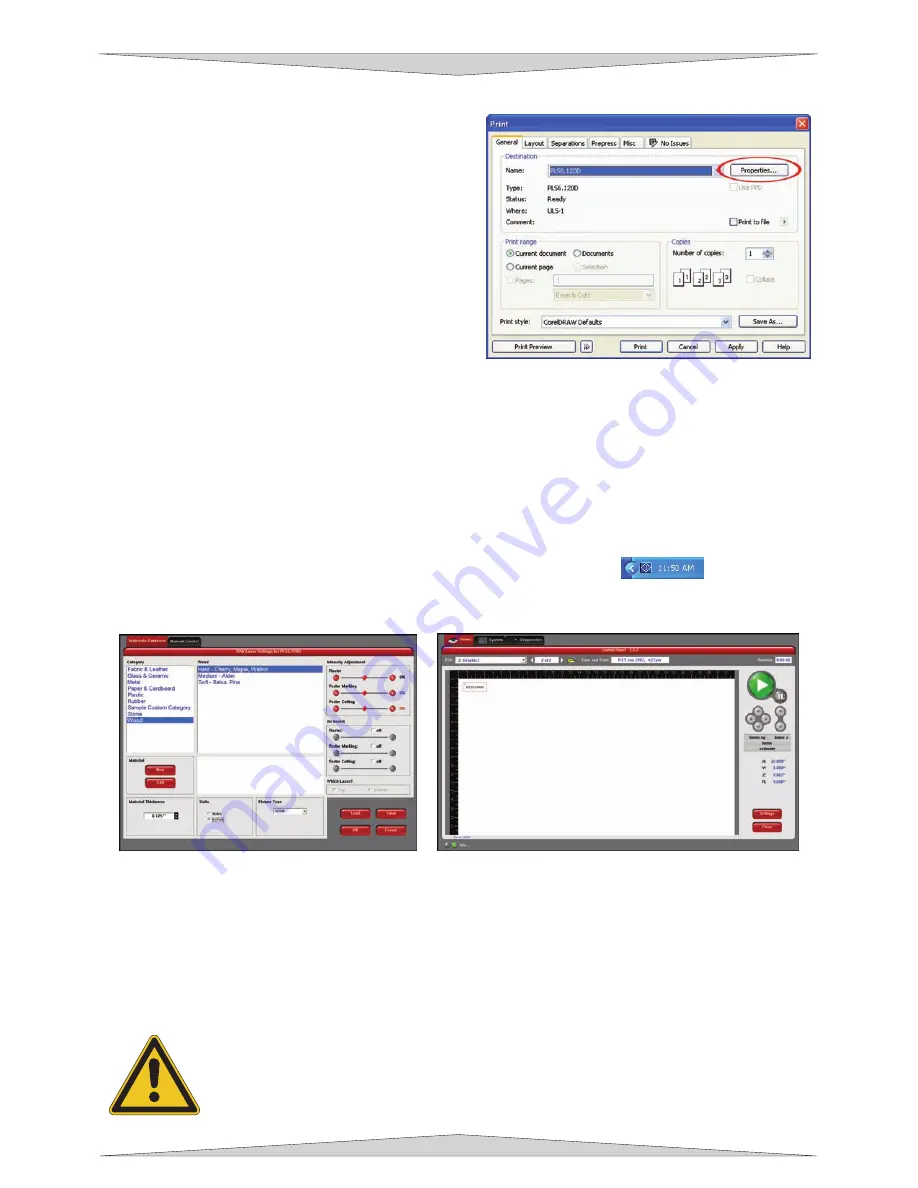
When you are ready to print the file to the laser
system, click FILE and then click PRINT. Make sure
that the laser system appears in the DESTINATION
NAME dropdown list, and then click PROPERTIES
(Figure 4) to display the PLS printer driver settings
(Figure 5).
Choose your material by selecting the appropriate
category from the material categories on the left (in
this case wood) and then select the correct material
type from the material types on the right (in this case
hardwood) (Figure 5). Since we are placing the
material directly on the work surface, leave the Fixture Type set to NONE. If you were using an optional
accessory or custom fixture you would choose it from the fixture list. Using a calipers or similar
measuring device, enter the thickness of the material (in this case .125 inch). For this sample there is no
need to make changes to the INTENSITY ADJUSTMENT or AIR ASSIST boxes. If you have purchased
two laser tubes and would like to make your sample using both laser tubes select BOTH in the “Which
Laser?” box (PLS6.120D only). When you have made all the appropriate selections and entered the
material thickness, click OK. The printer driver closes and reverts back to the Print Dialog box and now
click on PRINT (Figure 4). As the print job is being created, a small printer icon will appear in your taskbar
in the lower right corner of your computer screen. Once the icon disappears the print job is completed
and is now stored on your hard drive. Click on the PLS icon in the taskbar
and the current
print job will appear in the Viewer Tab of the Universal Control Panel (Figure 6). Now click on the System
Tab and verify that the Auto Z box is checked. Return to the Viewer Tab and proceed to the next step.
Step 4 – Starting the Engraving Process
•
Turn ON the exhaust system and PLS machine. Laser tube fans will stop spinning once the laser
system has been turned on. This is normal and the fans will start spinning once engraving has
started.
•
Make sure the material is positioned correctly within the engraving area.
•
Make sure the top door is closed.
•
Click the green START button on the UCP to begin laser processing (Figure 6).
WARNING:
Observe that the laser system is functioning as desired. If any abnormalities
are present, including but not limited to, flaming, sparking, melting, or excessive smoking
of the material you are engraving,
STOP THE ENGRAVING PROCESS IMMEDIATELY
BY EITHER PRESSING THE PAUSE BUTTON OR OPENING THE TOP DOOR!
Re-
check the settings in the printer driver as well as the laser system. If everything seems to
Figure 5
Figure 6
Figure 4
Содержание PLS3.60
Страница 8: ......
Страница 20: ...SAFETY Section 1 12 ...
Страница 21: ...Part 1 Initial Setup ...
Страница 22: ......
Страница 30: ...INSTALLATION Section 2 10 ...
Страница 44: ...GRAPHICS SOFTWARE SETUP Section 3 14 ...
Страница 58: ...MAKING A SAMPLE Section 5 4 ...
Страница 59: ...Part 2 Laser System Essentials ...
Страница 60: ......
Страница 70: ...BASIC SYSTEM FEATURES Section 6 12 ...
Страница 76: ...BASIC MAINTENANCE Section 7 6 ...
Страница 77: ...Part 3 Accessories ...
Страница 78: ......
Страница 95: ...Part 4 Advanced User ...
Страница 96: ......
Страница 116: ...ADVANCED SYSTEM OPERATION Section 9 22 ...


