ReadyV Quick Start Card for Self-Contained Sentinel V Systems
95D-6012-00 (September 2017)
EAR-Controlled Technology Subject to Restrictions Contained on the Cover Page.
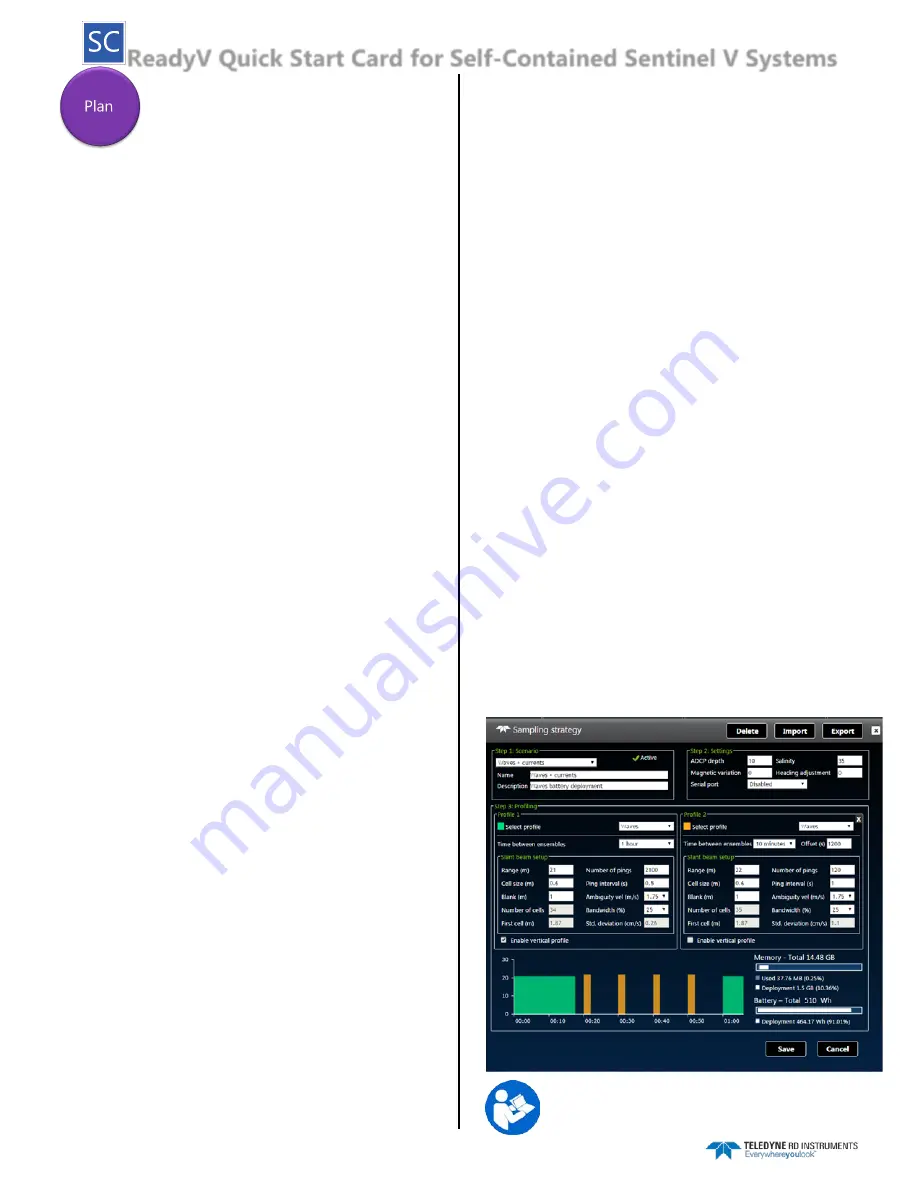
Step 1: Set Sampling Strategy
Use the
Step 1: Scenario
panel to:
•
Select a template using the drop-down list. Name the
deployment and enter a description.
When a scenario is first created, it will use a default name. For
example, selecting the
Coastal Mooring Template
and clicking the
Save
button will save the scenario as
Coastal Mooring
. Make sure to
change the name of the scenario and add a description for future use.
Use the
Step 2: Settings
panel to:
•
Set the ADCP depth, water salinity, magnetic variation, and
heading adjustment.
•
Enable or disable (default) the Serial port and select the Baud
rate to stream the data serial real-time. If the serial port
connector is not installed “Serial port not present” is displayed.
Use the
Step 3: Profiling
panel to:
•
Select a
Profile
using the drop-down list.
•
Select the
Range
to measure. The maximum range is
dependent on the ADCP frequency, water salinity, water
temperature and the depth of the ADCP.
•
Set the
Cell size
. Adjust the cell size as necessary. A larger cell
size decreases the standard deviation, but shallow water
situations may need to use smaller cells to gather more data
points.
•
The
Number of cells
value will be calculated based on the
Range and Cell size.
•
The
Blank
setting moves the location of the first cell away from
the ADCP transducer head
.
The default value is based on system
frequency and is highly recommended to use this value.
•
Ambiguity velocity
represents the maximum relative velocity
(ADCP motion plus the maximum actual water velocity) the
ADCP can measure along a beam. Select one of the settings
from the drop-down list. This must be set correctly to avoid
ambiguity errors. Ambiguity velocity is used to improve the
standard deviation: The lower the value of the ambiguity
velocity, the lower the single-ping standard deviation.
•
Set the profiling
Bandwidth
to Low or High. The Low bandwidth
allows the ADCP to profile farther, but the standard deviation is
increased by as much as 2.5 times.
•
Select a
Time between ensembles
from the drop down list.
Time is based on the start of one ensemble to the start of the
next ensemble.
•
Set the
Ping interval
(time per ping). For a Waves deployment,
the
Ping interval
must be 0.5 seconds.
Velocity
can only process
waves data collected at 2 Hz.
•
Adjust the
Number of pings
to gather the desired Standard
Deviation. To increase the expected accuracy of the velocity
measurement (reduce the Standard Deviation), increase either
the Number of pings, Cell size, or both.
•
Checkbox to enable the Vertical Beam (if feature is enabled).
•
Click the
Save
button to return to the
Home
panel.
Step 2: Review System
Use the
Review System
panel to:
•
View the configuration including software / firmware version.
•
View the sensor data.
•
Activate/Deactivate features.
Step 3: Download Data
Use the
Download Data
panel to:
•
Check the status of data files.
•
Download data files.
•
Delete data files.
•
Format recorder card.
Step 4: System Check
Use the
Maintenance
Panel to:
•
Calibrate the compass.
•
Zero the pressure sensor.
•
Set the date that the battery was replaced.
•
Set the date that the O-Ring was replaced.
•
Set the date that the desiccant was replaced.
•
Set the date that the silicone oil was replaced.
•
Set the date that the battery springs were replaced.
•
Update Firmware.
•
Shows a report of the factory maintenance performed.
Step 5: Review Resources
Use the
Review Resources
panel to:
•
Set the ADCP power source and the deployment duration to
estimate power usage and recorder requirements.
Step 6: Deployment Checklist
Use the
Deployment Checklist
panel to:
•
View deployment checklist.
•
Sets whether the ADCP deploys
Now
or
Later
.
•
Start a deployment.
•
Once deployed, the Deploy button changes to Stop. Click the
Stop
button to stop the deployment.
Import / Export / Delete
These buttons are located on the
Step 1: Sampling strategy
panel
•
Use the
Import
/
Export
buttons to import or export scenarios.
•
Use the
Delete
button to remove scenarios from the ADCP.
See Chapter 2 of the Sentinel V SC_RT Operation Manual
for details on each setting.


