


Using Objet Studio
5–20
DOC08010 Rev. A (DRAFT 1)
The
ȱ
object
ȱ
appears—on
ȱ
the
ȱ
build
ȱ
tray
ȱ
and
ȱ
in
ȱ
the
ȱ
model
ȱ
tree—as
ȱ
an
ȱ
assembly
ȱ
of
ȱ
parts
ȱ
(“shells”).
ȱ
You
ȱ
can
ȱ
assign
ȱ
each
ȱ
part
ȱ
a
ȱ
different
ȱ
model
ȱ
material
ȱ
(This
ȱ
is
ȱ
explained
ȱ
in
ȱ
“Model
Ȭ
Material
ȱ
Settings”
ȱ
on
ȱ
page 20).
ȱ
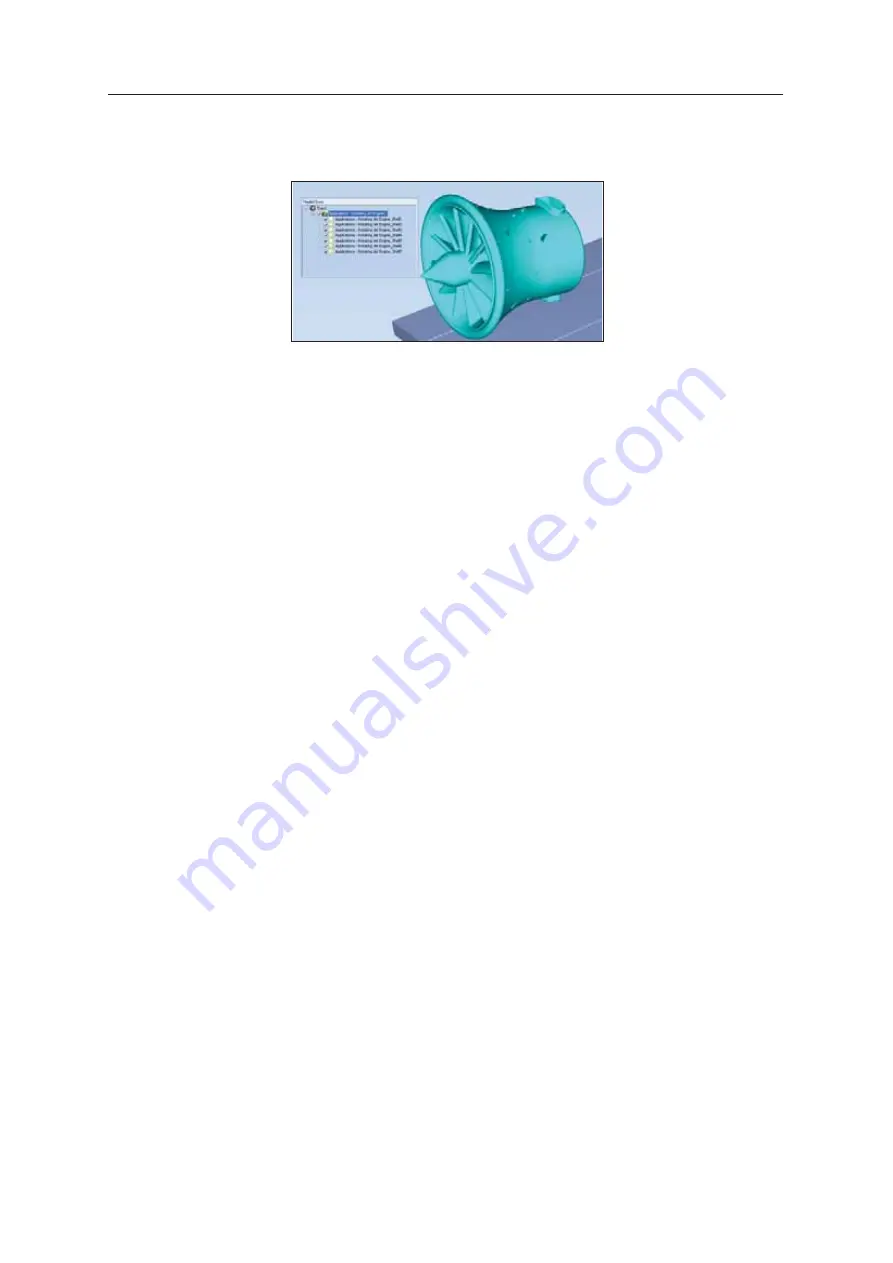
Figure 5-23: Object after being converted to an assembly of component parts
Model-Material
Settings
Before
ȱ
placing
ȱ
objects
ȱ
on
ȱ
the
ȱ
build
ȱ
tray
ȱ
in
ȱ
Objet
ȱ
Studio,
ȱ
you
ȱ
should
ȱ
pay
ȱ
attention
ȱ
to
ȱ
the
ȱ
material
ȱ
selection
ȱ
settings
ȱ
on
ȱ
the
ȱ
Tray
ȱ
Settings
ȱ
ribbon.
Figure 5-24: Material selection settings
•
By
ȱ
default,
ȱ
the
ȱ
material
ȱ
selection
ȱ
settings
ȱ
on
ȱ
the
ȱ
ribbon
ȱ
correspond
ȱ
to
ȱ
the
ȱ
model
ȱ
cartridges
ȱ
loaded
ȱ
in
ȱ
the
ȱ
printer.
•
The
ȱ
material
ȱ
displayed
ȱ
on
ȱ
the
ȱ
top
ȱ
(VeroBlack,
ȱ
in
ȱ
the
ȱ
figure
ȱ
above)
ȱ
is
ȱ
considered
ȱ
the
ȱ
primary
ȱ
model
ȱ
material
ȱ
(“Model
Ȭ
1”).
ȱ
It
ȱ
is
ȱ
assigned
ȱ
to
ȱ
objects
ȱ
that
ȱ
do
ȱ
not
ȱ
have
ȱ
a
ȱ
material
ȱ
assignment
ȱ
when
ȱ
you
ȱ
place
ȱ
them
ȱ
on
ȱ
the
ȱ
build
ȱ
tray.
ȱ
For
ȱ
example,
ȱ
since
ȱ
stl
ȱ
files
ȱ
do
ȱ
not
ȱ
contain
ȱ
information
ȱ
about
ȱ
the
ȱ
model
ȱ
material,
ȱ
Objet
ȱ
Studio
ȱ
assigns
ȱ
the
ȱ
primary
ȱ
model
ȱ
material
ȱ
to
ȱ
them.
ȱ
Also,
ȱ
if
ȱ
you
ȱ
try
ȱ
to
ȱ
insert
ȱ
objdf
ȱ
files
ȱ
whose
ȱ
assigned
ȱ
materials
ȱ
are
ȱ
not
ȱ
recognized
ȱ
by
ȱ
your
ȱ
version
ȱ
of
ȱ
Objet
ȱ
Studio,
ȱ
you
ȱ
can
ȱ
insert
ȱ
the
ȱ
file
ȱ
by
ȱ
substituting
ȱ
the
ȱ
primary
ȱ
model
ȱ
material
ȱ
for
ȱ
the
ȱ
missing
ȱ
materials.
•
Select
ȱ
Single Material
ȱ
if
ȱ
you
ȱ
want
ȱ
to
ȱ
ȱ
using
ȱ
only
ȱ
one
ȱ
material—
ȱ
of
ȱ
the
ȱ
material
ȱ
drop
Ȭ
down
ȱ
menus
ȱ
contain
ȱ
the
ȱ
same
ȱ
material.
ȱ
If
ȱ
you
ȱ
decide
ȱ
to
ȱ
ȱ
with
ȱ
multiple
ȱ
materials,
ȱ
the
ȱ
material
ȱ
in
ȱ
the
ȱ
top
ȱ
drop
Ȭ
down
ȱ
menu
ȱ
remains
ȱ
assigned
ȱ
to
ȱ
the
ȱ
object
ȱ
until
ȱ
you
ȱ
select
ȱ
another
ȱ
material.
•
If
ȱ
you
ȱ
insert
ȱ
an
ȱ
objdf
ȱ
file
ȱ
into
ȱ
an
ȱ
empty
ȱ
build
ȱ
tray,
ȱ
and
ȱ
the
ȱ
model
Ȭ
material
ȱ
assignment
ȱ
does
ȱ
not
ȱ
match
ȱ
the
ȱ
settings
ȱ
on
ȱ
the
ȱ
Tray
ȱ
Settings
ȱ
ribbon,
ȱ
these
ȱ
settings
ȱ
are
ȱ
changed
ȱ
automatically.
ȱ
However,
ȱ
if
ȱ
there
ȱ
is
ȱ
an
ȱ
object
ȱ
already
ȱ
on
ȱ
the
ȱ
build
ȱ
tray
ȱ
whose
ȱ
materials
ȱ
do
ȱ
not
ȱ
match
ȱ
the
ȱ
material
ȱ
assignment
ȱ
in
ȱ
the
ȱ
objdf
ȱ
file,
ȱ
you
ȱ
cannot
ȱ
place
ȱ
the
ȱ
new
ȱ
object
ȱ
on
ȱ
the
ȱ
tray.
ȱ
To
ȱ
ȱ
this
ȱ
object,
ȱ
you
ȱ
have
ȱ
the
ȱ
following
ȱ
options:
Instead
ȱ
of
ȱ
printing
ȱ
it
ȱ
on
ȱ
the
ȱ
same
ȱ
build
ȱ
tray,
ȱ
ȱ
the
ȱ
new
ȱ
object
ȱ
as
ȱ
a
ȱ
separate
ȱ
job.
Change
ȱ
the
ȱ
materials
ȱ
assigned
ȱ
to
ȱ
objects
ȱ
on
ȱ
the
ȱ
build
ȱ
tray
ȱ
to
ȱ
match
ȱ
those
ȱ
assigned
ȱ
to
ȱ
the
ȱ
new
ȱ
object
ȱ
(see
ȱ
“Changing
ȱ
the
ȱ
Model
ȱ
Material”
ȱ
and
ȱ
“Assigning
ȱ
a
ȱ
Model
ȱ
Material
ȱ
to
ȱ
Objects,”
ȱ
below).
Change
ȱ
the
ȱ
materials
ȱ
assigned
ȱ
to
ȱ
the
ȱ
new
ȱ
object
ȱ
before
ȱ
inserting
ȱ
it,
ȱ
so
ȱ
there
ȱ
is
ȱ
no
ȱ
conflict
ȱ
with
ȱ
the
ȱ
settings
ȱ
on
ȱ
the
ȱ
Tray
ȱ
Settings
ȱ
ribbon.
To change the materials assigned to an object before inserting it:
1. Open
ȱ
another
ȱ
Objet
ȱ
Studio
ȱ
window,
ȱ
by
ȱ
running
ȱ
the
ȱ
application
ȱ
from
ȱ
the
ȱ
Windows
ȱ
Start
ȱ
menu.
2. Insert
ȱ
the
ȱ
new
ȱ
object
ȱ
(objdf
ȱ
file)
ȱ
into
ȱ
the
ȱ
empty
ȱ
build
ȱ
tray.
Содержание P750K
Страница 1: ...User Guide English Stratasys P750K 3D Printer System...
Страница 2: ......
Страница 20: ...Safety 2 8 DOC08010 Rev A DRAFT 1...
Страница 30: ...Introducing the Stratasys P750K 3D Printing System 3 10 DOC08010 Rev A DRAFT 1...
Страница 196: ...Handling Printed Models 7 6 DOC08010 Rev A DRAFT 1...


