8-10
Sound
Settings
8
8-11
Sound
Settings
8
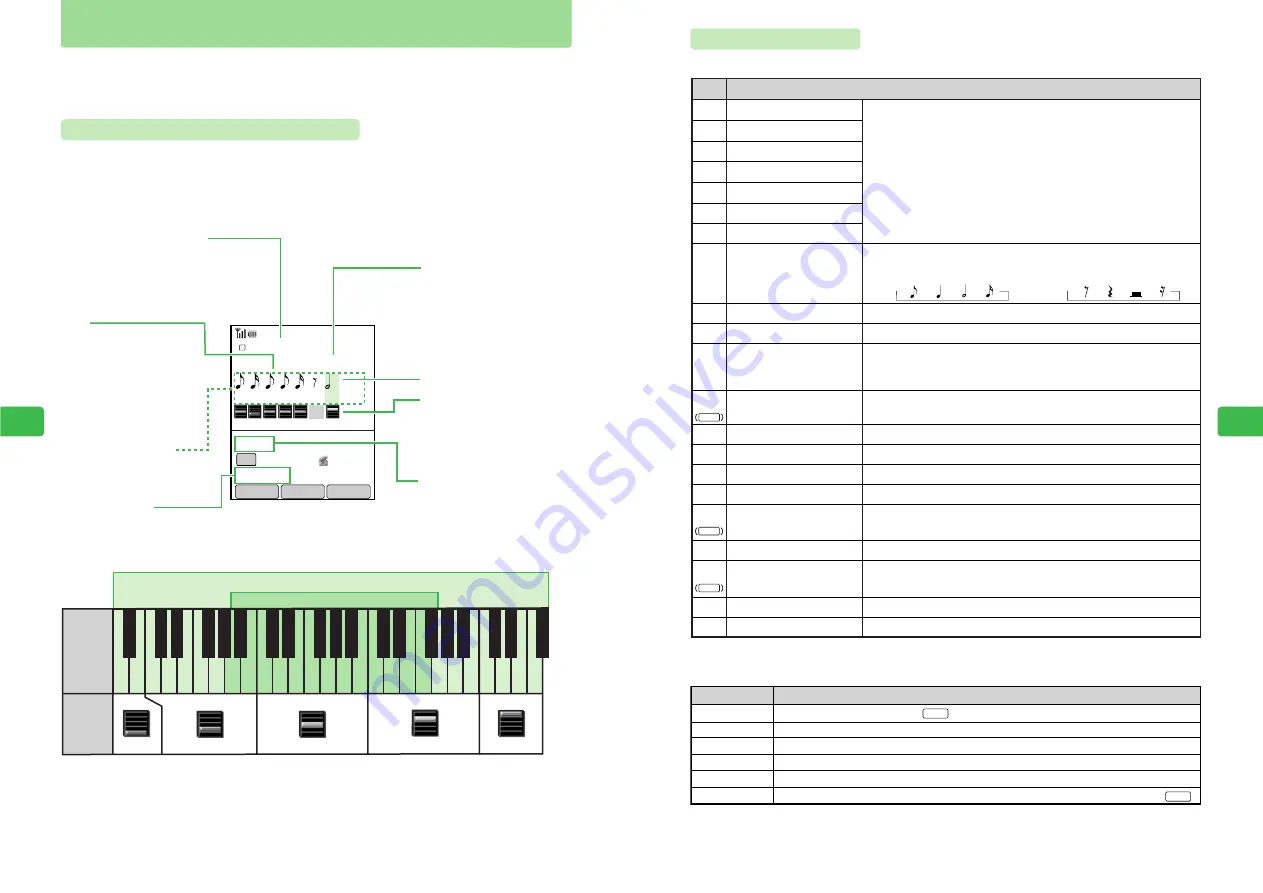
Entering Notes
The following shows the key assignment for entering notes.
Paste a range selected with
I
(
@
page 8-14).
Change the instrument for the displayed melody (
@
page 8-15).
Delete the whole of the displayed melody line.
Move the cursor to the right of the last note of the melody line.
Move the cursor to the first note of the melody line.
To see the functions of the keys, open the Help menu. To return to Sub Menu, press
I
.
Enters C or C#
Key
Description
Menu Item
Description
Enters D or D#
Overwrites with a rest
Inserts a rest
Changes tempo
Enters E
Enters F or F#
Enters G or G#
Enters A or A#
Enters B
Opens the Play menu
Deletes note, rest, etc.
Ends session
Switches to another melody screen
Stops an operation
Moves cursor forward/backward
Switches octave range
Selects a range
Enters a tie
Opens Sub Menu
Switches length of note
or rest
1
2
9
0
#
3
4
5
6
7
Q
N
O
F
G
@
P
I
K
L
8
Eighth note Quarter note Half note Sixteenth note
Eighth rest Quarter rest Half rest Sixteenth rest
To toggle between the natural note and the sharp, press
1
,
2
,
4
,
5
or
6
again after entering the note. For example, press
1
once
to enter C or twice to enter C#.
To cycle through the following sequences, press
8
after entering
a note (with
1
to
7
) or a rest (with
9
or
0
):
Input a rest overwriting the cursor position.
Insert a rest before the cursor position.
Insert a tempo change at the cursor position. The tempos 96, 108, 120 and 144
are available (default: 120). The tempo symbol appears only where the tempo
changes. Pressing
#
cycles through the available tempos in sequence.
Play the melody line displayed in the melody input screen.
1
Open Sub Menu.
3
Cycle through the melody screens in sequence.
Delete whatever is at the cursor position.
End input of the displayed melody.
Cycle a note through the octaves.
Move the cursor forward or backward in the melody line.
Input a tie at the cursor position (to join two notes of the same pitch together).
Select a range of notes.
2
Interrupt an operation.
Menu
Range
Range
Back
Play
Paste
Instrument
Delete All
Jump to Last
Jump to Top
Help
1 For details on playing melodies, see page 8-16.
2 Cut or copy the selected notes (
@
page 8-14).
3 Sub Menu contains the following items.
→
→
→
→
→
→
→
→
Compose your own melodies and store them in Data Folder. Select melodies in Data Folder as
ring tones (
@
page 8-3) or attach them to messages (
@
Network Media Manual). For details
on Data Folder, see Chapter 9.
Original Melody Input Screens
Enter melody lines in three different screens, Main Melody, Sub Melody 1 and Sub Melody 2, to
create an original melody. Enter different tones in the three screens to produce harmonies.
Enter up to 256 notes for one melody in a four-octave range together with rests, tempos and
ties. An original melody input screen is as shown below.
Original Melodies
Main Melody
120 _ 96
E F G G B C
Piano
:Tie Tune
007/007 ◎End
Play
Menu
Range
Melody Line indicator
Melody input screen
Tie
Octave indicator
Input counter
Note/Tone indicators
Tempo indicator
Cursor
Shows the melody line being
worked on. The screen in which
notes are currently being entered
is indicated.
Instrument
Appears when a tie is
entered. Enter a tie to
make two consecutive
notes of the same pitch
play as a single note
without a break in
between.
Shows the current cursor
position and the total number
of notes and rests already entered (256 maximum).
Show note lengths,
note tones and rests.
A B C D E F G A B C D E F G A B C D E F G A B C D E F
A
#
C
#
D
#
F
#
G
#
A
#
C
#
D
#
F
#
G
#
A
#
C
#
D
#
F
#
G
#
A
#
C
#
D
#
F
#
Range available for melodies to be attached to other messages.
Notes
Octave
Indicators
Range available for melodies to be attached to Long Mail.
The selected instrument
is displayed. A total of
175 instruments are
available.
Shows which octave
each note is in.
Appears where the tempo
(speed of play) changes.
Choose from four tempos:
96, 108, 120 and 144.
文字
Содержание 304T
Страница 14: ...1 1 Before Using the Handset...
Страница 24: ...2 1 Basic Operations...
Страница 35: ...Manner Function 3 1...
Страница 40: ...Entering Text 4 1...
Страница 64: ...5 1 Phone Book...
Страница 99: ...7 1 Display Settings...
Страница 107: ...8 1 Sound Settings...
Страница 117: ...9 1 File Management...
Страница 130: ...10 1 Security...
Страница 138: ...11 1 Convenient Functions...
Страница 160: ...Additional Functions 12 1...
Страница 184: ...Optional Services 13 1...
Страница 191: ...14 1 Appendix...
Страница 207: ...Network Media Services 1 1...
Страница 217: ...Mail...
Страница 218: ...Receiving Messages 2 1...
Страница 224: ...3 1 Sending Mail...
Страница 241: ...4 1 Mailbox...
Страница 261: ...5 1 Mail Server...
Страница 266: ...6 1 Additional Functions...
Страница 279: ...Web...
Страница 280: ...Accessing Web 7 1...
Страница 285: ...8 1 Using Information...
Страница 299: ...9 1 Additional Functions...
Страница 303: ...Station...
Страница 304: ...Station Basic Operations 10 1...
Страница 310: ...11 1 Using Information...
Страница 318: ...12 1 Additional Functions...
Страница 321: ...Appendix 13 1...
Страница 325: ...13 9 13 Appendix Pictograph List...


