


5-101
3
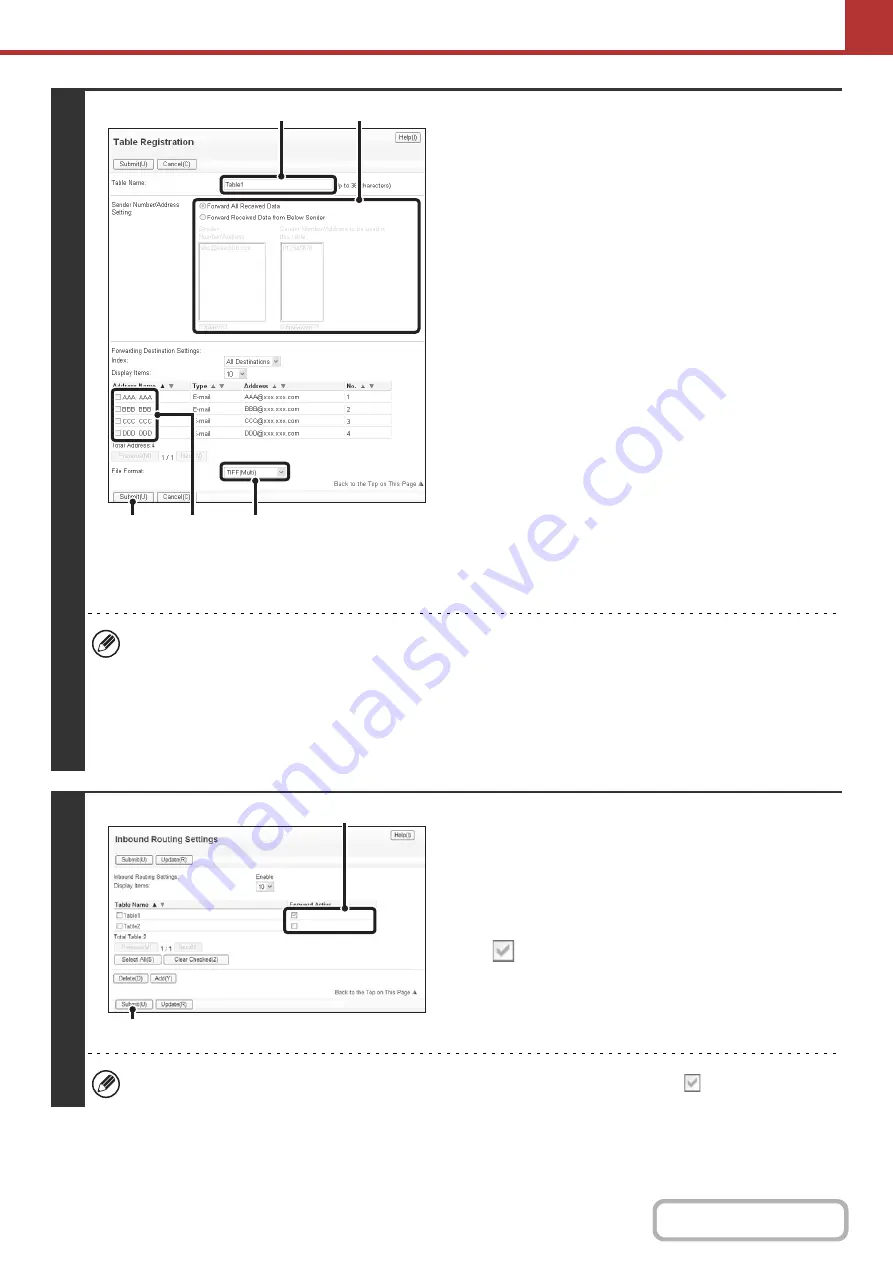
Store a forwarding table.
Follow the steps below to store a forwarding table that
combines a specified sender and forwarding address.
(1) Click [Inbound Routing Settings] in the Web
page menu and click the [Add] button.
(2) Enter a "Table Name".
(3) Select the sender whose faxes will be
forwarded.
• To forward all received faxes, select [Forward All
Received Data].
• To forward faxes received from a specific sender only,
select [Forward Received Data from Below Sender],
select the sender from the list, and then click the [Add]
button.
(4) Select the forwarding address.
Forwarding addresses can be selected from the
machine's address book. (Multiple addresses can be
selected.) A maximum of 1000 forwarding addresses can
be stored (a combined maximum of 100 file server,
desktop, and network folder addresses can be stored).
(5) Select the file format
A file format can be set for each forwarding table.
(6) Click [Submit].
• When selecting senders from the "Sender Number/Address Setting" list, you can use the [Shift] key or the [Ctrl] key
on your keyboard to select multiple senders.
• A maximum of 50 forwarding tables can be stored.
• If you wish to select a group of addresses for the forwarding destination, you can only select a group that contains
e-mail addresses only.
• Images sent in TIFF format may not display correctly in some recipient environments. In this event, change the file
format to PDF.
4
Specifying forwarding tables to be used.
To use the inbound routing function, enable the forwarding
tables that you wish to use from among the stored tables.
(1) Click [Inbound Routing Settings] in the Web
page menu.
(2) Select the "Forward Activated" checkbox
of each forwarding table that you wish
to use.
(3) Click [Submit].
To delete a forwarding table, click the checkbox next to the table name so that it is selected
and click [Delete].
(6)
(4)
(3)
(2)
(5)
(2)
(3)
Содержание MX-C311
Страница 79: ...mxc401_us_saf book 76 ページ 2008年10月15日 水曜日 午前11時52分 ...
Страница 80: ...mxc401_us_saf book 77 ページ 2008年10月15日 水曜日 午前11時52分 ...
Страница 156: ...Reduce copy mistakes Print one set of copies for proofing ...
Страница 158: ...Make a copy on this type of paper Envelopes and other special media Transparency film ...
Страница 159: ...Add the date or page numbers 2010 04 04 Add the date Add a stamp 9 10 11 Add the page number ABCDEFG Add text ...
Страница 160: ...Assemble output into a pamphlet Create a pamphlet Staple output Create a blank margin for punching ...
Страница 163: ...Conserve Print on both sides of the paper Print multiple pages on one side of the paper ...
Страница 171: ...Conserve Send when the rate is lowest Check received data before printing Relay a transmission through a branch office ...
Страница 181: ...Prevent transmission to the wrong destination Check the result of transmission Check the log of previous transmissions ...
Страница 185: ...SAVE A JOB AND REUSE IT LATER Search for a file Organize my files Save an important document Print a batch of files ...
Страница 186: ...Search for a file abc Search for a file using a keyword Search by checking the contents of files ...
Страница 187: ...Organize my files Delete a file Delete all files Periodically delete files Change the folder ...
Страница 364: ...3 18 PRINTER Contents 4 Click the Print button Printing begins ...