


5-27
4
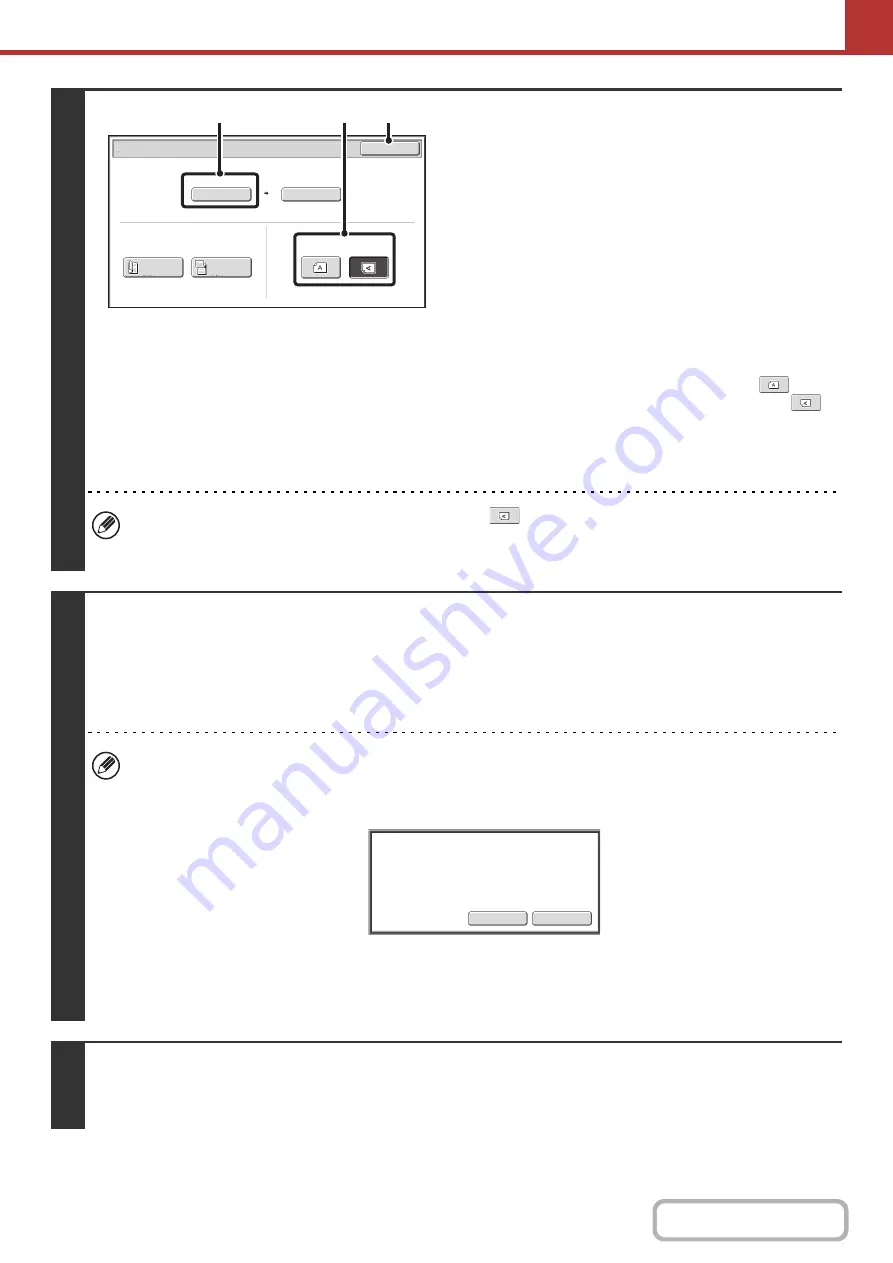
Check the original scan size and
placement orientation.
To make sure that the original is scanned in the correct
orientation (the orientation in which the top edge of the original
appears at the top of the display), check the size and
orientation of the original placed in step 1.
(1) Check the scan size.
Check if the size of the placed original is displayed. If the
displayed size is different from the size of the placed
original, set the original size.
☞
SPECIFYING THE ORIGINAL SCAN SIZE AND
SEND SIZE
(2) Touch the appropriate orientation key.
If the top edge of the original is up, touch the
key. If
the top edge of the original is to the left, touch the
key.
(3) Touch the [OK] key.
You will return to the screen of step 2.
• The placement orientation of the original is initially set to
. If you placed the original with the top edge to the
left, this step is not necessary.
• The original size set in the system settings appears as the original size.
5
Press the [COLOR START] key or the [BLACK & WHITE START] key.
Scanning begins.
• If the original is placed on the document glass, the [Read-End] key appears in the touch panel. If the original is only one
page, go to step 7. To scan more pages, go to the next step.
• If the original was inserted in the document feeder tray, a beep will sound when scanning is completed and transmission
will take place.
• To scan in full color, press the [COLOR START] key. To scan in black and white, press the [BLACK & WHITE
START] key. If the color mode of the [COLOR START] key is set to [Auto], the color of the original will be detected
automatically and scanning in full color, grayscale or Mono2 will take place.
• If the file type is [Encrypt PDF], a password entry screen will appear when the [START] key is pressed.
Touch the [Entry] key to open the keyboard screen, enter a password (maximum of 32 characters), and touch the
[OK] key. The recipient must use the password entered here to open the encrypted PDF file.
To cancel encrypted PDF, touch the [Cancel] key. The format settings screen will appear to let you change the file
type. Select a new file type and press the [START] key to begin transmission.
6
If the original was placed on the document glass, replace it with the next original
and press the [COLOR START] key or the [BLACK & WHITE START] key.
Repeat until all originals have been scanned.
Scan/Original
OK
Auto
Scan Size
2-Sided
Tablet
2-Sided
Booklet
Send Size
100%
Image Orientation
8½x11
(3)
(2)
(1)
Entry
Cancel
Please enter encrypt PDF
password.
Содержание MX-C311
Страница 79: ...mxc401_us_saf book 76 ページ 2008年10月15日 水曜日 午前11時52分 ...
Страница 80: ...mxc401_us_saf book 77 ページ 2008年10月15日 水曜日 午前11時52分 ...
Страница 156: ...Reduce copy mistakes Print one set of copies for proofing ...
Страница 158: ...Make a copy on this type of paper Envelopes and other special media Transparency film ...
Страница 159: ...Add the date or page numbers 2010 04 04 Add the date Add a stamp 9 10 11 Add the page number ABCDEFG Add text ...
Страница 160: ...Assemble output into a pamphlet Create a pamphlet Staple output Create a blank margin for punching ...
Страница 163: ...Conserve Print on both sides of the paper Print multiple pages on one side of the paper ...
Страница 171: ...Conserve Send when the rate is lowest Check received data before printing Relay a transmission through a branch office ...
Страница 181: ...Prevent transmission to the wrong destination Check the result of transmission Check the log of previous transmissions ...
Страница 185: ...SAVE A JOB AND REUSE IT LATER Search for a file Organize my files Save an important document Print a batch of files ...
Страница 186: ...Search for a file abc Search for a file using a keyword Search by checking the contents of files ...
Страница 187: ...Organize my files Delete a file Delete all files Periodically delete files Change the folder ...
Страница 364: ...3 18 PRINTER Contents 4 Click the Print button Printing begins ...