System Maintenance
7-15
g)
Click OK button, and the DICOM uninstall is completed.
5. Install and uninstall the HPRF”, “Smart3D”, “iScape” and “Free Xros M”
h)
In the dialog box for installing and uninstalling the software, select Install and the
corresponding function button and press the Set key, and apply correct KEY file to
install the corresponding function software.
i)
In the dialog box for installing and uninstalling the software, select Uninstall and
corresponding function button and press the Set key to uninstall the function
software.
Note: to install the function software, you must use the KEY file which is corresponded to the
system.
7.2.7 Monitor test
1.
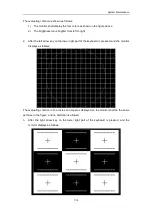
Enter the Maintenance menu as per section 7.2.3.1 and select the monitor test item and
press the Set button to enter the monitor test.
Содержание DC-6
Страница 1: ...DC 6 DC 6T DC 6Vet Diagnostic Ultrasound System Service Manual...
Страница 2: ......
Страница 20: ...2 1 2 System Overview 2 1 System Appearance 2 1 1 Complete System with CRT Monitor...
Страница 23: ...System Overview 2 4 2 2 LCD Monitor...
Страница 26: ...System Overview 2 7 2 2 3 Lever of upper support arm...
Страница 66: ...4 1 4 System Structure and Assembly Disassembly 4 1 Exploded View of Complete System...
Страница 97: ...System Structure and Assembly Disassembly 4 32 10 screw caps 13 M4 8 screws Rear cover assembly...
Страница 101: ...System Structure and Assembly Disassembly 4 36 Power boards Card detacher...
Страница 138: ...Checks 6 4 6 3 Safety Checks 6 3 1 Electric safety Refer to Appendix D Electrical Safety Inspection...
Страница 187: ...D 13 ELECTRICAL SAFETY INSPECTION 7 Mains on Applied Part Leakage LIMITS For BF ECG Input and transducer 5000 A...
Страница 191: ...P N 2105 20 40473 V10 0...

