


3-15
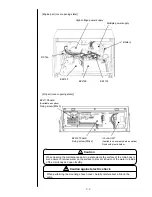
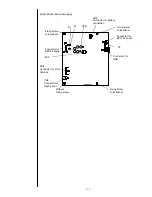
Battery
CN14
EZJ126
board
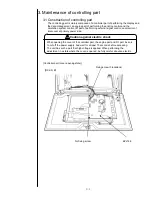
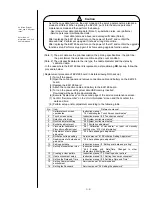
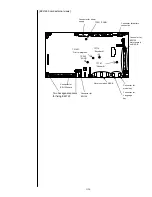
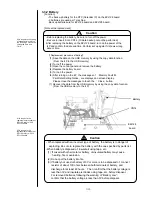
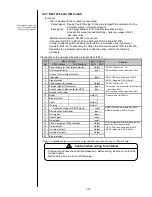
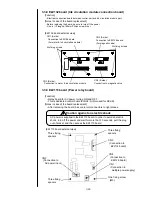
3.3.2 Battery
[Function]
- The back up battery for the RTC (Calendar IC) on the EZJ126 board
- 2 batteries are used per 1 machine.
Back up batteries are for EZJ126 board and EZJ128 board.
[Note at the replacement]
【
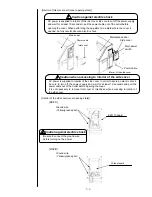
Replacement procedure of battery
】
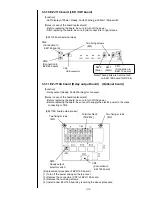
(1) Save the data on the USB memory by using the copy data function.
(From the IJP to the USB memory)
(2) Turn off the power.
(3) Open the control panel and remove the battery.
(4) Replace the battery board.
(5) Turn on the power.
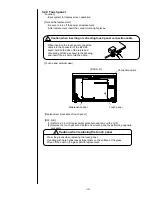
(6) After turning on the IJP, the messages of
「
Memory Fault M
」
「
Print Data/Setting Notice
」
are displayed on screen display.
Please close the messages to touch the
「
Close
」
button.
(7) Recover the data from the USB memory by using the copy data function.
(From the USB memory to the IJP)
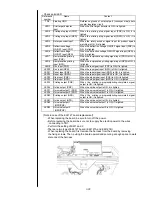
- Before replacing the battery, be sure to turn off the power.
- Be sure to insert it into CN14. (Or date backup cannot be performed)
-After replacing the battery on the EZJ126 board, turn on the power of the
IJP and confirm the date and time. Perform set up again if it shows wrong
date or time.
!
Caution
With respect to the setting
of date and time, refer to
the Instruction manual
“6.2
setting the Date and
Time
”.
With respect to the
replacement procedure of
EZJ125, ref
er to “3.3.6
EZJ125 board
”.
With respect to the
replacement procedure of
EZJ130, ref
er to “3.3.12
EZJ130 board
”.
- When replaced with an incorrect type of battery, the battery is in danger of
exploding. Be sure to replace the battery with the one specified by parts list.
-When battery is disposed of, insulate it using tape, etc.
(1) If mixed with other metal or battery, uninsulated battery may cause
heating, fire or explosion.
(2) Do not put the battery into fire.
(3) If battery not used or battery of 3V or more is to be disposed of, connect
resistor of about 100 ohms between both terminals of battery, and
discharge for at least 48 hours. Then confirm that the battery voltage is
less than 3V and insulate electrodes using tape, etc. before disposal.
For removed batteries following the warning of
“Battery Low”,
confirm that the battery voltage is less than 3V before disposal.
!
Caution
Содержание IJ RX2
Страница 1: ...Service Manual HITACHI Printer Model RX2 Revision Feb 2014 Version A ...
Страница 13: ...1 8 2 External views Rear side 1 2 2 Main body internal ...
Страница 14: ...1 9 1 2 3 Print head ...
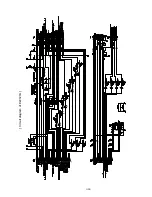
Страница 101: ...3 26 Circuit diagram of EZJ127A ...
Страница 102: ...3 27 Circuit diagram of EZJ127B ...
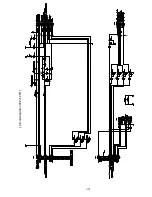
Страница 116: ...3 41 Circuit diagram of EZJ129 ...
Страница 164: ...4 40 5 Reset the time of the R air filter to 0 on the Parts usage time management screen ...
Страница 247: ...7 Attached Drawing 7 1 Circulation System Diagram Circulation System Diagram 7 1 ...
Страница 248: ...7 2 Electrical Connection Diagram 7 2 1 Electrical Connection Diagram RX2 S Standard model 7 2 ...
Страница 249: ...7 3 7 2 2 Electrical Connection Diagram RX2 B Basic model 7 3 ...
Страница 252: ... Nozzle diameter 65μm 7 6 7 4 Dimensions around charge electrode and deflection electrode 循環系統図 ...


