


4-26
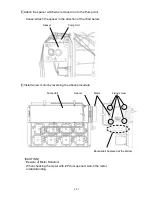
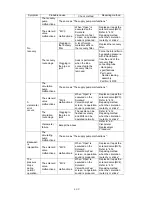
4.9.5 Proximity sensor replacement procedure
Replace the single proximity sensor when it is faulty.
Caution: Perform replacement only after turning power off.
Do not spill the intensifier over the proximity sensor: Doing so could
cause a fault.
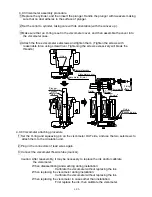
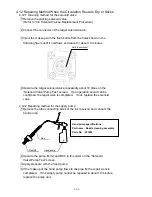
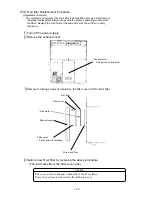
1 Remove the viscometer from circulation unit, referring to item 4.9.1.
2 Remove the cover setscrew, and then take out the proximity sensor.
3 Install a new proximity sensor in the viscometer.
Caution: Install the proximity sensor making sure that the model indication
surface faces the rear. While pushing the cover in the Q direction as
shown in the illustration, tighten the cover setscrew (to determine the
position of sensor).
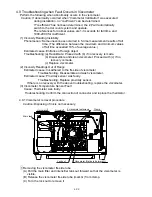
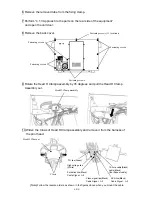
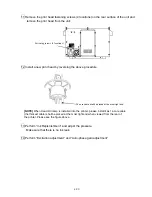
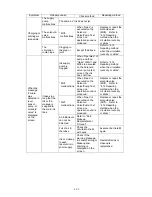
4 Return the viscometer to its original position, referring to item 4.9.4. (Take care not to forget
to plug in the connectors of lead wires.)
Caution: After replacing the proximity sensor, it is necessary to replace the ink
and calibrate the viscometer (see “2.6 Calibration of viscometer”).
4.9.6 Replacing thermistor
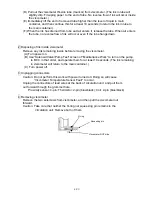
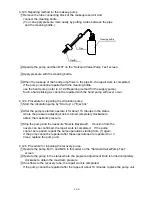
1 Remove the viscometer from circulation unit, referring to item 4.9.1.
2 Remove the screw holding the thermistor fixing plate, and then replace the thermistor.
Caution: When installing new thermistor, moisten the O-ring with intensifier to prevent it
from being scratched.
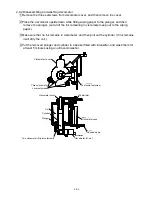
3 Return the viscometer to its original position, referring to item 4.9.4.
Caution: After replacing the thermistor, it is necessary to replace the ink and
calibrate the viscometer (see “2.6 Calibration of viscometer”).
Cover setscrew
Cover
Proximity sensor
Model indication surface
Proximity sensor
Cover
Q
Tighten the screw
while pushing the
cover.
Cover
Содержание IJ RX2
Страница 1: ...Service Manual HITACHI Printer Model RX2 Revision Feb 2014 Version A ...
Страница 13: ...1 8 2 External views Rear side 1 2 2 Main body internal ...
Страница 14: ...1 9 1 2 3 Print head ...
Страница 101: ...3 26 Circuit diagram of EZJ127A ...
Страница 102: ...3 27 Circuit diagram of EZJ127B ...
Страница 116: ...3 41 Circuit diagram of EZJ129 ...
Страница 164: ...4 40 5 Reset the time of the R air filter to 0 on the Parts usage time management screen ...
Страница 247: ...7 Attached Drawing 7 1 Circulation System Diagram Circulation System Diagram 7 1 ...
Страница 248: ...7 2 Electrical Connection Diagram 7 2 1 Electrical Connection Diagram RX2 S Standard model 7 2 ...
Страница 249: ...7 3 7 2 2 Electrical Connection Diagram RX2 B Basic model 7 3 ...
Страница 252: ... Nozzle diameter 65μm 7 6 7 4 Dimensions around charge electrode and deflection electrode 循環系統図 ...


