


1-12
1.3.2 Installation procedure
Perform an installation work of the unit according to the following procedure at the
unpacking.
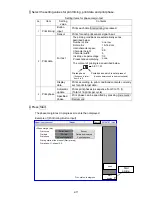
1
Selection
of
ink
type(Touch
screen
operation)
Service Manual
2.2 System environment setup
2
Fill ink and makeup in each reservoir.
Instruction manual
8. Makeup replenishment
3
Ink stream alignment
(For filling makeup path and adjusting ink stream
position)
Technical Manual
6.5 Stream alignment
4
Ink replenishment (first replenishment)
(Replace a solvent with ink)
Execute “Ink refill” function.
CAUTION) Perform this operation
with the print head tip inserted into
a beaker.
5
Ink drainage
(Drainage ink due to insufficient
replacement of a solvent with ink)
Execute “Ink drainage” function.
6
Ink replenishment (second replenishment)
(Fill ink into a circulating system)
Execute “Ink refill” function.
CAUTION) Perform this operation
with the print head tip inserted into
a beaker.
7
Viscometer calibration
(Touch screen operation, automatic
acquisition)
Service Manual
2.6.1 Calibration of viscometer
8
Pressure adjustment
(Set pressure to the standard value of every
ink)
Technical Manual
6.10 Pressure adjustment
9
Adjustment of excitation voltage
(Touch screen operation, automatic
acquisition)
Service Manual
2.3.1 Excitation adjustment
10
Adjustment of APH gain
(Touch screen operation, automatic
acquisition)
Service Manual
2.3.4 Auto phase gain adjustment
11
Setting of excitation voltage
(Confirm the real printing state and the ink drop
mode and then, set the excitation voltage)
Technical Manual
6.11 Pressure adjustment
12
Readjustment of APH gain
(Touch screen operation, automatic
acquisition)
Service Manual
2.3.4 Auto phase gain adjustment
13
Editing Print Data, etc.
(Print start delay, character height, etc.)
Instruction Manual
4. Creation and printing of
messages
14
Back up(
backup in service staff maintenance
mode)
Service Manual
2.9 Back up
* [Caution]
The viscometer calibration will not be performed correctly if the step 5 and 6 are skipped.
Содержание IJ RX2
Страница 1: ...Service Manual HITACHI Printer Model RX2 Revision Feb 2014 Version A ...
Страница 13: ...1 8 2 External views Rear side 1 2 2 Main body internal ...
Страница 14: ...1 9 1 2 3 Print head ...
Страница 101: ...3 26 Circuit diagram of EZJ127A ...
Страница 102: ...3 27 Circuit diagram of EZJ127B ...
Страница 116: ...3 41 Circuit diagram of EZJ129 ...
Страница 164: ...4 40 5 Reset the time of the R air filter to 0 on the Parts usage time management screen ...
Страница 247: ...7 Attached Drawing 7 1 Circulation System Diagram Circulation System Diagram 7 1 ...
Страница 248: ...7 2 Electrical Connection Diagram 7 2 1 Electrical Connection Diagram RX2 S Standard model 7 2 ...
Страница 249: ...7 3 7 2 2 Electrical Connection Diagram RX2 B Basic model 7 3 ...
Страница 252: ... Nozzle diameter 65μm 7 6 7 4 Dimensions around charge electrode and deflection electrode 循環系統図 ...


