


4-22
4.9 Troubleshooting when Fault Occurs in Viscometer
Perform the following when abnormality occurs in the viscometer:
Caution
: If abnormality occurred when “Viscometer Calibration” was executed
during installation,
no “coefficient” can be determined.
If “coefficient” has not been determined, the IJP will automatically
switch to the dot count system and operate.
The references for normal values are 1-3 seconds for fall time, and
1000-2000 for coefficient.
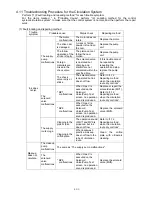
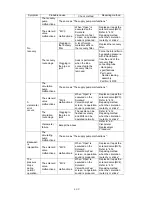
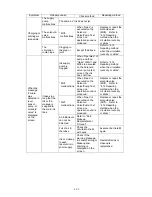
(1) Viscosity Reading Instability
Phenomenon: Some unevenness occurred in 5-time measurement results of fall
time. (The difference between the maximum and minimum values
of fall time exceeded 10% of average value.)
Estimated cause: Entrance of foreign object
Troubleshooting:(a) Recalibrate: Proceed with (b) if no recovery is made.
(b) Disassemble and clean viscometer: Proceed with (c) if no
recovery is made.
(c) Replace viscometer.
(2) Viscosity Readings Out of Range
Estimated cause: Ink adhered to the IN-side of viscometer.
Troubleshooting: Disassemble and wash viscometer.
Estimated cause: Proximity sensor was faulty.
Troubleshooting: Replace proximity sensor.
If there is no recovery with the above troubleshooting, replace the viscometer.
(3) Viscometer Temperature Sensor Fault
Cause: Thermistor was faulty.
Troubleshooting: Confirm the connection of connector and replace the thermistor.
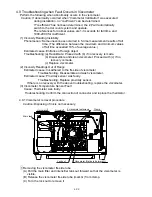
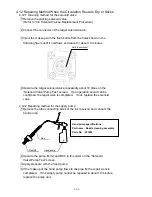
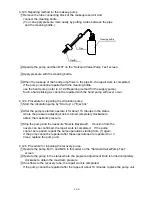
4.9.1 Viscometer removal procedure
Caution: Disposing of ink is not necessary.
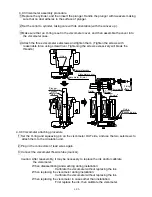
1 Removing the viscometer IN-side tube
(A) Pull the main filter and intensifier tank out forward so that the viscometer is
visible.
(B) Release the viscometer IN-side tube (mark G) from clamp.
(C) Turn the lock nut to remove it.
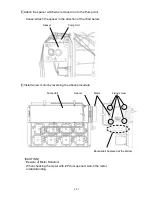
Main tank
Viscometer
Grommet
2 viscometer setscrews
Clamp
Lock nut
Viscometer IN-side tube (mark G)
Содержание IJ RX2
Страница 1: ...Service Manual HITACHI Printer Model RX2 Revision Feb 2014 Version A ...
Страница 13: ...1 8 2 External views Rear side 1 2 2 Main body internal ...
Страница 14: ...1 9 1 2 3 Print head ...
Страница 101: ...3 26 Circuit diagram of EZJ127A ...
Страница 102: ...3 27 Circuit diagram of EZJ127B ...
Страница 116: ...3 41 Circuit diagram of EZJ129 ...
Страница 164: ...4 40 5 Reset the time of the R air filter to 0 on the Parts usage time management screen ...
Страница 247: ...7 Attached Drawing 7 1 Circulation System Diagram Circulation System Diagram 7 1 ...
Страница 248: ...7 2 Electrical Connection Diagram 7 2 1 Electrical Connection Diagram RX2 S Standard model 7 2 ...
Страница 249: ...7 3 7 2 2 Electrical Connection Diagram RX2 B Basic model 7 3 ...
Страница 252: ... Nozzle diameter 65μm 7 6 7 4 Dimensions around charge electrode and deflection electrode 循環系統図 ...


