


64
Upgrade and Maintenance Manual
RX2520
M1
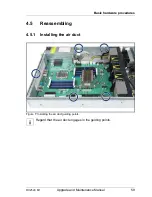
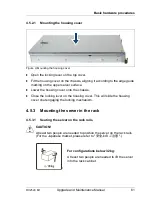
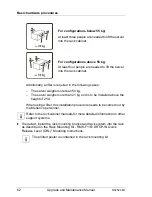
Basic hardware procedures
4.5.3.2
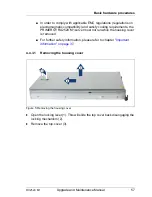
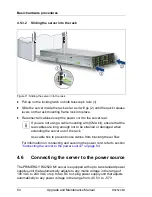
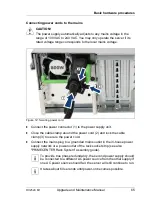
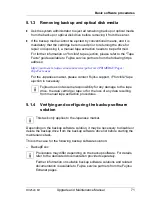
Sliding the server into the rack
Figure 11: Sliding the server into the rack
Ê
Pull up on the locking latch on both telescopic rails (1).
Ê
Slide the server inside the rack as far as it will go (2) until the quick release
levers on the rack mounting frame lock into place.
Ê
Reconnect all cables except the power cord to the server rear.
I
If you are not using a cable mounting arm (CMA kit), ensure that the
rear cables are long enough not to be strained or damaged when
extending the server out of the rack.
Use cable ties to prevent loose cables from blocking the air flow.
For information on connecting and securing the power cord, refer to section
"Connecting the server to the power source" on page 64
.
4.6
Connecting the server to the power source
The PRIMERGY RX2520 M1 server is equipped with up to two standard power
supplies unit that automatically adjusts to any mains voltage in the range of
100 VAC to 240 VAC or up to two DC hot-plug power supply unit that adjusts
automatically to any power voltage in the range from -40.5 V to -57 V.
Содержание PRIMERGY RX2520 M1
Страница 36: ...36 Upgrade and Maintenance Manual RX2520 M1 Before you start ...
Страница 120: ...120 Upgrade and Maintenance Manual RX2520 M1 Power supply units ...
Страница 162: ...162 Upgrade and Maintenance Manual RX2520 M1 Hard disk drives solid state drives ...
Страница 169: ...RX2520 M1 Upgrade and Maintenance Manual 169 System fan Figure 73 Removing the fan box Ê Remove the two screws ...
Страница 220: ...220 Upgrade and Maintenance Manual RX2520 M1 Expansion cards and backup units ...
Страница 230: ...230 Upgrade and Maintenance Manual RX2520 M1 Main memory ...
Страница 283: ...RX2520 M1 Upgrade and Maintenance Manual 283 Accessible drives Ê Enabling BitLocker functionality on page 93 ...
Страница 310: ...310 Upgrade and Maintenance Manual RX2520 M1 Accessible drives ...
Страница 410: ...410 Upgrade and Maintenance Manual RX2520 M1 Cables ...