


RX2520 M1
Upgrade and Maintenance Manual
249
Processors
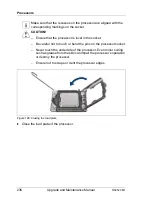
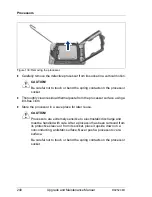
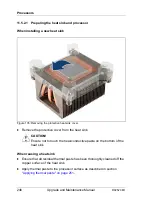
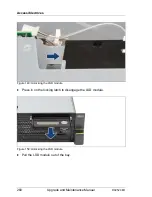
Figure 138: Removing the processor heat sink (B)
Ê
Carefully turn the heat sink back and forth to detach it from the processor (1).
I
This may be necessary due to the adhesive quality of the thermal
paste located between the heat sink and processor.
V
CAUTION!
Pay special attention not to damage any system board components
surrounding the processor socket.
Ê
Lift the heat sink out of the chassis (2).
Ê
Thoroughly clean residual thermal paste from the surface of the heat sink
and the processor using a lint-free cloth.
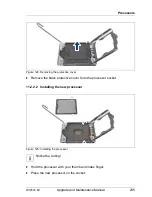
11.5.4 Replacing processor heat sinks
11.5.4.1 Removing the processor heat sink
Ê
Remove the processor heat sink as described in section
"Removing
processor heat sinks" on page 248
.
Содержание PRIMERGY RX2520 M1
Страница 36: ...36 Upgrade and Maintenance Manual RX2520 M1 Before you start ...
Страница 120: ...120 Upgrade and Maintenance Manual RX2520 M1 Power supply units ...
Страница 162: ...162 Upgrade and Maintenance Manual RX2520 M1 Hard disk drives solid state drives ...
Страница 169: ...RX2520 M1 Upgrade and Maintenance Manual 169 System fan Figure 73 Removing the fan box Ê Remove the two screws ...
Страница 220: ...220 Upgrade and Maintenance Manual RX2520 M1 Expansion cards and backup units ...
Страница 230: ...230 Upgrade and Maintenance Manual RX2520 M1 Main memory ...
Страница 283: ...RX2520 M1 Upgrade and Maintenance Manual 283 Accessible drives Ê Enabling BitLocker functionality on page 93 ...
Страница 310: ...310 Upgrade and Maintenance Manual RX2520 M1 Accessible drives ...
Страница 410: ...410 Upgrade and Maintenance Manual RX2520 M1 Cables ...