136
Upgrade and Maintenance Manual
RX2520
M1
Hard disk drives / solid state drives
7.3.2
Installing 3.5-inch HDD modules
7.3.2.1
Preliminary steps
Ê
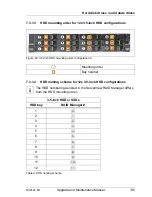
Locate the correct drive bay as described in section
"3.5-inch HDD / SSD
configurations" on page 133
.
7.3.2.2
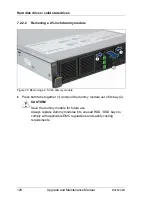
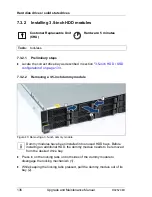
Removing a 3.5-inch dummy module
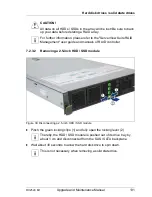
Figure 43: Removing a 3.5-inch dummy module
I
Dummy modules have been installed into unused HDD bays. Before
installing an additional HDD, the dummy module needs to be removed
from the desired drive bay.
Ê
Press in on the locking tabs on both sides of the dummy module to
disengage the locking mechanism (1).
Ê
While keeping the locking tabs pressed, pull the dummy module out of its
bay (2).
Customer Replaceable Unit
(CRU)
Hardware: 5 minutes
Tools:
tool-less
Содержание PRIMERGY RX2520 M1
Страница 36: ...36 Upgrade and Maintenance Manual RX2520 M1 Before you start ...
Страница 120: ...120 Upgrade and Maintenance Manual RX2520 M1 Power supply units ...
Страница 162: ...162 Upgrade and Maintenance Manual RX2520 M1 Hard disk drives solid state drives ...
Страница 169: ...RX2520 M1 Upgrade and Maintenance Manual 169 System fan Figure 73 Removing the fan box Ê Remove the two screws ...
Страница 220: ...220 Upgrade and Maintenance Manual RX2520 M1 Expansion cards and backup units ...
Страница 230: ...230 Upgrade and Maintenance Manual RX2520 M1 Main memory ...
Страница 283: ...RX2520 M1 Upgrade and Maintenance Manual 283 Accessible drives Ê Enabling BitLocker functionality on page 93 ...
Страница 310: ...310 Upgrade and Maintenance Manual RX2520 M1 Accessible drives ...
Страница 410: ...410 Upgrade and Maintenance Manual RX2520 M1 Cables ...

