


OF-500 OptiFiber Certifying OTDR
Technical Reference Handbook
1-24
Setting User Preferences
The following sections describe settings you may want to
change when you first start using the tester.
Changing the Date, Time, and Numeric Formats
To set the date and time:
1
Press
S
; then press
E
to select the
System
tab.
2
Use
L
to highlight
DATE
or
TIME
; then press
t
.
3
Use
N
or
K
to highlight the field you want to
change; then use
M
or
L
to change the setting.
4
Press
s
when you are finished.
To select a date, time, or numeric format:
1
Press
S
; then press
E
to select the
System
tab.
2
Use
L
to highlight
DATE FORMAT
,
TIME FORMAT
,
or
NUMERIC FORMAT
; then press
t
.
3
Use
L
to highlight the desired format; then press
t
.
Changing the Length Units
1
Press
S
; then press
E
to select the
System
tab.
2
Use
L
to highlight
LENGTH UNITS
; then press
t
.
3
Use
L
to highlight the setting you want; then press
t
.
Enabling or Disabling the Save Warning
If you do not save a test, it is deleted from temporary
memory when you run another test.
To enable or disable a warning that reminds you about
the unsaved test:
1
Press
S
; then press
E
to select the
System
tab.
2
Use
L
to highlight
Enabled
or
Disabled
; then press
t
.
Adjusting the Display Brightness
Press
J
to see the brightness adjustment screen. Use
K
or
N
for coarse adjustments; use
D
and
E
for fine
adjustments. Press
s
when you are finished.
The setting is retained when you turn the tester off.
The brightness setting does not affect the battery life.
Содержание OF-500 OptiFiber
Страница 12: ...OF 500 OptiFiber Technical Reference Handbook x ...
Страница 18: ...OF 500 OptiFiber Technical Reference Handbook xvi ...
Страница 27: ...Getting Acquainted Powering the Tester 1 1 9 ajt20f eps Figure 1 1 Battery Pack Features ...
Страница 29: ...Getting Acquainted Verifying Operation 1 1 11 ajt56f eps Figure 1 2 Removing the Module ...
Страница 46: ...OF 500 OptiFiber Certifying OTDR Technical Reference Handbook 1 28 ...
Страница 95: ...Using the OTDR Running the OTDR Test 3 3 21 ajt33f eps Figure 3 12 Connecting the OTDR to Spooled Cable ...
Страница 133: ...Using the ChannelMap Function Running the Test 4 4 3 ajt55f eps Figure 4 2 ChannelMap Test Connections ...
Страница 136: ...OF 500 OptiFiber Certifying OTDR Technical Reference Handbook 4 6 ...
Страница 148: ...OF 500 OptiFiber Certifying OTDR Technical Reference Handbook 6 4 ajt61f eps Figure 6 2 Changing the Connector Adapter ...
Страница 192: ...OF 500 OptiFiber Certifying OTDR Technical Reference Handbook 6 48 ...
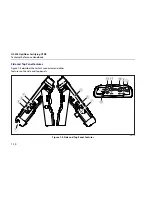
Страница 196: ...OF 500 OptiFiber Certifying OTDR Technical Reference Handbook 7 4 ajt03f eps Figure 7 2 Using the Visual Fault Locator ...
Страница 254: ...OF 500 OptiFiber Certifying OTDR Technical Reference Handbook 11 36 ...
Страница 256: ...OF 500 OptiFiber Certifying OTDR Technical Reference Handbook ...
Страница 261: ...Loss Test Methods Method A A 2 B B 3 ajt58f eps Figure B 1 Method A A 2 Reference and Test Connections singlemode shown ...
Страница 263: ...B 5 ajt59f eps Figure B 2 Method B A 1 Reference and Test Connections singlemode shown Loss Test Methods Method B A 1 B ...
Страница 265: ...Loss Test Methods Method C A 3 B B 7 ajt60f eps Figure B 3 Method C A 3 Reference and Test Connections singlemode shown ...
Страница 272: ...B 14 OF 500 OptiFiber Certifying OTDR Technical Reference Handbook ...
Страница 274: ...OF 500 OptiFiber Certifying OTDR Technical Reference Handbook C 2 ...
Страница 282: ...OF 500 OptiFiber Technical Reference Handbook 8 ...


