


OF-500 OptiFiber Certifying OTDR
Technical Reference Handbook
6-36
Running the Test in Far End Source Mode
W
Caution
If you disconnected the reference test cord from
the source's output, you must set the reference
again to ensure valid measurements.
1
Verify that the settings described in Table 6-1 are
appropriate. Let the tester and source warm up for 5
minutes.
2
Select Loss/Length mode: On the
HOME
screen, press
A
Change Test
; then select
Loss/Length
.
3
Clean the connectors on the cabling to be tested.
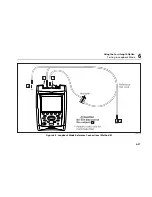
4
Connect the tester to the cabling as shown in Figure
6-13.
5
Set the source to the correct wavelength and to
continuous wave output.
6
Press
T
.
7
Select a wavelength for the test.
Auto
is used with
SimpliFiber sources, as described in the next section.
8
To test at a second wavelength, repeat steps 5
through 7.
9
To save the results, press
s
, select or create a
fiber ID; then press
s
again.
If you tested at two wavelengths, both are stored in
the same record.
Using Auto Wavelength Detection with SimpliFiber
Sources (OFTM-5731 and OFTM-5732 Modules)
A Fluke Networks SimpliFiber source can transmit
wavelength information that can be read by OFTM-5731
and OFTM-5732 modules. This feature helps eliminate
wavelength selection errors when testing in Far End
Source mode.
To use auto wavelength detection, do the following:
1
Verify that the SimpliFiber source is set to Auto
mode. The
Auto
LED should be lit. Press
B
if it is
not.
2
Run the Far End Source test, selecting
Auto
on the
tester's
SET SOURCE WAVELENGTH
screen.
Содержание OF-500 OptiFiber
Страница 12: ...OF 500 OptiFiber Technical Reference Handbook x ...
Страница 18: ...OF 500 OptiFiber Technical Reference Handbook xvi ...
Страница 27: ...Getting Acquainted Powering the Tester 1 1 9 ajt20f eps Figure 1 1 Battery Pack Features ...
Страница 29: ...Getting Acquainted Verifying Operation 1 1 11 ajt56f eps Figure 1 2 Removing the Module ...
Страница 46: ...OF 500 OptiFiber Certifying OTDR Technical Reference Handbook 1 28 ...
Страница 95: ...Using the OTDR Running the OTDR Test 3 3 21 ajt33f eps Figure 3 12 Connecting the OTDR to Spooled Cable ...
Страница 133: ...Using the ChannelMap Function Running the Test 4 4 3 ajt55f eps Figure 4 2 ChannelMap Test Connections ...
Страница 136: ...OF 500 OptiFiber Certifying OTDR Technical Reference Handbook 4 6 ...
Страница 148: ...OF 500 OptiFiber Certifying OTDR Technical Reference Handbook 6 4 ajt61f eps Figure 6 2 Changing the Connector Adapter ...
Страница 192: ...OF 500 OptiFiber Certifying OTDR Technical Reference Handbook 6 48 ...
Страница 196: ...OF 500 OptiFiber Certifying OTDR Technical Reference Handbook 7 4 ajt03f eps Figure 7 2 Using the Visual Fault Locator ...
Страница 254: ...OF 500 OptiFiber Certifying OTDR Technical Reference Handbook 11 36 ...
Страница 256: ...OF 500 OptiFiber Certifying OTDR Technical Reference Handbook ...
Страница 261: ...Loss Test Methods Method A A 2 B B 3 ajt58f eps Figure B 1 Method A A 2 Reference and Test Connections singlemode shown ...
Страница 263: ...B 5 ajt59f eps Figure B 2 Method B A 1 Reference and Test Connections singlemode shown Loss Test Methods Method B A 1 B ...
Страница 265: ...Loss Test Methods Method C A 3 B B 7 ajt60f eps Figure B 3 Method C A 3 Reference and Test Connections singlemode shown ...
Страница 272: ...B 14 OF 500 OptiFiber Certifying OTDR Technical Reference Handbook ...
Страница 274: ...OF 500 OptiFiber Certifying OTDR Technical Reference Handbook C 2 ...
Страница 282: ...OF 500 OptiFiber Technical Reference Handbook 8 ...


