BRAKES
Page D-13
Repair and Service Manual
Read all of Section B and this section before attempting any procedure. Pay particular attention to all Notes, Cautions and Warnings
BRAKE PEDAL REPLACEMENT
To prevent severe injury
or death resulting from a
battery explosion:
The battery negative (-) cable must be removed
using insulated wrench before removing brake
pedal from vehicle.
Wrap wrenches with vinyl
tape to prevent the possibil-
ity of a dropped wrench
from ‘shorting out’ a bat-
tery, which could result in an explosion and
severe personal injury or death.
Cover battery with a shop rag before servicing the
vehicle.
When connecting battery cables, pay particular
attention to the polarity of the battery terminals.
Never confuse the positive (+) and negative (-)
cables.
Tool List
Qty. Required
Ratchet, 3/8" drive....................................................... 1
Torque wrench, 3/8" drive, ft. lbs. ................................ 1
Deep well socket, 3/4", 3/8" drive................................ 1
Wrench, 3/4" ............................................................... 1
Needle nose pliers ...................................................... 1
Straight blade screwdriver........................................... 1
Before starting, refer to SAFETY section. Be sure that
the parking brake is engaged.
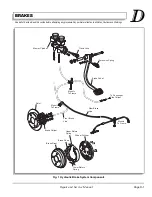
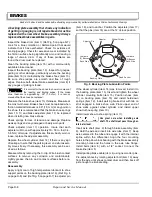
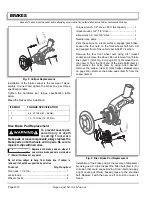
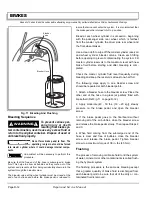
Remove the nut (item 1) using 3/4" wrench and remove
bolt (item 2) (Ref Fig. 12 on page D-13). Remove exten-
sion spring (item 3) using needle nose pliers. Slide brake
pedal (item 4) back so that clevis yoke (item 5) will come
out of master cylinder (item 6).
Inspect the shoulder bolt (item 2) for corrosion that could
cause binding. This bolt and both bushings (item 7) must
be replaced with new ones if corrosion or wear is found.
Installation of brake pedal is the reverse of disassembly
using new lock nut.
Tighten the hardware per torque specification table given
below.
PARKING BRAKE
The rear brake includes a parking brake consisting of a
wheel brake lever and strut. The wheel brake lever is
activated by a cable attached to the hand operated park-
ing brake lever
.
The parking brake is used to retain the
vehicle when stationary. It may also be used as an emer-
gency brake in the event of hydraulic system failure.
The hand operated parking brake lever is located at the
left side of the driver.
Lubrication
When lubricating parking brake, be sure
to use the recommended dry spray
lubricant. Commercial grease can attract dirt and accelerate
wear.
Adjustment
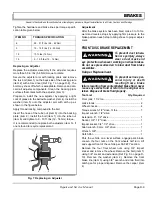
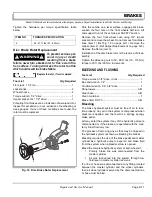
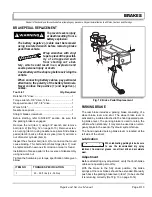
Before attempting any adjustment, verify that both brake
cables are operating smoothly.
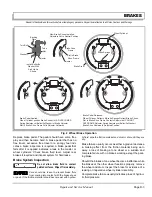
With the brake in the fully down position, the brake
springs at the rear brakes should be extended. Manually
push back the parking brake lever (item 1) to be sure that
it is returning correctly (Ref Fig. 13 on page D-14).
ITEM NO
TORQUE SPECIFICATION
1
25 - 29 ft. lbs (34 - 39 Nm)
!
!
Fig. 12 Brake Pedal Replacement
6
4
2
1
7
5
3
Содержание ST 4X4
Страница 6: ...Page iv Repair and Service Manual TABLE OF CONTENTS Notes...
Страница 10: ...Repair and Service Manual SAFETY INFORMATION Page viii Notes...
Страница 12: ...GENERAL INFORMATION ROUTINE MAINTENANCE Page A ii Repair and Service Manual Notes...
Страница 24: ...SAFETY Page B ii Repair and Service Manual Notes...
Страница 34: ...BODY AND TRUCKBED Page C ii Repair and Service Manual Notes...
Страница 50: ...BRAKES Page D ii Repair and Service Manual Notes...
Страница 68: ...CONTINUOUSLY VARIABLE TRANSMISSION CVT Page E ii Repair and Service Manual Notes...
Страница 74: ...DIRECTION AND DRIVE SELECTOR Page F ii Repair and Service Manual Notes...
Страница 80: ...ELECTRICAL Page G ii Repair and Service Manual Notes...
Страница 114: ...FRONT SUSPENSION AND STEERING Page J ii Repair and Service Manual Notes...
Страница 128: ...FUEL SYSTEM Page K ii Repair and Service Manual Notes...
Страница 136: ...PAINT Page L ii Repair and Service Manual Notes...
Страница 142: ...REAR AXLE AND SUSPENSION Page M ii Repair and Service Manual Notes...
Страница 152: ...SPEED CONTROL Page N ii Repair and Service Manual Notes...
Страница 160: ...TROUBLESHOOTING Page P ii Repair and Service Manual Notes...
Страница 168: ...WHEELS AND TIRES Page R ii Repair and Service Manual Notes...
Страница 174: ...GENERAL SPECIFICATIONS Page S ii Repair and Service Manual Notes...
Страница 180: ...LIMITED WARRANTY Page T ii Repair and Service Manual Notes...
Страница 182: ...Page T 2 Repair and Service Manual LIMITED WARRANTY Notes...

