FUEL SYSTEM
Page K-2
Repair and Service Manual
Read all of Section B and this section before attempting any procedure. Pay particular attention to all Notes, Cautions and Warnings
GENERAL
In the following text, there are references to
removing/installing bolts, etc. Additional hard-
ware (nuts, washers, etc.) that is removed must always be
installed in its original position unless otherwise specified. Non-
specified torque specifications are as shown in the table con-
tained in Section A.
The fuel system consists of a fuel tank, fuel lines, fuel fil-
ter, fuel pump, and carburetor. Refer to HONDA
®
GX610,
18 HP Engine Repair Manual for engine, obtainable from
Honda dealer.
FUEL
To prevent serious per-
sonal injury or death
resulting from a possi-
ble explosion, do not smoke near the fuel tank or refu-
el near open flame or electrical items which could
produce a spark.
Always wear safety glasses while refueling to pre-
vent possible eye injury from gasoline or gasoline
vapor.
When refueling, inspect the fuel cap for leaks or
breaks that could result in fuel spillage.
Do not over fill the fuel tank. Allow adequate
space for the expansion of gasoline. Leave at
least 1" (2.5 cm) space below bottom of filler neck.
Do not handle fuel in an area that is not ade-
quately ventilated. Do not permit anyone to smoke
in an area where vehicles are being fueled.
Shut off the vehicle, when fueling.
Do not use a cell phone while fueling.
Some fuels, called oxygenated or refor-
mulated gasoline, are gasoline blended
with alcohols or ethers. Excessive amounts of these blends can
damage the fuel system or cause performance problems. If any
undesirable operating symptoms occur, use gasoline with a low-
er percentage of alcohol or ether.
Do not use gasoline which contains more than 5% Methanol.
Do not mix oil with gasoline.
The fuel tank cap is located near the passenger seat. Fill
the tank with fresh, clean, automotive grade, unleaded,
87 octane (minimum) gasoline.
FUEL SYSTEM COMPONENT SERVICE AND
REPLACEMENT
To prevent serious per-
sonal injury or death
resulting from explosion
or fire:
Check for clogged or kinked hoses. Clogged or
kinked carburetor hoses are not only detrimental
to the proper operation and performance of the
vehicle, but can also be a safety hazard in the
case of fuel leaking on a hot engine.
Tests that involve fuel flow should be avoided if at
all possible. If a test to determine fuel/vapor pres-
ence or flow is required, the ignition system must
be disabled. Ground the magneto in order to pre-
vent an ignition spark that could ignite the fuel/
vapor. Never permit smoking or an open flame in
an area that contains fuel/vapor. Clean up all fuel
spills immediately.
Never attempt to repair a damaged or leaking fuel
tank. It must be replaced.
Disconnect the negative (-) battery cable before ser-
vicing fuel system.
The fuel filter, tank, hoses and cap should be checked
frequently for leaks or signs that the cap vent or filter has
become clogged. The filter should be replaced periodi-
cally. See ‘Periodic Service Schedule’ in Section A.
Fuel Lines and Filter
The filter is marked with a flow direction
arrow. Be sure that the arrow points
towards the fuel pump.
Orient direction of new fuel filter according to
FLOW arrow on side of filter.
Tool List
Qty. Required
Pliers............................................................................ 1
Hose plug ....................................................................1
Fuel is supplied to the fuel pump and carburetor through
flexible fuel hoses. An in-line filter is installed in the hose
between the fuel tank and fuel pump.
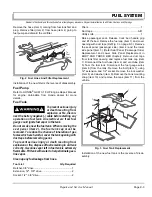
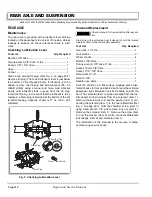
Move clamps (item 1) from ends of filter (item 2) and
raise filter (item 2) above the fuel pump to reduce the
amount of gas that will spill (Ref Fig. 2 on page K-3).
!
!
!
!
Содержание ST 4X4
Страница 6: ...Page iv Repair and Service Manual TABLE OF CONTENTS Notes...
Страница 10: ...Repair and Service Manual SAFETY INFORMATION Page viii Notes...
Страница 12: ...GENERAL INFORMATION ROUTINE MAINTENANCE Page A ii Repair and Service Manual Notes...
Страница 24: ...SAFETY Page B ii Repair and Service Manual Notes...
Страница 34: ...BODY AND TRUCKBED Page C ii Repair and Service Manual Notes...
Страница 50: ...BRAKES Page D ii Repair and Service Manual Notes...
Страница 68: ...CONTINUOUSLY VARIABLE TRANSMISSION CVT Page E ii Repair and Service Manual Notes...
Страница 74: ...DIRECTION AND DRIVE SELECTOR Page F ii Repair and Service Manual Notes...
Страница 80: ...ELECTRICAL Page G ii Repair and Service Manual Notes...
Страница 114: ...FRONT SUSPENSION AND STEERING Page J ii Repair and Service Manual Notes...
Страница 128: ...FUEL SYSTEM Page K ii Repair and Service Manual Notes...
Страница 136: ...PAINT Page L ii Repair and Service Manual Notes...
Страница 142: ...REAR AXLE AND SUSPENSION Page M ii Repair and Service Manual Notes...
Страница 152: ...SPEED CONTROL Page N ii Repair and Service Manual Notes...
Страница 160: ...TROUBLESHOOTING Page P ii Repair and Service Manual Notes...
Страница 168: ...WHEELS AND TIRES Page R ii Repair and Service Manual Notes...
Страница 174: ...GENERAL SPECIFICATIONS Page S ii Repair and Service Manual Notes...
Страница 180: ...LIMITED WARRANTY Page T ii Repair and Service Manual Notes...
Страница 182: ...Page T 2 Repair and Service Manual LIMITED WARRANTY Notes...

