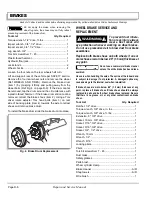


BRAKES
Page D-4
Repair and Service Manual
Read all of Section B and this section before attempting any procedure. Pay particular attention to all Notes, Cautions and Warnings
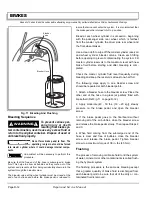
The hydraulic system may be checked for leaks by
applying pressure to the pedal gradually and steadily. If
the pedal sinks very slowly to the floor, the system has a
leak. This is not to be confused with a springy or spongy
feel due to the compression of air within the lines.
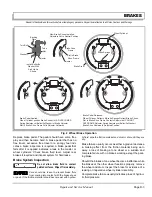
Check for leaks along all lines and at brake assembly. If
no external leaks are apparent, the problem is inside the
master cylinder.
After making any repairs to hydraulic lines, wheel cylin-
ders or master cylinder, the brakes must be bled to
remove any trapped air. A bleeder valve is located at
each wheel cylinder for this purpose.
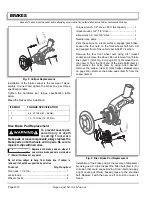
MASTER CYLINDER
Just like any other brake part, the master cylinder will
eventually require replacement. The usual reason for a
master cylinder failure is the cylinder seals (cups) deteri-
orate. Fluid leaks past the cups and shows as an exter-
nal leak. A common symptom is a ‘spongy’ brake pedal
that goes all the way to the floor when all the other brake
components are in good condition. The rubber parts wear
with usage or deteriorate with age or fluid contamination.
Corrosion or deposits formed in the cylinder bore due to
moisture or dirt in the hydraulic system may result in
wear of the cylinder bore or related parts. Do not try to
remove corrosion or deposits with a cylinder hone. If cor-
rosion or deposits are present, discard master cylinder
and replace with new one.
Brake Fluid
To prevent serious per-
sonal injury or death
resulting from a battery
explosion, remove the battery. Always disconnect the
negative (-) battery cable first using insulated wrench.
To prevent serious personal injury or death resulting
from a brake system containing air, bleed the brake
system whenever the brake component is removed, a
brake line is disconnected, or the brake fluid in the
master cylinder is allowed to fall below the minimum
level and it is suspected that air may have entered the
system. Ref Bleeding And Flushing section.
During this process, it is likely that
brake fluid will leak from the master cyl-
inder. Avoid allowing brake fluid to contact the painted body
components of the vehicle. Wipe off immediately.
Hydraulic brake systems must be totally
flushed if the fluid becomes contaminated with
water, dirt or other corrosive chemicals. To flush, bleed the
entire system until all brake fluid has been replaced with fresh
DOT 3 standard automotive brake fluid.
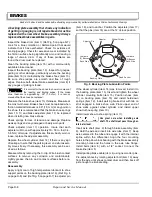
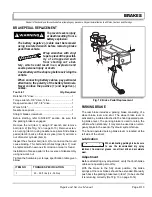
It is important to maintain proper fluid levels in the master
cylinder. The fill cap for the cylinder is located under the
cowl. To prevent contamination when checking fluid, wipe
off any dirt from fill cap before removing it. Reservoir fluid
level should be checked per ‘Periodic Service Schedule’
Section in GENERAL INFORMATION AND ROUTINE
MAINTENANCE. When required, clean brake fluid
should be added to maintain fluid level between the max-
imum and minimum level indicators of the reservoirs.
Use fresh DOT 3 standard automotive brake fluid.
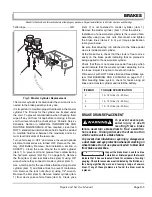
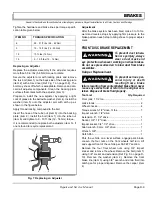
Master Cylinder Replacement
To prevent serious per-
sonal injury or death
resulting from a battery
explosion, remove the battery. Always disconnect the
negative (-) battery cable first using insulated wrench.
To prevent serious personal injury or death resulting
from a brake system containing air, bleed the brake
system whenever the brake component is removed, a
brake line is disconnected, or the brake fluid in the
master cylinder is allowed to fall below the minimum
level and it is suspected that air may have entered the
system. Ref Bleeding And Flushing section.
To prevent serious personal injury or death resulting
from a brake failure resulting from contaminated
brake fluid, never reuse any excess fluid or return to
the original container. Dispose of brake fluid properly.
During this process, it is likely that
brake fluid will leak from the master cyl-
inder. Avoid allowing brake fluid to contact the painted body
components of the vehicle. Wipe off immediately.
It is recommended that brake fluid be drained
when the master cylinder is removed. Open
each bleeder valve in turn, and drain fluid into catch pan. Dis-
pose of old fluid properly.
Tool List
Qty. Required
Torque wrench, 3/8" drive, ft. lbs ................................. 1
Wrench, 3/8" ................................................................ 1
Insulated wrench, 1/2" .................................................1
Needle nose pliers .......................................................1
Shop towels ............................................................. A/R
Catch pan ....................................................................1
!
!
!
!
Содержание ST 4X4
Страница 6: ...Page iv Repair and Service Manual TABLE OF CONTENTS Notes...
Страница 10: ...Repair and Service Manual SAFETY INFORMATION Page viii Notes...
Страница 12: ...GENERAL INFORMATION ROUTINE MAINTENANCE Page A ii Repair and Service Manual Notes...
Страница 24: ...SAFETY Page B ii Repair and Service Manual Notes...
Страница 34: ...BODY AND TRUCKBED Page C ii Repair and Service Manual Notes...
Страница 50: ...BRAKES Page D ii Repair and Service Manual Notes...
Страница 68: ...CONTINUOUSLY VARIABLE TRANSMISSION CVT Page E ii Repair and Service Manual Notes...
Страница 74: ...DIRECTION AND DRIVE SELECTOR Page F ii Repair and Service Manual Notes...
Страница 80: ...ELECTRICAL Page G ii Repair and Service Manual Notes...
Страница 114: ...FRONT SUSPENSION AND STEERING Page J ii Repair and Service Manual Notes...
Страница 128: ...FUEL SYSTEM Page K ii Repair and Service Manual Notes...
Страница 136: ...PAINT Page L ii Repair and Service Manual Notes...
Страница 142: ...REAR AXLE AND SUSPENSION Page M ii Repair and Service Manual Notes...
Страница 152: ...SPEED CONTROL Page N ii Repair and Service Manual Notes...
Страница 160: ...TROUBLESHOOTING Page P ii Repair and Service Manual Notes...
Страница 168: ...WHEELS AND TIRES Page R ii Repair and Service Manual Notes...
Страница 174: ...GENERAL SPECIFICATIONS Page S ii Repair and Service Manual Notes...
Страница 180: ...LIMITED WARRANTY Page T ii Repair and Service Manual Notes...
Страница 182: ...Page T 2 Repair and Service Manual LIMITED WARRANTY Notes...


