


File Transfer Operations
164
NetLinx Studio - Instruction Manual
2.
Click the
Browse (...)
button to navigate to the target directory (in the
Browse For Folder
dialog). The selected
directory path is displayed in the
Location
field. Assuming that the specified target directory contains one or more
Kit files, the Kit files in the selected directory are displayed in the
Files
list box (with the file's last modified date
and time).
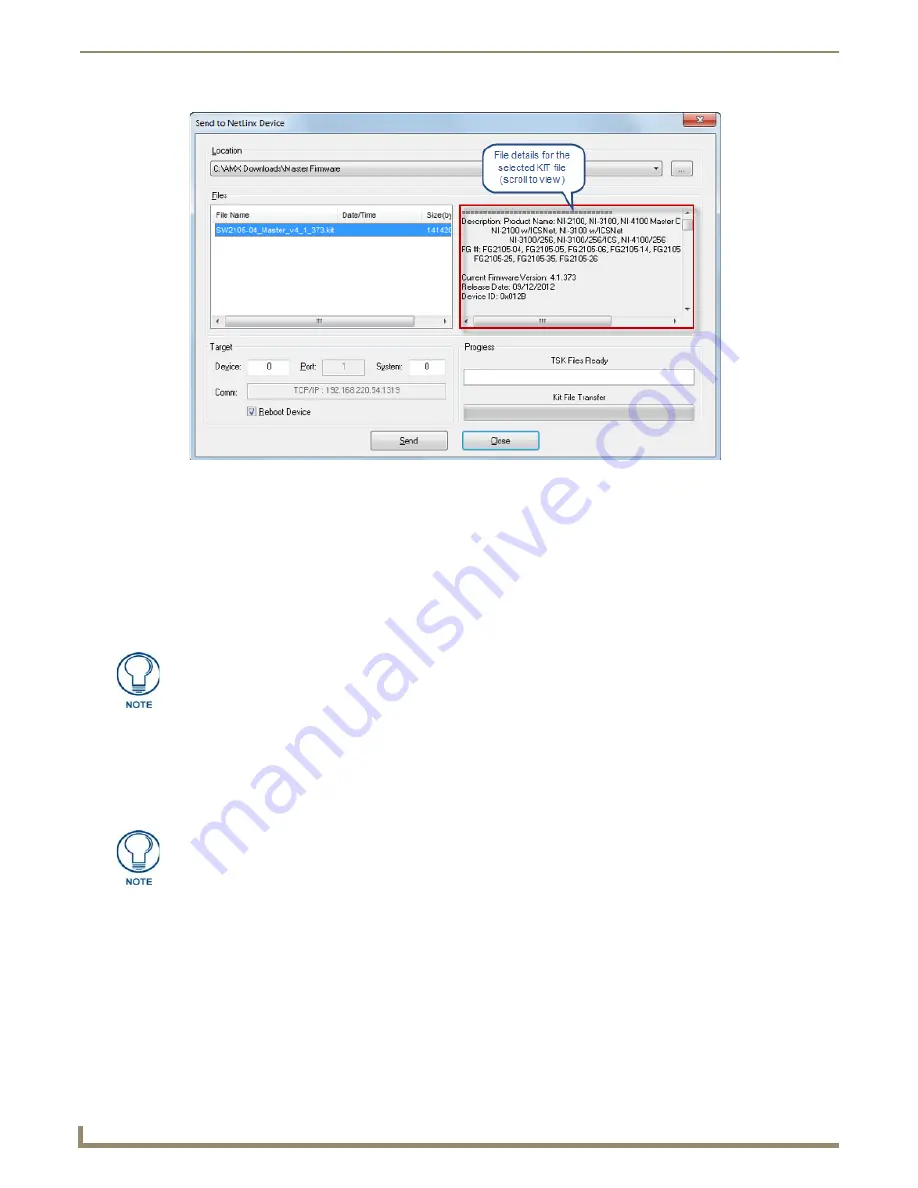
3.
Select the appropriate KIT file from the list.
4.
Enter the Device and System ID numbers for the target NetLinx Device in the
Device
and
System
text boxes.
If the Kit file is determined to be specifically for the target Master, the Device number is forced to zero. If the Kit
file is for an unspecified device, you must enter the correct Device ID number.
5.
Review the File, Connection, Address, and Target Device information before you send.
Check the
Reboot
option (if required by the target device - see note below).
Click the
Send
button to send the selected KIT file to the specified device. You can watch the progress of the
transfer in the
Send to NetLinx Device
dialog.
When the transfer is finished, and the reboot is complete, press the
Close
button.
Sending Firmware to an Axcess Device (TSK File)
Use the
Firmware Transfers
options in the Tools menu to update the firmware in Axcess Masters. Axcess Master
Controllers use .TSK files for firmware upgrades.
1.
Choose
Tools > Firmware Transfers > Send To Axcess Device
to open the
Send To Axcess Device
dialog
(FIG. 244).
FIG. 243
Send To NetLinx Device dialog
Use the Online Tree to determine the device's assigned ID.
If the device is a NetLinx Master or NXI, then the Reboot option is valid. Other
NetLinx devices need to be given the command to reboot (if they support it). Allow
20-30 seconds for NetLinx Masters to reboot. When the Master has rebooted, the
Status LED on the front panel blinks once a second to indicate that it is functioning
properly. Once it has rebooted, click OK.
Содержание NetLinx Studio
Страница 40: ...Working with Projects 28 NetLinx Studio Instruction Manual...
Страница 148: ...Communication Settings 136 NetLinx Studio Instruction Manual...
Страница 160: ...Working with Online Devices 148 NetLinx Studio Instruction Manual...
Страница 178: ...File Transfer Operations 166 NetLinx Studio Instruction Manual...
Страница 208: ...Tools Menu Options 196 NetLinx Studio Instruction Manual...
Страница 229: ...Setting Program Preferences 217 NetLinx Studio Instruction Manual...


