File Transfer Operations
152
NetLinx Studio - Instruction Manual
By default this dialog opens to the
Current Workspace
tab. This tab provides a listing of Projects, Systems and
System Files that are contained in the currently open Workspace file.
2.
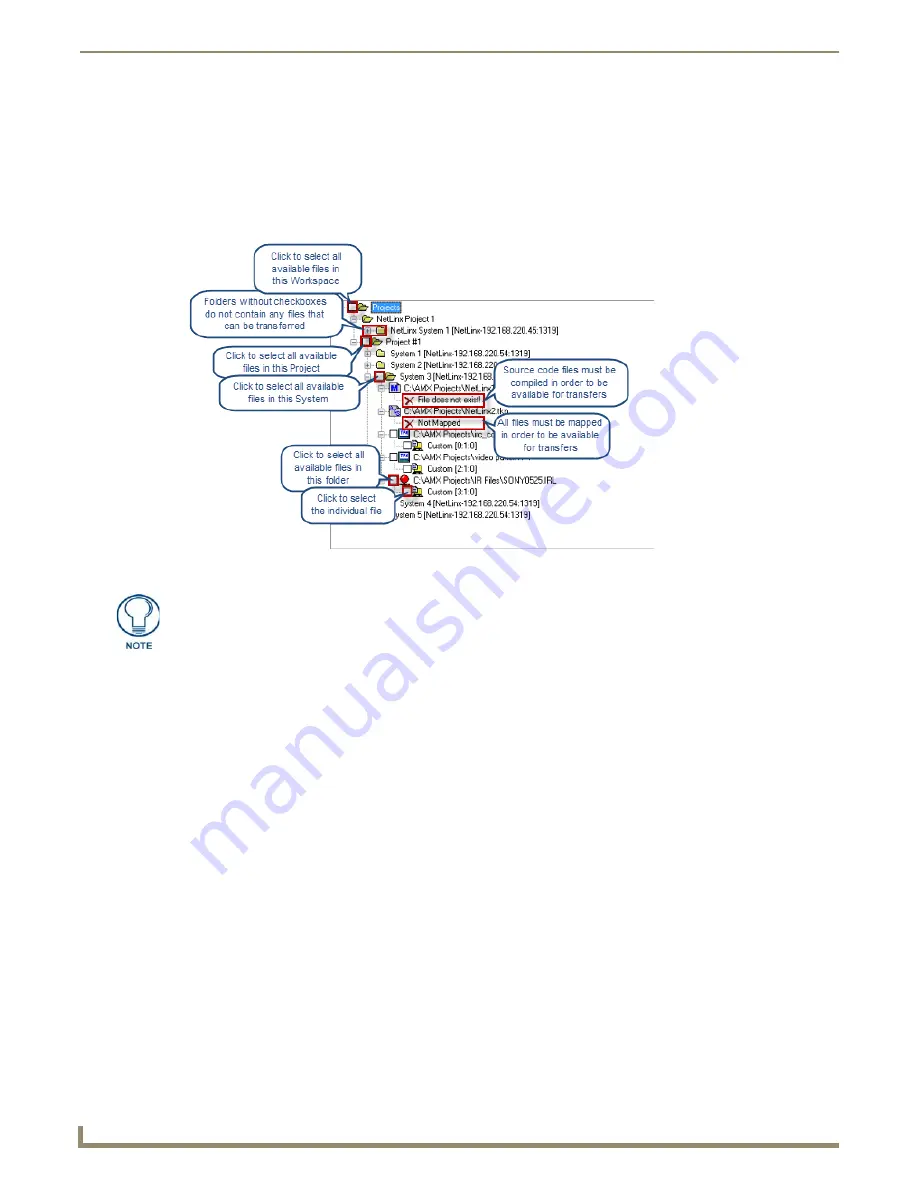
Use the check boxes to select the file(s) to include in this transfer. Note that only some of the folders and files will
not have a check box:
If there is no check box next to a folder, then that folder does not contain any files that are available to
transfer.
If there is no check box next to a file, then that fie is not available to transfer (FIG. 231).
Select the top-level
Projects
folder to automatically select all available files contained in the Workspace.
Select a Project or System folder to select all available files contained in the Project or System.
Click the
[+]
icons to expand the folders; click
[-]
to collapse
3.
Click
OK
to close this dialog and return to the
File Transfer
dialog.
System Files - Prerequisites for Transfer Operations
Files cannot be added to the
Files To Send
list without device mapping information.
Source Code files cannot be sent until they have been successfully compiled.
While Touch Panel UI files are sent to the panels themselves, KPD files are sent to the master and not directly
to the keypad. Before sending a KPD (KPDesign) file to the target keypad(s), be sure that you have
successfully compiled the Source Code file that contains the keypad module, and sent it to the Master.
Adding Orphan Files
Orphan
files are files that are not contained in the currently open Workspace. Use the
Other
tab of the
Select Files For
File Transfer
dialog to add orphan files to the Send tab (for inclusion in a file transfer operation).
1.
With a Workspace open, select
Tools > File Transfer
to open the
File Transfer
dialog (
Send
tab).
2.
Click the
Add
command button to open the
Select Files For File Transfer
dialog.
3.
Open the
Other
tab (FIG. 232).
FIG. 231
Select Files For File Transfer dialog (Current Workspace tab) - File list
To see a description of what makes a file available for transfer, refer to the System
Files - Prerequisites for Transfer Operations
section on page 152
.
Содержание NetLinx Studio
Страница 40: ...Working with Projects 28 NetLinx Studio Instruction Manual...
Страница 148: ...Communication Settings 136 NetLinx Studio Instruction Manual...
Страница 160: ...Working with Online Devices 148 NetLinx Studio Instruction Manual...
Страница 178: ...File Transfer Operations 166 NetLinx Studio Instruction Manual...
Страница 208: ...Tools Menu Options 196 NetLinx Studio Instruction Manual...
Страница 229: ...Setting Program Preferences 217 NetLinx Studio Instruction Manual...


