Adobe Photoshop CS6 Скачать руководство пользователя страница 353

Transforming objects

To the top

Note:

Scale

Apply transformations
Select an item to transform
Set or move the reference point for a transformation
Scale, rotate, skew, distort, apply perspective, or warp
Flip or rotate precisely
Repeat a transformation
Duplicate an item when transforming it
Transform freely
Warp an item
Puppet Warp

Apply transformations

Transforming scales, rotates, skews, stretches, or warps an image. You can apply transformations to a selection, an entire layer, multiple layers, or
a layer mask. You can also apply transformations to a path, a vector shape, a vector mask, a selection border, or an alpha channel. Transforming
affects image quality when you manipulate the pixels. To apply non-destructive transformations to raster images, use Smart Objects. (See 

About

Smart Objects

.) Transforming a vector shape or path is always non-destructive because you’re only changing the mathematical calculations

producing the object.

To make a transformation, first select an item to transform and then choose a transformation command. If necessary, adjust the reference point
before manipulating the transformation. You can perform several manipulations in succession before applying the cumulative transformation. For
example, you can choose Scale and drag a handle to scale, and then choose Distort and drag a handle to distort. Then press Enter or Return to
apply both transformations.

Photoshop uses the interpolation method selected in the General area of the Preferences dialog box to calculate the color values of pixels that are
added or deleted during transformations. This interpolation setting directly affects the speed and quality of the transformation. Bicubic interpolation,
the default, is slowest but yields the best results.

You can also warp and distort raster images using the Liquify filter.

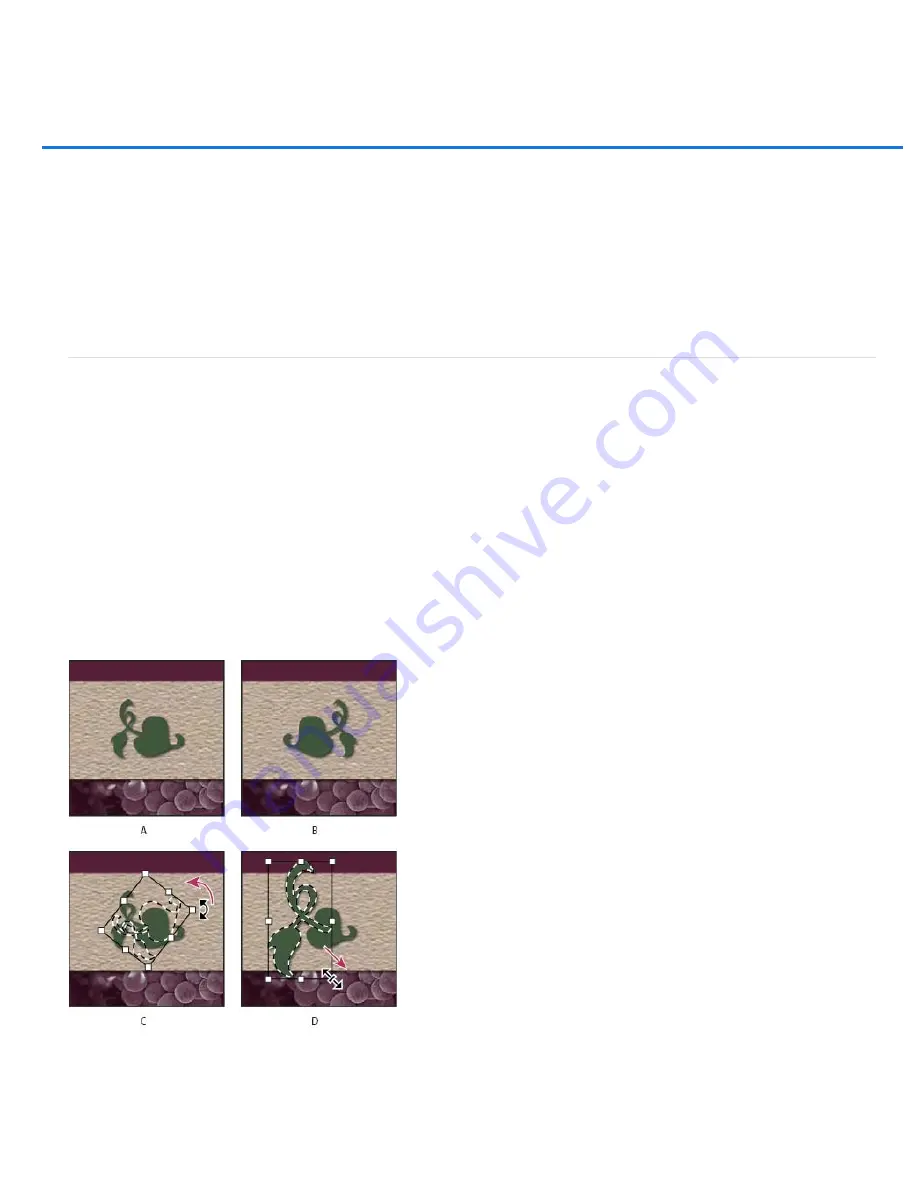
Transforming an image


A. Original image B. Layer flipped C. Selection border rotated D. Part of object scaled 

Transform submenu commands

Enlarges or reduces an item relative to its 

reference point

, the fixed point around which transformations are performed. You can scale

Содержание Photoshop CS6

Страница 1: ...ADOBE PHOTOSHOP Help and tutorials...

Страница 2: ...aced blurs New Crop tool Lynda com Oct 7 2012 video tutorial Interactive previews help you precisely trim images down to size Auto color corrections Kelby May 7 2012 video tutorial One click correctio...

Страница 3: ...settings across workgroups Streamlined 3d controls Lynda com May 7 2012 video tutorial Expand creative possibilities into another dimension Using Content Aware Patch Lynda com May 7 2012 video tutoria...

Страница 4: ...c blur effects in the Blur gallery now support Smart Objects and can be applied non destructively as smart filters This feature also supports Smart Object video layers For more information see Photogr...

Страница 5: ...ally loaded in the Character Style and Paragraph Style panels when a new Photoshop document is created The default styles can also be loaded into any existing document using the Load Type Styles comma...

Страница 6: ...he image window or drag in the window to start with specific borders To correct image perspective hold down the Crop tool and select the Perspective Crop tool Learn More Crop and straighten photos or...

Страница 7: ...ion Photoshop CS6 lets you record tools such as the brush tool in your action To enable this feature choose Allow Tool Recording from the Actions panel menu For more information see Recording tools in...

Страница 8: ...s bar Workspace and workflow Numerous enhancements help you complete common tasks more efficiently Mercury Graphics Engine Experience blazing fast interactions with processor intensive commands such a...

Страница 9: ...tyles in Photoshop CS6 by Julieanne Kost Type menu A new Type menu has been added and most of the text and type related functionality is available from the Type menu For example you can access the Cha...

Страница 10: ...for each stroke by default Note For details about brush pose projection and color dynamics options see Painting and patterns The heads up display HUD for changing brush size and hardness can also chan...

Страница 11: ...lending options have been customized Alt Opt click FX toggle arrows shows or hides all layer effects Correct opacity and blend mode displayed for hidden layers When renaming layers pressing Tab goes t...

Страница 12: ...n from path dialog Transform Layer thumbnail continues to show Smart Object icon when transforming a layer Improved dragging of vector curves Can rotate 90 degrees with even x odd pixel dimension to a...

Страница 13: ...esigned video engine you can import a wider range of video audio and image sequence files Easily work with file types such as the following 3GP 3G2 AVI DV FLV and F4V MPEG 1 MPEG 4 QuickTime MOV in Wi...

Страница 14: ...nal fade and cross fade effects Click the transitions icon in the upper left of the Timeline panel Then choose a duration and drag a transition type to the start or end of clips Place the transition b...

Страница 15: ...Twitter and Facebook posts are not covered under the terms of Creative Commons Legal Notices Online Privacy Policy...

Страница 16: ...shop 4 Choose Type Language Options Middle Eastern features Text direction To create content in Arabic and Hebrew enable right to left RTL text direction While RTL is the default direction of text man...

Страница 17: ...Stylistic Note Kashidas are inserted only in paragraphs with fully justified margins To apply Kashidas to a group of characters select the characters in the document and then choose Type Language Opt...

Страница 18: ...r panel modify the position of the diacritic marks relative to the script Values you can change are Adjust Horizontal Diacritic Position and the Adjust Vertical Diacritic Position Justification altern...

Страница 19: ...ns resuming the rendering will be applied to the selections Resuming a rendering also works even after saving your document as a PSD Cross Section now works with reflective surfaces and other surface...

Страница 20: ...t and point types and adjust color intensity and shadows Move tool consolidates object and camera adjustments The Move tool lets you adjust the placement of objects and camera In the options bar choos...

Страница 21: ...ayer from File The imported object is placed on the ground plane you defined Make paths from 3D layers Choose 3D Make Work Path from 3D Layer to convert the current rendering into a Work Path This com...

Страница 22: ...you want to adjust Then in the upper half of the Properties panel do any of the following Choose a light type Spot Infinite or Point from the top menu Adjust color intensity and hotspot size To duplic...

Страница 23: ...the light drag beyond the outer ellipse To change the hotspot angle drag the edge of the interior ellipse To extend or shrink the ellipse drag one of the four outer handles To change how much of the e...

Страница 24: ...ave a preset click Save name the style and click OK Saved presets include all the settings for each light and appear in the Style menu whenever you open the image To delete a preset choose it and then...

Страница 25: ...onstraint tool Double click inside crop box or press Enter or Return Commit crop Esc Cancel crop X Switch crop box orientation between portrait and landscape I Creative Cloud only Front Image for Crop...

Страница 26: ...ool M Move tool H Hand tool Z Zoom tool Control shortcuts P Preview W Show Constraint E Show Mesh T Correction S Scale F Focal Length R Crop Factor A As Shot Hidden shortcuts not visible in interface...

Страница 27: ...PP AVC AVI F4V FLV MOV QuickTime MPE MPEG 1 MPEG 4 MPEG 2 if a decoder is installed for example with an Adobe video suite MTS MXF R3D TS VOB Video export formats DPX MOV QuickTime MP4 Graphic file for...

Страница 28: ...ms of Creative Commons Legal Notices Online Privacy Policy PICT Resource Mac only can open only Radiance 3D related formats 3D Studio import only DAE Collada Flash 3D export only JPS JPEG Stereo KMZ G...

Страница 29: ...photorealistic to surreal Or apply an HDR look to standard images with the HDR Toning adjustment See Merge images to HDR and Adjust HDR toning Extraordinary painting effects Take advantage of realist...

Страница 30: ...e source See Retouch with the Clone Stamp tool Customize defaults for layer styles See Change style defaults to custom values Paste in the same relative location or into or outside selections See Unde...

Страница 31: ...d the Layers panel What is Photoshop Lynda com May 7 2012 video tutorial An introduction to the essential digital imaging application Enhancing Raw images video2brain May 7 2012 video tutorial Draw up...

Страница 32: ...L Using improved selecting and masking video 12 15 Create enhanced HDR images with HDR Pro video 8 00 Using faux HDR toning video 4 53 Using the mixer brush video 7 19 Working with the new bristle bru...

Страница 33: ...Dodge burn and sponge colors video 6 47 CS4 CS5 Match replace and mix colors HTML Retouching and transforming Sharpen images video 5 45 CS4 CS5 Straighten an image video 0 57 Correct perspective with...

Страница 34: ...How to tune Photoshop CS6 for peak performance Jeff Tranberry Oct 18 2012 article Background save and Auto recover Kelby May 7 2012 video tutorial Protect precious image data Preset migration and sha...

Страница 35: ...Bridge gallery offers easier access to images and documents Choose Window Extensions Mini Bridge Maximized screen space Click the button at the bottom of the toolbar to switch between Standard and Fu...

Страница 36: ...r resize the Application frame or any of its elements all the elements within it respond to each other so none overlap Panels don t disappear when you switch applications or when you accidentally clic...

Страница 37: ...re information Note Dreamweaver does not support docking and undocking Document windows Use the Document window s Minimize button to create floating windows Windows or choose Window Tile Vertically to...

Страница 38: ...ould be To move a panel drag it by its tab To move a panel group drag the title bar Narrow blue drop zone indicates Color panel will be docked on its own above the Layers panel group A Title bar B Tab...

Страница 39: ...ve a panel or panel group from the stack so that it floats by itself drag it out by its tab or title bar Resize panels To minimize or maximize a panel panel group or stack of panels double click a tab...

Страница 40: ...or Menu Customization Saves the current set of menus Display or switch workspaces Select a workspace from the workspace switcher in the Application bar In Photoshop you can assign keyboard shortcuts...

Страница 41: ...ns descriptions appear in tool tips by default If you find tool tips visually distracting you can hide them In the Interface preferences deselect Show Tool Tips Note Tool tips are not available in som...

Страница 42: ...pop up sliders for example the Opacity option in the Layers panel If there is a triangle next to the text box you can activate the pop up slider by clicking the triangle Position the pointer over the...

Страница 43: ...m Customize the list of items in a pop up panel 1 Click the triangle in the upper right corner of the pop up panel to view the panel menu 2 To return to the default library choose the Reset Tool Prese...

Страница 44: ...following To hide a menu item click the Visibility button To show a menu item click the empty Visibility button To add color to a menu item click the color swatch if no color is assigned it will say...

Страница 45: ...menu After the menu closes the items return to their hidden state Do one of the following From a menu with hidden items choose Show All Menu Items Ctrl click Windows or Command click Mac OS a menu wi...

Страница 46: ...idden tools beneath them A small triangle at the lower right of the tool icon signals the presence of hidden tools You can view information about any tool by positioning the pointer over it The name o...

Страница 47: ...blemishes and objects The Healing Brush tool paints with a sample or pattern to repair imperfections in a image The Patch tool repairs imperfections in a selected area of an image using a sample or pa...

Страница 48: ...The Pencil tool paints hard edged strokes The Color Replacement tool replaces a selected color with a new color The Mixer Brush tool Simulates realistic painting techniques such as blending canvas col...

Страница 49: ...tool makes customized shapes selected from a custom shape list The Hand tool moves an image within its window The Rotate View tool non destructively rotates the canvas The Zoom tool magnifies and redu...

Страница 50: ...cle through a set of hidden tools by holding down Shift and repeatedly pressing a tool shortcut key If you prefer to cycle through tools without holding down Shift you can disable this preference 1 Ch...

Страница 51: ...wing tools Marquee Lasso Polygonal Lasso Magic Wand Crop Slice Patch Eyedropper Pen Gradient Line Paint Bucket Magnetic Lasso Magnetic Pen Freeform Pen Measure and Color Sampler tools To toggle betwee...

Страница 52: ...how presets for only the tool selected in the toolbox Create a tool preset 1 Choose a tool and set the options you want to save as a tool preset in the options bar 2 Do one of the following Click the...

Страница 53: ...ne of the following Choose the preference set from the menu at the left of the dialog box Click Next to display the next preference set in the list click Prev to display the previous set For informati...

Страница 54: ...onstraint tool Double click inside crop box or press Enter or Return Commit crop Esc Cancel crop X Switch crop box orientation between portrait and landscape I Creative Cloud only Front Image for Crop...

Страница 55: ...ool M Move tool H Hand tool Z Zoom tool Control shortcuts P Preview W Show Constraint E Show Mesh T Correction S Scale F Focal Length R Crop Factor A As Shot Hidden shortcuts not visible in interface...

Страница 56: ...Mac OS 9 won t appear Do one of the following To install an Adobe Systems plug in module use the plug in installer if provided In Windows you can also install or copy the module into the appropriate P...

Страница 57: ...new libraries After you load a library in the Preset Manager you can access the library s items in locations such as the options bar panels dialog boxes and so on In general when you change a preset P...

Страница 58: ...set item and click Delete Alt click Windows or Option click Mac OS the items you want to delete Create a new library of presets 1 Do one of the following To save all the presets in the list as a libra...

Страница 59: ...Commons Legal Notices Online Privacy Policy c Click OK 2 To display hidden files in Windows Vista a Go to Start Control Panel Appearance and Personalization Folder Options b In the View tab under Hid...

Страница 60: ...llowing To show or hide all enabled Extras choose View Extras A check mark appears next to enabled Extras in the Show submenu To enable and show an individual Extra choose View Show and select the Ext...

Страница 61: ...Guides Snaps to guides Grid Snaps to the grid You cannot select this option when the grid is hidden Layer Snaps to the content in the layer Slices Snaps to slice boundaries You cannot select this opti...

Страница 62: ...e Ruler isn t visible hold down the Eyedropper tool 2 Drag from the starting point to the ending point Hold down the Shift key to constrain the tool to 45 increments 3 To create a protractor from an e...

Страница 63: ...u specify image width in terms of columns Using columns is convenient when you plan to import an image into a page layout program such as Adobe InDesign and you want the image to fit exactly within a...

Страница 64: ...of the window and drag diagonally down onto the image A set of cross hairs appears marking the new origin on the rulers You can hold down Shift as you drag to make the ruler origin snap to the ruler t...

Страница 65: ...Legal Notices Online Privacy Policy...

Страница 66: ...restore and choose Edit Fill For Use choose History and click OK Note To restore the image with a snapshot of the initial state of the document choose History Options from the Panel menu and make sure...

Страница 67: ...iscarded if you continue working from the selected state By default selecting a state and then changing the image eliminates all states that come after it If you select a state and then change the ima...

Страница 68: ...er visibility on or off is not recorded as a history step and therefore can t be undone Select this option to include layer visibility changes in history steps Set Edit History Log options You may nee...

Страница 69: ...he Name text box 3 Choose the snapshot contents from the From menu Full Document Makes a snapshot of all layers in the image at that state Merged Layers Makes a snapshot that merges all layers in the...

Страница 70: ...mand or tool in the set an alert appears Click Accept to assign the shortcut to the new command or tool and erase the previously assigned shortcut After you reassign a shortcut you can click Undo Chan...

Страница 71: ...t shortcuts export them to an HTML file which you can display or print with a web browser 1 Choose Edit Keyboard Shortcuts 2 From the Shortcuts For menu choose a shortcut type Application Menus Panel...

Страница 72: ...l Keys for the Info panel Keys for the Layers panel Keys for the Layer Comps panel Keys for the Paths panel Keys for the Swatches panel Keys for 3D tools Photoshop Extended Keys for measurement Photos...

Страница 73: ...Red Eye tool J J Brush tool Pencil tool Color Replacement tool Mixer Brush tool B B Clone Stamp tool Pattern Stamp tool S S History Brush tool Art History Brush tool Y Y Eraser tool Background Eraser...

Страница 74: ...evious document Shift Control Tab Shift Command Close a file in Photoshop and open Bridge Shift Control W Shift Command W Toggle between Standard mode and Quick Mask mode Q Q Toggle forward between St...

Страница 75: ...ag view area box in Navigator panel Spacebar drag or drag view area box in Navigator panel Scroll up or down 1 screen Page Up or Page Down Page Up or Page Down Scroll up or down 10 units Shift Page Up...

Страница 76: ...Cancel button to Reset Alt Option Undo Redo Control Z Command Z Step forward Control Shift Z Command Shift Z Step backward Control Alt Z Command Option Z Keys for Liquify Result Windows Mac OS Forwar...

Страница 77: ...en Fit in view Control 0 zero Double click Hand tool Command 0 zero Double click Hand tool Zoom to center at 100 Double click Zoom tool Double click Zoom tool Increase brush size Brush Stamp tools Dec...

Страница 78: ...ialog box Note Holding down a key temporarily activates a tool Letting go of the key returns to the previous tool Result Windows Mac OS Zoom tool Z Z Hand tool H H White Balance tool I I Color Sampler...

Страница 79: ...rease temporary Adjustment Brushtool feather Alt Shift Alt Shift Option Shift Option Shift Increase decrease temporary Adjustment Brushtool flow in increments of 10 Alt Alt Option Option Switch to New...

Страница 80: ...osure Recovery or Black sliders Highlight clipping warning O O Shadows clipping warning U U Filmstrip mode Add 1 5 star rating Ctrl 1 5 Command 1 5 Filmstrip mode Increase decrease rating Ctrl period...

Страница 81: ...single column and single row spacebar drag Any marquee tool except single column and single row spacebar drag Add to a selection Any selection tool Shift drag Any selection tool Shift drag Subtract fr...

Страница 82: ...Keys for transforming selections selection borders and paths This partial list provides shortcuts that don t appear in menu commands or tool tips Result Windows Mac OS Transform from center or reflec...

Страница 83: ...100 1 10 4 then 5 in quick succession 45 When airbrush option is enabled use Shift number keys Any painting or editing tool number keys e g 0 100 1 10 4 then 5 in quick succession 45 When airbrush op...

Страница 84: ...id Light Shift Alt V Shift Option V Linear Light Shift Alt J Shift Option J Pin Light Shift Alt Z Shift Option Z Hard Mix Shift Alt L Shift Option L Difference Shift Alt E Shift Option E Exclusion Shi...

Страница 85: ...bounding box for transforming text when editing text or activate Move tool if cursor is inside the bounding box Control Command Scale text within a bounding box when resizing the bounding box Control...

Страница 86: ...ce Spacebar drag Spacebar drag Open context sensitive menu Right click slice Control click slice Keys for using panels This partial list provides shortcuts that don t appear in menu commands or tool t...

Страница 87: ...Use Legacy Channel Shortcuts Then restart Photoshop Result Windows Mac OS Choose specific channel for adjustment Alt 3 red 4 green 5 blue Option 3 red 4 green 5 blue Choose composite channel for adju...

Страница 88: ...ge Down Right Arrow or Page Down Back ten frames Shift Left Arrow or Shift Page Up Shift Left Arrow or Shift Page Up Forward ten frames Shift Right Arrow or Shift Page Down Shift Right Arrow or Shift...

Страница 89: ...nel thumbnail Set options for Save Selection As Channel button Alt click Save Selection As Channel button Option click Save Selection As Channel button Create a new spot channel Control click Create N...

Страница 90: ...nt units Click crosshair icon Click crosshair icon Keys for the Layers panel Result Windows Mac OS Load layer transparency as a selection Control click layer thumbnail Command click layer thumbnail Ad...

Страница 91: ...e Option double click layer effect style Edit layer style Double click layer Double click layer Disable enable vector mask Shift click vector mask thumbnail Shift click vector mask thumbnail Open Laye...

Страница 92: ...ton Open Layer Comp Options dialog box Double click layer comp Double click layer comp Rename in line Double click layer comp name Double click layer comp name Select deselect multiple contiguous laye...

Страница 93: ...the Z plane Scales on the Z plane To scale on the Y plane hold down the Shift key Camera Tool Right click Windows Control click Mac OS Alt Windows Option Mac OS Orbit Changes to Drag tool Changes to...

Страница 94: ...attern Maker optional plug ins Result Extract and Pattern Maker Windows Mac OS Fit in window Control 0 Command 0 Zoom in Control plus Command plus Zoom out Control hyphen Command hyphen Cycle through...

Страница 95: ...e Slider showing Set strength of Cleanup or Edge Touch up tool 0 9 0 9 Hold down Shift to decrease increase by 10 Result Pattern Maker only Windows Mac OS Delete current selection Control D Command D...

Страница 96: ...F5 Show Hide Color panel F6 F6 Show Hide Layers panel F7 F7 Show Hide Info panel F8 F8 Show Hide Actions panel F9 Option F9 Revert F12 F12 Fill Shift F5 Shift F5 Feather Selection Shift F6 Shift F6 I...

Страница 97: ...or and style is the same for all images Show or hide a grid guides or smart guides Do one of the following Choose View Show Grid Choose View Show Guides View Show Smart Guides Choose View Extras This...

Страница 98: ...uide drag the guide outside the image window To remove all guides choose View Clear Guides Set guide and grid preferences 1 Do one of the following Windows Choose Edit Preferences Guides Grid Slices M...

Страница 99: ...1 In the Finder choose Go Applications 2 Expand the Photoshop folder Then right click the Photoshop application icon and choose Get Info 3 In the General section of the Info window select Open In 32...

Страница 100: ...Image and color basics...

Страница 101: ...isp edges when resized printed to a PostScript printer saved in a PDF file or imported into a vector based graphics application As a result vector graphics are the best choice for artwork such as logo...

Страница 102: ...ls An 8 bit per pixel RGB image has 256 possible values for each channel which means it has over 16 million possible color values RGB images with 8 bits per channel bpc are sometimes called 24 bit ima...

Страница 103: ...of pixels along an image s width and height Resolution is the fineness of detail in a bitmap image and is measured in pixels per inch ppi The more pixels per inch the greater the resolution Generally...

Страница 104: ...ge resolution thus becomes a compromise between image quality capturing all the data you need and file size Another factor that affects file size is file format Because of the varying compression meth...

Страница 105: ...me images and output devices a lower resolution can produce good results To determine your printer s screen frequency check your printer documentation or consult your service provider Note Some images...

Страница 106: ...esult in poorer image quality For example when you resample an image to larger pixel dimensions the image loses some detail and sharpness Applying the Unsharp Mask filter to a resampled image can help...

Страница 107: ...ermines the base size at which an image is placed into another application You can further manipulate the scale of the printed image using the Print command however changes you make using the Print co...

Страница 108: ...Legal Notices Online Privacy Policy...

Страница 109: ...Click Start 6 Select the digital camera from which to import images Note If the name of your camera does not appear in the submenu verify that the software and drivers were properly installed and tha...

Страница 110: ...pen Acquired Images In Photoshop unless you have a large number of images to import or if you want to edit the images at a later time 5 Select Unique Subfolder if you want to save imported images in a...

Страница 111: ...cument For Pixel Aspect Ratio choose Square unless you re using the image for video In that case choose another option to use non square pixels 9 When you finish you can save the settings as a preset...

Страница 112: ...Document Format PDF is a versatile file format that can represent both vector and bitmap data It has electronic document search and navigation features PDF is the primary format for Adobe Illustrator...

Страница 113: ...ution Mode Sets the color mode for the new document See also Color modes Bit Depth Sets the bit depth for the new document See also Bit depth The Width and Height values plus the Resolution determine...

Страница 114: ...w Screen Mode Full Screen Mode Or click the Screen Mode button in the Application bar and select Full Screen Mode from the pop up menu View another area of an image Do one of the following Use the win...

Страница 115: ...he magnification type a value in the text box click the Zoom Out or Zoom In button or drag the zoom slider To move the view of an image drag the proxy view area in the image thumbnail You can also cli...

Страница 116: ...tor pixels Do one of the following Double click the Zoom tool in the toolbox Creative Cloud Choose View 100 or click 100 in either the Zoom tool or Hand tool options bar CS5 and CS6 Choose View Actual...

Страница 117: ...s of the image magnification This can be helpful when using smaller monitors or working with tiled views Note To automatically resize the window when using keyboard shortcuts for zooming choose Edit P...

Страница 118: ...If the Show Tool Hints option is enabled you see hints for using the tool selected in the toolbox Depending on the options selected the Info panel displays status information such as document size do...

Страница 119: ...ent Dimensions Displays the dimensions of the image Scratch Sizes Displays information on the amount of RAM and the scratch disk used to process the image The number on the left represents the amount...

Страница 120: ...f RAM and the scratch disk used to process the image The number on the left represents the amount of memory currently being used by the program to display all open images The number on the right repre...

Страница 121: ...e instance of the color is added not duplicates This feature recognizes the following HTML CSS color syntax 112233 123 rgb 1 2 3 rgba 1 2 3 4 hsb 1 2 3 and hsba 1 2 3 4 To add colors from an HTML CSS...

Страница 122: ...or Grayscale Ramp to display the spectrum of the specified color model Current Colors to display the spectrum of colors between the current foreground color and the current background color 2 To displ...

Страница 123: ...hes panel To choose a background color Ctrl click Windows or Command click Mac OS a color in the Swatches panel Note Change how swatches are displayed by choosing an option from the Swatches panel men...

Страница 124: ...n images Select it in the options bar and drag in one image to scroll through all visible images Match zoom and location in multiple images Match only zoom 1 Open one or more images or open one image...

Страница 125: ...4 Select the Zoom tool or the Hand tool 5 Select one of the images hold down the Shift key and click in or drag an area of an image The other images are magnified to the same percentage and snap to t...

Страница 126: ...GB to a target mode of CMYK Applying this action to an image in Grayscale mode or any other source mode besides RGB results in an error When you record an action you can use the Conditional Mode Chang...

Страница 127: ...ansparency to a color select the Eyedropper tool in the Color Table dialog box and click the color in the table or in the image The sampled color is replaced with transparency in the image 6 Click OK...

Страница 128: ...ansparency to a color select the Eyedropper tool in the Color Table dialog box and click the color in the table or in the image The sampled color is replaced with transparency in the image 6 Click OK...

Страница 129: ...ditive primaries to create color Additive colors RGB R Red G Green B Blue Subtractive primaries are pigments which create a spectrum of colors in different combinations Unlike monitors printers use su...

Страница 130: ...s are the same or similar enough so they appear consistent See Why colors sometimes don t match In Photoshop a document s color mode determines which color model is used to display and print the image...

Страница 131: ...HSB color model H Hue S Saturation B Brightness More Help topics Understanding color management Legal Notices Online Privacy Policy...

Страница 132: ...ground color appears in the lower box Foreground and background color boxes in toolbox A Default Colors icon B Switch Colors icon C Foreground color box D Background color box To change the foreground...

Страница 133: ...s Photoshop Extended users can access an HDR high dynamic range picker to choose colors for use in HDR images The Color field in the Adobe Color Picker displays color components in HSB color mode RGB...

Страница 134: ...color using the RGB model Choose a color by specifying its red green and blue components 1 In the Adobe Color Picker enter numeric values in the R G and B text boxes Specify component values from 0 t...

Страница 135: ...se is web safe Select a web safe color using the Color panel 1 Click the Color panel tab or choose Window Color to view the Color panel 2 Choose an option for selecting a web safe color Choose Make Ra...

Страница 136: ...e Each color has a specified CMYK equivalent You can select from HKS E for continuous stationery HKS K for gloss art paper HKS N for natural paper and HKS Z for newsprint Color samplers for each scale...

Страница 137: ...f an HDR image is like adjusting the exposure when photographing a scene in the real world Merging images of different exposures to create an HDR image A Image with shadow detail but highlights clippe...

Страница 138: ...Note Although Photoshop cannot save an HDR image in the LogLuv TIFF file format it can open and read a LogLuv TIFF file Filters Average Box Blur Gaussian Blur Motion Blur Radial Blur Shape Blur Surfa...

Страница 139: ...Options Options for 16 or 8 bit images HDR images contain luminance levels that far exceed the dynamic range that 16 or 8 bpc images can store To produce an image with the dynamic range you want adju...

Страница 140: ...range for 32 bit HDR images The dynamic range of HDR images exceeds the display capabilities of standard computer monitors When you open an HDR image in Photoshop it can look very dark or washed out...

Страница 141: ...tering HSB or RGB numeric values as in the Adobe Color Picker 2 Adjust the Intensity slider to boost or reduce the color s brightness The new color swatch in the Preview scale at the top of the Color...

Страница 142: ...ure settings in an HDR image 1 Open an HDR image 2 Optional Set the exposure for the image See Adjust displayed dynamic range for 32 bit HDR images 3 For the Brush or Pencil tools click the foreground...

Страница 143: ...olor to reflect the blend color by increasing the contrast between the two Blending with white produces no change Linear Burn Looks at the color information in each channel and darkens the base color...

Страница 144: ...han the Difference mode Blending with white inverts the base color values Blending with black produces no change Subtract Looks at the color information in each channel and subtracts the blend color f...

Страница 145: ...r Dodge Linear Dodge Add Overlay Soft Light Hard Light Vivid Light Linear Light Pin Light Hard Mix Difference Exclusion Subtract Divide Hue Saturation Color Luminosity 80 opacity Lighter Color Darker...

Страница 146: ...ts have values of 0 Use the CMYK mode when preparing an image to be printed using process colors Converting an RGB image into CMYK creates a color separation If you start with an RGB image it s best t...

Страница 147: ...ges and the like Limited editing is available in this mode For extensive editing you should convert temporarily to RGB mode Indexed color files can be saved in Photoshop BMP DICOM Digital Imaging and...

Страница 148: ...first convert it to Grayscale mode This removes the hue and saturation information from the pixels and leaves just the brightness values However because only a few editing options are available for B...

Страница 149: ...scale image and 50 Threshold conversion method Pattern Dither conversion method and Diffusion Dither conversion method Convert a color photo to Grayscale mode 1 Open the photo you want to convert to b...

Страница 150: ...ontrol a palette more precisely first select a part of the image containing the colors you want to emphasize Photoshop weights the conversion toward these colors Master Perceptual Creates a custom pal...

Страница 151: ...ither options None Does not dither colors but instead uses the color closest to the missing color This tends to result in sharp transitions between shades of color in the image creating a posterized e...

Страница 152: ...tches panel Alternatively choose New Swatch from the Swatches panel menu Position the pointer over an empty space in the bottom row of the Swatches panel the pointer turns into the Paint Bucket tool a...

Страница 153: ...n to the default library of swatches Choose Reset Swatches from the Swatches panel menu You can either replace or append the current set of colors with the default swatch library Share swatches betwee...

Страница 154: ...dia newsprint paper reproduces a smaller gamut than magazine quality paper and other natural variations such as manufacturing differences in monitors or monitor age Color gamuts of various devices and...

Страница 155: ...ually be used both in print and online Print color correctly to an unknown color output device for example you could store a document online for consistently reproducible on demand color printing anyw...

Страница 156: ...Layers To learn more view these recommended resources online Layers 101 Infinite Skills Aug 9 2012 video tutorial Introduction to layers and the Layers panel...

Страница 157: ...Video tutorial Understanding layers for an overview on working with Layers Organizing layers A new image has a single layer The number of additional layers layer effects and layer sets you can add to...

Страница 158: ...e of layer thumbnails Choose Panel Options from the Layers panel menu and select a thumbnail size Change thumbnail contents Choose panel Options from the Layers panel menu and select Entire Document t...

Страница 159: ...panel of the source image select one or more layers or a layer group 3 Do one of the following Drag the layer or group from the Layers panel to the destination image Select the Move tool and drag fro...

Страница 160: ...mut in Mac OS choose Photoshop Preferences Transparency Gamut 2 Choose a size and color for the transparency checkerboard or choose None for Grid Size to hide the transparency checkerboard 3 Click OK...

Страница 161: ...group and choose a color CS5 Select a layer or group choose Layer Properties or Group Properties from the Layers menu Then choose a color from the Color pop up menu and click OK Rasterize layers You...

Страница 162: ...nt you cannot revert back to the unmerged state the layers are permanently merged Merge two layers or groups 1 Make sure that the layers and groups you want to merge are visible 2 Select the layers an...

Страница 163: ...white When you save a flattened image you cannot revert back to the unflattened state the layers are permanently merged Converting an image between some color modes flattens the file Save a copy of yo...

Страница 164: ...ers panel Note When selecting Ctrl click Windows or Command click Mac OS the area outside the layer thumbnail Ctrl clicking or Command clicking the layer thumbnail selects the nontransparent areas of...

Страница 165: ...icon at the bottom of the Layers panel 3 To unlink layers do one of the following Select a linked layer and click the link icon To temporarily disable the linked layer Shift click the Link icon for th...

Страница 166: ...hoose Layer from the drop down menu Shift click to select multiple layers Select Auto Select then choose Group to select the entire group when you select one layer in the group 3 Do one of the followi...

Страница 167: ...versions of Photoshop Lock Image Pixels Prevents modification of the layer s pixels using the painting tools Lock Position Prevents the layer s pixels from being moved Note For type and shape layers L...

Страница 168: ...ayers to ensure that adjustment layers won t affect the separate layer twice You can discard unsatisfactory retouching if necessary Editing in Camera Raw Adjustments to batches of raw JPEG or TIFF ima...

Страница 169: ...eet Copying CSS from a layer group containing shapes or text creates a class for each layer as well as a Group class The Group class represents a parent div containing child divs that correspond to th...

Страница 170: ...unmasked areas on a layer that has a layer mask Ctrl click Windows or Command click Mac OS the layer mask thumbnail in the Layers panel 2 If a selection already exists you can do any of the following...

Страница 171: ...ayer partially visible paint the mask with gray Darker grays make the level more transparent lighter grays make it more opaque To add to the mask and hide the layer or group paint the mask with black...

Страница 172: ...he shape using the shape pen or Direct Selection tools See Editing paths Change vector mask opacity or feather mask edges 1 In the Layers panel select the layer containing the vector mask 2 In the Mas...

Страница 173: ...Twitter and Facebook posts are not covered under the terms of Creative Commons Legal Notices Online Privacy Policy More Help Topics About masks and alpha channels Applying filters video...

Страница 174: ...the correct content portrait with eyes open 5 Select the two new layers and choose Edit Auto Align Layers 6 Select Reposition Only then click OK Photoshop finds the common areas in each layer and ali...

Страница 175: ...Option Mac OS position the pointer over the line in the Layers panel dividing the base layer and the first layer above it that you want to include in the clipping mask the pointer changes to two overl...

Страница 176: ...Legal Notices Online Privacy Policy...

Страница 177: ...d with a pen or shape tool Layer and vector masks are nondestructive which means you can go back and re edit the masks later without losing the pixels they hide In the Layers panel both the layer and...

Страница 178: ...g To create a mask that reveals the entire layer click the Add Layer Mask button in the Layers panel or choose Layer Layer Mask Reveal All To create a mask that hides the entire layer Alt click Window...

Страница 179: ...lete a layer mask without applying the changes 1 In the Layers panel select the layer containing the layer mask 2 In the Masks panel click the Pixel Mask button 3 Do one of the following To remove the...

Страница 180: ...Masks panel CS5 drag the Density slider to adjust the mask opacity At 100 density the mask is completely opaque and blocks out any underlying area of the layer As you lower the density more of the ar...

Страница 181: ...veal the base layer of a clipping mask place the layers you want to use in a clipping mask See Mask layers with clipping masks Make sure that the Blend Clipped Layers As Group option is selected for t...

Страница 182: ...Legal Notices Online Privacy Policy...

Страница 183: ...tent differences and create a seamless composite Adobe recommends Have a tutorial you would like to share Depth of field blending Martin Evening Learn more with this excerpt from Adobe Photoshop for P...

Страница 184: ...er pixel on the selected layers to the horizontal center pixel of all the selected layers or to the horizontal center of the selection border Right Edges Aligns the right pixel on the linked layers to...

Страница 185: ...so that overlapping content across layers is matched Cylindrical Reduces the bow tie distortion that can occur with the Perspective layout by displaying individual images as on an unfolded cylinder O...

Страница 186: ...p in the Layers panel Mode Specifies a blending mode for the layer or group See Blending modes Opacity Specifies an opacity level for the layer or group Fill With Mode Neutral Color Fills the layer wi...

Страница 187: ...nel Click the eye icon next to a layer group or layer effect to hide its content in the document window Click in the column again to redisplay the content To view the eye icon for styles and effects c...

Страница 188: ...t Filters Martin Evening Learn more with this excerpt from Adobe Photoshop for Photographers Apply a Smart Filter For a video on applying smart filters see www adobe com go vid0004 1 Do one of the fol...

Страница 189: ...art Filter from one Smart Object to another or to a new location in the Smart Filters list Note To duplicate all Smart Filters Alt drag Windows or Option drag Mac OS the Smart Filters icon that appear...

Страница 190: ...mbnail again Move or copy filter masks To move the mask to another Smart Filter Effect drag the mask to the other Smart Filter Effect To copy the mask Alt drag Windows or Option drag Mac OS the mask t...

Страница 191: ...r Try various designs with low resolution placeholder images that you later replace with final versions You can t perform operations that alter pixel data such as painting dodging burning or cloning d...

Страница 192: ...from the Layers panel and do one of the following Choose Layer Smart Objects Edit Contents Double click the Smart Objects thumbnail in the Layers panel 2 Click OK to close the dialog box 3 Make edits...

Страница 193: ...applied to the original Smart Object More Help topics Legal Notices Online Privacy Policy...

Страница 194: ...nding options choose Blending Options from the Add A Layer Style icon at the bottom of the Layers panel Specify a blending mode for a layer or group A layer s blending mode determines how its pixels b...

Страница 195: ...e layer to all layers in the clipping mask Deselecting this option which is always selected by default maintains the original blending mode and appearance of each layer in the group Advanced blending...

Страница 196: ...er to set the high value of the range Drag the black slider to set the low value of the range To define a range of partially blended pixels hold down Alt Windows or Option Mac OS and drag one half of...

Страница 197: ...olor to reflect the blend color by increasing the contrast between the two Blending with white produces no change Linear Burn Looks at the color information in each channel and darkens the base color...

Страница 198: ...han the Difference mode Blending with white inverts the base color values Blending with black produces no change Subtract Looks at the color information in each channel and subtracts the blend color f...

Страница 199: ...r Dodge Linear Dodge Add Overlay Soft Light Hard Light Vivid Light Linear Light Pin Light Hard Mix Difference Exclusion Subtract Divide Hue Saturation Color Luminosity 80 opacity Lighter Color Darker...

Страница 200: ...lending mode Note Unlike layer effects Smart Filter settings cannot be changed across layer comps Once a Smart Filter is applied to a layer it appears in all layer comps for the image Layer Comps pane...

Страница 201: ...or convert a layer to a background In such instances a caution icon appears next to the layer comp name Do one of the following Ignore the warning which may result in the loss of one or more layers O...

Страница 202: ...Style dialog box The layer effects icon appears to the right of the layer s name in the Layers panel You can expand the style in the Layers panel to view or edit the effects that compose the style Lay...

Страница 203: ...view the layer styles as a list with a thumbnail of the selected layer style displayed Layer Style dialog box overview You can edit styles applied to a layer or create new styles using the Layer Style...

Страница 204: ...ghting angle that is then available in all the layer effects that use shading Drop Shadow Inner Shadow and Bevel and Emboss In any of these effects if Use Global Light is selected and you set a lighti...

Страница 205: ...yer if you want the texture to move along with the layer as the layer moves Invert inverts the texture Depth varies the degree and direction up down to which the texturing is applied Snap To Origin ma...

Страница 206: ...ying and pasting styles is an easy way to apply the same effects to multiple layers Copy layer styles between layers 1 From the Layers panel select the layer containing the style you want to copy 2 Ch...

Страница 207: ...from the Styles panel You can save preset styles in a library and load or remove them from the Styles panel as you need them Create a new preset style 1 From the Layers panel select the layer containi...

Страница 208: ...delete and save libraries of preset styles Load a library of preset styles 1 Click the triangle in the Styles panel Layer Style dialog box or Layer Style pop up panel in the options bar 2 Do one of t...

Страница 209: ...ecommended resources online Selecting areas of a photo video2brain May 7 2012 video tutorial Discover the basic building block of image editing Refine a selection Infinite Skills Aug 9 2012 video tuto...

Страница 210: ...d paths Paths can be converted to selections Selections can be copied moved and pasted or saved and stored in an alpha channel Alpha channels store selections as grayscale images called masks A mask i...

Страница 211: ...boundaries When you drag it back the original border reappears intact You can also drag the selection border to another image window Original selection border left and selection border moved right You...

Страница 212: ...from a selection Select only an area intersected by other selections 1 Make a selection 2 Using any selection tool do one of the following Select the Intersect With Selection option in the options bar...

Страница 213: ...urrounding pixels are selected the pixel remains in the selection and the unselected pixels around it are added to the selection If less than half the surrounding pixels are selected the pixel is remo...

Страница 214: ...nt Output To Determines whether the refined selection becomes a selection or mask on the current layer or produces a new layer or document Soften the edges of selections You can smooth the hard edges...

Страница 215: ...ls nearby Defringe replaces the color of fringe pixels with the color of pixels farther in from the edge of the selection that lack the background color Remove Black Matte and Remove White Matte are u...

Страница 216: ...derstanding the copy and paste commands Copy Copies the selected area on the active layer Copy Merged Makes a merged copy of all the visible layers in the selected area Paste Pastes a copied selection...

Страница 217: ...one selection into or outside another 1 Cut or copy the part of the image you want to paste 2 In the same image or another select the area you want to paste into or outside Note If you re pasting out...

Страница 218: ...nds to copy selections from Photoshop and paste them into other applications or to paste artwork from other applications into Photoshop The cut or copied selection remains on the clipboard until you c...

Страница 219: ...ral 2 Select Export Clipboard to save any Photoshop contents to the clipboard when you quit Photoshop Copy artwork by dragging and dropping Do one of the following Drag one or more Illustrator vector...

Страница 220: ...ting tools and filters Areas painted black on a mask are protected and areas painted white are editable Use Quick Mask mode to convert a selection to a temporary mask for easier editing The Quick Mask...

Страница 221: ...white background Spot Color Converts an alpha channel to a spot color channel Only available for existing channels Color Sets the color and opacity of the mask Click the color field to change the colo...

Страница 222: ...bottom of the panel and then click the composite color channel near the top of the panel Drag the channel containing the selection you want to load onto the Load Selection button Ctrl click Windows or...

Страница 223: ...Eyedropper tool and pick sample colors from the image If you are selecting multiple color ranges in the image select Localized Color Clusters to build a more accurate selection Choose a color or tonal...

Страница 224: ...lick Reset 8 To save and load color range settings use the Save and Load buttons in the Color Range dialog box to save and reuse the current settings Creative Cloud only Skin Tones selection settings...

Страница 225: ...ment you can apply manually in the Refine Edge dialog with the Contrast and Radius options 5 Paint inside the part of the image you want to select The selection grows as you paint If updating is slow...

Страница 226: ...selects a broader range of colors Creates a smoother edged selection Selects only adjacent areas using the same colors Otherwise all pixels in the entire image using the same colors are selected Sele...

Страница 227: ...adjust the selection boundary See Refine selection edges Select with the Polygonal Lasso tool The Polygonal Lasso tool is useful for drawing straight edged segments of a selection border 1 Select the...

Страница 228: ...dth by 1 pixel To specify the lasso s sensitivity to edges in the image enter a value between 1 and 100 for Contrast A higher value detects only edges that contrast sharply with their surroundings a l...

Страница 229: ...gments and fastening points press the Delete key until you ve erased the fastening points for the desired segment 10 Close the selection border To close the border with a magnetic segment double click...

Страница 230: ...ning your selection to guides a grid slices or document bounds do one of the following to snap your selection Choose View Snap or choose View Snap To and choose a command from the submenu The marquee...

Страница 231: ...Twitter and Facebook posts are not covered under the terms of Creative Commons Legal Notices Online Privacy Policy...

Страница 232: ...icate 2 Make sure that the destination image is open Note The destination image does not have to have the same pixel dimensions as the duplicated channel 3 Do one of the following Drag the channel fro...

Страница 233: ...e with the selected mode Multichannel mode is automatically selected This creates a multichannel image with two or more channels 5 Click OK 6 For each channel make sure the image you want is open If y...

Страница 234: ...otects the area outside the selection Selected areas are left unprotected by this mask By default Quick Mask mode colors the protected area using a red 50 opaque overlay Selecting in Standard mode and...

Страница 235: ...ange Quick Mask options 1 Double click the Quick Mask Mode button in the toolbox 2 Choose from the following display options Masked Areas Sets masked areas to black opaque and selected areas to white...

Страница 236: ...Legal Notices Online Privacy Policy...

Страница 237: ...formats including TIFF and Photoshop formats compress channel information and can save space The size of an uncompressed file including alpha channels and layers appears as the right most value in the...

Страница 238: ...els A Not visible or editable B Visible but not selected for editing C Selected for viewing and editing D Selected for editing but not viewing To select a channel click the channel name Shift click to...

Страница 239: ...e When you delete a color channel from a file with layers visible layers are flattened and hidden layers are discarded This is done because removing a color channel converts the image to Multichannel...

Страница 240: ...ample one image is RGB and the other is CMYK you can apply a single channel but not the source s composite to the destination layer s composite channel 2 Choose Image Apply Image 3 Choose the source i...

Страница 241: ...to combine non overlapping images in two channels Because higher pixel values represent lighter colors adding channels with overlapping pixels lightens the image Black areas in both channels remain b...

Страница 242: ...xtract and then specify tool options Brush Size Enter a value or drag the slider to specify the width of the Edge Highlighter tool You also use the Brush Size option to specify the width of the Eraser...

Страница 243: ...6 Optional Click Preview to preview the extracted object Zoom in as needed Show Choose a menu option to switch between views of the original and the extracted image Display Choose a menu option to pre...

Страница 244: ...ese recommended resources online Using adjustment layers video2brain May 7 2012 video tutorial Change color and tone with total flexibility Auto color corrections Kelby May 7 2012 video tutorial One c...

Страница 245: ...r file size than 8 bit images Duplicate or make a copy of the image file Working on a copy of your image preserves the original in the event you want to use the image in its original state Remove any...

Страница 246: ...ommon image corrections In CS6 the Properties panel has a Presets menu with the adjustment presets Presets are available for Levels Curves Exposure Hue Saturation Black White Channel Mixer and Selecti...

Страница 247: ...by performing calculations in a linear color space Exposure is primarily for use in HDR images See Adjust Exposure for HDR images Adjusts color saturation so clipping is minimized See Adjust color sat...

Страница 248: ...om the panel menu Enter a name for the setting then click Save Reapply adjustment settings Once an adjustment setting is saved it s stored as a preset and can be reapplied CS5 In the Adjustments panel...

Страница 249: ...image may be lost depending on your conversion options You can identify the out of gamut colors in an image or correct them manually before converting to CMYK You can use the Gamut Warning command to...

Страница 250: ...detail concentrated in the midtones An image with full tonal range has some pixels in all areas Identifying the tonal range helps determine appropriate tonal corrections How to read a histogram A Over...

Страница 251: ...the channel including color channels alpha channels and spot channels Depending on the color mode of the image choose RGB CMYK or Composite to view a composite histogram of all the channels If the im...

Страница 252: ...resh button to redraw the histogram using the actual image layer View the histogram for a multilayered document 1 Choose Expanded View from the Histogram panel menu 2 Choose a setting from the Source...

Страница 253: ...olor Sampler tool and if necessary choose a sample size in the options bar Point Sample reads the value of a single pixel other options read the average of a pixel area 3 If you selected the Color Sam...

Страница 254: ...he options bar To delete a color sampler while an adjustment dialog box is open hold down Alt Shift Windows or Option Shift Mac OS and click the sampler Hide or show color samplers in an image Choose...

Страница 255: ...f an HDR image is like adjusting the exposure when photographing a scene in the real world Merging images of different exposures to create an HDR image A Image with shadow detail but highlights clippe...

Страница 256: ...Note Although Photoshop cannot save an HDR image in the LogLuv TIFF file format it can open and read a LogLuv TIFF file Filters Average Box Blur Gaussian Blur Motion Blur Radial Blur Shape Blur Surfa...

Страница 257: ...Options Options for 16 or 8 bit images HDR images contain luminance levels that far exceed the dynamic range that 16 or 8 bpc images can store To produce an image with the dynamic range you want adju...

Страница 258: ...range for 32 bit HDR images The dynamic range of HDR images exceeds the display capabilities of standard computer monitors When you open an HDR image in Photoshop it can look very dark or washed out...

Страница 259: ...tering HSB or RGB numeric values as in the Adobe Color Picker 2 Adjust the Intensity slider to boost or reduce the color s brightness The new color swatch in the Preview scale at the top of the Color...

Страница 260: ...ure settings in an HDR image 1 Open an HDR image 2 Optional Set the exposure for the image See Adjust displayed dynamic range for 32 bit HDR images 3 For the Brush or Pencil tools click the foreground...

Страница 261: ...er and discards image information 2 Optional In CS6 choose a Black White preset from the Preset menu in the Properties panel 3 In the Adjustments panel CS5 or the Properties panel CS6 manually adjust...

Страница 262: ...ed Adjustment layers can also be automated as part of an action but the process of recording an action is more complex than saving a preset in Adobe Camera Raw It is recommended that you do not use th...

Страница 263: ...topics Photoshop Tutorial Open a JPEG in Camera Raw by Brodie Butler Amazing Wonders of Adobe Camera Raw 7 0 in Photoshop CS6 by Russell Preston Brown In addition to the two workflows described above...

Страница 264: ...ale with minimal effect in the extreme shadows With 32 bit images you can also access the Exposure slider at the bottom of the image window Darkens the shadows and midtones with minimal effect on the...

Страница 265: ...adjustment to correct a color cast such as an unwanted tint from an excess of color red green blue or cyan magenta yellow It s easier to color balance an image by first identifying an area that you w...

Страница 266: ...Twitter and Facebook posts are not covered under the terms of Creative Commons Legal Notices Online Privacy Policy...

Страница 267: ...images the graph displays percentages of ink pigment For LAB and Grayscale images the graph displays light values Curves options in the Adjustment panel CS5 and Properties panel CS6 A On image adjustm...

Страница 268: ...Black and White Point sliders or use the Eyedropper tools to specify the darkest and lightest values in the image Click a point on the curve and enter values in the Input and Output text boxes Select...

Страница 269: ...Drag the black and white point sliders to any point along the horizontal axis Note that the Input value changes as your drag 2 To preview clipping as you adjust black and white points do one of the f...

Страница 270: ...Twitter and Facebook posts are not covered under the terms of Creative Commons Legal Notices Online Privacy Policy...

Страница 271: ...rkening of highlights You can adjust both Shadows and Highlights in an image 3 For finer control select Show More Options to make the additional adjustments To increase shadow detail in an otherwise w...

Страница 272: ...nt Radius settings to obtain the best balance between subject contrast and differential brightening or darkening of the subject compared to the background Adjusts the brightness in a grayscale image T...

Страница 273: ...s panel CS6 choose from the menu to the right of the On image adjustment tool Choose Master to adjust all colors at once Choose one of the other preset color ranges listed for the color you want to ad...

Страница 274: ...ent color area Drag one of the vertical white bars to adjust the range of the color component Moving a vertical bar from the center of the adjustment slider and closer to a triangle increases the colo...

Страница 275: ...ollowing To apply more adjustment to less saturated colors and prevent colors clipping as they reach total saturation move the Vibrance slider to the right To apply the same amount of saturation adjus...

Страница 276: ...filter or the Smart Sharpen filter for better control when sharpening your images Although Photoshop also has the Sharpen Sharpen Edges and Sharpen More filter options these filters are automatic and...

Страница 277: ...pronounced on screen than in high resolution output If your final destination is print experiment to determine what settings work best for your image 1 Optional If your image is multilayered select t...

Страница 278: ...ayers panel draw a selection 2 Choose Filter Sharpen Unsharp Mask Adjust the options and click OK Only the selection is sharpened leaving the rest of the image untouched Sharpen an image using an edge...

Страница 279: ...er and choose the alpha channel from the Source pop up menu To change the direction of the gradient select the Invert check box The way the blur appears depends on the iris shape you choose The number...

Страница 280: ...e Sharpen tool increases contrast along edges to increase apparent sharpness The more you paint over an area with the tool the more sharpening increases 1 Select the Sharpen tool If the tool isn t vis...

Страница 281: ...ixels are black and level 255 where the pixels are white With the Output sliders in the default positions moving the black input slider maps the pixel value to level 0 and moving the white point slide...

Страница 282: ...ose Show Clipping For Black White Points from the panel menu 6 To adjust midtones use the middle Input slider to make a gamma adjustment Moving the middle Input slider to the left makes the overall im...

Страница 283: ...tive Commons Legal Notices Online Privacy Policy Image layer doesn t extend to the ends of the graph indicating that the image is not using the full tonal range A Shadow Input slider B Highlight Input...

Страница 284: ...default the Auto option and the Auto Tone command clip the white and black pixels by 0 1 that is it ignores the first 0 1 of either extreme when identifying the lightest and darkest pixels in the ima...

Страница 285: ...djustments panel Choose Layer New Adjustment Layer Photo Filter Click OK in the New Layer dialog box Note You can also choose Image Adjustments Photo Filter But keep in mind that this method makes dir...

Страница 286: ...More Help topics Adjusting image color and tone in CS6 Legal Notices Online Privacy Policy...

Страница 287: ...acy mode is not recommended for photographic images but can be useful for editing masks or scientific imagery Note Use Legacy is automatically selected when editing Brightness Contrast adjustment laye...

Страница 288: ...ound layer permanently alters the image information To edit your images nondestructively work on a duplicate layer For information on duplicating layers see Layer Basics 1 Select the Dodge tool or the...

Страница 289: ...to part of an image Later you can control which parts of the image are adjusted by re editing the layer mask You can vary the adjustment by painting on the mask with different tones of gray Ability t...

Страница 290: ...o specific areas use layer masks By default adjustment and fill layers automatically have layer masks indicated by the mask icon to the right of the layer thumbnail To create adjustment layers without...

Страница 291: ...er Content Options 2 Make the desired changes in the Adjustments panel CS5 or Properties panel CS6 Note Inverted adjustment layers do not have editable settings Merging adjustment or fill layers You c...

Страница 292: ...e Layer New Adjustment Layer Invert Click OK in the New Layer dialog box Note You can also choose Image Adjustments Invert But keep in mind that this method makes direct adjustments to the image layer...

Страница 293: ...box Note You can also choose Image Adjustments Gradient Map But keep in mind that this method applies the adjustment directly to the image layer and discards image information 2 In the Adjustments pa...

Страница 294: ...romatic Contrast option 4 Specify the shadows and highlights that are clipped and adjust the target color for the midtones 5 Click OK to apply Auto Contrast Remove a color cast using Auto Color Auto C...

Страница 295: ...s enter percentages in the Clip text boxes A value between 0 0 and 1 is recommended By default Photoshop clips the black and white pixels by 0 1 that is it ignores the first 0 1 of either extreme when...

Страница 296: ...channel to pure white level 255 and pure black level 0 The intermediate pixel values are redistributed proportionately As a result using the Auto option or Auto Tone increases the contrast in an image...

Страница 297: ...justment With None chosen the target image and the source image are the same If necessary use the Layer menu to choose the layer from the source image whose colors you want to match You can also choos...

Страница 298: ...is 1 and the default is 100 8 To adjust the range of color pixel values in the target layer adjust the Color Intensity slider Alternatively enter a value in the Color Intensity box The maximum value...

Страница 299: ...e colors that you want to replace use the Eyedropper tool to click in the image or in the preview box to select the areas exposed by the mask 5 To refine the selection do any of the following Shift cl...

Страница 300: ...ng the other primary colors For example you can use selective color correction to dramatically decrease the cyan in the green component of an image while leaving the cyan in the blue component unalter...

Страница 301: ...ncrease or decrease the components in the selected color You can also save the settings you make for the Selective Color adjustment and reuse the settings on other images More Help topics Legal Notice...

Страница 302: ...45 and the printing press that you re using won t hold a dot smaller than 5 You can pull the highlight slider to level 242 which is a 5 dot on the press to shift the highlight detail from 245 to 242 N...

Страница 303: ...te these target values quickly by entering 96 in the Brightness B box under the HSB area of the Color Picker With a low key image you may want to set the highlight to a lower value to avoid too much c...

Страница 304: ...ecommended resources online Camera Raw 7 plug in Kelby May 7 2012 video tutorial Tap into the latest noise color and dynamic range controls Enhancing Raw images video2brain May 7 2012 video tutorial D...

Страница 305: ...very dark because what appears twice as bright to the photosensor and computer seems less than twice as bright to the human eye For a list of supported cameras and for more information about Camera R...

Страница 306: ...verter or the Camera Raw dialog box For more information on the DNG format and DNG Converter see the Digital Negative DNG product page To download the latest DNG Converter go to the Adobe downloads pa...

Страница 307: ...ggle Filmstrip C Camera name or file format D Toggle full screen mode E Image adjustment tabs F Histogram G Camera Raw Settings menu H Zoom levels I Workflow options J Navigation arrows K Adjustment s...

Страница 308: ...Bridge when image settings change in Camera Raw Because caches can become very large you may want to purge the Camera Raw cache or limit its size You can also purge and regenerate the cache if you su...

Страница 309: ...hotos see Synchronizing edits in Adobe Camera Raw byDan Moughamian Automating image processing You can create an action to automate the processing of image files with Camera Raw You can automate the e...

Страница 310: ...After Effects Select the images check the Camera Raw Sequence box and click Open Camera Raw settings applied to the first camera raw file upon import are applied to the remaining files in the sequence...

Страница 311: ...a flexible bitmap image format supported by virtually all paint image editing and page layout applications TIFF provides greater compression and compatibility with other applications than does PSD fo...

Страница 312: ...Contrast in the Basic panel You can also apply local corrections for white balance Temp and Tint Highlights Shadows Noise and Moir Images edited in Camera Raw 6 used PV2010 by default PV2010 offers im...

Страница 313: ...s the green blue channels The histogram changes automatically as you adjust the settings in the Camera Raw dialog box The RGB values of the pixel under the pointer in the preview image appear below th...

Страница 314: ...If Camera Raw doesn t recognize the white balance setting of a camera choosing As Shot is the same as choosing Auto Sets the white balance to a custom color temperature Decrease Temperature to correc...

Страница 315: ...cess Version PV2012 PV2010 or PV2003 as noted Adjusts the overall image brightness Adjust the slider until the photo looks good and the image is the desired brightness Exposure values are in increment...

Страница 316: ...the image where you click The Targeted Adjustment tool does not affect point curves Clarity Vibrance and Saturation controls You can change the color saturation of all colors by adjusting the Clarity...

Страница 317: ...ale image It can be an image that you converted to grayscale by selecting Convert To Grayscale in the HSL Grayscale tab 2 In the Split Toning tab adjust the Hue and Saturation properties for the highl...

Страница 318: ...other adjustments applied in Camera Raw local adjustments are nondestructive They are never permanently applied to the photo Local adjustments are saved with an image in an XMP sidecar file or in the...

Страница 319: ...how Mask option press Y or position the pointer over the pin icon To customize the color of the mask overlay click the color swatch next to the Show Mask option Then choose a new color from the Color...

Страница 320: ...sliders in the Graduated Filter tool options to customize the filter Toggle visibility of the guide overlays by selecting the Show Overlay option or press V Drag the green or red dot to freely expand...

Страница 321: ...l When using local adjustment presets keep in mind the following Only one local adjustment preset can be selected at a time When applying a local adjustment preset with the Adjustment Brush tool you c...

Страница 322: ...he crop operation press Esc with the Crop tool active or click and hold the Crop tool button and choose Clear Crop from the menu To cancel the crop and close the Camera Raw dialog box without processi...

Страница 323: ...ite dashed circle designates the sampled area of the photo used to clone or heal 5 Do any of the following To specify the sampled area drag inside the green and white circle to move it to another area...

Страница 324: ...is caused by the failure of the lens to focus different colors to the same spot In one type of chromatic aberration the image from each color of light is in focus but each image is a slightly differen...

Страница 325: ...ag to the left to correct pincushion distortion and straighten lines that bend toward the center Corrects perspective caused by tilting the camera up or down Makes vertical lines appear parallel Corre...

Страница 326: ...ers is narrow to protect green yellow image colors like foliage You can protect edges of purple and green objects using the local adjustment brush Press the Alt Option key as you drag any of the slide...

Страница 327: ...ults in unnatural looking results Adjusts how much high frequency information is sharpened in the image and how much the sharpening process emphasizes edges Lower settings primarily sharpen edges to r...

Страница 328: ...contrast Useful for noisy photos Higher values preserve contrast but can produce noisy blotches or mottling Lower values produce smoother results but can also have less contrast Reduces color noise C...

Страница 329: ...aRaw CameraProfiles Mac OS Library Application Support Adobe CameraRaw CameraProfiles Apply a camera profile To apply a camera profile select it from the Camera Profile pop up menu in the Camera Calib...

Страница 330: ...a profile use the standalone DNG Profile Editor utility For example use the DNG Profile Editor to correct an unwanted color cast in a profile or to optimize colors for a specific application such as s...

Страница 331: ...ton at the bottom of the tab Or right click Windows or Control click Mac OS the snapshot and choose Delete Snapshots applied in Photoshop Lightroom appear and can be edited in the Camera Raw dialog bo...

Страница 332: ...les can store IPTC International Press Telecommunications Council data or other metadata associated with a camera raw image file If you open files from a read only volume such as a CD or DVD be sure t...

Страница 333: ...aw dialog box Space Specifies the target color profile Generally set Space to the color profile you use for your Photoshop RGB working space The source profile for camera raw image files is usually th...

Страница 334: ...nge the Amount pop up menu to Low or High to decrease or increase the amount of sharpening applied In most cases you can leave the Amount set to the default option Standard Open In Photoshop As Smart...

Страница 335: ...ied to the image Drag to the right to increase the amount Set to zero to disable grain Size Controls grain particle size At sizes of 25 or greater the image may appear slightly blurred Roughness Contr...

Страница 336: ...rners lower values apply the adjustment to a larger area away from the corners Roundness Positive values make the effect more circular negative values make the effect more oval Feather Higher values i...

Страница 337: ...these recommended resources online Using Content Aware Move and Extend Lynda com May 7 2012 video tutorial Recompose images with these simple steps Using Content Aware Patch Lynda com May 7 2012 video...

Страница 338: ...or use any of the other Selection tools as well 4 Drag the selection over the area you want to generate a fill from Content Aware Move Use the Content Aware Move tool to select and move a part of a pi...

Страница 339: ...ea to move or extend You can use the Move tool to draw a selection or use any of the other Selection tools as well 4 Drag the selection over to the area you want to place the object Learn More Content...

Страница 340: ...n also use the Clone Stamp tool to paint content on video or animation frames See also Cloning content in video and animation frames Photoshop Extended To use the Clone Stamp tool you set a sampling p...

Страница 341: ...ent Clone Source button in the Clone Source panel You can change the sampling source for a Clone Source button by setting a different sampling point Scale or rotate the sample source 1 Select the Clon...

Страница 342: ...t And Below To sample only from the active layer choose Current Layer To sample from all visible layers choose All Layers To sample from all visible layers except adjustment layers choose All Layers a...

Страница 343: ...e a texture If the texture doesn t work try dragging through the area a second time Compares nearby image content to seamlessly fill the selection realistically maintaining key details such as shadows...

Страница 344: ...tination is selected in the options bar drag the selection border to the area you want to patch When you release the mouse button the newly selected area is patched with the sampled pixels Repair an a...

Страница 345: ...Twitter and Facebook posts are not covered under the terms of Creative Commons Legal Notices Online Privacy Policy...

Страница 346: ...ly correct image perspective and lens flaws Using lens profiles the default Auto Correction option quickly and accurately fixes distortion For proper automatic correction Photoshop requires Exif metad...

Страница 347: ...the camera up or down Makes vertical lines in an image parallel Corrects image perspective making horizontal lines parallel Rotates the image to correct for camera tilt or to make adjustments after c...

Страница 348: ...he image Luminance noise may be more pronounced in one channel of the image usually the blue channel You can adjust the noise for each channel separately in Advanced mode Before opening the filter exa...

Страница 349: ...to angles fast Straightening a crooked image video2brain May 7 2012 video tutorial Define the horizon line New Crop tool Lynda com Oct 7 2012 video tutorial Interactive previews help you precisely tri...

Страница 350: ...the crop box You can also choose a preset enter your own or even define your own preset values for later use Choose a view to display overlay guides while cropping Guides such as Rule of Thirds Grid a...

Страница 351: ...ighten it The image canvas is automatically resized to accommodate the rotated pixels Rotate the image using the crop tool to straighten it To straighten an image do one of the following Place the poi...

Страница 352: ...tch the edges of the marquee to the rectangular edges of the object 3 Press Enter Windows or Return Mac OS to complete the perspective crop Resize the canvas using the Crop tool CS6 You can use the Cr...

Страница 353: ...make a transformation first select an item to transform and then choose a transformation command If necessary adjust the reference point before manipulating the transformation You can perform several...

Страница 354: ...oad a selection Then choose Select Transform Selection To transform an alpha channel select the channel in the Channels panel Set or move the reference point for a transformation All transformations a...

Страница 355: ...nu Rotate to specify degrees in the options bar Rotate 180 to rotate by a half turn Rotate 90 CW to rotate clockwise by a quarter turn Rotate 90 CCW to rotate counterclockwise by a quarter turn Flip H...

Страница 356: ...u in the options bar After choosing from the Warp pop up menu a square handle is available for adjusting the shape of the warp To change the reference point click a square on the reference point locat...

Страница 357: ...he options bar To specify the amount of warp using numeric values enter the values in the Bend set bend X set horizontal distortion and Y set vertical distortion text boxes in the options bar You can...

Страница 358: ...ny of the following Drag pins to warp the mesh To reveal a mesh area you ve overlapped with another click the Pin Depth buttons in the options bar To remove selected pins press Delete To remove other...

Страница 359: ...Twitter and Facebook posts are not covered under the terms of Creative Commons Legal Notices Online Privacy Policy Press Alt Windows or Option Mac OS to rotate the mesh around a selected pin...

Страница 360: ...ick Front Image in the options bar Then make the image you want to crop active Resampling while cropping uses the default interpolation method set in the General preferences To select or create a resa...

Страница 361: ...e areas of the image to trim away Top Bottom Left or Right Transform perspective while cropping CS5 To learn how to transform perspective in CS6 see Transform perspective while cropping CS6 The Crop t...

Страница 362: ...3 Optional Draw a selection around the images you want to process 4 Choose File Automate Crop And Straighten Photos The scanned images are processed and then each image opens in its own window If the...

Страница 363: ...kground the added canvas is transparent If the image doesn t have a transparent background there are several options for determining the color of the added canvas 1 Choose Image Canvas Size 2 Do one o...

Страница 364: ...lor You can also use one of the prerecorded actions to make a styled photo frame It s best work on a copy of your photo 1 Open the Actions panel Choose Window Actions 2 Choose Frames from the Actions...

Страница 365: ...r Photomerge Your source photographs play a large role in panoramic compositions To avoid problems follow these guidelines when taking pictures for use with Photomerge Overlap images sufficiently Imag...

Страница 366: ...ive Creates a consistent composition by designating one of the source images by default the middle image as the reference image The other images are then transformed repositioned stretched or skewed a...

Страница 367: ...77v1001 1 Choose File Automate Photomerge 2 In the Photomerge dialog box add the images you want to use Do not include images that cover the top zenith or bottom nadir of the scene You ll add these im...

Страница 368: ...aware scaling see www adobe com go lrvid4120_ps Discussion of this feature begins at the four minute mark Preserve visual content when scaling images 1 Optional Choose Select All if you re scaling a B...

Страница 369: ...el click Save Selection As Channel 2 Optional Choose Select All if you re scaling a Background layer 3 Choose Edit Content Aware Scale 4 In the options bar choose the alpha channel you created 5 Drag...

Страница 370: ...nds Have a tutorial you would like to share Using the Liquify filter to fix imperfections Eddie Tapp Software Cinema for Photographers Professional photographer and educator Eddie Tapp walks you throu...

Страница 371: ...tool Copies pixels to the brush area Drag to mirror the area perpendicular to the direction of the stroke to the left of the stroke Alt drag Windows or Option drag Mac OS to mirror the area in the dir...

Страница 372: ...ging the color of frozen areas Choose a color from the Mask Color pop up menu in the View Options area of the dialog box Mask options with the Liquify filter When you have an existing selection transp...

Страница 373: ...ue shows less of the Liquify filter s effect on the target layer Changing the blending between the target layer and the backdrop Specify a Opacity value Determining how the target layer and the backdr...

Страница 374: ...e To restore their original appearance use Revert reconstruction mode Stiff Acts like a weak magnetic field At the edges between frozen and unfrozen areas the unfrozen areas take on the distortions of...

Страница 375: ...and drag a handle To distort freely press Ctrl Windows or Command Mac OS and drag a handle To skew press Ctrl Shift Windows or Command Shift Mac OS and drag a side handle When positioned over a side...

Страница 376: ...Legal Notices Online Privacy Policy...

Страница 377: ...u retouch add or remove content in an image the results are more realistic because the edits are properly oriented and scaled to the perspective planes After you finish working in Vanishing Point you...

Страница 378: ...ion by moving the bounding box handles Its behavior is similar to using the Free Transform command on a rectangle selection See also Transform freely Eyedropper tool Selects a color for painting when...

Страница 379: ...four corner nodes of the plane surface By default the Create Plane tool is selected Click in the preview image to define the corner nodes Try to use a rectangle object in the image as a guide when cr...

Страница 380: ...the image Besides helping to line up the perspective planes with image elements the grid is helpful for visualizing measurements when used with the Measure tool An option is available to link the grid...

Страница 381: ...other so your edits are scaled and oriented in the proper perspective 2 Optional Do one of the following to change the angle of the newly torn off plane With either the Edit Plane tool or Create Plane...

Страница 382: ...hing Point making selections let you paint or fill specific areas in an image while honoring the perspective defined by the planes in the image Selections can also be used to clone and move specific i...

Страница 383: ...selection with the color lighting and shading of surrounding pixels 3 Drag the tool in a plane You can make a selection that spans more than one plane Hold the Shift key to constrain the selection to...

Страница 384: ...or Option Mac OS to scale from the center Fill selections with another area of an image 1 Make a selection in a perspective plane 2 Optional Move the selection where you want it Make sure the Move Mod...

Страница 385: ...oint is moved into the plane and honors the selection For convenience it s recommended that you create perspective planes in a previous Vanishing Point session 1 Copy an item to the clipboard The copi...

Страница 386: ...ng behavior of the Stamp tool Select Aligned to sample pixels continuously without losing the current sampling point even when you release the mouse button Deselect Aligned to continue using the sampl...

Страница 387: ...ion angle of an existing measurement 1 Select the Measure tool and move it over the end point of an existing measurement line 2 Do any of the following To change the orientation and length of a measur...

Страница 388: ...make a transformation first select an item to transform and then choose a transformation command If necessary adjust the reference point before manipulating the transformation You can perform several...

Страница 389: ...oad a selection Then choose Select Transform Selection To transform an alpha channel select the channel in the Channels panel Set or move the reference point for a transformation All transformations a...

Страница 390: ...nu Rotate to specify degrees in the options bar Rotate 180 to rotate by a half turn Rotate 90 CW to rotate clockwise by a quarter turn Rotate 90 CCW to rotate counterclockwise by a quarter turn Flip H...

Страница 391: ...u in the options bar After choosing from the Warp pop up menu a square handle is available for adjusting the shape of the warp To change the reference point click a square on the reference point locat...

Страница 392: ...he options bar To specify the amount of warp using numeric values enter the values in the Bend set bend X set horizontal distortion and Y set vertical distortion text boxes in the options bar You can...

Страница 393: ...ny of the following Drag pins to warp the mesh To reveal a mesh area you ve overlapped with another click the Pin Depth buttons in the options bar To remove selected pins press Delete To remove other...

Страница 394: ...Twitter and Facebook posts are not covered under the terms of Creative Commons Legal Notices Online Privacy Policy Press Alt Windows or Option Mac OS to rotate the mesh around a selected pin...

Страница 395: ...Drawing and painting To learn more view these recommended resources online Vector Shapes Infinite Skills Oct 7 2012 video tutorial Drawing shapes in CS6...

Страница 396: ...e areas of a layer See About layer and vector masks Convert a path to a selection See Convert paths to selection borders Fill or stroke a path with color See Fill paths with color Designate a saved pa...

Страница 397: ...Twitter and Facebook posts are not covered under the terms of Creative Commons Legal Notices Online Privacy Policy A Shape Layers B Paths C Fill Pixels More Help Topics...

Страница 398: ...ol options 4 Optional To apply a style to the shape select a preset style from the Style pop up menu in the options bar See Apply preset styles 5 Drag in your image to draw a shape To constrain a rect...

Страница 399: ...w shape to create the cutout When you release the mouse the image underneath the new shape shows through 6 To reposition either shape click the Path Selection tool in the toolbox it may be hidden by t...

Страница 400: ...s a percentage of the line width 10 to 1000 for Width and 10 to 5000 for Length Enter a value for the concavity of the arrowhead from 50 to 50 The concavity value defines the amount of curvature on th...

Страница 401: ...layer To change the color of a shape double click the shape layer s thumbnail in the Layers panel and choose a different color using the Color Picker To fill a shape with a pattern or gradient select...

Страница 402: ...with soft edges with large brush strokes with various brush dynamics with different blending properties and with brushes of different shapes You can apply a texture with your brush strokes to simulat...

Страница 403: ...s opacity and flow options control how fast and how much the paint is applied Click the button to turn on or off this option Pencil tool only Paints the background color over areas containing the fore...

Страница 404: ...sed The Pencil always paints a hard edge that is not anti aliased Change how preset brushes are displayed Choose a display option from the Brush Presets panel menu Text Only to view the brushes as a l...

Страница 405: ...ick Windows or Option click Mac OS the brush you want to delete Select a brush and choose Delete Brush from the panel menu or click the Delete icon Create a new preset brush You can save a customized...

Страница 406: ...h panel overview In the Brush panel you can select preset brushes from the Brush Presets panel but you can also modify existing brushes and design new custom brushes The Brush panel contains the brush...

Страница 407: ...rush Tip Shape on the left side of the Brush panel and set options 4 To set other options for the brush see the following topics Adding dynamic elements to brushes Determining the scattering in a stro...

Страница 408: ...een the brush s short and long axes Enter a percentage value or drag the points in the preview box A value of 100 indicates a circular brush a value of 0 indicates a linear brush and intermediate valu...

Страница 409: ...e determines the brush tip angle Shows brush tip that reflects changes to settings above as well as current pressure and stroke angle Click the preview window to see the brush from different sides Bri...

Страница 410: ...sh stroke creating a watercolor effect Applies gradual tones to an image simulating traditional airbrush techniques The Airbrush option in the Brush panel corresponds to the Airbrush option in the opt...

Страница 411: ...ge of brush marks applied at each spacing interval enter a value To specify how you want to control the count variance of brush marks choose an option from the Control pop up menu Specifies no control...

Страница 412: ...olor to reflect the blend color by increasing the contrast between the two Blending with white produces no change Linear Burn Looks at the color information in each channel and darkens the base color...

Страница 413: ...han the Difference mode Blending with white inverts the base color values Blending with black produces no change Subtract Looks at the color information in each channel and subtracts the blend color f...

Страница 414: ...r Dodge Linear Dodge Add Overlay Soft Light Hard Light Vivid Light Linear Light Pin Light Hard Mix Difference Exclusion Subtract Divide Hue Saturation Color Luminosity 80 opacity Lighter Color Darker...

Страница 415: ...e pattern See Blending modes Specifies how deeply the paint penetrates into the texture Type a number or use the slider to enter a value At 100 the low points in the texture do not receive any paint A...

Страница 416: ...diameter of the brush tip The Use Sample Size option is available only if the brush tip shape was created by sampling pixels in an image Controls the distance between the dual tip brush marks in a st...

Страница 417: ...with shape dynamics Specifies how the size of brush marks vary in a stroke For more information see Creating and modifying brushes To specify the maximum percentage of jittering type a number or use t...

Страница 418: ...nce at the beginning of each stroke You can vary color between strokes rather than within each individual stroke Specifies how paint varies between the foreground color and background color To specify...

Страница 419: ...pecifies no control over the opacity variance of brush marks Fades the opacity of paint from the opacity value in the options bar to 0 in the specified number of steps Varies the opacity of paint base...

Страница 420: ...the Wacom tablet you can control painting tools with pen pressure angle rotation or the stylus wheel 1 Select the Brush Pencil or other painting tool 2 In the options bar do either of the following Cl...

Страница 421: ...form color select Load Solid Colors Only from the Current Brush Load pop up menu in the options bar 3 Choose a brush from the Brush Presets panel See Select a preset brush 4 In the options bar set too...

Страница 422: ...Commons Legal Notices Online Privacy Policy To draw a straight line click a starting point in the image Then hold down Shift and click an ending point When using the Brush tool as an airbrush hold dow...

Страница 423: ...brush from the Brush Presets panel See Select a preset brush 3 Set tool options for mode opacity etc in the options bar See Paint tool options 4 Select Aligned in the options bar to maintain the patt...

Страница 424: ...ng the size of the image by a factor of 4 to soften the details Example of using the Art History Brush tool A Original B Using a small brush C Using a large brush 1 In the History panel click the left...

Страница 425: ...To History in the options bar Photoshop To temporarily use the Eraser tool in Erase to History mode hold down Alt Windows or Option Mac OS as you drag in the image 6 Drag through the area you want to...

Страница 426: ...ose Pen Pressure to base the variation on the pen pressure Choose Stylus Wheel to base the variation on the position of the pen thumbwheel Choose Off if you don t want to vary the size or tolerance 4...

Страница 427: ...the library file in the Presets Patterns folder in the default location the library name will appear at the bottom of the Pattern pop up panel menus after you restart Photoshop Return to the default...

Страница 428: ...u can change how patterns are displayed in the pop up panels by choosing a display option from the pop up panel menu You can also manage pattern presets using the preset manager Define an image as a p...

Страница 429: ...ease in pen pressure causes the width to decrease 2 Click in the image to set the first fastening point 3 To draw a freehand segment move the pointer or drag along the edge you want to trace The most...

Страница 430: ...om Shape icon Before drawing with the Pen tool you can create a new path in the Paths panel to automatically save the work path as a named path Adobe recommends Have a tutorial you would like to share...

Страница 431: ...nwanted bumps in a curve Instead draw widely spaced anchor points and practice shaping curves by adjusting the length and angles of the direction lines 1 Select the Pen tool 2 Position the Pen tool wh...

Страница 432: ...tool pointer when it is positioned correctly Click or drag to close the path Note To close a path in InDesign you can also select the object and choose Object Paths Close Path To leave a path open Ctr...

Страница 433: ...h point to a corner point Press Alt Windows or Option Mac OS to temporarily change the Pen tool to the Convert Point tool 4 Select the Pen tool from the toolbox position the Pen tool where you want th...

Страница 434: ...the image to set the first fastening point 3 To draw a freehand segment move the pointer or drag along the edge you want to trace The most recent segment of the border remains active As you move the p...

Страница 435: ...n line D Selected anchor point E Unselected anchor point A path can be closed with no beginning or end for example a circle or open with distinct end points for example a wavy line Smooth curves are c...

Страница 436: ...ile selecting additional paths or segments When the Direct Selection tool is selected you can select the entire path or path component by Alt clicking Windows or Option clicking Mac OS inside the path...

Страница 437: ...ns select Constrain Path Dragging in the options bar Note You can also apply a transformation such as scaling or rotating to a segment or anchor point Delete a segment 1 Optional If you re creating an...

Страница 438: ...s you position it over an anchor point You must select Auto Add Delete in the options bar to enable the Pen tool to automatically change to the Add Anchor Point or Delete Anchor Point tool You can sel...

Страница 439: ...icate vector objects between a Photoshop image and an image in another application such as Adobe Illustrator Change the overlap mode for the selected path component 1 Using the Path Selection tool dra...

Страница 440: ...u want to copy and choose Edit Copy Then select the destination path and choose Edit Paste Copy path components between two Photoshop files 1 Open both images 2 In the source image use the Path Select...

Страница 441: ...at least three components you want to distribute Then in CS6 choose an option from the Path Arrangement drop down menu in the options bar or in CS5 select a distribute option from the options bar Dist...

Страница 442: ...for the fill See Fill a selection or layer with color 4 Specify an opacity for the fill To make the fill more transparent use a low percentage A setting of 100 makes the fill opaque 5 Choose a blendi...

Страница 443: ...path In the options bar set the tool options and specify a brush For information on specific tool settings see Smudge image areas and About painting tools options and panels 3 To stroke the path do o...

Страница 444: ...side the selection border the feather edge extends Enter a value in pixels Anti aliased Creates a finer transition between the pixels in the selection and the surrounding pixels Make sure the Feather...

Страница 445: ...The higher the tolerance value the fewer the anchor points used to draw the path and the smoother the path If the path is used as a clipping path and you have problems printing the image use a higher...

Страница 446: ...from all visible layers select All Layers 9 Click the part of the image you want to fill All specified pixels within the specified tolerance are filled with the foreground color or pattern If you re...

Страница 447: ...tern library prior to making a selection See Manage pattern libraries and presets History Restores the selected area to the source state or snapshot set in the History panel Content aware fill A Creat...

Страница 448: ...ow to create the shape Hold down the Shift key while dragging to constrain the shape to a circle or square 4 Choose Edit Stroke 5 In the Stroke dialog box type a value for Width and then click the col...

Страница 449: ...tile that fills the layer 7 Click Generate You can press Esc to cancel the generation The preview area is tiled with the generated pattern To switch between the generated preview and the source image...

Страница 450: ...icon 10 When you are satisfied with a pattern preview and you have saved the tiles that you might want to use in the future click OK to fill the layer or selection If you are creating preset patterns...

Страница 451: ...mple to pick a preset gradient fill Click inside the sample to view the Gradient Editor Select a preset gradient fill or create a new gradient fill See Create a smooth gradient The Neutral Density pre...

Страница 452: ...d Choose Replace Gradients from the panel menu to replace the current list with a different library Select the library file you want to use and click Load Choose a library file from the bottom of the...

Страница 453: ...fine the ending color click the right color stop under the gradient bar Then choose a color 8 To adjust the location of the starting point or ending point do one of the following Drag the correspondin...

Страница 454: ...for Location 7 To delete the opacity stop you are editing click Delete 8 To add an intermediate opacity to the mask click above the gradient bar to define a new opacity stop You can then adjust and mo...

Страница 455: ...panel Create a new path in the Paths panel To create a path without naming it click the Create New Path button at the bottom of the Paths panel To create and name a path make sure no work path is sele...

Страница 456: ...ws JPEG JPEG 2000 DCS EPS PDF and TIFF formats support paths in Photoshop In Mac OS all available file formats support paths Note Paths in formats other than those listed here generally don t survive...

Страница 457: ...Text...

Страница 458: ...dy Anderson will show you the basics of using text the creative way About type layers Important Type layers aren t created for images in Multichannel Bitmap or Indexed Color mode because these modes d...

Страница 459: ...ntal Type tool or the Vertical Type tool 2 Click in the image to set an insertion point for the type The small line through the I beam marks the baseline of the type the imaginary line on which type r...

Страница 460: ...ndle the pointer turns into a double arrow and drag Shift drag to maintain the proportions of the bounding box To rotate the bounding box position the pointer outside the bounding border the pointer t...

Страница 461: ...Legal Notices Online Privacy Policy...

Страница 462: ...es are traditionally used for quotation marks and apostrophes Straight quotes are traditionally used as abbreviations for feet and inches 1 Choose Edit Preferences Type Windows or Photoshop Preference...

Страница 463: ...in the Change To text box and click Change If the suggested word is not the word you want select a different word in the Suggestions text box or enter the correct word in the Change To text box Change...

Страница 464: ...if the type layer has multiple languages the pop up menu in the Character panel will be dimmed and it will display the word Multiple Scaling and rotating type Adjust the scale of type You can specify...

Страница 465: ...type flows from left to right Don t confuse the orientation of a type layer with the direction of characters in a type line 1 Select the type layer in the Layers panel 2 Do one of the following Select...

Страница 466: ...l overview of several approaches Book excerpt Create type on a path Adobe Photoshop Classroom in a Book Walk through the process step by step You can enter type that flows along the edge of a work pat...

Страница 467: ...the direction of the type use the Baseline Shift option in the Character panel For example if you created type that runs from left to right across the top of a circle you can enter a negative number i...

Страница 468: ...layer remains intact and editable Select a type layer and choose Type Create Work Path CS6 or Layer Type Create Work Path CS5 Note You cannot create work paths from fonts that don t include outline d...

Страница 469: ...toolbox 3 Click the Character tab to bring the Character panel to the front or if the panel isn t open choose Window Character 4 In the Character panel select the font and other type attributes for th...

Страница 470: ...elect all characters in a bounding box To use the arrow keys to select characters click in the text and then hold down Shift and press the Right Arrow or Left Arrow key To use the keys to select words...

Страница 471: ...mall Caps Superscript Subscript Underline and Strikethrough Dynamic shortcuts appear in the Character panel menu only when you are entering point or paragraph type when type is selected or when the I...

Страница 472: ...r at the top of the work area click the color swatch 5 In the Adobe Color Picker locate the color range you want using the triangle sliders on the color spectrum bar and then click the desired color i...

Страница 473: ...the flexibility to customize your designs For a video overview see Paragraph and Character Styles in Photoshop CS6 by Julieanne Kost Create a character style 1 If you want to base a new style on the f...

Страница 474: ...aph Styles panel choose Load Default Type Styles from the panel menu 2 If you are loading the default type styles into a document that already has an existing type style the Import Paragraph Styles di...

Страница 475: ...l set the Leading value Change the default auto leading percentage 1 Choose Justification from the Paragraph panel menu 2 For Auto Leading enter a new default percentage Kern and track Kerning is the...

Страница 476: ...ion in the Character panel To automatically adjust the spacing between selected characters based on their shapes select Optical for the Kerning option in the Character panel To adjust kerning manually...

Страница 477: ...her or have too much extra space making it difficult to read Turn off fractional widths when you want to fix type spacing in whole pixel increments and prevent small type from running together The fra...

Страница 478: ...type layer in the Layers panel Paragraph panel overview You use the Paragraph panel to change the formatting of columns and paragraphs To display the panel choose Window Paragraph or click the Paragra...

Страница 479: ...e available only for paragraph type and determine word letter and glyph spacing Justification settings apply only to Roman characters double byte characters available in Chinese Japanese and Korean fo...

Страница 480: ...paragraph Indents from the right edge of the paragraph For vertical type this option controls the indention from the bottom of the paragraph Indents the first line of type in the paragraph For horizo...

Страница 481: ...ent capitalized words from being hyphenated Hyphenation settings apply only to Roman characters double byte characters available in Chinese Japanese and Korean fonts are not affected by these settings...

Страница 482: ...yles are hierarchical Manual overrides supersede any applied character styles which in turn replace applied paragraph styles This hierarchical approach lets you combine the efficiency of styles with t...

Страница 483: ...shop 4 Choose Type Language Options Middle Eastern features Text direction To create content in Arabic and Hebrew enable right to left RTL text direction While RTL is the default direction of text man...

Страница 484: ...Stylistic Note Kashidas are inserted only in paragraphs with fully justified margins To apply Kashidas to a group of characters select the characters in the document and then choose Type Language Opt...

Страница 485: ...r panel modify the position of the diacritic marks relative to the script Values you can change are Adjust Horizontal Diacritic Position and the Adjust Vertical Diacritic Position Justification altern...

Страница 486: ...rs can include ligatures fractions swashes ornaments ordinals titling and stylistic alternates superior and inferior characters old style figures and lining figures A glyph is a specific form of a cha...

Страница 487: ...ut missing fonts and glyph protection If a document uses fonts that aren t installed on your system you see an alert message when you open it If you later try to edit type layers with missing fonts Ph...

Страница 488: ...y Ligatures Are typographic replacement characters for letter pairs such as ct st and ft Note Although the characters in ligatures appear to be joined they are fully editable and do not cause the spel...

Страница 489: ...with Asian languages other than Chinese Japanese and Korean Reduce spacing around Asian type characters Tsume reduces the space around a character by a specified percentage value As a result the chara...

Страница 490: ...a line to the large character Em box Top Right Em box Center or Em box Bottom Left Aligns the small characters in a line to the specified position of the large character s em box In vertical text fram...

Страница 491: ...acter Set Character Map A Font menu B Advanced View check box Mac OS In the Kotoeri Character panel select Glyph from the View menu Kotoeri Character panel A View menu B Font menu C Character Informat...

Страница 492: ...ext composition for spacing of Japanese characters roman characters punctuation special characters line start line end and numbers Photoshop includes several predefined mojikumi sets based on the Japa...

Страница 493: ...hen choose one of the following methods Push In First Moves characters up to the previous line to prevent prohibited characters from ending or beginning a line Push Out First Moves characters down to...

Страница 494: ...Video and animation To learn more view these recommended resources online Video workflow Kelby May 7 2012 video tutorial Intuitive editing for video DSLRs and other sources...

Страница 495: ...esigned video engine you can import a wider range of video audio and image sequence files Easily work with file types such as the following 3GP 3G2 AVI DV FLV and F4V MPEG 1 MPEG 4 QuickTime MOV in Wi...

Страница 496: ...nal fade and cross fade effects Click the transitions icon in the upper left of the Timeline panel Then choose a duration and drag a transition type to the start or end of clips Place the transition b...

Страница 497: ...Twitter and Facebook posts are not covered under the terms of Creative Commons Legal Notices Online Privacy Policy...

Страница 498: ...using the brush tools and stamp tools Like working with regular layers you can create selections or apply masks to restrict your edits to specific areas of a frame You navigate through the frames usin...

Страница 499: ...irst frame B Selects the previous frame C Plays animation D Selects the next frame E Tweens animation frames F Duplicates selected frames G Deletes selected frames H Converts to timeline mode Photosho...

Страница 500: ...frame Drag the current time indicator to navigate frames or change the current time or frame Displays keyframes where you set and change the master lighting angle for layer effects such as Drop Shadow...

Страница 501: ...r each Timeline mode shows frames in a continuous timeline letting you animate properties with keyframes and play video layers Ideally you should select the mode you want before starting an animation...

Страница 502: ...itter and Facebook posts are not covered under the terms of Creative Commons Legal Notices Online Privacy Policy Set the timeline area to preview Photoshop Extended Understanding the timeline mode vid...

Страница 503: ...ation To create frame based animations in Photoshop use the following general workflow 1 Open a new document If they are not already visible open the Animation and Layers panels as well In Photoshop E...

Страница 504: ...imation If you have an image open the Animation panel displays the image as the first frame in a new animation Each frame you add starts as a duplicate of the preceding frame You then make changes to...

Страница 505: ...n frame animation mode change the attribute to one frame 2 In the Layers panel click Unify Layer Position Unify Layer Visibility or Unify Layer Style to have the changed attribute apply to all other f...

Страница 506: ...w frames Using tweening to animate text position 1 Photoshop Extended Make sure the Animation panel is in frame animation mode 2 To apply tweening to a specific layer select it in the Layers panel 3 S...

Страница 507: ...ds Fractions of a second are displayed as decimal values For example one quarter of a second is specified as 25 If you set a delay on the current frame every frame you create after that will remember...

Страница 508: ...display before the next frame is displayed Only a single frame is displayed at any time and the current frame does not appear through the transparent areas of the next frame Specify looping in frame a...

Страница 509: ...timeline based animation in Photoshop Extended use the following general workflow 1 Create a new document Specify the size and background contents Make sure the pixel aspect ratio and dimensions are...

Страница 510: ...rty using keyframes you must set at least two keyframes for that property Otherwise changes that you make to the layer property remain in effect for the duration of the layer Each layer property has a...

Страница 511: ...order The keyframes remain selected after pasting so you can immediately move them in the timeline Note You can copy and paste keyframes between more than one property at a time 1 In the Animation pa...

Страница 512: ...mode is useful for drawing frame by frame animations because it gives you reference points for stroke positions and other edits Onion skin settings specify how previous and later frames appear when O...

Страница 513: ...st frame 1 Choose File Open and select the Photoshop file to open 2 In the Layers panel select the layers you want for the animation and choose Make Frames From Layers from the Animation panel menu Yo...

Страница 514: ...preset file size guides A Action safe area outer rectangle B Title safe area inner rectangle Note If you are creating content for the web or for CD the title safe and action safe margins do not apply...

Страница 515: ...ut alteration images appear distorted for example circles distort into ovals However when displayed on a broadcast monitor the images appear correctly proportioned because broadcast monitors use recta...

Страница 516: ...nsquare pixels for use in DVD slide shows NTSC and PAL standard and widescreen aspect ratios creating an alpha channel from all currently visible layers adjusting image areas especially thin lines tha...

Страница 517: ...pdating Photoshop layers Organize and name layers If you change a layer name or delete a layer in a Photoshop document after you import it into After Effects After Effects won t be able to find the re...

Страница 518: ...tual or Selective palette This ensures that the colors are consistent across frames 1 Photoshop Extended Make sure the Animation panel is in frame animation mode 2 Choose Optimize Animation from the A...

Страница 519: ...ple Computer multimedia architecture that includes a number of codecs To export audio you must use this format Audio Video Interleave AVI is a standard format for audio and video data on Windows compu...

Страница 520: ...menu below the File Format menu and specify the following Creates a file for RTSP streaming to QuickTime Player This option creates a hint track instructions necessary for streaming a file Helps the...

Страница 521: ...ifies either NTSC or PAL video broadcast standard Specifies whether the exported video has interlaced fields or no fields Progressive Scan Specifies an aspect ratio of 4 3 or 16 9 Specifies an option...

Страница 522: ...ngs dialog box make sure Video is selected Although the Movie Settings dialog box displays Sound options you cannot adjust the current audio settings To include audio in exported files see Preview aud...

Страница 523: ...ec QuickTime movie size settings The following settings are available in the Export Size Settings dialog box Specifies the frame size for your exported movie If you want to specify a frame size not in...

Страница 524: ...o layers see www adobe com go vid0027 Open a video file Choose File Open select a video file and click Open The video appears on a video layer in a new document Add a video file as a new video layer 1...

Страница 525: ...move video layers changes become permanent when you save the file If you trim video however you can restore it by re extending the ends of the layer duration bar 1 In the Animation or Layers panel sel...

Страница 526: ...r The selected video layer is duplicated and appears immediately above the original in the Animation panel The original layer is trimmed from the start to the current time and the duplicate layer is t...

Страница 527: ...only be able to specify the current frame for the topmost video layer 1 In the Layers panel select the video layer 2 In the Animation panel move the current time indicator to the frame that you want...

Страница 528: ...animation will be more successful if all files have the same pixel dimensions To order frames correctly for the animation name the files in alphabetical or numeric order For example filename001 filen...

Страница 529: ...video footage Photoshop Extended Interpret video footage You can specify how Photoshop Extended interprets the alpha channel and frame rate of the video you ve opened or imported 1 In the Animation or...

Страница 530: ...ted as Straight Unmatted lower left When interpreted as Premultiplied Matte with black specified as background color halo does not appear lower right More Help topics About missing and mismatched colo...

Страница 531: ...ush includes options for blending the sampled content with the target frame Note You can also clone content with the Spot Healing Brush and the Patch tools However the Clone Stamp and the Healing Brus...

Страница 532: ...e the Photoshop Extended document is in Adobe RGB Your final exported video or document might not have the colors you expect due to the color space mismatch Before investing a lot of time painting or...

Страница 533: ...o export or preview do any of the following in the Animation panel Drag either end of work area bar Dragging an end of the work area bar Drag the work area bar over the section you want to preview Mov...

Страница 534: ...ct ratio settings of the display device you will see an alert Note The Send Video Preview To Device command uses the previous settings in the Video Preview dialog box 3 Under Device Settings specify o...

Страница 535: ...Apply Pixel Aspect Ratio To Preview check box is selected to maintain the image s pixel aspect ratio In general you would deselect this option if the document s pixel aspect ratio is assumed to be squ...

Страница 536: ...ommended resources online Blur gallery overview Kelby May 7 2012 video tutorial Quick creative control in a dedicated blur workspace Using the new three part Blur Gallery Lynda com May 7 2012 video tu...

Страница 537: ...ting results For information on other blur effects see Adjusting image sharpness and blur Field blur Use Field Blur to build a gradient of blurs by defining multiple blur points with different amounts...

Страница 538: ...rease or decrease the blur You can also use the Blur Tools panel to specify a blur value 3 To define the different areas do the following Drag the lines to move them Drag the handles and rotate Press...

Страница 539: ...overall picture by controlling the appearance of out of focus or blurred parts Specify the bokeh parameters to ensure an overall pleasing effect In the Blur Effects panel specify a value for the foll...

Страница 540: ...pherical to correct 360 degree panoramas created in CS6 The panoramas must have a 2 1 aspect ratio Use Auto to detect the appropriate correction automatically Specify a value to scale the image Use th...

Страница 541: ...Twitter and Facebook posts are not covered under the terms of Creative Commons Legal Notices Online Privacy Policy...

Страница 542: ...you want to adjust Then in the upper half of the Properties panel do any of the following Choose a light type Spot Infinite or Point from the top menu Adjust color intensity and hotspot size To duplic...

Страница 543: ...the light drag beyond the outer ellipse To change the hotspot angle drag the edge of the interior ellipse To extend or shrink the ellipse drag one of the four outer handles To change how much of the e...

Страница 544: ...ave a preset click Save name the style and click OK Saved presets include all the settings for each light and appear in the Style menu whenever you open the image To delete a preset choose it and then...

Страница 545: ...Blur Blur More Box Blur Gaussian Blur Lens Blur Motion Blur Radial Blur Surface Blur Shape Blur Lens Correction Add Noise Despeckle Dust Scratches Median Reduce Noise Fibers Clouds Difference Clouds L...

Страница 546: ...ects are applied in the order you select them You can rearrange filters after you apply them by dragging a filter name to another position in the list of applied filters Rearranging filter effects can...

Страница 547: ...rounds and textures You might then blur these textures Although some filters have little or no visible effect when applied to solid colors for example Glass others produce interesting effects Combinin...

Страница 548: ...Legal Notices Online Privacy Policy...

Страница 549: ...from various sources Fresco Paints an image in a coarse style using short rounded and hastily applied daubs Neon Glow Adds various types of glows to the objects in an image This filter is useful for...

Страница 550: ...esults or Good and Best for smoother results which are indistinguishable from each other except on a large selection Specify the origin of the blur by dragging the pattern in the Blur Center box Shape...

Страница 551: ...ixels in your selection The Ridges option sets the number of direction reversals of the zigzag from the center of the selection to its edge You also specify how to displace the pixels Pond Ripples dis...

Страница 552: ...hining a bright light into a camera lens Specify a location for the center of the flare by clicking anywhere inside the image thumbnail or by dragging its cross hair Lighting Effects Lets you produce...

Страница 553: ...th the original fill color Options include an embossing angle from 360 to recess the surface to 360 to raise the surface height and a percentage 1 to 500 for the amount of color within the selection T...

Страница 554: ...using the Threshold command or converting the image to Bitmap mode The filter is useful for extracting line art and large black and white areas from scanned images Maximum and Minimum Are useful for...

Страница 555: ...e options bar 3 Select Sample All Layers in the options bar to smudge using color data from all visible layers If this is deselected the Smudge tool uses colors from only the active layer 4 Select Fin...

Страница 556: ...hop CS6 to give an image the look of a classic painting 1 Choose Filter Oil Paint 2 Experiment with the Brush and Lighting options 3 Click OK to apply the filter If the Oil Paint filter is not working...

Страница 557: ...r use in other images The Lighting Effects filter works only on RGB images 1 Choose Filter Render Lighting Effects 2 For Style choose a style 3 For Light Type choose a type If you re using multiple li...

Страница 558: ...se Filter Render Lighting Effects 2 For Light Type choose Spotlight 3 Adjust the light To move the light drag the center circle To increase the light angle drag the handle to shorten the line To decre...

Страница 559: ...create a style choose Default for Style and drag the light bulb icon at the bottom of the dialog box into the preview area Repeat as desired for a maximum of 16 lights To save a style click Save name...

Страница 560: ...Load Texture to specify a Photoshop file 3 Drag the Scaling slider to increase or reduce the size of the texture pattern 4 Drag the Relief slider if available to adjust the depth of the texture s sur...

Страница 561: ...lue in pixels for the maximum radius of a halftone dot from 4 to 127 3 Enter a screen angle value the angle of the dot from the true horizontal for one or more channels For Grayscale images use only c...

Страница 562: ...pixel in this position multiplied For example to multiply the brightness value of the pixel to the immediate right of the current pixel by 2 enter 2 in the text box to the immediate right of the cent...

Страница 563: ...Style dialog box The layer effects icon appears to the right of the layer s name in the Layers panel You can expand the style in the Layers panel to view or edit the effects that compose the style Lay...

Страница 564: ...view the layer styles as a list with a thumbnail of the selected layer style displayed Layer Style dialog box overview You can edit styles applied to a layer or create new styles using the Layer Style...

Страница 565: ...ghting angle that is then available in all the layer effects that use shading Drop Shadow Inner Shadow and Bevel and Emboss In any of these effects if Use Global Light is selected and you set a lighti...

Страница 566: ...yer if you want the texture to move along with the layer as the layer moves Invert inverts the texture Depth varies the degree and direction up down to which the texturing is applied Snap To Origin ma...

Страница 567: ...ying and pasting styles is an easy way to apply the same effects to multiple layers Copy layer styles between layers 1 From the Layers panel select the layer containing the style you want to copy 2 Ch...

Страница 568: ...from the Styles panel You can save preset styles in a library and load or remove them from the Styles panel as you need them Create a new preset style 1 From the Layers panel select the layer containi...

Страница 569: ...delete and save libraries of preset styles Load a library of preset styles 1 Click the triangle in the Styles panel Layer Style dialog box or Layer Style pop up panel in the options bar 2 Do one of t...

Страница 570: ...Saving and exporting...

Страница 571: ...et a variety of file saving options in the Save As dialog box The availability of options depends on the image you are saving and the selected file format As A Copy Saves a copy of the file while keep...

Страница 572: ...up to 300 000 pixels in either dimension and offers three file formats for saving documents with images having more than 30 000 pixels in either dimension Keep in mind that most other applications in...

Страница 573: ...inator You can even specify a custom size at the bottom of the tab 6 Click Create A blank PSD file with the specified size opens in Photoshop The new file has the following parameters set by default C...

Страница 574: ...es up to 2 GB in size For files larger than 2 GB save in Large Document Format PSB Photoshop Raw flattened image only TIFF up to 4 GB or DICOM format The standard bit depth for images is 8 bits per ch...

Страница 575: ...en saving a PSD you can set a preference to maximize file compatibility This saves a composite version of a layered image in the file so it can be read by other applications including previous version...

Страница 576: ...ring white balance adjustments or other in camera processing Digital Negative format DNG Digital Negative DNG is a file format that contains the raw image data from a digital camera and metadata that...

Страница 577: ...stores the values as 16 bits channel floating point PCX PCX format is commonly used by IBM PC compatible computers Most PC software supports version 5 of PCX format A standard VGA color palette is us...

Страница 578: ...format used for high dynamic range images This format was originally developed for the Radiance system a professional tool for visualizing lighting in virtual environments The file format stores the q...

Страница 579: ...transparency and multiresolution pyramid data in TIFF format In Photoshop TIFF image files have a bit depth of 8 16 or 32 bits per channel You can save high dynamic range images as 32 bits per channel...

Страница 580: ...PP AVC AVI F4V FLV MOV QuickTime MPE MPEG 1 MPEG 4 MPEG 2 if a decoder is installed for example with an Adobe video suite MTS MXF R3D TS VOB Video export formats DPX MOV QuickTime MP4 Graphic file for...

Страница 581: ...ms of Creative Commons Legal Notices Online Privacy Policy PICT Resource Mac only can open only Radiance 3D related formats 3D Studio import only DAE Collada Flash 3D export only JPS JPEG Stereo KMZ G...

Страница 582: ...toshop does not provide options for opening multiresolution files the image opens at the highest resolution within the file However Adobe InDesign and some image servers provide support for opening mu...

Страница 583: ...all page layout word processing and graphics applications accept imported or placed EPS Encapsulated PostScript files To print EPS files you should use a PostScript printer Non PostScript printers wi...

Страница 584: ...ferring images between applications and computer platforms The Photoshop Raw format is not the same as camera raw 1 Choose File Save As and choose Photoshop Raw from the Format menu 2 In the Photoshop...

Страница 585: ...notes spot color or alpha channels Click Save 2 In the Save Adobe PDF dialog box choose an Adobe PDF preset specifying whether the Photoshop PDF file will be printed on a desktop printer or proofer se...

Страница 586: ...ich they are prepared PDF files created with PDF X 1a compliance can be opened in Acrobat 4 0 and Acrobat Reader 4 0 and later PDF X 1a uses PDF 1 3 downsamples color and grayscale images to 300 ppi a...

Страница 587: ...ents that will be distributed widely consider choosing Acrobat 5 0 PDF 1 4 or Acrobat 6 0 PDF 1 5 to ensure that all users can view and print the document The following table compares some of the func...

Страница 588: ...ype of compression that is used ZIP compression Works well on images with large areas of single colors or repeating patterns and for black and white images that contain repeating patterns ZIP compress...

Страница 589: ...F preset Although the default PDF presets are based on best practices you may discover that your workflow requires specialized PDF settings that aren t available using any of the built in presets In t...

Страница 590: ...New PDF Preset dialog box you can modify the settings and save them as a new preset To delete an Adobe PDF preset select the preset in the Preset window and click the Delete button You can t delete t...

Страница 591: ...nto a gallery page You use the Web Photo Gallery command to automatically generate a web photo gallery from a set of images Web photo gallery home page Photoshop provides a variety of styles for your...

Страница 592: ...ages inside a pages subfolder JPEG thumbnail images inside a thumbnails subfolder Making sure that your colors match If you work with photos in a wide gamut color working space such as ProPhoto RGB or...

Страница 593: ...ach image as a theft deterrent Content Specifies the text to be displayed Select Custom Text to enter customized text Select Filename Description Credits Title or Copyright to display text drawn from...

Страница 594: ...INDEX NEXTIMAGE NEXTINDEX PAGE PREVIMAGE and PREVINDEX When generating specific pages of a gallery Photoshop skips lines in a template that contain tokens that don t apply to those pages For example w...

Страница 595: ...he color of links NEXTIMAGE Determines the link for the next gallery page NEXTIMAGE _CIRCULAR Sets the link from large preview image to next large preview image NEXTINDEX Determines the link for the n...

Страница 596: ...ng a digital watermark in your image Color variation The image must contain some degree of variation or randomness in color to embed the digital watermark effectively and imperceptibly The image canno...

Страница 597: ...rag the slider or enter a value as described in the next section 7 Select Verify to automatically assess the watermark s durability after it is embedded 8 Click OK Using the Watermark Durability setti...

Страница 598: ...Printing...

Страница 599: ...s you work in a commercial printing company or service bureau you probably print images to a desktop printer such as an inkjet dye sublimation or laser printer not to an imagesetter Photoshop lets you...

Страница 600: ...int Settings dialog box This scaling affects everything on the page including the size of all page marks such as crop marks and captions whereas the scaling percentage provided by the Print command af...

Страница 601: ...nd clipped using their vector outline Consequently the edges of vector graphics print at the printer s full resolution even though the content of each layer is limited to the resolution of your image...

Страница 602: ...a commercial printing company or service bureau you probably print images to a desktop printer such as an inkjet dye sublimation or laser printer not to an imagesetter Photoshop lets you control how...

Страница 603: ...Set printer options 1 In the Print dialog box click Print Settings 2 Set paper size source and page orientation as desired The available options depend on your printer printer drivers and operating s...

Страница 604: ...values for Height and Width To achieve the desired scale select Bounding Box and drag a bounding box handle in the preview area Print vector data If an image includes vector graphics such as shapes an...

Страница 605: ...Select to view image colors in the preview area as they will actually print Enabled when Match Print Colors is selected Select to highlight out of gamut colors in the image as determined by the selec...

Страница 606: ...n do this using a preset or by creating a custom proof setup See Soft proof colors The view changes automatically according to the proof you choose Choose Custom to create custom proof settings which...

Страница 607: ...lors in the image as determined by the selected printer profile A gamut is the range of colors that a color system can display or print A color that can be displayed in RGB may be out of gamut for you...

Страница 608: ...warning that your image is larger than the printable area of the paper and you don t want to exceed that area click Cancel choose File Print and select the Scale To Fit Media box To make changes to yo...

Страница 609: ...simulated device Using this option results in more accurate proofs of dark colors but it is not available for all profiles 8 Access the color management options for the printer driver from the Print...

Страница 610: ...and each caption is on a separate text layer 4 In the Thumbnails area specify layout options for the thumbnail previews For Place choose whether to arrange thumbnails across first from left to right t...

Страница 611: ...d you manipulate the channels through the curves in the Duotone Options dialog box Convert an image to duotone 1 Convert the image to grayscale by choosing Image Mode Grayscale Only 8 bit grayscale im...

Страница 612: ...isfied with the ink combination Then click OK Saving and loading duotone settings Use the Save button in the Duotone Options dialog box to save a set of duotone curves ink settings and overprint color...

Страница 613: ...if the image contains spot channels convert it to Multichannel mode and save it in DCS 2 0 format Remember to name custom colors using the appropriate suffix so that the importing application can reco...

Страница 614: ...chool photos You can also place different images on the same page You can choose from a variety of size and placement options to customize your package layout A picture package layout 1 Picture Packag...

Страница 615: ...If you choose Custom Text enter the text for the label in the Custom Text field 8 Specify font font size color opacity position and rotation for the labels 9 Click OK Customize a picture package layo...

Страница 616: ...Bridge provides updated contact sheet features the Contact Sheet plug in is not installed with Photoshop 1 Download and install the plug in for Windows or Mac OS 2 Run Photoshop in 32 bit mode 64 bit...

Страница 617: ...pace the thumbnails in the contact sheet If you deselect Use Auto Spacing you can specify the vertical and horizontal space around the thumbnails The contact sheet preview in the dialog box is automat...

Страница 618: ...essary then send the CMYK file to the professional printer Place your RGB or CMYK image in Adobe InDesign or Adobe Illustrator In general most images printed on a commercial press are not printed dire...

Страница 619: ...ed on paper are printed with emulsion up with type readable when the photosensitive layer faces you Images printed on film are often printed with emulsion down Negative Prints an inverted version of t...

Страница 620: ...Print Settings dialog box In Windows click the Properties button to access the printer driver options in Mac OS use the pop up menu in the Print Settings dialog box that appears 3 Click Print Separati...

Страница 621: ...kjet printers check your printer documentation for the optimal resolution Many dye sublimation printers and devices that print directly onto photographic paper have an optimal resolution of 300 to 400...

Страница 622: ...olor channel to a composite color printer will print the spot color at an opacity indicated by the Solidity setting You can merge spot channels with color channels splitting the spot color into its co...

Страница 623: ...x the Opacity option in the painting or editing tool s options determines the actual density of ink used in the printed output Change a spot channel s color or solidity 1 Double click the spot channel...

Страница 624: ...Windows or Command Mac OS and click the channel in the Channels panel 3 For Channel choose the spot channel from step 1 and click OK 4 To create a trap when knocking out the underlying color choose S...

Страница 625: ...Automation To learn more view these recommended resources online Batch Actions Infinite Skills Aug 9 2012 video tutorial...

Страница 626: ...re stored in sets to help you organize them You can record edit customize and batch process actions and you can manage groups of actions by working with action sets Actions panel overview You use the...

Страница 627: ...Legal Notices Online Privacy Policy...

Страница 628: ...e action will always play back in the same relative position in the image You can record the Play command listed on the Actions panel menu to cause one action to play another Record an action When you...

Страница 629: ...o insert a stop at the end of the action Select a command to insert a stop after the command 2 Choose Insert Stop from the Actions panel menu 3 Type the message you want to appear 4 If you want the op...

Страница 630: ...mmand 2 Choose Insert Menu Item from the Actions panel menu 3 With the Insert Menu Item dialog box open choose a command from its menu 4 Click OK Edit and rerecord actions It is easy to edit and custo...

Страница 631: ...trl click Windows or Command click Mac OS the Play button in the Actions panel You can also press Ctrl Windows or Command Mac OS and double click the command In Photoshop to undo an action take a snap...

Страница 632: ...reate and organize sets of task related actions that can be saved to disk and transferred to other computers Note Any actions that you create are automatically listed in the Actions panel but to truly...

Страница 633: ...first Then the new set will appear in the set popup menu when you create your new action To move an action to a different set drag the action to that set When the highlighted line appears in the desi...

Страница 634: ...ll images in the folder Note The settings you apply with the Image Processor are temporary and used only with the Image Processor The image s current camera raw settings are used to process the image...

Страница 635: ...ou want to use to process files from the Set and Action pop up menus The menus display actions available in the Actions panel You may need to choose a different set or load a set in the panel if you d...

Страница 636: ...cified folder Suppress Color Profile Warnings Turns off display of color policy messages Suppress File Open Options Dialogs Hides File Open Options dialog boxes This is useful when batching actions on...

Страница 637: ...original files To create a batch process that saves files in a new format record the Save As command followed by the Close command as part of your original action Then choose Override Action Save As...

Страница 638: ...ther location choose File Scripts Browse and navigate to the script Set scripts and actions to run automatically You can have an event such as opening saving or exporting a file in Photoshop trigger a...

Страница 639: ...specify the parts of the image that change See Define variables 3 Create or import the data sets You can create the data sets in the template or import them from a text file See Define a data set and...

Страница 640: ...erscores and colons Choose an existing variable from the Name pop up menu to link this layer to Layers linked to the same variable are shown next to the Name menu along with the link icon 5 For Pixel...

Страница 641: ...u and editing its options Use the arrow icons to move between data sets Click the Delete icon to delete a data set Preview or apply a data set You can apply a data set s contents to the base image whi...

Страница 642: ...e must be enclosed in double quotes All variables defined in the PSD document must be defined in the text file An error is displayed if the number of variables in the text file does not match the numb...

Страница 643: ...s from the Then Play Action menu and the Else Play Action menu and then click OK You can also choose None in one of the menus but not both You can run an action only if a particular condition is false...

Страница 644: ...Allow Tool Recording from the Actions panel menu A couple items to keep in mind When recording a tool choose your brush as part of the action or Photoshop uses the currently selected brush If you are...

Страница 645: ...GB to a target mode of CMYK Applying this action to an image in Grayscale mode or any other source mode besides RGB results in an error When you record an action you can use the Conditional Mode Chang...

Страница 646: ...Web graphics...

Страница 647: ...nto a gallery page You use the Web Photo Gallery command to automatically generate a web photo gallery from a set of images Web photo gallery home page Photoshop provides a variety of styles for your...

Страница 648: ...ages inside a pages subfolder JPEG thumbnail images inside a thumbnails subfolder Making sure that your colors match If you work with photos in a wide gamut color working space such as ProPhoto RGB or...

Страница 649: ...ach image as a theft deterrent Content Specifies the text to be displayed Select Custom Text to enter customized text Select Filename Description Credits Title or Copyright to display text drawn from...

Страница 650: ...INDEX NEXTIMAGE NEXTINDEX PAGE PREVIMAGE and PREVINDEX When generating specific pages of a gallery Photoshop skips lines in a template that contain tokens that don t apply to those pages For example w...

Страница 651: ...he color of links NEXTIMAGE Determines the link for the next gallery page NEXTIMAGE _CIRCULAR Sets the link from large preview image to next large preview image NEXTINDEX Determines the link for the n...

Страница 652: ...ays drop shadows glow or emboss to the primary layer To create a rollover pair turn the layer style on or off and save the image in each state See Layer effects and styles Use preset button styles fro...

Страница 653: ...hexadecimal value color xxyyzz or as the hexadecimal value alone 1 Do one of the following With the Eyedropper tool move the pointer over the color that you want to copy Right click Windows or Control...

Страница 654: ...auto Slices created with the Slice tool are called user slices slices created from a layer are called layer based slices When you create a new user slice or layer based slice additional auto slices a...

Страница 655: ...compasses all the pixel data in the layer If you move the layer or edit the layer s content the slice area automatically adjusts to include the new pixels A layer based slice is updated when the sourc...

Страница 656: ...dges or icons indicate certain conditions User slice has Image content User slice has No Image content Slice is layer based Show or hide slice boundaries Choose View Show Slices To hide and show slice...

Страница 657: ...e a user slice 1 Select one or more user slices 2 Do one of the following To move a slice move the pointer inside the slice selection border and drag the slice to a new position Press Shift to restric...

Страница 658: ...selection Copy and paste a slice You can copy and paste a selected slice within an image into another image or into another application such as Dreamweaver Copying a slice copies all layers within the...

Страница 659: ...e contents of the layers 1 Select the user slices you want to align 2 Choose the Slice Select tool and select an option in the options bar Alignment options A Top B Vertical Centers C Bottom D Left E...

Страница 660: ...box 2 In the Slice Options dialog box select a slice type from the Type pop up menu Rename a slice As you add slices to an image you may find it helpful to rename slices based on their content By defa...

Страница 661: ...hen you choose a slice of type No Image you can enter text to be displayed in the slice area of the resulting web page This can be plain text or text formatted with standard HTML tags You can also sel...

Страница 662: ...Legal Notices Online Privacy Policy...

Страница 663: ...tings for your needs You can also specify transparency and matting select options to control dithering and resize the image to specified pixel dimensions or a specified percentage of the original size...

Страница 664: ...download time The annotation area below each image in the Save For Web Devices dialog box provides optimization information The annotation for the original image shows the file name and file size The...

Страница 665: ...rn and flash use All Saves all metadata in the file 8 Click Save 9 In the Save Optimized As dialog box do the following and then click Save Enter a file name and select a location for the resulting fi...

Страница 666: ...or to all slices Click OK Resize artwork while optimizing In the Save For Web Devices dialog box you can resize an image to specified pixel dimensions or to a percentage of the original size 1 Click t...

Страница 667: ...up menu In the Browsers dialog box you can find all browsers on your computer and set the default browser to preview your image Save a file to e mail 1 Choose File Save For Web Devices 2 Click the Opt...

Страница 668: ...eet Copying CSS from a layer group containing shapes or text creates a class for each layer as well as a Group class The Group class represents a parent div containing child divs that correspond to th...

Страница 669: ...le will appear in the Settings pop up menu 5 Optional To load output settings click Load select a file and click Open HTML output options You can set the following options in the HTML set Output XHTML...

Страница 670: ...splay the optimized image as a tiled background Background Image Enter the location of an image file or click Choose and select an image The file you specify will be tiled behind the optimized image o...

Страница 671: ...ession algorithm preserves However using a high Quality setting results in a larger file size than using a low Quality setting View the optimized image at several quality settings to determine the bes...

Страница 672: ...s a color table similar to the Perceptual color table but favoring broad areas of color and the preservation of web colors This color table usually produces images with the greatest color integrity Se...

Страница 673: ...Black or Other to use the color picker Note The Foreground Color andBackground Color options are only available in Photoshop Examples of transparency and matting A Original image B Transparency select...

Страница 674: ...select Transparency and select None from the Matte menu PNG 24 To save an image with multilevel transparency up to 256 levels select Transparency The Matte option is disabled since multilevel transpar...

Страница 675: ...ck in the preview with the Save For Web Devices Eyedropper tool Shift click to select additional colors To deselect all colors choose Deselect All Colors from the Color Tablepalette menu Shift a color...

Страница 676: ...the following Click the Lock button Choose Lock Unlock Selected Colors from the Color Table palette menu The white square disappears from the color swatch Delete selected colors You can delete selecte...

Страница 677: ...quare pattern to determine the value of pixels Noise Applies a random pattern similar to the Diffusion dithering but without diffusing the pattern across adjacent pixels No seams appear with the Noise...

Страница 678: ...and transparency but it doesn t support clipping masks symbols or SVG filter effects For additional information on SVG profiles see the SVG specification on the World Wide Web Consortium W3C website...

Страница 679: ...cessors UTF 8 is an 8 bit format UTF 16 is a 16 bit format ISO 8859 1 and UTF 16 encoding don t preserve file metadata Optimize For Adobe SVG Viewer Optimizes images for Adobe SVG Viewer More Help top...

Страница 680: ...hese recommended resources online Streamlined 3d controls Lynda com May 7 2012 video tutorial Expand creative possibilities into another dimension New 3D reflections and dragable shadows Lynda com May...

Страница 681: ...ns resuming the rendering will be applied to the selections Resuming a rendering also works even after saving your document as a PSD Cross Section now works with reflective surfaces and other surface...

Страница 682: ...t and point types and adjust color intensity and shadows Move tool consolidates object and camera adjustments The Move tool lets you adjust the placement of objects and camera In the options bar choos...

Страница 683: ...ayer from File The imported object is placed on the ground plane you defined Make paths from 3D layers Choose 3D Make Work Path from 3D Layer to convert the current rendering into a Work Path This com...

Страница 684: ...rial can use up to nine different texture map types to define its overall appearance See 3D Materials settings Types include Infinite Spot Point lights as well as Image based lights that wrap around a...

Страница 685: ...move the camera view while leaving the position of the 3D object fixed For tips about each 3D tool choose Panel Options from the Info panel menu and select Show Tool Hints Click a tool then move the...

Страница 686: ...be enabled to display the 3D Axis See About GPU and OpenGL Show or hide the 3D Axis Choose View Show 3D Axis Minimize restore move or resize the 3D Axis 1 Move the pointer over the 3D Axis to display...

Страница 687: ...g an axis drag one of the colored transform cubes either toward or away from the center cube To constrain movement to an object plane move the mouse pointer into the area where two axes intersect near...

Страница 688: ...The bottom section of the panel shows settings and options for the 3D component selected in the top section 3D panel displaying Scene options A Display Scene Meshes Materials or Lights options B Rende...

Страница 689: ...the left of a mesh icon View the ground plane The ground plane is a grid that reflects the position of the ground relative to the 3D model To view the ground plane click the Toggle icon at the bottom...

Страница 690: ...p Extended Select to create a planar cross section that can intersect the model at an angle you choose Allows you to slice through a model and view interior content See View cross sections View cross...

Страница 691: ...the selected mesh casts shadows on other mesh surfaces Hides the mesh but displays any shadows on its surface Controls the softness of shadows cast by the selected mesh The setting is helpful when ble...

Страница 692: ...mplete opacity and black values create complete transparency Creates bumps in the material surface without altering the underlying mesh A bump map is a grayscale image in which lighter values create r...

Страница 693: ...ctive surfaces This color interacts with the Global Ambient Color for the entire scene See 3D Scene settings Photoshop Extended Sets the refractive index when scene Quality is set to Ray Traced and th...

Страница 694: ...xt to the texture map type 2 Choose New Texture 3 Enter the name dimensions resolution and color mode for the new map then click OK To match the aspect ratio of an existing texture map view its dimens...

Страница 695: ...rnally referenced by the 3D file choose Undo or Step Backward to restore a deleted texture Edit texture properties A texture map is applied to a particular surface area of the model depending on its U...

Страница 696: ...ject is closer than Inner limit light is full strength When an object is further that Outer limit light is at zero strength At intermediate distances light attenuates linearly from full strength to ze...

Страница 697: ...hts To store groups of lights for later use save them as a preset To include the preset in other projects either add to or replace the existing lights From the 3D panel menu select any of the followin...

Страница 698: ...frame rendering choose the Solid Wireframe preset To view a model as a simple box reflecting its outermost dimensions choose a Bounding Box preset 1 At the top of the 3D panel click the Scene button 2...

Страница 699: ...l depth Displays paintable regions as white oversampled regions in red and undersampled regions in blue See Identify paintable areas When Face Style is set to Unlit Texture specifies the texture map S...

Страница 700: ...render can be time consuming depending on the model lighting and maps in your 3D scene 1 Make any necessary adjustments to your model including lighting and shadow effects You don t need to change An...

Страница 701: ...ptional If exporting to U3D format choose an encoding option ECMA 1 is compatible with Acrobat 7 0 ECMA 3 is compatible with Acrobat 8 0 and later and provides some mesh compression 4 Click OK to expo...

Страница 702: ...ale with minimal effect in the extreme shadows With 32 bit images you can also access the Exposure slider at the bottom of the image window Darkens the shadows and midtones with minimal effect on the...

Страница 703: ...k path 2 Choose 3D Repouss then choose the item that reflects your selection in step 1 3 Set the following options Available along the upper left of the dialog box these tools function like 3D object...

Страница 704: ...osed paths exist the resulting meshes can create highly complex 3D scenes that are difficult to edit 1 Select a text layer layer mask or work path to which you previously applied repouss 2 Choose 3D R...

Страница 705: ...e an internal constraint 1 Select a 3D repouss layer that includes an internal constraint 2 Choose 3D Repouss Edit In Repouss 3 In the Internal Constraints section click Delete To reapply a deleted co...

Страница 706: ...ng a panoramic image as your 2D input This option converts a complete 360 x 180 degree spherical panorama to a 3D layer Once converted to a 3D object you can paint areas of the panorama that are typic...

Страница 707: ...to move the model or 3D camera over time Photoshop can tween frames between position or camera movements to create smooth motion effects 3D render settings Change render modes with the ability to twee...

Страница 708: ...he second section of the Tools panel such as the Paint Bucket Smudge Dodge Burn or Blur tools While painting after completing a stroke you can view the effect of the painting on the texture map itself...

Страница 709: ...ly to the model is different from directly painting on a 2D texture map What appears to be a small brush on the model may in fact be much larger in relation to the texture depending on the resolution...

Страница 710: ...lected See 3D Materials settings Photoshop Extended To edit 3D textures in Photoshop do either of the following Edit a texture in 2D format The texture opens as a Smart Object in a separate document w...

Страница 711: ...final render Reparameterize a texture map Occasionally you may open a 3D model whose textures are poorly mapped to the underlying model mesh Poor texture mapping can produce obvious distortions in th...

Страница 712: ...rted to a 3D plane containing nine identical tiles of the original content Image dimensions remain the same 3 Edit the tiled texture with painting tools filters or other techniques Changes you make to...

Страница 713: ...ly embedded in the other model after merging 3D layers After merging two 3D models all meshes and materials from each 3D file are contained in the target file and appear in the 3D panel In the Meshes...

Страница 714: ...mart Object Photoshop Extended Converting a 3D layer to a Smart Object allows you to retain the 3D information contained in the 3D layer After converting you can apply transforms or other adjustments...

Страница 715: ...or vertically Alt click Windows or Option click Mac OS to remove a marker The total count is updated Click Clear in the options bar to reset the count for the currently selected count group to 0 Note...

Страница 716: ...Analysis Record Measurements or click Record Measurements in the Measurement Log If this option isn t available select a tool other than the Count tool Photoshop counts the selection areas and enters...

Страница 717: ...h scripting see Scripting Open a DICOM file Photoshop Extended Before you open a DICOM file you can specify how DICOM frames are opened as layers in a grid or as a 3D volume and set options in the DIC...

Страница 718: ...different render modes 1 Select the 3D layer containing the DICOM volume in the Layers panel 2 Choose Window 3D to open the 3D panel 3 From the Preset menu in the lower section of the 3D panel select...

Страница 719: ...me and study description Series data Includes series number modality series date and time and series description Equipment data Includes the equipment institution and manufacturer Image data Includes...

Страница 720: ...them to other images in the set 1 Combine the separate images into one multi layered image See Duplicate layers Note An image stack must contain at least two layers You can also combine images using a...

Страница 721: ...nsparent pixels 1 Remove stack rendering Choose Layers Smart Objects Stack Mode None to remove any rendering from an image stack and convert it back to a regular Smart Object Edit an image stack Becau...

Страница 722: ...Legal Notices Online Privacy Policy...

Страница 723: ...d Use the Ruler tool to set the measurement scale for a document You can create measurement scale presets for frequently used measurement scales Presets are added to the Analysis Set Measurement Scale...

Страница 724: ...he caption or change text size font or color Add or replace scale markers You can place multiple scale markers in a document or replace existing markers Note Additional scale markers are placed in the...

Страница 725: ...r You can repeat steps 2 through 6 for a variety of different selections in the same or multiple documents The Document column in the Measurement Log reflects the source of the measurement data Measur...

Страница 726: ...surement Log Photoshop Extended When you measure an object the Measurement Log panel records the measurement data Each row in the log represents a measurement set columns represent the data points in...

Страница 727: ...nt Log options menu Click the Delete icon at the top of the panel Right click in a row or column header then select Delete from the pop up menu Export Measurement Log data You can export data from the...

Страница 728: ...er must be installed In Windows install Microsoft Developer Studio In Mac OS install XCode For more information see the MATLAB Photoshop Read Me in the Photoshop application folder Note In Windows use...

Страница 729: ...H The W and H values use the current units set in the Units Rulers option in the Photoshop Preferences dialog box Other document attributes are set to their default values Note Enter undefined as a s...

Страница 730: ...Color Management...

Страница 731: ...dia newsprint paper reproduces a smaller gamut than magazine quality paper and other natural variations such as manufacturing differences in monitors or monitor age Color gamuts of various devices and...

Страница 732: ...ually be used both in print and online Print color correctly to an unknown color output device for example you could store a document online for consistently reproducible on demand color printing anyw...

Страница 733: ...synchronized in a central location through Adobe Bridge If you decide to change the default settings easy to use presets let you configure Adobe color management to match common output conditions You...

Страница 734: ...r managing documents for online viewing Synchronize color settings across Adobe applications If you use Adobe Creative Suite you can use Adobe Bridge to automatically synchronize color settings across...

Страница 735: ...any color you apply or create within a color managed Adobe application automatically uses a color profile that corresponds to the document If you switch color modes the color management system uses th...

Страница 736: ...model For example if Adobe RGB 1998 is the current RGB working space profile each new RGB document that you create will use colors within the Adobe RGB 1998 gamut Working spaces also determine the ap...

Страница 737: ...r imported color data For example when opening a document with a missing color profile you can choose to assign the current working space profile or a different profile When opening a document with a...

Страница 738: ...t rendering intents In general it is best to use the default rendering intent for the selected color setting which has been tested by Adobe Systems to meet industry standards For example if you choose...

Страница 739: ......

Страница 740: ...evice is capable of capturing or scanning If your digital camera offers a choice of profiles Adobe recommends that you select Adobe RGB Otherwise use sRGB which is the default for most cameras Advance...

Страница 741: ...ors use to emit light Different phosphors have different color characteristics White point The color and intensity of the brightest white the monitor can reproduce Calibrate and profile your monitor W...

Страница 742: ...ile for a document There are very few situations that require you to change the color profile for a document This is because your application automatically assigns the color profile based on the setti...

Страница 743: ...rs to another profile Photoshop 1 Choose Edit Convert To Profile 2 Under Destination Space choose the color profile to which you want to convert the document s colors The document will be converted to...

Страница 744: ...anagement policy Make sure that your RGB working space is set to sRGB In Photoshop and InDesign you can also manually convert the colors to sRGB using the Edit Convert To Profile command Note In InDes...

Страница 745: ...a PostScript printer you can take advantage of PostScript color management PostScript color management makes it possible to perform color composite output or color separations at the raster image proc...

Страница 746: ...n general you have the following choices for handling colors when creating PDFs PDF X 3 Does not convert colors Use this method when creating a document that will be printed or displayed on various or...

Страница 747: ...o be reseparated For example pure CMYK black objects may be reseparated as rich black For more information on color management options for printing and saving PDFs search in Help Preparing imported gr...

Страница 748: ......

Страница 749: ...of setup for a specific output condition This option is recommended for the most accurate preview of your final printed piece 2 Choose View Proof Colors to toggle the soft proof display on and off Whe...

Страница 750: ...l countries have guidelines that require CUD compliant graphics in public spaces The most common types of color blindness are protanopia reduced sensitivity to red and deuteranopia reduced sensitivity...

Страница 751: ...int Production Output Preview 2 Choose the color profile of a specific output device from the Simulation Profile menu 3 Choose a soft proof option Simulate Black Ink Simulates the dark gray you really...

Отзывы: