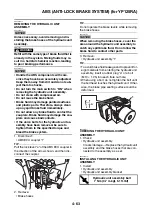
FRONT FORK
4-77
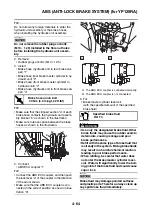
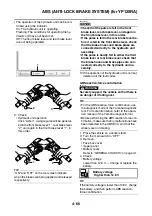
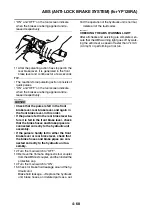
EAS23010
CHECKING THE FRONT FORK LEGS
The following procedure applies to both of the
front fork legs.
1. Check:
• Inner tube
• Outer tube
Bends/damage/scratches
→
Replace.
WARNING
EWA13650
Do not attempt to straighten a bent inner
tube as this may dangerously weaken it.
2. Measure:
• Spring free length “a”
Out of specification
→
Replace.
3. Check:
• Damper rod
Damage/wear
→
Replace.
Obstruction
→
Blow out all of the oil passag-
es with compressed air.
• Oil flow stopper
Damage
→
Replace.
NOTICE
ECA37P1032
When disassembling and assembling the
front fork leg, do not allow any foreign mate-
rial to enter the front fork.
EAS23030
ASSEMBLING THE FRONT FORK LEGS
The following procedure applies to both of the
front fork legs.
WARNING
EWA13660
• Make sure the oil levels in both front fork
legs are equal.
• Uneven oil levels can result in poor han-
dling and a loss of stability.
TIP
• When assembling the front fork leg, be sure to
replace the following parts:
–Oil seal
–Dust seal
–Clip
• Before assembling the front fork leg, make
sure all of the components are clean.
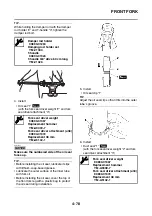
1. Install:
• Damper rod “1”
NOTICE
ECA37P1033
Allow the damper rod to slide slowly down
the inner tube “2” until it protrudes from the
bottom of the inner tube. Be careful not to
damage the inner tube.
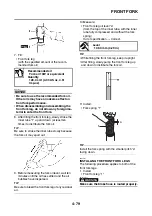
2. Lubricate:
• Inner tube’s outer surface
3. Tighten:
• Damper rod bolt “1”
Fork spring free length
307.1 mm (12.09 in)
Limit
301.0 mm (11.85 in)
3
2
1
Recommended oil
Fork oil 10W or equivalent
T
R
.
.
Damper rod bolt
30 Nm (3.0 m·kgf, 22 ft·lbf)
LOCTITE®
1
2
Summary of Contents for MBK XMAX 2014
Page 1: ...2014 SERVICE MANUAL YP125R YP125RA 2DM F8197 E0 ...
Page 6: ......
Page 8: ......
Page 64: ...TIGHTENING TORQUES 2 17 Muffler tightening sequence 1 2 3 ...
Page 72: ...LUBRICATION SYSTEM DIAGRAMS 2 25 EAS2DM1116 LUBRICATION SYSTEM DIAGRAMS 1 2 3 4 5 3 ...
Page 78: ...CABLE ROUTING 2 31 Steering head front view 1 2 3 4 5 6 8 8 A 7 7 ...
Page 80: ...CABLE ROUTING 2 33 Front brake left side view for YP125R 1 2 2 1 1 2 2 D E A B C ...
Page 82: ...CABLE ROUTING 2 35 Front brake left side view for YP125RA 2 1 1 2 1 2 2 A B D E C ...
Page 92: ...CABLE ROUTING 2 45 Frame right side view 3 2 4 1 2 3 A B 6 5 3 A B 3 3 2 3 3 A A B A B B 3 ...
Page 94: ...CABLE ROUTING 2 47 Engine right side view 6 6 6 6 C D C D D C 10 B 9 5 6 1 2 8 3 4 5 6 7 A ...
Page 98: ...CABLE ROUTING 2 51 Frame left side view C D C D 2 1 E 1 2 D C 6 1 4 5 3 2 1 7 3 2 1 A B ...
Page 100: ...CABLE ROUTING 2 53 Engine left side view 1 1 1 1 1 2 3 4 5 6 7 8 9 7 7 A B A B A B 1 ...
Page 106: ...CABLE ROUTING 2 59 Rear brake right side view 2 2 2 2 2 2 1 1 2 3 A B C 3 ...
Page 110: ...CABLE ROUTING 2 63 ...
Page 228: ...REAR SHOCK ABSORBER ASSEMBLIES AND SWINGARM 4 89 ...
Page 231: ......
Page 291: ...CRANKSHAFT 5 60 a 1 ...
Page 292: ...CRANKSHAFT 5 61 ...
Page 302: ...WATER PUMP 6 9 ...
Page 313: ......
Page 331: ...CHARGING SYSTEM 8 18 ...
Page 349: ...COOLING SYSTEM 8 36 ...
Page 391: ...FUEL PUMP SYSTEM 8 78 ...
Page 400: ...IMMOBILIZER SYSTEM 8 87 a Light on b Light off ...
Page 401: ...IMMOBILIZER SYSTEM 8 88 ...
Page 405: ...ABS ANTI LOCK BRAKE SYSTEM for YP125RA 8 92 ...
Page 439: ...ABS ANTI LOCK BRAKE SYSTEM for YP125RA 8 126 ...
Page 464: ...ELECTRICAL COMPONENTS 8 151 ...
Page 476: ......
Page 477: ......
Page 478: ......

