6C13G11
7-28
1
2
3
4
5
6
7
8
9
WARNING
After tilting up the outboard motor, be
sure to support it with the tilt stop lever.
Otherwise, the outboard motor could sud-
denly lower if the power trim and tilt unit
should lose fluid pressure.
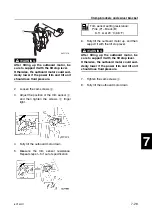
2.
Loosen the cam screws
2
.
3.
Adjust the position of the trim sensor
3
,
and then tighten the screws
2
finger
tight.
4.
Fully tilt the outboard motor down.
5.
Measure the trim sensor resistance.
Repeat steps 1–5 if out of specification.
6.
Fully tilt the outboard motor up, and then
support it with the tilt stop lever.
WARNING
After tilting up the outboard motor, be
sure to support it with the tilt stop lever.
Otherwise, the outboard motor could sud-
denly lower if the power trim and tilt unit
should lose fluid pressure.
7.
Tighten the cam screws
2
.
8.
Fully tilt the outboard motor down.
1
S6C17370
Trim sensor setting resistance:
Pink (P) – Black (B)
9–11
Ω
at 20 °C (68 °F)
Summary of Contents for F50F
Page 1: ...F50F FT50G F60C FT60D SERVICE MANUAL 6C1 28197 3G 11 290551 ...
Page 4: ......
Page 48: ...SPEC Specifications 2 25 6C13G11 MEMO ...
Page 190: ...LOWR Lower unit 6 47 6C13G11 Shimming FT50 FT60 6 ...
Page 195: ...6C13G11 6 52 1 2 3 4 5 6 7 8 9 MEMO Backlash FT50 FT60 ...
Page 221: ...6C13G11 7 24 1 2 3 4 5 6 7 8 9 Steering arm ...
Page 249: ...6C13G11 7 52 1 2 3 4 5 6 7 8 9 MEMO Power trim and tilt electrical system ...
Page 272: ...ELEC Electrical systems 8 21 6C13G11 MEMO ...
Page 301: ...6C13G11 i 5 1 2 3 4 5 6 7 8 9 Index MEMO ...
Page 303: ......
Page 304: ...YAMAHA MOTOR CO LTD Printed in the Netherlands Jul 2004 1 2 1 CR E_2 ...


