background image

User Guide

7-18

Maintenance

Xerox 700 Digital Color Press

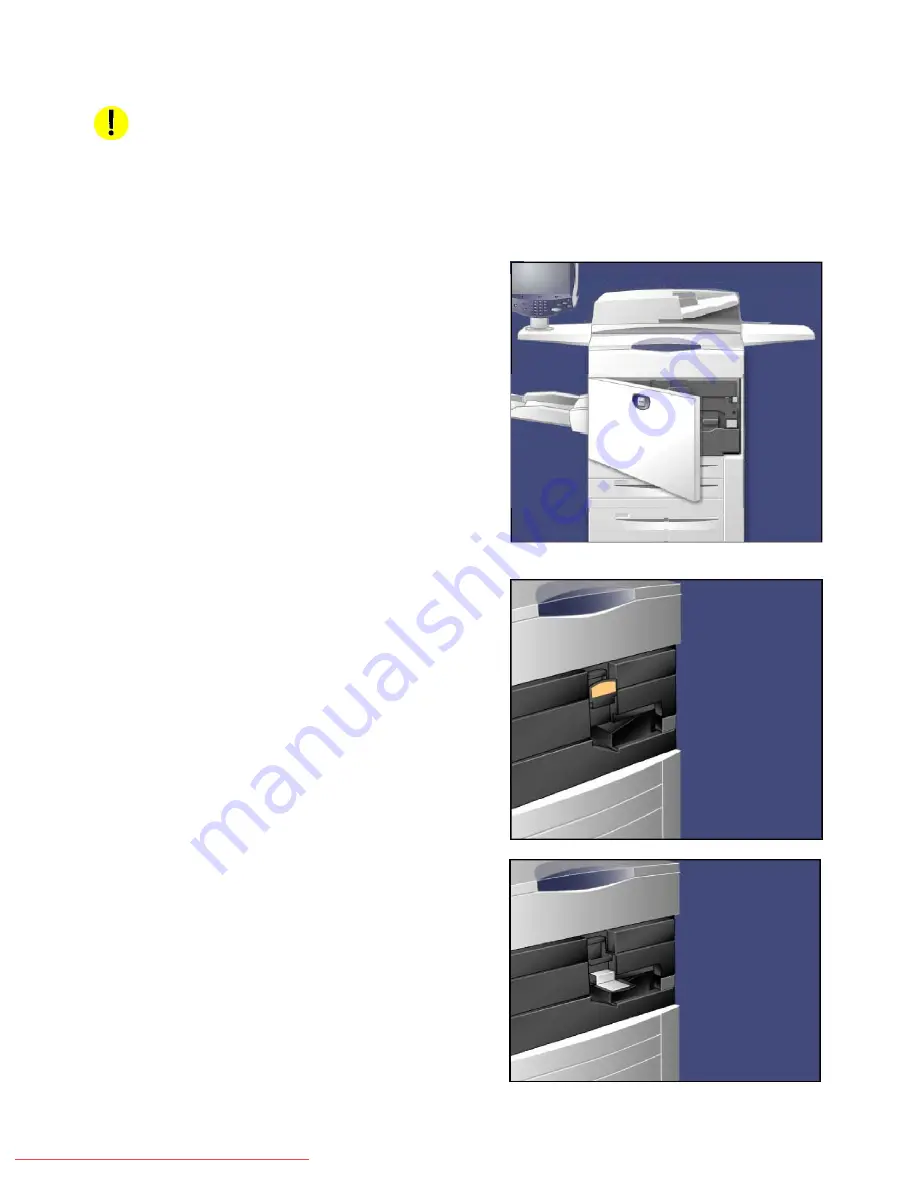
Pull down the R1-R4 handle.


Raise the Release Handle.


Make sure the machine has stopped, and open the Front 
door.


CAUTION:
Do not expose this item to direct sunlight or strong light from indoor fluorescent lighting. Image quality may 
deteriorate when these are exposed to light for more than two minutes.

2.

3.

1.

Downloaded From ManualsPrinter.com Manuals

Summary of Contents for Digital Color Press 700

Page 1: ...Xerox 700 Digital Color Press User Guide Version 2 0 May 2009 Downloaded From ManualsPrinter com Manuals ...

Page 2: ...here of connectivity design are trademarks of Xerox Corporation in the United States and or other countries Changes are periodically made to this document Changes technical inaccuracies and typographic errors will be corrected in subsequent editions Downloaded From ManualsPrinter com Manuals ...

Page 3: ...edia 3 1 Storing paper stock 3 1 Handling paper stock 3 2 Stock and tray selection 3 2 Paper trays 3 3 Tray 1 Tray 2 and Tray 3 3 3 Bypass Tray Tray 5 3 4 High Capacity Feeder 3 5 Oversized High Capacity Feeder 3 6 Tray 8 Post Process Inserter also called Interposer 3 7 Loading Paper and Media 3 8 Loading paper trays 1 2 and 3 3 8 Loading the Bypass Tray 3 11 Loading the High Capacity Feeder 3 13 ...

Page 4: ...15 Color Balance 4 17 Color Shift 4 17 Layout Adjustment 4 18 Book Copying 4 18 2 Sided Book Copying 4 19 Original Size 4 20 Edge Erase 4 21 Image Shift 4 22 Image Rotation 4 24 Invert Image 4 25 Original Orientation 4 26 Output Format 4 27 Booklet Creation 4 27 Covers 4 29 Page Layout 4 30 Multiple Up 4 30 Repeat Image 4 31 Tranparency Options 4 33 Poster 4 35 ID Card Copying 4 36 Annotation 4 37...

Page 5: ...Replacing the Toner Cartridges 7 13 Replacing the Fuser 7 14 Replacing the Charge Corotron 7 17 Replacing the Waste Toner Container 7 21 Emptying the Punch Scrap Container 7 23 Emptying the Staple Waste Container 7 24 8 Problem solving 8 1 Jam Clearance 8 1 Paper Jams 8 1 Document Feeder 8 2 Transfer Module and Fuser Jam Clearance 8 4 Tray 1 3 Jam Clerance 8 6 Bypass Tray Tray 5 Jam Clearance 8 7 ...

Page 6: ... 10 2 Auto Decurler 10 3 Preset Decurler settings 10 3 Manual Decurler 10 3 Jam clearance 10 4 Interface Module jams 10 4 Basic troublshooting 10 4 Fault codes 10 5 Specifications 10 6 Electrical 10 6 Temperature and humidity 10 6 High Capacity Stacker HCS 10 7 Overview 10 7 Identifying the components 10 7 Control Panel 10 8 HCS trays 10 9 Top Tray 10 9 Sample Print feature 10 9 Unloading the Stac...

Page 7: ... at one time using the Document Handler Documents from 216 mm x 140 mm 8 5 x 5 5 in to A3 11 x 17 in can be accommodated Document Handler Document Glass This main area is located under the Document Handler and is used for scanning and copying documents Documents should be placed face down on the glass and aligned with the tip of the registration arrow in the top left corner The document glass can ...

Page 8: ...s access to the Services screen where different features copy scan etc can be viewed and programmed Access to the All Services button is also available from the services screen This button is located in the top right of the touch screen Job Status Displays job progress information on the touch screen Log In Out Provides password protected access to the System Administration menu used to adjust the...

Page 9: ...creen is displayed Clear All If pressed once resets the default settings and displays the first screen for the current pathway If pressed twice resets all the features to their machine default settings Stop Temporarily stops the current job Follow the message to cancel or resume your job Start Starts the job Interrupt Temporarily stops the current copy job to allow a priority job to be run 6 Downl...

Page 10: ... 140 mm to 13 x 19 2 in 330 x 488 mm and has a capacity of approximately 250 sheets of 20 lb 75 gsm bond paper or a maximum stack height of 0 4 in 10 16 mm The tray accommodates paper of weights between 64 300 gsm 18 lb bond 80 lb cover Stock can be loaded either long or short edge feed portrait or landscape When lowered the Bypass Tray can be extended to support longer length stock 2 1 Finishing ...

Page 11: ... the new cartridges so you do not have to wait for a service call Toner Cartridges The Toner Cartridges can be loaded while the machine is running Supplied with the toner cartridge is the waste toner container Fuser The fuser will provide approximately 200 000 prints or copies Charge Corotron The machine display and this documentation will enable you to successfully install the new Charge Corotron...

Page 12: ...High Capacity Feeder HCF Tray 6 Information on the HCF Tray 6 can be found ithroughout this user guide Refer to the table of contents for specific page locations 1 drawer Oversized High Capacity Feeder OHCF Tray 6 Information on the OHCF can be found in this user guide Refer to the table of contents for specific page locations The High Capacity Feeder HCF provides a 2000 sheet 8 5 x 11 in A4 paper...

Page 13: ...zed High Capacity Feeder Information on the OHCF can be found in this user guide Refer to the table of contents for specific page locations The 2 drawer OHCF provides an alternative to the HCF The OHCF feeds oversized stock up to 13 x 19 in 330 x 488 mm paper Each drawer holds 2000 sheets Downloaded From ManualsPrinter com Manuals ...

Page 14: ...rovides a wide range of finishing options The Right Top Tray is used for stacked output and can receive up to 500 sheets of paper The Stacker Tray is used for offset and or stapled output and can hold up to 3000 sheets Both trays can be used for hole punched output optional This output device provides a wide range of finishing options The Right Top Tray is used for stacked output and can receive u...

Page 15: ...ce Module IM acts as a communication device and paper path between the printer and the Light Production C Finisher 1 3 4 2 5 6 2 3 4 5 6 Tray 8 Post Process Inserter is standard on this finisher and is used to load paper that will be used as separators and covers Tray 8 holds a maximum of 200 sheets The Top Tray is used for stacked output and can receive up to 500 sheets of 20 lb 80 gsm paper The ...

Page 16: ...a communication device and paper path between the printer and the HCS Note The SquareFold Trimmer Module is an optional finishing device that is used in conjunction with a finishing device that contains a booklet maker The booklet is assembled and stapled in the booklet area of the finisher therefore the booklet enters the SquareFold Trimmer Module already assembled The SquareFold Trimmer Module R...

Page 17: ...link The required Interface Module information is found in the Accessories chapter of this user guide Note The GBC AdvancedPunch is shown here with the required Interface Module and with the optional Light Production C Finisher GBC AdvancedPunch The GBC AdvancedPunch provides another level of finishing options to your output by allowing you to punch holes in 8 5 x 11 in A4 documents which support ...

Page 18: ... will be available before other functions e g printing Press the power switch to turn your machine off If the Power Save option is selected the machine will immediately enter low power mode If there are any jobs in the queue a second pop up screen is displayed Power on and off Power On Power Off Note To re activate the machine when in this mode touch a button on the touch screen or the Power Save ...

Page 19: ...oftware 0 210 0 Website For system support user help and service support go to www xerox com and click on the Contact Us link for specific contact information telephone numbers in your area The serial number can be located from the touch screen as follows Select the Machine Status button on the Control Panel The machine serial number is displayed You can also open the front doors of the machine to...

Page 20: ...209 1601 Total Impressions Black Impressions Counter Count The Billing Meters information is shown here Customers can view the various billing meters and machine serial number for tracking purposes The Billing Meters feature provides access to machine usage and billing information The meters vary depending on your machine configuration and setup To access the Billing Meters Touch the Billing Infor...

Page 21: ...o not stack more than five reams on top of each other It is important for optimum printing that paper stock is storedcorrectly Take note of the following when storing paper stock The User Interface UI screens shown in this guide may or may not reflect the screens displayed on your copier printer The UI screens vary from system to system and from marketplace to marketplace Therefore the screens pro...

Page 22: ...u Co lo r 700 N e t w o r k S c a n n i n g H o m e W e b A p p l i c a t i o n s Close Paper Supply Paper Tray Full Paper Size Paper Type Paper Weight Tray 1 Tray 2 Auto Paper Select Tray 5 Tray 3 100 100 100 100 Plain 8 5x11 in 8 5x11 in 8 5x11 in 8 5x11 in Plain Plain Plain Heavyweight 1 Heavyweight 1 Heavyweight 1 Heavyweight 1 Handling paper stock Stock and tray selection A user has the optio...

Page 23: ...rays Trays 1 2 and 3 Bypass Tray Optional High Capacity Feeder Optional Oversized High Capacity Feeder 1 or 2 drawer Trays 1 2 and 3 are identical Each tray has a capacity of 550 sheets of 20 lb 75 gsm paper The trays are pulled out by the operator for loading The trays accommodate paper from 18 lb 64 gsm bond to 110 lb 300 gsm cover and are fully adjustable for all stock sizes in the range 5 5 x ...

Page 24: ...ock in a range of sizes between 4 0 x 6 0 in 101 6 x 152 4 mm and 13 x 19 2 in SRA3 330 x 488 mm and has a capacity of approximately 250 sheets of 20 lb 75 gsm paper or a maximum stack height of 0 4 in 10 16 mm Hole punched paper should be loaded with the holes on the leading right edge Tabbed stock should be loaded with the tabs on the trailing left edge The Bypass Tray is only 13 in 330 2 mm wid...

Page 25: ...nd type of stock Your machine also alerts you if the High Capacity Feeder is selected for a print job where the stock selected does not match the stock currently loaded It also warns you if the Feeder runs out of stock during a job The optional High Capacity Feeder is primarily intended for use as a large quantity feeder and accommodates 8 5 x 11 in A4 Long Edge Feed LEF stock This feature may be ...

Page 26: ...hange or confirm the type and size of the stock The tray may not be ready for use until you change or confirm the size and type of stock Your machine also alerts you if the Oversized High Capacity Feeder is selected for a print job where the stock selected does not match the stock currently loaded It also warns you if the Feeder runs out of stock during a job This feature may be enabled disabled b...

Page 27: ...s finisher and is used to load paper that will be used as separators and covers Tray 8 holds a maximum of 200 sheets Paper size Maximum A3 11 17 in Minimum B5 LEF The machine does not copy or print on paper loaded in Tray 8 Capacity 200 sheets when using Xerox 20 lb 75 gsm paper Paper type 60 220 gsm Tray 8 Downloaded From ManualsPrinter com Manuals ...

Page 28: ...ure shows you how to load Tray 1 with 8 5 x 11 in A4 paper A paper jam may occur if a tray is opened while it is being used to feed stock CAUTION Slowly pull out the tray towards you until it stops The paper or media must not be loaded above the maximum fill line Note Load and align the edge of the paper against the left edge of the tray Downloaded From ManualsPrinter com Manuals ...

Page 29: ...u load into the paper tray The Auto Size Detect option allows standard sized paper loaded in the trays to be automatically detected by the machine If enabled by your System Administrator the Paper Tray settings screen may be displayed on the touch screen Select the Change Settings button if changes have been made to the paper tray otherwise press Confirm 8 7 9 To position the front and rear guides...

Page 30: ...factors If the System Default setting is not correcting curl then you can use one of the Decurler Paper Type A C settings For example If the System Default is not correcting curl select Decurler Paper Type A If Decurler Paper Type A is not correcting curl select Decurler Paper Type B If Decurler Paper Type B is not correcting curl select Decurler Paper Type C Save Tray 1 Cancel Paper Size 8 0 8 0 ...

Page 31: ... Tray a pop up window may appear asking you to change or confirm the type and size of the stock The tray will not be ready for use until you change or confirm the size and type of stock Alternatively you can change the paper size and paper type by accessing the Paper Tray Attributes screen from the System Administrator Menu Loading the Bypass Tray Move the front and rear guides to just touch the e...

Page 32: ...s allow you to select the paper type Heavyweight Transparency Tabs Hole Punched etc from a list of available paper types The Paper Size options allow you to specify the size of the paper you load into the paper tray If paper curl is a problem using one of the preset Decurler Paper Type A C Profile Settings usually eliminates the problem These profile settings cover a broad range of paper variables...

Page 33: ...screen Load and register the stack of paper or media against the right side of the tray Select the Change Settings button if changes have been made to the paper tray otherwise press Confirm Loading the High Capacity Feeder Fan the sheets before loading them into the tray Slowly pull out the tray towards you until it stops Move the paper guide to just touch the edges of the stack 1 2 3 4 6 5 The pa...

Page 34: ...The Paper Size options allow you to specify the size of the paper you load into the paper tray The Auto Size Detect option allows standard sized paper loaded in the trays to be automatically detected by the machine The Paper Type Paper Weight options allow you to select the paper type Heavyweight Transparency Tabs Hole Punched etc from a list of available paper types Select the Save button to cont...

Page 35: ... Administrator Tools Refer to the section entitled Common Service Settings Paper Tray Settings Custom Paper Settings for more information Note The lead edge blower is on at all times and produces heated air if one of the following selections are made Coated paper Transparencies or plain paper 29 lb 106 gsm or heavier The trail edge blower is on at all times and does not produce heated air The pape...

Page 36: ...paper tray The Auto Size Detect option allows standard sized paper loaded in the trays to be automatically detected by the machine The Paper Type Paper Weight options allow you to select the paper type Heavyweight Transparency Tabs Hole Punched etc from a list of available paper types Select the Save button to continue Select the Confirm button If enabled by your System Administrator the Paper Tra...

Page 37: ...ou cannot make copies using the Post Process Inserter media Remove any paper that remains loaded into the Inserter 2 Hold the center of the paper guides and slide them to the desired paper size 3 Load the paper aligning to the front side of the tray If the paper is preprinted load the paper with the printed side facing up and with the tab side to be fed first Downloaded From ManualsPrinter com Man...

Page 38: ...ge of the tab paper against the right edge of the tray with the side to be copied or printed on facing down Move the two paper guide levers while holding their grips so that they lightly contact the edges of the paper Hold the center of the paper guides and slide them to the desired paper size Place the tab paper With the side to be copied or printed facing up The bottom side to be fed first Light...

Page 39: ...nto Tray 8 Post Process Inserter 1 Hold the center of the paper guides and slide them to the desired paper size 2 If the paper is preprinted load the paper with the printed side facing up and with the tab side to be fed first Tabs Downloaded From ManualsPrinter com Manuals ...

Page 40: ...s and sizes of stock that can be fed in each tray Your machine can operate with a variety of paper such as plain recycled non tearing heavyweight and coated papers However coated papers are very susceptible to humidity Multifeeds are much more likely with humidity greater than 40 Environmental conditions may require that coated paper be fed one sheet at a time from Tray5 Bypass The following paper...

Page 41: ...ld not exceed 100 transparencies for Trays 1 3 However for the Bypass Tray do not load more than 50 transparencies in order to avoid possible jam problems Transparency stock is primarily used to create images that can be projected on to a screen for presentations Transparencies are made of polyester film coated with a chemical substance to make toner stick to it readily Clear transparencies allow ...

Page 42: ...n a detachable mail back portion or a sheet that is part of a bound document may be perforated along the inside edge for easy removal Papers with perforations can cause feeding and stacking problems if the perforations are not rolled enough to eliminate underside bulge Jams can also occur if a full length perforation line parallel to the paper s long side is closer than 3 inches to the leading edg...

Page 43: ...that the documents are in a good condition The document glass is used to scan only one original at a time and suitable for any type of document up to a maximum size of 11 x17 in A3 Place the document face down align with the top of the registration arrow near the upper left hand corner of the document glass Lower the document handler The User Interface UI screens shown in this guide may or may not...

Page 44: ...e Copy tab are the ones used most often They allow you to program the standard features for a copy job On touching the button for the required feature the button changes to blue If a More button is selected additional options for that feature become available Enter the Quantity On your machine the maximum copy quantity is 9999 Use the numeric keypad to enter the number of copies The number entered...

Page 45: ...sembly As a general rule load your documents face up in the same orientation as the copy paper However if this is not possible the machine will automatically rotate the image for you Loading documents Document Handler Document Handler Mixed size original The Document Handler can even feed documents containing different size pages However the top left corners of the original documents must be align...

Page 46: ...ixed Size Originals the machine will detect the size of the documents This means that you can either a Select Auto Reduce Enlarge and a specific copy paper size The image will be modified to fit the selected paper or b Select the 100 Reduce Enlarge ratio and Auto Paper Paper Supply The machine will automatically make copies that are the same size as the originals Document glass The document glass ...

Page 47: ...e t w o r k S c a n n i n g H o m e W e b A p p l i c a t i o n s On this screen you can select the Auto Detect option which enables automatic detection of scanned paper sizes Document glass Bound originals Bound originals can be placed on the document glass to make single sided or two sided copies The bound original should be placed face down and registered to the rear left corner of the document...

Page 48: ...n to use the Binding Edge Erase feature which deletes the shadow from your copies that is caused by the center binding When you have saved your selections apply a light pressure to the spine of the document and press the Start button Select the Save button to continue You can make 2 sided copies from 2 pages of a bound original This feature allows you to assign pages when making copies of a bound ...

Page 49: ...Sided Copying 1 2 Sided 2 2 Sided 2 1 Sided Cancel Rotate Side 2 a b a b 2 Sided Copying The machine provides options to make one or two sided copies from one or two sided originals using either the Document Handler or the document glass The two sided option enables you to select your output in book or calendar orientation In this section you will learn how to select the appropriate 2 Sided Copyin...

Page 50: ...enlarge feature provides a variety of reduction and enlargement options to adjust the size of the output image Originals can be enlarged or reduced by between 400 and 25 Various automatic and pre set selections are available to help you choose the most common reductions or enlargements while a custom setting enables you to select the ratio that suits your requirements In this section you will lear...

Page 51: ...k S c a n n i n g H o m e W e b A p p l i c a t i o n s 1 2 3 1 2 3 2 2 1 1 Paper Supply Reduce Enlarge Output Color Copy Output 100 Plain 100 Auto 64 78 129 More More Plain Plain Auto Detect Color Black and White More Dual Color Single Color Red Black Red 2 Sided Copying Original Type Lighten Darken Auto Paper Select Quantity Image Quality Layout Adjustment Output Format Job Assembly Copy Auto Pa...

Page 52: ...b A p p l i c a t i o n s Save Proportional Reduce Enlarge Independent X Y Calculator Cancel 100 Auto 141 25 25 50 64 70 78 94 Save Proportional Reduce Enlarge Independent X Y Calculator Cancel Auto Copy All X Y This button opens a new window to more reduce enlarge options All of the Proportional options will reduce or enlarge the image by the same ratio in both directions so that the image gets b...

Page 53: ...t Text Photo Auto selection of original type is determined by setting made by the System Administrator Maps Cancel Quantity 1 Image Quality Original Type The Original Type feature provides a convenient way to enhance the quality of your output based on the type of original images you are copying Select the Original Type button on the Image Quality tab Auto sets the output color of the General Sett...

Page 54: ...hoto Auto selection of original type is determined by setting made by the System Administrator Maps Cancel Quantity 1 Text is for use if your original contains only text or line art The result is sharper edges for the text and line art Photo is specifically designed to copy photographs or magazine pictures without any text or line drawings This option prevents faint reproduction of colors The Phot...

Page 55: ...ect Save so that you can program any other features you may require from the control panel Access the Image Options settings by selecting the Image Quality tab and the Image Options button Lighten Darken provides manual control to adjust the lightness or darkness of the scanned images Press the down scroll button to darken the scanned image from light originals such as pencil images Press the up s...

Page 56: ...ntrast Access the Image Enhancement settings by selecting the Image Quality tab and the Image Enhancement button Background Suppression prevents reproduction of unwanted shading from originals where the opposite side printing shows through The Auto Suppression option in the Background Suppression area of the screen automatically reduces or eliminates any background on the copies caused by colored ...

Page 57: ...ssion Cool Cancel Ready To Copy Quantity 1 Save Off Color Effects Lively Bright Warm Shadow Suppression Cool Cancel Color Effects When you choose one of the Color Effects options an entire group of associated image quality settings are adjusted to meet your required output If other image quality settings are changed after selecting a Color Effects option the Color Effects will be returned to the d...

Page 58: ...uppression Cool Cancel Ready To Copy Quantity 1 Save Off Color Effects Lively Bright Warm Shadow Suppression Cool Cancel The Shadow Suppression setting reduces or eliminates any background shadow caused by colored paper or newspaper originals The Warm setting produces colors that have a slightly low density with more dominant reds The Cool setting produces blue colors more clearly Downloaded From ...

Page 59: ...Original Color Copy Color M M M R Y R Y G C B G C B R Color Balance You can access the Color Balance button on the Image Quality tab Select the Color Balance button shown to continue The Color Balance feature allows you to adjust the balance between colors and the overall amount of color on the output copies You can adjust the levels of all four process colors Yellow Magenta Cyan and Black for the...

Page 60: ... p p l i c a t i o n s Layout Adjustment Book Copying Bound originals can be placed on the document glass to make single sided or two sided copies The bound original should be placed face down and registered to the rear left corner of the document glass Align the top of the bound original against the rear edge of the document glass Various options are available when copying from bound originals Se...

Page 61: ... a t i o n s 2 Sided Book Copying Bound originals can be placed on the document glass to make single sided or two sided copies The bound original should be placed face down and registered to the rear left corner of the document glass Align the top of the bound original against the rear edge of the document glass You can make 2 sided copies from 2 pages of a bound original This feature allows you t...

Page 62: ...our selections apply a light pressure to the spine of the document and press the Start button This completes the Document Glass Bound Originals topic The machine can detect the size of the document if it is a standard size If the document is not a standard size the machine will not know what size it is This does not matter if you select a specific reduction enlargement and also select a specific p...

Page 63: ... l i c a t i o n s When you select Mixed Size Originals the machine will detect the size of the documents This means that you can either 1 Select Auto Reduce Enlarge and a specific copy paper size The image will be modified to fit the selected paper or 2 Select the 100 Reduce Enlarge ratio and Auto Paper Paper Supply The machine will automatically make copies that are the same size as the original...

Page 64: ... Shift 2 Sided Book Copying Original Size Auto Detect Original Orientation Upright Images Invert Image Off None Off Off Normal Image All Services Positive Image C o p y DocuCol or 700 N e t w o r k S c a n n i n g H o m e W e b A p p l i c a t i o n s Individual Edges This option allows you to independently set the amount to be erased for each of the four edges of your copy The default is 0 1in an...

Page 65: ...Right Shift Down Available Auto Center automatically centers the scanned image on the output paper To work effectively the original should be smaller than the selected output stock or the image should be reduced Margin Shift allows you to independently set the shift for each side of your copied output This feature is often used to create a binding edge The Mirror Side 1 option enables the same set...

Page 66: ...es Positive Image C o p y DocuCol or 700 N e t w o r k S c a n n i n g H o m e W e b A p p l i c a t i o n s Image Rotation If the orientation of the paper loaded in the selected paper tray differs from that of the document that is scanned the Image Rotation option will automatically rotate the document image to match the orientation of the paper loaded in the paper tray The Image Rotation options...

Page 67: ...ervices Positive Image C o p y DocuCol or 700 N e t w o r k S c a n n i n g H o m e W e b A p p l i c a t i o n s On During Auto When Reduce Enlarge or Paper Supply is set to Auto this option causes the image of the original to be rotated to match the orientation of the paper in the selected paper tray Invert Image The Invert Image feature allows you to make copies with the left and right sides of...

Page 68: ...e left corner of the glass The Negative Image feature converts the black image areas in the original to white the white image areas to black and any dark gray image areas to light gray If the Output Color is set to Color then the complementary colors are reversed on the printed image This feature is useful for documents that have a substantial amount of dark background and or light text and images...

Page 69: ...old or Staple Divide Output Off Off Output Offset Stacking Booklet creation enables the production of booklets or multi page copies from 1 or 2 sided originals The machine will scan your originals and automatically reduce and arrange the images in the correct sequence on your selected copy paper so that a booklet is created when the copy set is folded in half The Booklet Creation options are acces...

Page 70: ...f On Save Cancel Original Input Covers Rotate Side 2 2 Sided Originals 1 Sided Originals Booklet Options Fold and Staple Booklet Fold Only Booklet Fold and Staple No Fold or Staple Divide Output Off Off Output Offset Stacking You have the option to choose from the Original Input selections 1 Sided Originals 2 Sided Originals Rotate Side 2 These features are accessed under the Original Input area o...

Page 71: ...Quantity Paper Tray Settings Covers No Covers Blank Covers Save Cancel Printed Back Cover Side 1 Printed Back Cover Side 2 No Covers Blank Covers Printed Back Cover Side 1 This feature adds covers to the copy sets Colored or heavyweight paper can be used as covers Printed Back Cover 2 Sided Printed Back Cover Side 2 Printed Back Cover 2 Sided Front Cover Back Cover Ready To Copy Quantity This feat...

Page 72: ...y To Copy C o p y Do cu Co lo r 700 N e t w o r k S c a n n i n g H o m e W e b A p p l i c a t i o n s First select the paper tray you want to use Multiple up is not available if the Auto paper supply option is selected The Multiple up options are accessed from the button on the Output Format tab Access the Multiple up feature by selecting the Output Format tab the Page Layout button then the Mul...

Page 73: ...number of images you want printed on each sheet from 2 Up to 8 Up on the Multiple Up screen You can also select the Reading Order options on this screen When you have made your selections you must select Save so that you can program any other features you may require from the control panel Select the Save button to continue The examples shown are typical output that can be produced when using the ...

Page 74: ...le Repeat When you select Auto Repeat the machine automatically sets the number of images per page according to the document size and paper size and then repeatedly copies the document image onto the paper Copies cannot be made when the document image is larger than the specified paper size When you select Variable Repeat you can specify the number of times to repeatedly copy the image along each ...

Page 75: ...f transparencies you can insert a divider between each transparency in order to make it easier to manage your presentation slides This option is reached from the Output Format tab on the touch screen Transparency Separators are not available if the Auto Paper Supply option is selected Select the Output Format Tab and then select the Transparency Options button When you select the No Separators opt...

Page 76: ... a blank sheet of paper between each printed transparency In addition a distribution set of copies will also be printed on the stock you specify using the Paper Supply Settings button Select the Transparency Set and Handouts button When you select the Transparency Set and Handouts option the transparencies will be produced without separators However a distribution set of copies will be printed on ...

Page 77: ...ers Off Transparency Options No Separators No Covers Tab Margin Shift Off Off Face Up Face Down Off ID Card Copying Off Watermark Poster Save Cancel Off Output Size Enlargement Note Be sure to touch the Save button after you have made your enlargement selection Note Poster The Poster feature allows you to create a large poster by pasting together copies spread over multiple sheets Copies are provi...

Page 78: ...nto one side of one sheet of paper without the need to reload the paper into the paper or bypass tray Follow the instructions below to complete the ID Card Copy process Lift the Document Feeder Cover and place the ID Card on the top left corner of the document glass Gently lower the cover Use the number keypad to enter the number of copies you require Press Start to begin scanning side 1 Lift the ...

Page 79: ...ding Covers Off Transparency Options No Separators No Covers Tab Margin Shift Off Off Face Up Face Down Off ID Card Copying Off Watermark Annotations Off Off Save Cancel Off Head to Top Head to Left Comment Date Stamp Page Numbers Off Bates Stamp Upright Images Original Orientation Format and Style Save Comment Off Comment Cancel The Annotation option allows you to add stamp date page number Bates...

Page 80: ...messages to be printed on the first page or all pages of your copied sets You can also change the position and appearance of the stamped message using the Print On Position and Detailed Settings buttons Press the Save button to continue Press the Date Stamp button to continue The Date Stamp screen is shown here Press the Date Stamp button to continue You can also make copies with a Date printed on...

Page 81: ... N Page 2 N Page 3 N Style Annotations Off Off Save Cancel Off Head to Top Head to Left Comment Date Stamp Page Numbers Off Bates Stamp Upright Images Original Orientation Format and Style Press the Page Number button to continue The Page Number screen is shown here Press the Page Numbers button to continue You can add an independent Page Number to one or many copied pages You can also change the ...

Page 82: ...Digits The Bates Stamping screen is shown here Press the On button to continue You can add an independent Bates Prefix Number to one or many copied pages You can also change the number of digits position appearance and size of the Bates Number using the Number of Digits Position and Stored Prefixes buttons Press the Save button to continue Downloaded From ManualsPrinter com Manuals ...

Page 83: ... On Cancel Control Number Off Date and Time Serial Number Stored Watermarks Off Watermark Effect Save Off On Cancel Control Number Serial Number Date and Time Stored Watermarks Off Start Number 1 Off Watermark Effect The Control Number opton allows you to input a Start Number that will be printed on each document set For example if you select 1 for the Start Number the number 1 will be printed on ...

Page 84: ... one page or many pages You can choose from the following text messages Copy Prohibited Copy Duplicate Press the Save button to continue Press the Date and Time button to continue Selecting the Date and Time option will cause the date and time to be printed on each copy Press the Serial Number button to continue Enabling this option allows you to make copies with the machine s Serial Number printe...

Page 85: ...Booklet Creation Page Layout Image Quality Layout Adjustment Output Format Job Assembly General Settings Off 1 Up Annotation Off Poster Folding Covers Off Transparency Options No Separators No Covers Tab Margin Shift Off Off Face Up Face Down Off ID Card Copying Off Watermark Save Tab Margin Shift Shift All Off Shift to Tab Cancel Tab Margin Shift The Tab Margin Shift option allows you to copy ima...

Page 86: ...hift to Tab Shift All Press the Shift to Tab button to continue The Shift to Tab optons are shown here This option will print the edge of the original document image onto the tab of the tabbed stock You can change the amount of shift required by using the Shift Value arrow keys on the touch screen Press the Shift All button to continue To determine how to load the tab stock into trays 1 2 3 or 5 s...

Page 87: ...ation Off Poster Folding Covers Off Transparency Options No Separators No Covers Tab Margin Shift Off Off Face Up Face Down Off ID Card Copying Off Watermark Output Orientation Save Cancel Auto Face Up Face Down The job will take longer to output when Face Up is selected Face Up Reverse Order Output Orientation Save Cancel Auto Face Up Face Down Face Up Reverse Order Face Up Down Output The Face U...

Page 88: ...electing the Face Down button causes all output to be delivered face down with the first page on the bottom of the output stack Selecting the Face Up Reverse Order button causes all output to be delivered face up with the last page on the top of the output stack This setting may not be available depending on how your system administrator configures the machine Downloaded From ManualsPrinter com Ma...

Page 89: ...age at a time Fold as a Set Cancel Collated Uncollated Copy Output Single fold Page to Fold C Fold Z Fold Z Fold Half Sheet Note Folding Depending on your finisher configuration you can access the Folding button on the Output Format tab Select the Folding button to continue The No Folding button disables all folding options Selecting the Single Fold option will give access to more features The Fol...

Page 90: ...ment of the job Copy Output Booklet Creation Off Off Covers Auto Annotations Separators Off No Separators Ready To Copy Quantity 1 Build Job Build Job Off Build Job On Save This feature scans and merges individual job segments with different features programmed Segments can consist of one or more originals Note That features which apply to the entire job such as Copy Output Booklet Creation and Co...

Page 91: ...handler or place the segment on the glass one page at a time Press the Start button on the keypad When the first segment has finished scanning the Copy Status screen will appear Remove the originals and press the Change Settings button Program the job requirements for the second segment of the job Load the second segment into the document handler or on the document glass and press the Start button...

Page 92: ...t Interrupt Stop Dial Pause Energy Saver Clear All When copying a large number of sets use the Sample Set feature to review a proof copy You can ensure that the proof copy is exactly what you expected before printing the remaining sets Sample Set Access the Sample Job feature from the Job Assembly tab Switch on Sample Set by selecting the Job Assembly tab and the Sample Job button Switch the sampl...

Page 93: ... of the job the sample set is printed The remainder of the job is held After the sample set is printed the machine will pause You will be able to change settings change quantities cancel the job or start the job If the sample set is acceptable select the Start button The programmed number of sets will be produced If the sample set is unacceptable select the Cancel button This completes the descrip...

Page 94: ...bine Original Sets feature allows you to copy sets of documents that cannot be loaded into the Document Handler at one time Combine Original Sets Select the Combine Original Sets button on the Job Assembly tab If you select the Off button the Last Original option will be highlighted on the copy screen when scanning is in process If you select the On button the Next Original option will be highligh...

Page 95: ...e Delete Outside Delete Inside Off Delete Outside Save Cancel Area 2 Area 3 Not Set Area 1 Not Set Not Set Delete Inside Both Sides Side 1 Only Side 2 Only Originals Area Settings Delete Outside Delete Inside The Delete Outside Delete Inside feature allows you to delete up to three image areas of an original document from your copied output You can access the Delete Outside Delete Inside feature f...

Page 96: ...tes of two diagonally opposite corners Clear Area 1 Use the Delete Outside Delete Inside Area screen to define each of the areas you want to use as targets for deletion To define an area enter the two coordinates x y within a range of 0 0 17 0 inches measuring from the top right corner of the document You can navigate from coordinate to coordinate by touching the Y1 Y2 X1 X2 buttons When you have ...

Page 97: ...on of the type of screens that may be seen on your particular system Network Scanning Remove any staples and paper clips from your documents and ensure that the documents are in a good condition Load the documents in the Document Handler long edge feed and in order 1 2 3 with page 1 face up on top Slide the document guide against the edges of the documents Touch the Services button on the Control ...

Page 98: ...ns the destination and other settings required for your scan job from the template list on the touch screen Contact your system administrator if none of the templates have been set up If you need to change the scan settings follow the instructions provided in your optional Network Controller documentation 4 Touch the Start button on the Control Panel 5 Downloaded From ManualsPrinter com Manuals ...

Page 99: ...mode used for example Copy or Print Report Machine Job Status Note The User Interface UI screens shown in this guide may or may not reflect the screens displayed on your copier printer The UI screens vary from system to system and from marketplace to marketplace Therefore the screens provided in this guide are a representation of the type of screens that may be seen on your particular system Job S...

Page 100: ...ueue and can be resumed Held The job has been temporarily stopped from printing The job remains in the print queue and will continue to proceed up the list as prior jobs are printed If a held job is at the top of the queue all subsequent jobs will continue to be processed and printed a held job does not hold up other jobs in the queue There are various reasons why a job might be held for example t...

Page 101: ...Lists On selecting the Job Status button the Active Jobs list is automatically displayed To view the Completed jobs on the machine select the Completed Jobs tab Select the Completed Jobs tab to continue The completed jobs are shown on the screen When you touch a job listed on this screen you can view detailed information about that job 1 2 To view the Secure Print jobs on the machine select the Se...

Page 102: ...bs Active Jobs Secure Print Jobs and More Completed Jobs Owner Status Name To view the Print Waiting jobs on the machine select the Print Waiting Jobs tab Select the Print Waiting Jobs tab to continue The Print Waiting jobs are shown on the screen When you touch a job listed on this screen you can view detailed information about that job 5 6 Downloaded From ManualsPrinter com Manuals ...

Page 103: ...l Machine Status Machine Information The Machine Information screen allow you to view details that apply specifically to your machine This topic shows you the various options available to you Machine Information Paper Tray Status Print Report List Overwrite Hard Disk Machine Configuration Software Version The Machine Information screen displays data needed for service calls and contact numbers Acc...

Page 104: ...e Version General Information Machine Serial Number xxxxxxxxxx Current System Software 0 210 0 Website The Machine Information screen provides you with the telephone number used to contact your local Xerox representative You can also view the Machine Serial Number on this screen Select the Machine Configuration button to continue 2 The Machine Configuration screen allows you to check the status an...

Page 105: ... tab Select the Paper Tray button on the Machine Status tab to view the paper loaded and the status of each of the paper trays Select the Paper Tray button 1 Information about each of the trays including the Bypass Tray is displayed The paper Size Type and Color are the attributes set when loading the trays 2 The Status column relates to the current status of the paper tray The different paper tra...

Page 106: ... Print Report Copy Reports Scan Reports Print Report List A variety of useful reports are available on the Print Report List screen Touch the Print Report List button 1 An example of a typical Print Report screen is shown here To begin navigating to the desired report simply touch the corresponding report button on the touch screen When the desired report is selected then press the Start button on...

Page 107: ...em Administrator Close Job Status Print Report Copy Reports Scan Reports Overwrite Hard Disk The Overwrite Hard Disk feature prevents the document image and registered data recorded on the hard disk from being illegally retrieved The number of overwrites is set by the System Administrator Access to this feature is via the Machine Status button on the control panel Select the Overwrite Hard Disk bu...

Page 108: ...essages Fault History Close Job Status Print Report Copy Reports Scan Reports Fault Logs The Faults tab allows access to the Error History Report which displays a list of errors that have or are currently occuring on your machine Access to the Faults tab is via the Machine Status button on the control panel Select the Machine Status button on the control panel and the Faults tab on the touch scree...

Page 109: ...artridge 75 Remaining Drum Cartridge 75 Remaining Waste Container OK Toner Remaining 100 100 100 100 100 0 0 0 0 0 Close Job Status Print Report Copy Reports Scan Reports Supplies View the status of the machine supplies to gain an indication of when the customer replaceable units need to be replaced Access to Supplies information is via the Machine Status button on the control panel Select the Mac...

Page 110: ...ssions Total Impressions Total Impressions Total Impressions 2000 1000 500 526 5568 The Billing Meters feature provides access to machine usage and billing information The meters vary depending on your machine configuration and setup Billing Meters To access the Billing Meters Select the Machine Status button on the Control Panel Touch the Billing Meter Information tab 1 The Billing Meters informa...

Page 111: ... in this guide may or may not reflect the screens displayed on your copier printer The UI screens vary from system to system and from marketplace to marketplace Therefore the screens provided in this guide are a representation of the type of screens that may be seen on your particular system Simple step by step instructions are provided here to help you to complete your maintenance task When order...

Page 112: ...3 USSG XE 6R01379 DMO 6R01375 WW Metered Cyan Toner Cartridge 1 box 6R01384 USSG XE 6R01380 DMO 6R01376 WW Metered Magenta Toner Cartridge 1 box 6R01385 USSG XE 6R01381 DMO 6R01377 WW Metered Yellow Toner Cartridge 1 box 6R01386 USSG XE 6R01372 DMO 6R01378 WW Metered Black Developer 1 5R00730 Cyan Developer 1 5R00731 Magenta Developer 1 5R00732 Yellow Developer 1 5R00733 Waste Toner Bottle 1 008R1...

Page 113: ...he covers or guards that are fastened with screws You cannot maintain or service any of the parts that are behind these covers and guards Do NOT attempt any maintenance procedure that is NOT specifically described in the documentation supplied with your machine CAUTION When cleaning your machine do NOT use organic or strong chemical solvents or aerosol cleaners Do NOT pour fluids directly onto any...

Page 114: ...installed and it is time to replace the staple cartridge a message appears on the touch screen When this message appears replace the staple cartridge with a new one Control Panel Touch Screen Trays and Document Handler Use a lightly dampened cloth to clean the Document Handler output trays paper trays and the outside areas of your machine Loading Staples Simple step by step instructions are provid...

Page 115: ...to the instructions contained in the new staple cartridge box 3 Insert the staple cartridge while gripping the orange lever until you hear it click into place Close the front cover of the finisher The use of staple cartridges not recommended by Xerox may impair quality and performance Use only staple cartridges recommended for the machine Light Production C Finisher 1 To gain access to the staple ...

Page 116: ...the machine 3 Remove the staple cartridge from the staple case 4 Insert a new staple cartridge into the staple case 5 Push the cartridge back to its original position 6 Push the cartridge down until it clicks into place 7 Close the right cover on the finisher Downloaded From ManualsPrinter com Manuals ...

Page 117: ...e an empty booklet staple cartridge from the Professional Finisher or Light Production C Finisher and replace it with a new booklet staple cartridge Loading Booklet Maker Staples 1 To gain access to the staple cartridge make sure the machine has stopped and open the Front Door 2 Press the levers R2 and R3 to the right and pull out of the unit 3 Hold the tabs of the booklet staple cartridge and the...

Page 118: ...le cartride Holding the tabs of the new booklet staple cartridge return the cartridge to the original position and gently push it until you hear it click into place 5 Return the unit to its original position and close the front door Downloaded From ManualsPrinter com Manuals ...

Page 119: ...er to Chapter 8 Problem Solving the section entitled Image Quality for the specific IQ problem and its related corrective actions Also refer to the section entitled Miscellaneous in the Hints and Tips section of Chapter 8 if the machine s UI is not displaying the appropriate information when a supply needs replenishing Note Replacing the Drum Cartridges CAUTION Do not expose drum cartridges to dir...

Page 120: ...ome drum cartridges may include a protective film Remove the the film on the drum cartridge if it is present CAUTION Do not touch or scratch the surface of the drum when you take it out from the bag CAUTION Do not expose drum cartridges to direct sunlight or strong light from indoor fluorescent lighting for more than two minutes Image quality may deteriorate when the drum cartridges are exposed to...

Page 121: ...move the old drum cartridge by holding the finger rings provided at the both ends of the drum cartridge and gently lifting up Place the new drum cartridge in the machine following the guides with the side marked front facing the front 7 8 9 Downloaded From ManualsPrinter com Manuals ...

Page 122: ... touch or scratch the surface of the drum Doing so may result in unsatisfactory printing Return the R1 R4 handle to the original position and close the front door Insert the used drum cartridge into an empty container for recycling That completes the procedure for replacing the Drum Cartridges Press both ends of the drum cartridge to place it in a horizontal position 10 11 12 13 Return the Release...

Page 123: ...ing or printing without replacing the toner cartridge a message will appear and the machine will stop after copying or printing around 1 800 pages for Black or around 1200 pages for Cyan Magenta and Yellow Follow the disposal instructions for the old cartridge when you receive with the new cartridge Replace the toner cartridge while the machine is on Open the toner cover located just above the mac...

Page 124: ... down and then left and right to redistribute the toner Install the toner cartridge by aligning the arrows on the cartridge evenly with the printer until you hear a click That completes the procedure for replacing the toner cartridge This procedure shows you how to remove a used Fuser and replace it with a new Fuser The machine will tell you when you need to install a new one The Fuser can be recy...

Page 125: ...re the machine has stopped running and open the Front Door Grasp Handle 2 and turn it to the unlocked position Warning To avoid burns wait at least 5 10 minutes after powering off the printer to allow the fuser to cool down and observe warning labels inside 1 2 3 Downloaded From ManualsPrinter com Manuals ...

Page 126: ... lift the Amber Gold colored handle only lift and pull up and out of the Transfer Module Dispose the fuser as normal office waste or recycle the fuser Remove the new fuser from its packaging Pull out the Fuser Handle 4 5 6 7 Downloaded From ManualsPrinter com Manuals ...

Page 127: ... the locked position Close the Front Door of the printer That completes the procedure for replacing the Fuser This procedure shows you how to remove the used Charge Corotron and replace it with a new Charge Corotron The machine will tell you when you need to order a new one and when to install it Replacing the Charge Corotron 8 9 10 11 Downloaded From ManualsPrinter com Manuals ...

Page 128: ...e Handle Make sure the machine has stopped and open the Front door CAUTION Do not expose this item to direct sunlight or strong light from indoor fluorescent lighting Image quality may deteriorate when these are exposed to light for more than two minutes 2 3 1 Downloaded From ManualsPrinter com Manuals ...

Page 129: ...awer Grasp both of the amber gold colored casings on the old charge corotron and push towards the back of the machine You will hear a clicking noise indicating that it is being released CAUTION Remember to minimize the amount of time that the drum cartridges are exposed to light Exposure for more than two minutes may result in light shock to the drums 4 5 6 Downloaded From ManualsPrinter com Manua...

Page 130: ... charge corotron by holding the amber gold colored casings provided at the both ends of the charge corotron and gently pulling straight up Gently lower the new charge corotron into the machine straight down and not at an angle 7 8 Downloaded From ManualsPrinter com Manuals ...

Page 131: ... on the new charge corotron and pull towards the front of the machine until you hear a clicking noise to indicate the charge corotron is in place This procedure shows you how to remove the used Waste Toner Container and replace it with a new Waste Toner Container The machine will tell you when you need to order a new Container and when to install it Make sure the machine has stopped running and op...

Page 132: ... toner container and pull out about half of it Hold the center part on the top of a new container and insert it until it comes to a stop Close the waste toner container cover Close the front cover door CAUTION Never use a vacuum cleaner when you clean spilled toner It can cause explosion as the toner fills the vacuum cleaner and gets sparks Use a broom or a cloth moistened with a neutral detergent...

Page 133: ... may be full before the next message is displayed It may cause machine malfunctions This procedure shows you how to empty the hole punch waste container Make sure that the machine has stopped and open the front cover of the finisher Emptying the Punch Scrap Container 1 Pull out the punch scrap container 2 Dispose of the drilled paper scraps into the waste bin 3 Install the emptied hole punch waste...

Page 134: ... the Right Cover on the finisher Locate the Staple Waste Container R5 in the finisher 4 3 Remove the container from the finisher 6 5 Remove the new container from the packaging Dispose of the full container in the new container packaging Insert the new container into the finisher Grip the container and move the lever to the right the Unlock position 4 5 1 3 6 8 7 Move the lever to the left the loc...

Page 135: ...a message stating in which area the jam is situated The following steps show how paper jams are cleared in these areas Problem Solving Jam Clearance Paper Jams Bypass Tray Tray 5 Jam Clearance Tray 6 HCF Jam Clearance Tray 6 Tray 7 OHCF Jam Clearance Transfer Module Fuser Document Feeder Output Tray Inverter Bottom Right Cover Paper Trays Bottom Left Cover Downloaded From ManualsPrinter com Manual...

Page 136: ...ocument Feeder Document Feeder 2 1 Open the Document Feeder Top Cover until it comes to a stop Open the Left Cover until it comes to a stop 4 3 If the document is not caught in the document feeder pull out the document Lift the handle and open the Inner Cover Remove the jammed document Downloaded From ManualsPrinter com Manuals ...

Page 137: ...l the handle and remove the document The return the handle to its original position and close the Document Feeder 8 7 If the document is still not found lift the Document Feeder Tray and remove the document Gently return the Document Feeder Tray to its original position Make sure that the document is not torn wrinkled or folded and load the document again following the instructions displayed on th...

Page 138: ... Tray 5 feeder Then open the Front Door 2 Turn Handle 2 to the right until it is in the horizontal position then pull out the transfer module 3 Warning Never touch a labeled area found on the fuser unit or nearby indicating High Temperature and Caution You may get burned Remove the visible jammed paper After clearing the jammed sheet check to see that no torn paper pieces are left in the machine a...

Page 139: ...the right and remove any jammed paper 6 Pull down Handle 2b and remove the jammed paper 7 Return Handle 2a and Handle 2b to their original position Push in the transfer module completely and turn Handle 2 to the left 8 Close the front cover Downloaded From ManualsPrinter com Manuals ...

Page 140: ...he tray where the paper jam occurred 2 Remove the jammed paper 3 Push the tray in gently until it comes to a stop Paper is sometimes torn and remains inside the machine if you open a tray without checking the paper jam position This may cause machine malfunction Check where the paper jam occurred before clearing the problem Note Downloaded From ManualsPrinter com Manuals ...

Page 141: ...he Tray 5 Cover Inspect the paper feed entrance area and remove any jammed paper 2 When two or more sheets of paper are loaded remove all of the sheets from the tray Close the Tray 5 Cover 3 Fan the paper you removed making sure that all four corners are neatly aligned If paper is torn check for any torn pieces of paper inside the machine Note Downloaded From ManualsPrinter com Manuals ...

Page 142: ...1 If Tray 6 is installed gently move Tray 6 to the left until it stops Gently open the Bottom Left Cover while gripping the release handle 2 Remove the jammed paper 3 Gently close the Bottom Left Cover If Tray 6 is installed gently move Tray 6 back into position If paper is torn check for any torn pieces of paper inside the machine Note Downloaded From ManualsPrinter com Manuals ...

Page 143: ...aper Tray 6 HCF Tray 6 HCF Jam Clearance 1 Open Tray 6 and remove any jammed paper 2 Gently close Tray 6 3 Gently move Tray 6 to the left until it stops Open the Tray 6 Top Cover and remove any jammed paper If paper is torn check for any torn pieces of paper inside the machine Note Downloaded From ManualsPrinter com Manuals ...

Page 144: ...F may not be present Tray 6 Tray 7 OHCF Jam Clearance 1 Pull out the tray where the paper jam occurred To avoid tearing paper review where the paper jam occurred before pulling out a tray Torn paper remaining inside the machine can cause machine malfunction 2 Remove the jammed paper If paper is torn check inside the machine and remove it 3 Push the tray in gently until it comes to a stop Note Note...

Page 145: ... then open the Bottom Right Cover by pressing the down arrow button 2 If the Output Catch Tray is installed open the Bottom Right Cover while pressing the down arrow button 3 Pull sheet straight down towards floor WARNING When clearing this jam the sheet should be pulled straight down towards the floor Pulling the sheet at an angle towards the front of the machine can cause damage to the Fuser rol...

Page 146: ...turn Handle 1a to its original position then close the front door of the finisher This section describes how to clear paper jams that occur in the Output Tray Output Tray 1 Remove jammed paper from the Output Tray If paper is torn check for any torn pieces of paper inside the machine Downloaded From ManualsPrinter com Manuals ...

Page 147: ...ning the front cover of the finisher 2 Grip the Handle R1 of the staple cartridge holder and pull out the holder to the right towards you 3 Remove the staple cartridge holder by gripping the orange lever The staple cartridge is firmly held in place When you remove the staple cartridge you must pull the cartridge out with some force Downloaded From ManualsPrinter com Manuals ...

Page 148: ...isher for any remaining staples 5 Pull up th e metal part of the staple cartridge Remove the jammed staples and return the metal part pulled up in the previous step to the original position 6 Insert the staple cartridge while gripping the orange lever until you hear it click into place Downloaded From ManualsPrinter com Manuals ...

Page 149: ...e Staple Cartridge After removing the staple cartridge check the inside of the finisher for any remaining staples 3 Open the staple cartridge cover and remove the jammed staple If the jammed staple cannot be removed push the staple in the direction indicated by arrow 4 Return the staple cartridge to its original position until it clicks into place Downloaded From ManualsPrinter com Manuals ...

Page 150: ...am 1 Make sure that the machine has stopped before opening the front cover of the finisher 2 Press the levers together then pull out the Booklet Maker Staple Cartridge 3 Hold the tabs of the Booklet Maker Staple Cartridge to lift and remove it Downloaded From ManualsPrinter com Manuals ...

Page 151: ...ove the jammed staples 5 Holding the tabs of the Booklet Maker Staple Cartridge gently push the cartridge to its original position until it clicks into place Return the unit to its original position and close the Finisher door Downloaded From ManualsPrinter com Manuals ...

Page 152: ...Press Hole Punch Jam 1 If the Hole Punch feature jams remove and empty the chad tray as well as removing the paper jam For more information on removing paper jams go to the topic titled Paper Jams within this module Downloaded From ManualsPrinter com Manuals ...

Page 153: ...ality If you have poor quality originals use the document glass to copy a new set If using computer fanfold forms ensure that the perforations down each side of the sheet have been removed When removed the forms can be loaded either short edge feed or long edge feed Ensure that the Document Handler guides are against the edges of the loaded originals 3 Check that your originals are within specific...

Page 154: ...ring the jam the Tray 5 feeder jams or misfeeds again follow the steps on the following pages 2 Fan the paper and load into the bypass tray Ensure that the paper does not cover the maximum fill line 3 Ensure that the Bypass Tray guides are against the edges of the loaded paper Do not add paper to the tray when paper is already loaded Instead remove the paper and combine the additional paper with t...

Page 155: ...fter clearing the jam the envelope jams again follow the steps on the following pages 1 Ensure that the guides are against the edges of the envelopes Check that the attributes of the paper tray are set correctly 2 Envelopes can be fed only from the Bypass Tray Check that the envelopes are within specification For more information about envelope specifications refer to Chapter 3 the Paper and Media...

Page 156: ... different types of media paper can tolerate more heat than transparencies If appropriate select the button after each selection on the touch screen Check to see if the paper tray guides are locked into position against the paper Check the power cord installation Firmly press the ON OFF button Check to see if the AC outlet is receiving voltage Connect another appliance to the outlet to verify volt...

Page 157: ...f this program Alternatively you can place the documents on the Document Glass Documents will not feed correctly Check the external device to ensure that it is properly connected and powered on With an external control device connected the machine displays Ready to Copy but users cannot log in Check to see if the paper tray guides are locked into position against the paper Select the option on the...

Page 158: ...scan at 600dpi an error occurs Remedy Decrease Scan Resolution to 400dpi or less and rescan Cause When scanning a mixed size document using the 2 sided simultaneous scan feature with 300 400 or 600dpi an error occurs Remedy Decrease Scan Resolution to 200dpi or less and rescan Fault Codes If an error caused the printing to end abnormally or a malfunction occurred in the machine then an error code ...

Page 159: ...epeat Remedy Change the paper size for the tray or change the Paper Type Priority settings Cause An error occurred when reading the Gradation Adjustment Chart Remedy Place the Adjustment Chart properly on the document glass Cause When enlarging reducing a scanned document to the specified paper size the reduction enlargement ratio value exceeds the allowed range Remedy Take one of the following ac...

Page 160: ...e Cause The Finisher malfunctioned Remedy Check for any obstructions in the paper path and clear them Power off on the machine and if necessary resend restart your print copy job If the fault continues contact the Customer Support Center Downloaded From ManualsPrinter com Manuals ...

Page 161: ...upport Center Cause Unable to retrieve IP address from DNS Remedy Check the DNS configurations and IP address retrieve method Cause An error occurred on the software settings Remedy Power cycle the machine If the machine is not improved by performing the relevant remedy Contact your Xerox Customer Support Center Cause Finisher Punch Scrap Container is not attached Remedy Check that the punch scrap...

Page 162: ...to print Job Template List while updating the job template Remedy Retry printing after waiting for a period Cause Annotation is not possible due to insufficient hard disk space Remedy Remove unnecessary data from the hard disk to increase free disk space Cause Delayed print documents cannot be registered Remedy Check print options and specify the print data again If the hard disk is malfunctioning...

Page 163: ...the correct password Cause No Permissions to use service Remedy Check with your Auditron Administrator Cause Maximum number of pages for this service has been reached Remedy Check with your Auditron Administrator Cause Can not connect to the SMTP server Remedy Contact the SMTP server administrator Cause Booklet Creation is not applied to the specified paper Remedy Specify the printable paper size ...

Page 164: ...ion conversion is not possible due to insufficient hard disk space Remedy Remove unnecessary data from the hard disk to increase free disk space Cause Could not send mail because the hard disk on the SMTP server was full Remedy Contact the SMTP server administrator Cause An error occurred on the SMTP server Remedy Contact the SMTP server administrator Cause Remedy Code Downloaded From ManualsPrint...

Page 165: ... conversion processing Remedy Retry scanning Cause A hard disk error occurred during scanned image conversion processing Remedy The hard disk might be defective When replacing a hard disk contact your Xerox Customer Support Center Cause When using the scan feature hard disk capacity is insufficient for writing to a file Remedy Either remove unnecessary data from the hard disk to increase free disk...

Page 166: ...error occurred and your Xerox Customer Support Center could not be contacted Remedy Check that the phone lines are connected and try sending an inspection or maintenance request again after a short time If the error persists contact your Xerox Customer Support Center Cause A feature one of paper size tray output tray or 2 sided printing that is incompatible with the specified paper quality has bee...

Page 167: ...idge Cause The finisher stacker tray is full Remedy Remove all paper from the stacker tray Cause The finisher top tray is full Remedy Remove all paper from the finisher top tray Cause The finisher stacker tray lower safety warning is on Remedy Remove all paper from the stacker tray and remove any other obstructions Cause The finisher booklet tray is full Remedy Remove all paper from the booklet tr...

Page 168: ...e A media reader is not connected with the machine correctly Remedy Check the connection between the media reader and the machine Cause An application interface destination does not exist Remedy Check whether an application linked CentreWare Flow Service operates correctly Cause The jobs was timed out during connection with an application interface destination Remedy Try to process the job flow ag...

Page 169: ...ore job template due to insufficient hard disk space Remedy Remove unnecessary data from the hard disk to increase free disk space Cause The specified job template server is incorrect Remedy Check the settings for the job template server Cause There is a problem in the domain name of the job template server Remedy Make sure that the DNS server connection and the domain name are registered to the D...

Page 170: ...settings for the job flow Cause PDL Printer Description Language error detected by the controller while processing a network print job Remedy Cancel and resend the print job If problem continues reboot both the controller and the printer and resend job If the problem persists call the Customer Support Centre for further help instructions Cause Disk full error message on the controller Remedy Cance...

Page 171: ...the document feeder Remedy Power cycle the machine If the machine is not improved by performing the relevant remedy contact your Xerox Customer Support Center Cause The scanned document is copy protected Remedy Refer to the Safety Guide and check to see if the document can be copied Refer to 062 211 Cause An error occurred with the machine Remedy Contact your Xerox Customer Support Center Cause An...

Page 172: ...port Center Trays other than the Tray 3 can be used Cause The Tray 5 bypass malfunctioned Remedy Power cycle the machine If the machine is not improved by performing the relevant remedy contact your Xerox Customer Support Center Cause Optional Paper Tray 6 malfunctioned Remedy Check the paper loaded in Tray 6 Power off and then power on the machine If the tray errors are not fixed by performing th...

Page 173: ...wer off and then power on the machine If the tray errors are not fixed by performing the relevant remedy contact the Customer Support Center Check the paper loaded in Tray 5 and then power off on the printer Power off on the printer Cause Optional Paper Trays 6 and or 7 malfunctioned Remedy Check the paper loaded in Trays 6 7 Power off and then power on the machine If the errors are not fixed by p...

Page 174: ... relevant remedy contact your Xerox Customer Support Center Cause A media is not inserted correctly Remedy Insert the media correctly Refer to 016 795 Cause 2 sided print could not be made due to insufficient memory Remedy Print each side Cause Charge Corotron cleaner failure Remedy Power cycle the machine If the error is not fixed by performing the relevant remedy contact the Customer Support Cen...

Page 175: ... machine is not improved by performing the relevant remedy contact your Xerox Customer Support Center Cause The settings for punching are canceled Remedy Confirm the punching position and try to print again Cause The settings for folding are canceled Remedy Confirm the folding settings and try to print again Cause The number of pages exceeds the number of pages that can be stapled Remedy Decrease ...

Page 176: ...controller Remedy Contact the Customer Support Center for information and or instructions to remedy the problem Cause Detected a communication error of the video system by the controller Remedy Remove and reinsert the cable connection between the printer and the controller Power off and on both the printer and the controller If the problem persists call the Customer Support Center Cause Detected a...

Page 177: ...es not successfully complete a print job Try selecting the Network Scanning button If the Network Scanning button is showing but it is grayed out and non selectable try switching the machine off by pressing the Power On Off button Wait for two minutes then press the Power On Off button to restart the machine Network Scanning is not installed on your machine Scanning options are available from your...

Page 178: ...d with Xerox Anti Static or General Cleaning Fluid or another suitable non abrasive glass cleaner clean the Document Glass and Document Handler white underside Ensure that the Document Handler guides are against the edges of the loaded originals Access the Original Type screen by selecting the Image Quality tab Check that the Original Type Photo is NOT selected Access the Sharpness Color Saturatio...

Page 179: ...occurs every 36 mm on the prints do not replace the Drum This interval is caused by a damaged or defective Developer Housing If lines streaks or deletions in the process direction appear only with Black then replace the Black Scorotron Assembly If spots or bands occur every 126 mm on the prints the Yellow Magenta or Cyan Drum is damaged or light shocked Before performing any of the following steps...

Page 180: ...om the Document Handler ensure that your original is loaded face up and the document handler guides are against the edges of the loaded originals If you are copying your original from the Document Glass ensure that your original is loaded face down and to the rear left of the document glass Ensure that the paper loaded is within machine specifications Go to the Paper and Media section for informat...

Page 181: ...e Document Glass select the paper size required to make the copy DO NOT use the Auto Paper option Ensure that the paper size and type is correctly set for the selected paper tray Using a lint free cloth lightly dampened with Xerox Anti Static or General Cleaning Fluid or another suitable non abrasive glass cleaner clean the Document Glass and Document Handler white underside Blurred or Distorted I...

Page 182: ...ssage about low toner on the screen replace the toner cartridge If your original or output is 2 sided check that the paper is not too thin Double Image or Show Through The output image repeats has a ghosting effect or shadows with a replica of the image Check that the Lighten Darken scroll on the General Settings tab is set to a darker setting Open then fully close the Document Handler If your ori...

Page 183: ... no obstacles in the paper path Go to the Jam Clearance topic for information on clearing the paper paths Ensure that your original is loaded face down and to the rear left of the document glass Align your document with the edges of the glass Check that your originals are flat and in good condition Access the Color Effects screen by selecting the Image Quality tab Check that the Shadow Suppression...

Page 184: ...e paper tray guides are against the edges of the loaded paper Misregistration or Image Shift The output image is not in the correct position some of the image may be cut off If you are copying your original from the Document Handler ensure that your original is loaded face up and the document handler guides are against the edges of the loaded originals If you are copying your original from the Doc...

Page 185: ...d selects Use Machine Settings in the print properties screen then it is possible that the media type may not be the correct weight in the paper tray and may lead to Fuser or Inverter jams Therefore it is recommended that the customer select the proper media type from the print driver and never select Use Machine Settings Hints and Tips Fuser Extending fuser life Preventing Fuser Jams To extend th...

Page 186: ...econd number in the size indicates the grain direction For example 11 x 17 in A3 indicates the grain is in the 17 inch 431 8 mm direction This paper is Long Grain 17 x 11 in A3 indicates the grain is in the 11 inch 279 4 mm direction This paper is Short Grain HeavyWeight 1 or Coated 1 Papers labeled 11 x 17 in A3 12 x 18 in 304 8 x 457 2 mm 13 x 19 in 330 2 x 482 6mm etc are Long Grain and should ...

Page 187: ...bmitted verify that the applicable paper tray is not empty The system will stop if sufficient media is not available for a submitted job If the problem persists check the Machine Status Fault screen select the fault and click on the Instructions button The system does not prohibit duplexing coated substrates from the internal trays Trays 1 3 however there can be a significant increase in jams or m...

Page 188: ...8 54 User Guide Problem Solving Xerox 700 Digital Color Press Downloaded From ManualsPrinter com Manuals ...

Page 189: ...paper Original document sizes 5 5 x 8 5 in A5 to 11 x 17 in A3 Paper weights Automatic duplexing on all media size up to a maximum of 80 lb cover 200 gsm Manual duplexing on media up to 110 lb cover 300 gsm or coated 100 lb cover 280 gsm from the Bypass Tray Mixed size originals allowed when selected from the UI and the lead edges have the same dimensions 8 5 x 11 in A4 LEF 11 x 17 in A3 LEF 8 5 x...

Page 190: ...apacity 2000 sheets Sheet size 7 2 x 10 in 182 x 250 mm B5 to 13 x 19 in SRA3 330 x 488 mm Paper weight 18 lb bond 110 lb cover 64 300 gsm uncoated 28 lb bond 110 lb cover 106 300 gsm coated Capacity 1 drawer 2000 sheets 2 drawer 4000 sheets 1 drawer or 2 drawer Oversized High Capacity Feeder OHCF Trays 6 and 7 Optional feeding accessories Downloaded From ManualsPrinter com Manuals ...

Page 191: ...t Tray Stapled 15 sheets set up to 90 gsm of uncoated stock Non stapled 5 sheets set Bi Fold 1 sheet set up to 169 gsm of uncoated stock Stackable number of sets depends on paper size Top Tray capacity 500 sheets Stacker Tray Capacity 5000 sheets Paper weights 52 300 gsm uncoated 105 220 gsm coated Paper sizes 4 x 5 6 in 102 x 142 mm to 13 x 19 in SRA3 330 x 488 mm to Top Tray 7 2 x 10 5 in 182 x ...

Page 192: ...Tray 20 sets Tray may not support some paper types Tray Capacity Maximum stapled sheets 100 sheets When using paper of size larger than A4 or 8 5 x 11 in the maximum number of sheets that can be stapled is 65 Staple nails may bend when using certain paper types Paper size Maximum A3 11 x 17 in Minimum B5 LEF Staple position 1 location front angled stapling center parallel stapling back parallel st...

Page 193: ...5 sheets 81 90 gsm Uncoated 20 sheets 91 105 gsm Uncoated 10 sheets 106 128 gsm Uncoated 10 sheets Coated 10 sheets 129 150 gsm Uncoated 10 sheets Coated 10 sheets 151 176 gsm Uncoated 10 sheets Coated 10 sheets 177 220 gsm Uncoated 5 sheets Coated 5 sheets Booklet Creation Single Fold Note Non stapled fold sets are limited to 5 sheets of paper Refer to the optional Folder table on page 13 11 for ...

Page 194: ...8 5 x 11 in A4 SEF Maximum 13 x 18 in 330 x 457 mm Trim capacity 5 20 sheet booklet up to 80 imaged sides at 24 lb 90 gsm 5 25 sheet booklet up to 100 imaged sides at 200 lb 80 gsm Cut amount 2 20 mm adjustable in 0 1 mm increments Paper weights 16 lb bond 90 lb cover 60 220 gsm Dimensions 50 in 1271 4 mm width x 28 5 in 724 3 mm depth x 22 in 558 8 mm height Weight 209 lb 95 kg NoTE The SquareFol...

Page 195: ...ernal devices such as auditrons or coin op devices This will perform in copy and print modes Additional optional accessories Electrical Specifications Voltage 208 240 VAC minus 10 plus6 Frequency 50 60 Hz plus minus 3 Amperage 12 Amps Power Consumption 2 746 KVA maximum Electrical Specifications Downloaded From ManualsPrinter com Manuals ...

Page 196: ...9 8 Specifications User Guide Xerox 700 Digital Color Press Downloaded From ManualsPrinter com Manuals ...

Page 197: ...een the machine and the various connected finishing devices Interface Module High Capacity Stacker HCS The Control Panel consists of the following 1 Auto Curl button This button selects the Auto Decurl function 2 Manual Curl Up button This button selects the three values of manual up curl 3 Manual Curl Down button This button selects the three values of manual down curl 4 Auto Curl indicator This ...

Page 198: ...nward curl The paper is then moved from the decurler to the connected finishing device From the machine Decurler To the finishing device Paper path Paper curl When paper is exposed to heat the paper loses moisture and curls toward the heat source High coverage jobs tend to curl more due to the toner plastification effect on the paper surface The system tries attempts to reduce this by using a mech...

Page 199: ...cting a related button The current selected amount of curl correction is displayed by the Control Panel LEDs Your system is also designed with several automated presettings for controlling paper curl When using these settings the machine automatically sets the amount of curl correction at the Decurler Therefore if paper curl is a problem use one of the preset Decurler settings in order to eliminat...

Page 200: ...rsists after following all instructions call your Xerox representative Jam clearance Interface Module jams Basic troubleshooting Perform the following steps to clear the Interface Module jam and resume printing Open the Interface Module Front Cover Lift the green handles and or rotate the green knob and remove all jammed paper and paper scraps Close the Interface Module Front Cover If the UI indic...

Page 201: ... paper used is within the approved paper specifications 048 300 The front door is open Close the front door 048 310 048 311 048 312 048 313 048 314 048 315 048 316 Decurler sensor or belt problem Power off then power on 048 318 048 319 Cooling fan failure Power off then power on 048 320 048 321 048 322 Communication failure or connection failure Check the connection between Interface Module and th...

Page 202: ...m 100V to 240V Frequency 50 60 Hz 10 to 32 C 15 to 85RH 50 to 90 F 15 to 85RH Above 82 F 28 C reduced humidity is required to maintain the specified performance Specifications Electrical Temperature and humidity Downloaded From ManualsPrinter com Manuals ...

Page 203: ...manual control of the various functions of the HCS Top Tray Up to 500 sheets are transported to the Top Tray When sheets are purged after a paper jam When the Sample Set button is selected When selected as an Output Location Labels must be sent to the Top Tray Bypass Only used when a second stacking finishing device is installed This path transports collated sets through the HCS to a connected fin...

Page 204: ...ay and unlock the front door Unload indicator This indicator lights when the Stacker Tray has reached the down position and the front door can be opened Top Tray jam area Blinks when there is a jam in the top tray area E7 Exit jam area Blinks where there is a jam in the exit area E8 Stacker Entrance jam area Blinks when there is a jam in the Stacker Entrance area E1 E2 or E3 Stacker Transport jam ...

Page 205: ...ple Job 3 Select Sample Job On The Sample Job On feature delivers specific pages or sets of an output job to the High Capacity Stacker s Top Tray The Sample Job allows the user to check the output while continuing to deliver the major portion of the job to the Stacker Cart For Collated output for example if the output is 100 sets of a 50 page original document the user can choose 1 3 output sample...

Page 206: ... the Stacker Tray has reached the down position Open the front door when the Unload Light illuminates Position the securing bar on top of the stacked paper Pull the Stacker Cart straight out Remove the securing bar Remove the paper from the Stacker Tray Push the empty Stacker Cart straight into the HCS Position the securing bar on the fixed area inside the HCS Close the door The tray will rise to ...

Page 207: ... Front Cover If the UI indicates there is a jam in the digital press follow the instructions on the screen to remove any paper in the area indicates Refer to the Jam Clearance section in the Problem Solving chapter in this manual Follow the instructions displayed on the digital press UI to resume printing Open the HCS Front Cover Follow the instructions located inside the Front Cover to clear the ...

Page 208: ... in this manual Follow the instructions displayed on the digital press UI to resume printing HCS Exit Jam E8 Perform the following steps to clear the HCS Exit jam and resume printing Open the HCS Front Cover Follow the instructions located inside the Front Cover to clear the E8 jam Lift the green handle and or rotate the green knob and remove all paper in the exit area Close the HCS Front Cover If...

Page 209: ...49 907 049 908 Paper jam A jam occurred during feeding A jam notification is displayed on the UI Open the front door Carefully remove all sheets and paper scraps from jam clearance areas Close the front door Verify the paper used is within the approved paper specifications 049 210 049 211 Front door sensor problem Power off then power on 049 212 049 213 Stacker problem Power off then power on Faul...

Page 210: ...the front door is actually closed locked Power off then power on 049 220 049 221 Stacker upper limit failure Stacker lower limit failure Power off then power on 049 222 049 223 049 224 049 225 049 228 049 229 049 232 049 233 049 234 049 235 049 236 049 237 049 238 049 239 049 240 049 241 049 242 049 243 049 244 049 245 049 246 049 247 049 248 049 249 049 250 049 251 049 252 049 253 Senor problem f...

Page 211: ...is open Close the upper cover 049 310 HCS download mode failure Power off then power on 049 700 Error in stacking the output paper media Remove the paper from the stacker tray 049 940 Front door is open Close the front door 049 941 UI indicates the Stacker Cart and or Tray needs to be reset Press the Unload button The Wait light blinks until the Stacker Tray has reached the down position 1 2 3 4 W...

Page 212: ... 969 049 970 049 971 049 972 The UI displays the following message Take out the paper stack Press the Unload button The Wait light blinks until the Stacker Tray has reached the down position 1 2 3 4 When the Stacker Tray has reached the down position open the front door Remove the Stacker Cart Remove all the stacked paper 5 Position the Stacker Cart securely into the HCS 6 Close the front door 7 P...

Page 213: ... of degraded stock quality and increased jam rate Transparencies may be run to either the Top Tray or the Stack Tray Stack height should be limited to 100 transparencies Coated paper lighter than 100 gsm may not run as reliably as coated paper heavier than 100 gsm Non standard papers longer than 305 mm 12in in the feed direction require 210 mm 8 3in minimum measurement across the feed direction No...

Page 214: ...10 18 User Guide Xerox 700 Digital Color Press Addendum Downloaded From ManualsPrinter com Manuals ...

Page 215: ...Downloaded From ManualsPrinter com Manuals ...

Page 216: ...Downloaded From ManualsPrinter com Manuals ...

Reviews: