User Guide
4-29
Copy
Xerox 700 Digital Color Press
1.2.3
1.2.3
2.2.
1.1.
Paper Supply
Reduce / Enlarge
Output Color
Copy Output
100
Plain
100%
%
Auto%
64%
78%
129%
More...
More...
Plain
Plain
Auto Detect
Color
Black and White
More...
Dual Color
Single Color
(Red/Black)
(Red)
2 Sided Copying
Original Type
Lighten / Darken
Auto Paper
Select
Quantity
Image Quality
Layout
Adjustment
Output Format
Job Assembly
Copy
Auto Paper Select
1
2
3
1 > 1 Sided
Copy
All Services
Ready To Copy
C o p y
Do cu Co l o r 700
N e t w o r k
S c a n n in g
H o m
e
W
e b
A p p lic a t io n s
Booklet Creation
Page Layout
Image Quality
Layout
Adjustment
Output Format
Job Assembly
General
Settings
Off
1 Up
Annotation
Off
Poster
Folding
Covers
Off
Transparency Options
No Separators
No Covers
Tab Margin Shift
Off
Off
Face Up/Face Down
Off
ID Card Copying
Off
Watermark
Covers
Covers
No Covers
Blank Covers
Save
Cancel
Printed Back Cover -
Side 1
Printed Back Cover -
Side 2
No Covers
Blank Covers
Printed Back Cover -
Side 1
Printed Back Cover -
2 Sided
Printed Back Cover -
Side 2
Printed Back Cover -
2 Sided
Front Cover
Back Cover
Front Cover
Quantity
Paper Tray
Settings
Covers
No Covers
Blank Covers
Save
Cancel
Printed Back Cover
- Side 1
Printed Back Cover -
Side 2
No Covers
Blank Covers
Printed Back Cover -
Side 1
This feature adds covers to
the copy sets Colored or
heavyweight paper can be
used as covers.
Printed Back Cover -
2 Sided
Printed Back Cover -
Side 2
Printed Back Cover -
2 Sided
Front Cover
Back Cover
Ready To Copy
Quantity
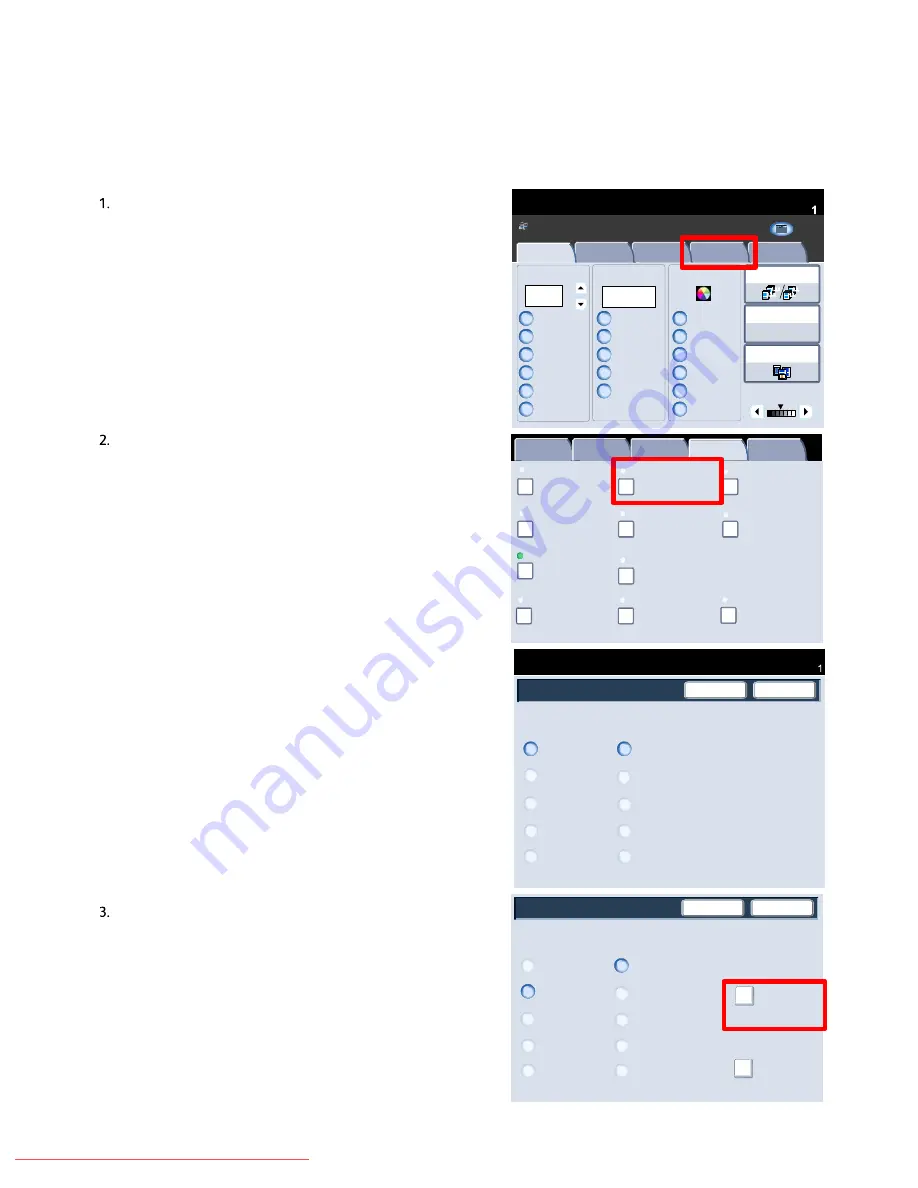
This feature allows you to automatically add covers to your copied sets using stock from a different tray. For example
you can add colored stock, card or transparencies to your copied sets to add a professional finish to your copy job.
There are numerous options as illustrated below.
First select the paper tray you want to use for the main body
of the copies. The
Covers
feature is not available if the
Auto
paper supply option is selected. Then load the cover stock
into another paper tray. As a rule, load your cover stock in
the same orientation as the paper you are using for the body
of your copies.
Select the
Output Format
tab and the
Covers
button.
Here you can choose front, back or front and back.
Select the appropriate
Front Cover
and
Back Cover
options.
You now need to select the tray that contains your cover
stock.
Select the Paper Supply Settings button.
Downloaded From ManualsPrinter.com Manuals


