background image

Page


6-2

Media Print

Media Print

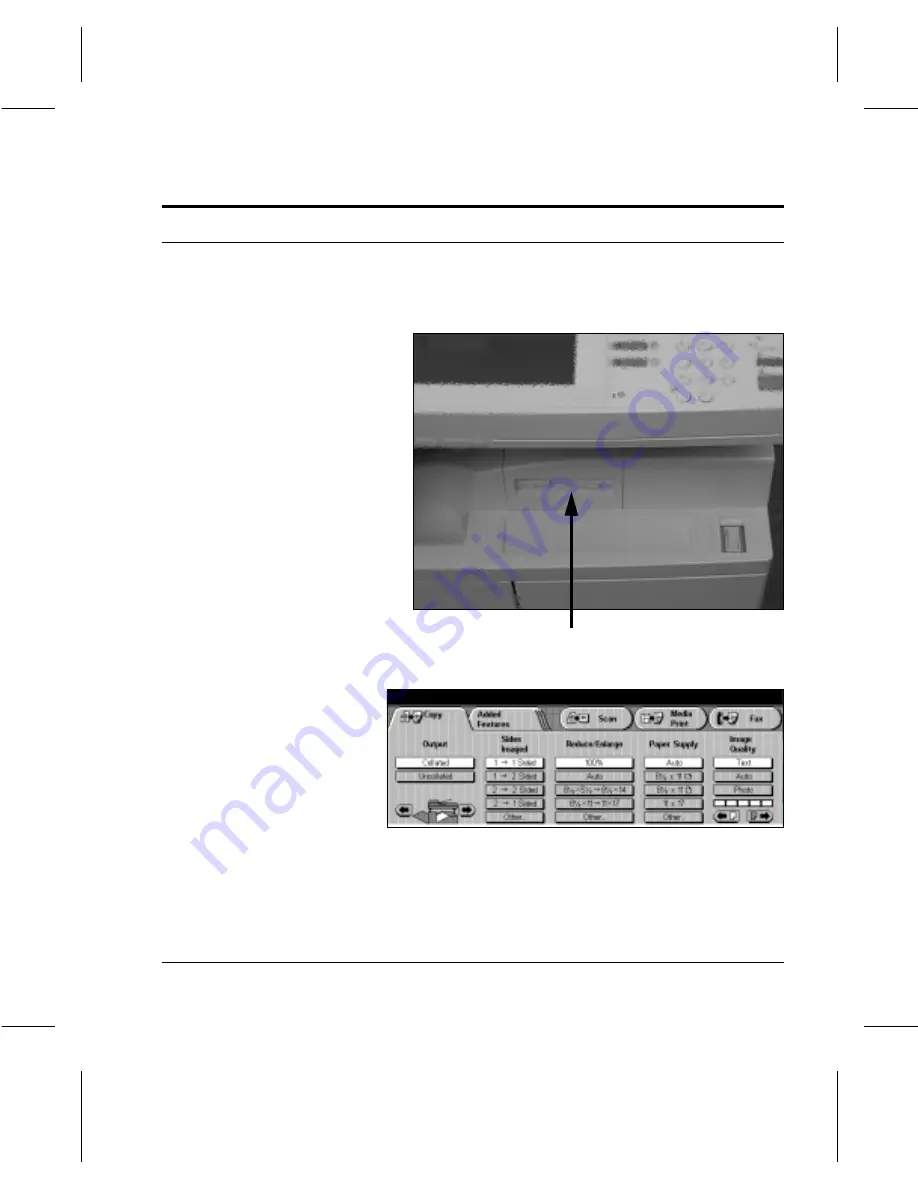
Use the following steps to make prints using the 

Media Print


feature.

À

Make sure the disk is DOS 
formatted.

À

At your workstation, select 
the ‘Print to File’ option and 
select the options required for 
the job. Print your files to 
PostScript or PCL (ASCII) 
and copy them on to a floppy 
disk.

À

At the 

Document Centre 

220/230/332/340 

insert the 

disk into the floppy drive.

Floppy Drive

À

Touch the 

Media Print

 button 

on the touch screen.


Summary of Contents for 220

Page 1: ...About This Guide Xerox Document Centre 220 230 332 340 User Guide July 1999 602p35312 ...

Page 2: ... or judicial law or hereinafter granted including without limitation material generated from the software programmess which are displayed on the screen such as icons screen displays looks etc Xerox and all Xerox products mentioned in this publication are trademarks of Xerox Corporation Product names and trademarks of other companies are hereby acknowledged Changes are periodically made to this doc...

Page 3: ... 1 4 Hints 1 5 Cautions 1 5 Warnings 1 5 Related Documentation 1 6 FCC Regulations 1 6 Send Header Requirements 1 6 Data Coupler Information 1 7 Radio Frequency Emissions 1 9 Canadian Certification 1 9 Environmental Compliance 1 12 Energy Star 1 12 Environmental Choice 1 12 Laser Safety 1 12 Ozone Safety 1 14 Electrical Safety 1 15 Disconnect Device 1 16 Operational Safety 1 16 Ground Fault Interr...

Page 4: ... 2 12 Changing the Default Time Settings for Low Power and Power Save Auto Off Sleep Modes 2 13 Mode Buttons 2 16 Features button 2 17 Job Status button 2 18 Machine Status button 2 28 System controls 2 30 Auditron Access Screen 2 31 Information Sources 2 32 Using the Help button 2 33 COPY 3 1 Copying procedure 3 2 1 Load the documents 3 2 2 Press the Features button 3 7 3 Select the features 3 8 ...

Page 5: ...t 3 31 Expert Image Quality 3 33 Erase 3 34 Edit optional 3 35 Area Edit Document Centre 332 340 3 36 Page Edit Document Centre 332 340 3 37 Edit Document Centre 220 230 3 39 Output Format 3 40 Transparencies 3 41 N Up 2 Up Document Centre 220 230 3 43 Annotation 3 44 Inserts 3 48 Booklet Creation 3 51 Covers Document Centre 332 340 3 52 Job Assembly 3 55 Build Job 3 55 Stored Jobs 3 57 FAX 4 1 Se...

Page 6: ...ilbox 4 33 Original Size DC 332 340 Mixed Size Originals DC 220 230 4 36 Reports Setups 4 37 Fax Reports 4 37 Answer Mode 4 38 Dial Directory Setup 4 40 Comment Setup 4 45 Transmit Header Print 4 47 Connecting Fax to the ISDN Digital Line DC 332 340 4 48 NETWORK PRINTING LAN FAX 5 1 Network Print and Fax Functions 5 2 MEDIA PRINT 6 1 Media Print 6 2 SCAN TO FILE 7 1 Standard Features Scan 7 2 Scan...

Page 7: ...ng the Document Centre 220 230 332 340 9 3 The Document Glass and Constant Velocity Transport Glass 9 3 The Control Panel and Touch Screen 9 4 The Document Feeder and Output Trays 9 4 Replacing the Copy Print Cartridge 9 5 Removing the old Copy Print Cartridge 9 5 Recycling the Print Cartridge 9 9 Inserting the new Copy Print Cartridge 9 9 Loading Staples 9 12 Finisher optional 9 12 Convenience St...

Page 8: ...Page vi Table of Contents Xerox Welcome Center Telephone Numbers 10 20 REFERENCE 11 1 Machine Specifications 11 2 Specifications for the Fax Feature 11 7 GLOSSARY 12 1 Terms Defined 12 2 INDEX 13 1 ...

Page 9: ...ications and procedural steps when using the integrated features of the machine Should further assistance be required please call our experts on the Xerox Welcome Center telephone number When telephoning the Welcome Centre please quote the machine serial number which for convenience may be written in the space below The serial number is located behind the left hand front cover as shown below Seria...

Page 10: ...stallation For convenience and future reference please record the telephone number in the space below Welcome Center Telephone Number Canada English French and local Toronto 800 939 3769 United States 800 821 2797 _______________________________________ Also keep a record of any error messages This information can help problems to be resolved quickly ...

Page 11: ...e Document Feeder load with one of the longer edges facing into the Document Feeder The short edges appear at the top and bottom of the paper facing the front and back of the Document Feeder When loading paper long edge feed into a paper tray place the paper with one of the long edges on the left hand side and one of the short edges toward the front of the tray Short Edge Feed SEF Landscape When l...

Page 12: ...erating equipment Refer to Maintenance on Page 9 1 for information about cleaning the Document Glass For more information about changing the default settings refer to the Setup Guide Notes Notes are statements that provide additional information For example NOTE If the Document Centre 220 230 332 340 does not include the Finisher and or High Capacity Feeder ignore the first step A A A A LEF Orient...

Page 13: ... action For example CAUTION When cleaning the Document Centre 220 230 332 340 do not use organic solvents or aerosol cleaners Do not pour fluids directly onto any area Avoid supplies that are not specifically listed as approved in this documentation Warnings Warnings are statements that alert users to the possibility of personal damage For example WARNING When the machine is in use the cover shoul...

Page 14: ...guration available FCC Regulations Send Header Requirements Federal Communications Commission FCC regulations require all persons within the United States who send any message via a facsimile machine to include an identifying message in the transmission The message must clearly contain an identifier and telephone number for the entity business or individual sending the message This facsimile machi...

Page 15: ...when your number is called In most but not all areas the sum of the RENs of all devices should not exceed five 5 0 To be certain of the number of devices you may connect to your line as determined by the REN you should call your local telephone company to determine the maximum REN for your calling area WARNING Ask your local telephone company for the modular jack type installed on your line Connec...

Page 16: ...phone company will where practical notify you when they need to temporarily disconnect service However if action is reasonable and necessary but prior notice is not practical they may still temporarily disconnect your service In such cases they must l Immediately notify you of their temporary action l Reconnect service when the source of damage is removed l Inform you of your rights to bring a com...

Page 17: ... commercial environment This equipment generates uses and can radiate radio frequency energy and if not installed and used in accordance with the instructions may cause harmful interference to radio communications Operation of this equipment in a residential area is likely to cause harmful interference in which case the user will be required to correct the interference at his own expense Changes o...

Page 18: ... repairs or alterations made by the user to this equipment or equipment malfunctions may give the telecommunications company cause to request the user to disconnect the equipment Users should ensure for their own protection the electrical ground connections of the power utility telephone lines and internal metallic water pipe system if present are connected together This precaution may be particul...

Page 19: ... the Class A limits for radio noise emissions from digital apparatus set out in the Radio Interference Regulations of Industry Canada Cet appareil numérique est conforme aux limites d émission de bruits radioélectriques pour les appareils de classe A stipulées dans le Règlement sur le brouillage radioélectrique du ministère des Industries du Canada ...

Page 20: ...switch to power save auto off sleep mode is set at 60 minutes from the last copy print out A more detailed description of these modes together with instructions on changing the default times to suit your work pattern can be found in the Energy Star section on Page 2 10 of this user guide ENERGY STAR IS A U S REGISTERED TRADE MARK Environmental Choice Terra Choice Environmental Services Inc of Cana...

Page 21: ...those specified in the documentation might result in hazardous exposure to laser light Since radiation emitted inside the printer is completely confined within the protective housings and external covers the laser beam cannot escape from the machine during any phase of user operation The Center for Devices and Radiological Health CDRH of the US Food and Drug Administration implemented regulations ...

Page 22: ... produces ozone The ozone produced does not present a hazard to the operator However it is advisable that the machine be operated in a well ventilated area For more information see the specifications in Chapter 11 Reference Cette machine dégage de l ozone pendant le fonctionnement normal La quantité d ozone produite ne présente pas de danger pour l utilisateur Cependant il est recommandé de placer...

Page 23: ...n extension cord If you are not sure whether or not an outlet is properly grounded consult an electrician WARNING You might receive a severe electrical shock if you do not connect the grounding conductors properly 4 Do not place the Document Centre 220 230 332 340 where people might step or trip on the power cable 5 Do not place objects on the power cable 6 Do not override or disable electrical or...

Page 24: ... 332 340 is damaged Disconnect Device The power cord is the disconnect device for the Document Centre 220 230 332 340 It is attached to the back of the machine as a plug in device To remove all electrical power from the Document Centre 220 230 332 340 disconnect the power cord from the power receptacle Operational Safety The Document Centre 220 230 332 340 and its supplies were designed and tested...

Page 25: ...ation openings l Do not attempt any maintenance function that is not specifically described in the Document Centre 220 230 332 340 documentation l Use materials and supplies specifically designed for your Document Centre 220 230 332 340 The use of unsuitable materials may result in poor performance and possibly a hazardous situation l To move or relocate the Document Centre 220 230 332 340 to anot...

Page 26: ...GFI on the right side of the machine toward the back If the GFI has been activated on the Document Centre 220 230 the switch will be in the down position on the Document Centre 332 340 the switch will be in left position Flip the switch to restore power to the machine If the GFI interrupts power to the machine again or if power has not been restored by this procedure call your Xerox service repres...

Page 27: ...ns from Bonds Silver Certificates United States Bonds Federal Reserve Notes Certificates of Deposit National Bank currency Federal Reserve Bank Notes Gold Certificates Treasure Notes Fractional Notes Paper money Bonds and obligations of certain agencies of the government such as FHA Bonds US Savings Bonds may be photographed only for publicity purposes in connection with the campaign for the sale ...

Page 28: ... government bank or corporation À Copyrighted material unless permission of the copyright owner has been obtained or the copying falls within the fair use or library reproduction provisions of the copyright law Further information of these provisions may be obtained from the Copyright Office Library of Congress Washington DC 20559 circular R21 À Certificates of Citizenship or Naturalization Foreig...

Page 29: ... or insignias carried by military or Naval personnel or by members of the various Federal Departments and Bureaus such as the FBI and Treasury unless the photograph is ordered by the head of such Department or Bureau Copying of the following is also prohibited in certain states automobile licences driver s licenses and automobile Certificates of Title This list is not all inclusive In case of doub...

Page 30: ...compliance with CSA 22 2 NO 220 Number 950 and UL 1950 within NRTL agreements which are accepted within the North American continent 50Hz 220V 240V This product is serviced under a BS 5750 Quality system accepted by the British Standards Institution The Xerox Document Centre 220 230 332 340 is certified by the British Standards Institution BS 7002 EN 60950 BSI The equipment is manufactured under a...

Page 31: ...on of the Duplex Module Document Centre 220 230 The Digital Copier can be upgraded to a Copier Fax with the installation of a Fax option kit The Copier Fax can be upgraded to a Copier Fax Printer The Digital Copier can be upgraded to a Copier Printer The Printer Document Centre 220 230 can be upgraded to a Copier Printer or a Copier Printer Fax For more information contact your local Xerox represe...

Page 32: ...trations of the machine components and control panel buttons and describe the services and modes available Document Centre 220 230 Document Glass under the document feeder Paper Trays Left Front Cover Bypass Tray Left Tray Control Panel Document Feeder Touch Screen On Off Switch Center Tray ...

Page 33: ...er Guide Page 2 3 Introduction Introduction Document Centre 332 340 under the document feeder Document Glass On Off Switch Left Front Cover Bypass Tray Left Tray Control Panel Document Feeder Touch Screen Paper Trays Center Tray Duplex Module ...

Page 34: ... optional feature The graphic below shows some of the optional features available Contact your local Xerox representative for more information about the optional features Duplex module Document Centre 220 230 Makes two sided copies from single sided and or double sided documents Refer to Page 3 17 for more information Paper Trays 3 4 Duplex Module Finisher High Capacity Feeder HCF ...

Page 35: ...ets of 20lb substance 20 paper 8 1 2 x 11 long edge feed Refer to Paper and other media on Page 8 1 for more information Finisher The Finisher can stack a variety of paper sizes from 5 1 2 x 8 1 2 through 11 x 17 and can handle a maximum of 1000 sheets of 20lb substance 20 paper at one time It can staple up to 50 pages of 20lb substance 20 paper in one set Refer to Copy on Page 3 1 for more inform...

Page 36: ...entre 220 230 332 340 contains a digital modem with automatic fallback capability supporting baud rates of 2 4 kbps to 14 4 kbps on the Document Centre 220 230 and bit rates up to 33 6 kbps on the Document Centre 332 340 For more information refer to Fax on Page 4 1 Multiple Fax Line Document Centre 332 340 If the Fax option has been installed on your Document Centre 332 340 the Multiple Fax Line ...

Page 37: ...in to the electrical outlet For detailed technical information refer to Reference on Page 11 1 The Document Centre 220 230 332 340 takes approximately 3 1 2 minutes to power ON and complete a self test Document Centre 220 230 The Document Centre 220 230 digital copier will take approximately 59 seconds to power ON On the Document Centre 220 230 the power switch is located on the right hand side of...

Page 38: ...tre 332 340 The Document Centre 332 340 digital copier will take approximately 55 seconds to power ON On the Document Centre 332 340 the power switch is located on the top of the printer on the right hand side À Locate the ON OFF switch ...

Page 39: ...off the Document Centre 332 340 the message Powering off Please wait will not appear on the touch screen However the machine remains on for approximately 10 seconds before the power is terminated The machine is storing files and preparing for the shutdown CAUTION Failure to leave at least 10 seconds between repeated power off on can result in damage to the your Document Centre 220 230 332 340 hard...

Page 40: ...y saver features which significantly reduces the power consumption during periods of inactivity The Power Saver indicator is a light located on the lower left portion of the control panel The Power Saver feature operates in three modes Stand by Low Power Auto Off Sleep Power Save Power Saver light ...

Page 41: ...nd all the features are available within 30 seconds The factory default setting of 15 minutes is customer changeable within the range of 5 to 240 minutes depending on the work pattern for more information refer to Changing the Default Time Settings for Low Power and Power Save Auto Off Sleep Modes on Page 2 13 Power Save Auto Off Mode Sleep Mode As delivered the machine automatically switches into...

Page 42: ...Auto Off Sleep Modes on Page 2 13 Recycled Paper The Document Centre 220 230 332 340 has established performance with the use of recycled paper with its consequent benefits to the environment Xerox recommends Xerox part number 3R5130 8 1 2 x 11 size stock a recycled paper with 20 post consumer content that can be obtained both through Xerox and many office suppliers The following is also available...

Page 43: ... the Default Time Settings for Low Power and Power Save Auto Off Sleep Modes À Press the Access button on the control panel À Enter the password using the keypad and select Enter NOTE User access to the machine Setups screen is password protected Please contact your Key Operator for assistance ...

Page 44: ...Page 2 14 Introduction À Touch the Machine Setups button À Touch the Timers button À Select the option required ...

Page 45: ... screen displays the current timer value Use the scroll buttons to apply the new setting and touch Save À Touch Close À Touch Exit The touch screen displays Please wait exit routine in progress After a few seconds the screen reverts to the standard display The timer settings have now been changed ...

Page 46: ... Job Status and Machine Status offer access to screens which enable users to program monitor the status of jobs on the machine as well as obtain general information about the Document Centre 220 230 332 340 Feature button Job Status button Machine Status button ...

Page 47: ...ature contains all the basic settings required for each feature For example the first Copy screen enables programming to make a copy and the first Fax screen to send a fax The additional screens provide settings to allow further programming selections À Press the Features button on the control panel to display the default screen NOTE The first Copy screen is normally the default setting This can b...

Page 48: ... to print or printing including all active and pending print jobs Paused jobs are considered active jobs The Print Queue can hold approximately 100 through 120 jobs at one time Jobs are placed in the queue according to job priority and type When full the queue will not accept any more jobs As space becomes available new jobs will enter the queue À Press the Job Status button on the control panel t...

Page 49: ...is local For fax jobs no owner name is displayed For Network jobs it will be the person who submitted the job Status information about the progress of a job such as printing scanning formatting Priority identifies the printing priority assigned to the job type Use the toolbar across the top of the Print Queue to manage your jobs When a toolbar button is selected a pop up window is displayed select...

Page 50: ... or one password for all jobs can be set Other jobs in the queue bypass this job and are completed After a problem has been resolved or when ready to print the held job select the job and touch Release Delete deletes the selected job from the Print Queue After the job is deleted all of the resources allocated to that job are also released In an open system no access control any job can be deleted ...

Page 51: ...aiting to be active if the queue is full Jobs are managed in the order they were submitted Delayed start re dial and re send jobs are in order based on start time The Document Centre 332 340 can have up to two fax lines available Therefore either the first or the first and second lines in the queue are reserved for Active fax jobs depending on the number of fax lines available Any job currently be...

Page 52: ...or poll and so on Owner the creator of the job For network fax jobs this is the name of the person submitting the job For fax send broadcast mailbox send and polling reservation jobs the owner is displayed as local Status information about the progress of an active or pending fax job such as sending receiving no active fax job scanning pending and delay Pages the number of pages in a job For queue...

Page 53: ...e selected active or pending job A pop up window enables confirmation or cancellation of the request If an active job is deleted communication stops immediately The job is removed from the Fax Queue and placed in the Completed Fax Queue with an error code in the Status column If a pending job is deleted it is removed from the Fax Queue and not listed in any other queue Details displays additional ...

Page 54: ...d unknown power interruption Owner the person who submitted the job For network fax jobs this is the name of the person submitting the job For fax send broadcast mailbox send and polling reservation jobs the owner is displayed as local Status information about the progress of the job such as complete or an error indicated by a specific error code Pages the number of pages stored in memory for tran...

Page 55: ...complete when they are successfully printed or terminated due to user request or a fault The queue contains the last 50 completed print jobs Jobs are maintained on a first in first out basis and organized in order of completion Use the scroll buttons to move through the jobs in the queue Item the number in sequence for the job Name the name of the document or the remote terminal Type the type of j...

Page 56: ...our jobs Details displays additional information about the jobs in the queue Other Queues displays the other job queues available Scan to File Queue The Scan to File Queue button will only be displayed if the Scan to File option is available Maintains active and pending Scan to File jobs The Scan to File Queue can hold up to 50 jobs at one time Active jobs appear at the top of the queue and comple...

Page 57: ...etup Owner the name of the template owner as defined in the template file Status information about the progress of a job such as active or faulted Scanned Filed the number of sheets scanned and filed for active jobs NOTE When powering OFF the machine active jobs remain in the queue When the machine is powered ON any active jobs contained in the queue are listed as unknown instead of active Use the...

Page 58: ... is grouped on four screens Machine Information displays the Customer Support Number machine serial number and software levels Paper Supply Status displays the status of each paper tray the bypass tray and the optional high capacity feeder It also displays the size type and color of the media in each tray and whether or not fax printing is enabled for each tray if fax is installed The Key Operator...

Page 59: ...he available memory Printer Configuration lists the status of the printer options installed options PCL5 options PostScript options and connectivity options PostScript Font List lists the available PostScript fonts for the printer PCL Font List lists the available PCL fonts for the printer Counters displays the number of jobs processed for each feature and the total machine usage The combined tota...

Page 60: ...en for the current pathway Interrupt button temporarily interrupts a job to enable another user to program a job Start button starts a job Clear button used to delete a numeric value or the last digit entered Also replacesthecurrent value with a default value hash button used to indicate the dialling character Also used to designate a group dial number asterisk button used to indicate the dialling...

Page 61: ...your Key Operator While still logged on use the following steps to review the status of your account À Use the numeric keypad to enter the account number À Touch Enter À Make feature selections as required to complete your job À To exit the account press the Clear All button twice À Press the Machine Status button on the right of the touch screen À Touch Account Information À The screen shown will...

Page 62: ...des context sensitive help specific information to the task being carried out Labels At point of need throughout the machine labels provide guidance when for example clearing paper jams or loading documents User Documentation There are 3 books available which fully describe the operation of the system User Guide All operational and maintenance procedures for use by the user Setup Guide Information...

Page 63: ...modes NOTE Jobs cannot be programmed when using the Help screen À Press the Help button at the top left of the numeric keypad À Select the feature you want more information about À If available touch the Page button to scroll through the options page by page System button to gain help about the machine Index button for a list of features available À Touch Close to exit the help screens ...

Page 64: ...Page 2 34 Introduction ...

Page 65: ...d the features available NOTE The graphic representations of the user interface screens in this chapter are based on a fully configured Document Centre 332 340 and the appearance of these interface screens may differ slightly on other models or configurations However feature descriptions and functionality remain the same as described ...

Page 66: ... the job in the Print Queue in Job Status mode NOTE If the Auditron has been enabled on the machine an account number may be required before programming can commence For user allocation or further information about the Auditron please contact your Key Operator 1 Load the documents A choice of document input areas is available These are A document feeder for multiple documents A document glass Docu...

Page 67: ...e paper size of the documents and detects the orientation of the paper The Document Centre 220 230 332 340 checks the paper trays to find one that corresponds to both the size and orientation À Before placing the documents into the document feeder remove all staples and paper clips À Insert the documents neatly into the document feeder face up The first page should be on top with the headings towa...

Page 68: ... NOTE This will only work with standard document sizes If the documents include non standard sizes use the document glass Document Glass The document glass should be used for single page jobs only and is suitable for any type of document up to a maximum of 11 x 17 size À Raise the document feeder Pic of document feeder being raised ...

Page 69: ...tre 220 230 332 340 User Guide Page 3 5 Copy Copy À Place the document face down onto the document glass aligned with the tip of the registration arrow near the top left of the document glass À Lower the document feeder ...

Page 70: ...t CVT glass is the narrow strip of glass located at the left hand side of the document glass When documents are fed from the document feeder the CVT glass automatically scans the images into memory this does not apply to documents placed on the glass Constant Velocity Transport Glass ...

Page 71: ...he first Copy screen is displayed À Press the Clear All button once to cancel any previous screen programming selections Pressing Clear All twice will clear all the programming pathways and return the machine to its default status The Digital Copier defaults to the first Copy screen This is the default set at the factory however this can be changed by the Key Operator Clear All Button Features But...

Page 72: ...s For a more detailed explanation of the standard features available on the touch screen please refer to the following pages Output Page 3 40 Sides Imaged Page 3 17 Reduce Enlarge Page 3 19 Paper Supply Page 3 21 Image Quality Page 3 23 À Touch the button for the feature required The button changes to white If Other is selected touch the Save button to confirm the selected feature or Cancel to ret...

Page 73: ...2 340 the maximum copy quantity is 999 Document Centre 220 230 On the Document Centre 220 230 the maximum copy quantity is 250 À Using the numeric keypad enter the number of copies The number entered is displayed in the top right hand corner of the touch screen To cancel an incorrect entry press the C button and enter the correct quantity ...

Page 74: ...ouch screen If there are any resource problems or programming conflicts which prevent the job completing a message will be displayed Follow the message to resolve the problem NOTE The job is placed in the print queue to be processed and printed À On completion remove the documents from under the document feeder or from the document glass Start button ...

Page 75: ...Copy Copy 6 Identify the copy job in the Print Queue À Press the Job Status button on the control panel À The Print Queue will be displayed À Your job will be displayed in the queue If there are no other jobs in the queue the job may have already been processed ...

Page 76: ...e 3 17 Reduce Enlarge Page 3 19 Paper Supply Page 3 21 Image Quality Page 3 23 Output There are two standard output options available on the Document Centre 220 230 332 340 the Center and Left Tray The Finisher is an optional output device The Center Tray is the default output tray Output will be delivered face down and offset to the Center Tray Copy sets delivered to the Left Tray will be face up...

Page 77: ...ers the specified number of copy sets to the Center Tray in the same order as the documents If selecting two copies of a three page document the order of the output will be pages 1 2 3 1 2 3 Uncollated This option delivers the copies to the Center Tray in the order based on the total number of copies for each document The order of the output for two copies of a three page document will be 1 1 2 2 ...

Page 78: ...inisher can staple either 8 1 2 x 11 x 17 in sets of 2 through 50 sheets of 20lb substance 20 paper either automatically or manually The staple cartridge holds 5000 staples Manual Stapling using the Finisher The Finisher stapler can also be used to staple documents manually Use the following steps to manually staple a set of documents 1 2 3 À Press and release the button on the top of the Finisher...

Page 79: ...g edge feed over the green rectangle with the left edge of the documents against the tab of the Staple Cartridge Door À Slide the documents forward until you hear the click of the staple being inserted The staple is inserted in the upper left corner of the documents À Remove the stapled set from the Finisher ...

Page 80: ... documents can be stapled straight or at an angle The Convenience Stapler can staple sets of 2 through 50 sheets of 20lb substance 20 paper The staple cartridge holds 5000 staples À With the documents face up slide the corner to be stapled in to the stapler À The stapler will automatically staple the documents During stapling the indicator light on the left hand side of the stapler will be lit À R...

Page 81: ... options 1 1 single sided copies from single sided documents 1 2 double sided copies from single sided documents 2 2 double sided copies from double sided documents 2 1 single sided copies from double sided documents NOTE When making two sided copies using drilled or pre printed paper load the paper the opposite of the single sided copying instruction label on the tray The machine copies the secon...

Page 82: ...Toe the output will be rotated 180o Portrait the image appears in the portrait orientation Landscape the image appears in the landscape orientation The following illustration depicts the results for Head to Head or Head to Toe selections for Portrait and Landscape images Document Centre 220 230 select the Other option and then 1 2 to access the following orientation options available Head to Head ...

Page 83: ...size copies reduced or enlarged copies can be produced by selecting one of the Reduce Enlarge options If the media loaded is the same size as the documents but does not match the orientation the Document Centre 220 230 332 340 can rotate the image so that it fits correctly on to the paper Rotation will only occur when Auto Reduce Enlarge or Auto Paper Supply but not both is selected B B Head to He...

Page 84: ...output The Document Centre 220 230 332 340 automatically rotates the image 90 to match the orientation of the 8 1 2 x 11 documents and prints on to 8 1 2 x 11 long edge feed paper Presets to save programming time a choice of the two most frequently used preset reduce enlarge settings are available on the first Copy screen Other used to specify a magnification not listed or select normal or custom ...

Page 85: ...stom Reduce Enlarge is selected the machine does not rotate the image to match the orientation of the documents If Auto Custom Reduce Enlarge is selected the machine does rotate the image Paper Supply The media loaded in the paper trays determines the sizes displayed in the Paper Supply selection on the touch screen For example if transparencies are loaded a picture of a transparency is displayed ...

Page 86: ...he document and sends the output to the Center Tray Presets displays the most regularly used paper supply options The presets are set up by the Key Operator Other displays a list of all the trays and the paper type color size and orientation loaded À Open the paper tray À The tray attributes window is displayed À Load the tray À If the paper type or color has been changed touch the Change Color or...

Page 87: ...HINT If copying a document onto larger size media and the output displays a line that appears to be from the edge of the document adjust the automatic exposure in the Image Quality selection on the touch screen or select Edge Erase to delete the borders or edges Auto adjusts the image quality automatically based on the quality of the document The Document Centre 220 230 332 340 deletes colored bac...

Page 88: ...t Centre 220 230 332 340 identifies black white and halftones gray patterns that are not black or white HINT For best results copy a maximum of 5 photos in one job unless the machine has additional memory Lighter Darker scroll bar allows manual adjustment to be made to the lightness and darkness of the output Scroll bar ...

Page 89: ...ing features for a copy job For more information about the features available refer to the following Original Size Page 3 26 Bound Originals Page 3 29 Image Shift Page 3 31 Expert Image Quality Page 3 33 Erase Page 3 34 Edit optional Page 3 35 Image Adjustment tab À Touch the Added Features tab À The Image Adjustment screen will be displayed ...

Page 90: ...p keypad which can be used to input and save the values À Place a document on the document glass À Select the features touch Image Adjustment and then Original Size Original Input on the Document Centre 220 230 À Touch Original Size À Use the up down scroll arrows until the correct size is displayed À Touch the required size and select Save If the size is not available in the list use the up down ...

Page 91: ...be used with the Document Feeder or the Document Glass NOTE The paper tray sensors can detect only the size of the paper loaded They cannot detect paper attributes such as transparencies color stock or drilled stock The attributes must be selected Mixed Size use this option to feed documents of different sizes through the document feeder You can select between size for size or reduced enlarged cop...

Page 92: ...uch Save À Enter the quantity and press Start For reduced enlarged copies À Load the documents À Select the paper size required À Touch the Added Features tab À Touch Original Size Original Input on the Document Centre 220 230 À Select Mixed Size and touch Save À Enter the quantity and press Start NOTE Inserts Booklet Creation and N Up 2 Up on the Document Centre 220 230 cannot be used with Mixed ...

Page 93: ... or magazines using the Document Glass À Place the bound document face down on to the document glass Close the cover until it rests on the bound document Do not force it shut À Select the features required À Touch the Added Features tab À Touch the Bound Originals button and select the features required À Touch Save À Press Start ...

Page 94: ...ge on the right when looking at the open book face up 1 and 2 copies both pages of an open book and places each page on a separate sheet of paper Book size use this option if the book size is anything other than 11 x 17 Gutter Erase erases the gutter area down the center of a bound document from 0 2 in When the 1 and 2 option is selected any amount from 0 2 in can be entered ...

Page 95: ...ayed on the page just as it is on the document Side 1 the default setting shifts the image to the left or right up or down for the first page of the document being copied The image can be shifted up to 2 in Side 2 shifts the image to the left or right up or down for the second page of the document being copied The image can be shifted up to 2 in Independent Use this to set different image placemen...

Page 96: ... are in the same orientation as the media loaded in the paper trays À Touch the Added Features tab À Touch Image Shift and then the Margin Shift option À Touch Side 1 and using the scrolling arrows manually enter the amount of shift required À Touch Save À Select the quantity and press Start ...

Page 97: ...e sharpness too much the copy might appear distorted Normal is the default setting Gray Scale Copying Document Centre 220 230 use when copying documents containing highlights and shadows This option provides better reproduction of gray levels Images tend to be sharper and have less contrast NOTE 1 2 2 2 transparencies 2 Up Booklet Creation Build Job or Annotation cannot be used with Gray Scale Cop...

Page 98: ...e erases equal amounts from all edges up to 2 in À Load the documents documents should be in the same orientation as the selected Paper Tray À Select the features required À Touch the Added Features tab À Touch the Image Adjustment tab À Touch Erase À Select either Border Erase or Edge Erase as required À Using the scroll arrows enter the amount of erase required À Touch Save À Enter the quantity ...

Page 99: ... best results use the marker supplied NOTE When editing a document keep the Document Glass closed unless editing a bound document or using the Original Size feature Do not press Interrupt or Pause while scanning a document HINT If the Editing feature is not working properly or if the edit marks are not dark replace the orange marker Also avoid placing edit marks within approximately 1 4 of an inch...

Page 100: ...raw a thick line through the areas Press firmly on the edit marker the line indicating the area to be edited must be dark without any breaks NOTE There is no limit to the number of markings À Place the marked copy on to the Document Glass À Touch the Added Features tab and then the Image Adjustment tab À Select Edit À Select Area Edit À Select the option you want to use and touch Save À Press Star...

Page 101: ...l be blank Centering Document Centre 332 340 Centers the image area inside the marker area onto the output paper and deletes all other areas outside the marker area Inversion Document Centre 332 340 changes all the black images to white and all the white images to black within the marker area Page Edit Document Centre 332 340 The feature does not require the use of a marker pen hence no pre scan i...

Page 102: ...he black images on the page to white and all the white images to black À Load the document in the Document Feeder or place it on the Document Glass À Touch the Added Features tab and then the Image Adjustment tab À Select Edit À Select Page Edit À Select the option you want to use and touch Save À Press Start ...

Page 103: ...o Area Edit Document Centre 332 340 on Page 3 36 for instructions on programming the Edit option Edit options Off the feature is not available Delete Inside scans everything outside the orange lines and ignores everything inside The center area will be blank Delete Outside scans everything inside the orange lines and ignores everything outside The outside area will be blank ...

Page 104: ...appearance of a copy job For more information about the features available refer to the following Transparencies Page 3 41 N Up 2 Up Document Centre 220 230 Page 3 43 Annotation Page 3 44 Inserts Page 3 48 Booklet Creation Page 3 51 Covers Document Centre 332 340 Page 3 52 À Touch the Output Format tab ...

Page 105: ...nd other media on Page 8 1 À Load the documents in the document feeder À Make the required feature selections À Touch the Output Format tab À Select the Transparencies button Select the option required À Load the transparency stock À Program the Tray Attributes screen À Touch the Type button Use the up down scroll arrows to display the transparency option Select Transparency and touch Save À Touch...

Page 106: ...ts at meetings After selecting Copy Sets enter the number of sets from the keypad on the control panel HINT If a paper tray has been loaded and the tray attributes have been programmed it is not necessary to assign a tray for transparencies When selecting Transparencies from the touch screen the Document Centre 220 230 332 340 automatically detects the tray that contains the transparencies NOTE Do...

Page 107: ... on one page based on the paper supply selected Document Centre 220 230 this feature is available as 2 Up It enables two independent documents to be scanned side by side on to one sheet of paper It reduces enlarges the images as needed to display them in landscape orientation on one page NOTE 2 1 Bound Originals Image Shift Transparencies Booklet Creation Gray Scale Copying Document Centre 220 230...

Page 108: ...ocument feeder Documents must be loaded long edge feed À Make the required feature selections for the job Select Paper Supply and the paper size required À Select the Added Features tab and touch the Output Format tab À Touch N Up À Select either 2 or 4 Up À Select landscape or portrait and then Save À Enter the quantity À Press Start ...

Page 109: ...he landscape edge of any document over A4 in size Annotation options Date displays the current date based on the machine settings On the Document Centre 332 340 the date can be added to the left right and center and at the top or bottom of a page On the Document Centre 220 230 the date can be added to the left right and center of the top of a page only À Load the documents in the document feeder À...

Page 110: ...are three options available in this screen Each option is available with any one of the annotations orientation informs the machine the orientation landscape or portrait of the document The machine then uses this information to determine what side of the page to place the annotation font size offers a choice of two fonts Small font size is set at 72 dots and the large font size is set at 144 dots ...

Page 111: ...ate right When date is selected there is a choice of format MM DD YY or DD MM YY Programming a new comment À If Off is selected select comment and the Document Centre will display the list À Select an empty slot in the list À Touch Enter À Use the pop up keypad to enter a new comment Touch the More Characters button on the keypad to use additional characters If an incorrect entry is made touch the...

Page 112: ...erts This feature enables a different type of stock to be automatically inserted within a set Up to 10 inserts can be added per copy set NOTE 1 2 2 1 cannot be used with the Inserts feature À Load the insert stock into the required paper tray À Program the Tray Attributes window and touch Save À Select the features required À Touch the Added Features tab and then the Output Format tab À Touch the ...

Page 113: ...aining the text in the place of the blank sheets À Add blank sheets to the set of documents where the inserts are to be placed À Working from the beginning of the set of documents count the pages and enter the page number where an insert is required À Touch the Add Insert button The insert programmed will appear in the review window Entries made are the physical page numbers not the page numbers y...

Page 114: ...nate between the two trays À To correct an error touch the Delete Last Insert button À After the last entry has been made touch Save À Load the documents into the document feeder and press Start Documents blank inserts Copies Blank inserts 2 2 sided copies 1 1 sided copies ...

Page 115: ...feature is selected the Document Centre 220 230 332 340 will print two pages side by side on both sides of each page To create a booklet fold the copies in half the pages will appear in the correct order NOTE If the number of document pages is a multiple of four the booklet will not contain blank pages Otherwise the extra pages in the book will be blank Documents specified as Copies Printed insert...

Page 116: ...ture enables paper and card covers to be added to a copy job Use the following steps to add covers to a job À Load the documents in the Document Feeder long edge feed and in order with the first page on top À Touch Booklet Creation in the Output Format tab À Touch On À Enter the quantity required and press Start À Load the cover stock into the required paper tray À The Change Attributes window wil...

Page 117: ...tically adds a cover page to the front of the set of documents Front Back the machine automatically adds a cover page to the front and back of the set of documents Once the Covers feature is selected the following two options will be available Blank Covers the machine automatically adds a blank cover s to the document Blank sheets do not have to be added to the documents À Select either Front Only...

Page 118: ...e added to the set of documents if only the front or the back cover is to be printed NOTE 1 2 2 1 Build Job Uncollated Transparencies Envelope Tray Booklet Creation and Mixed Size Originals if APS is selected cannot be used with the Covers feature If Annotation is selected with Printed Covers the annotation programmed will appear on the back cover ...

Page 119: ...ored Jobs Page 3 57 Build Job Use this feature to build a job that requires different settings for each page If a set of documents consists of some pages with text and some with photos you can select appropriate settings for each but end up with one complete job By default Build Job is set to Off HINT After the Build Job Screen is displayed use it rather than the control panel to program each page...

Page 120: ...ild Job button and select On À Program the job requirements À Load the first set of documents in to the document feeder or place the document on the glass À Press Start À On completion of scanning remove the originals À From the Build Job screen displayed program the next set and press Start À Repeat the steps above for each set À After the last set has been scanned touch End Build Job to indicate...

Page 121: ...ouch screen contains a list of all stored jobs Up to 8 jobs can be stored at one time The machine stores only the programming for the job not the image Each time a stored job is used the image must be scanned Stored jobs are set to Off as the default Contact your Key Operator change this feature to On To store a job À Program the job features À Touch the Added Features tab À Touch the Job Assembly...

Page 122: ...À Using the keypad on the touch screen enter a name for the job À If additional characters are required to name the job Select More Characters If an incorrect entry is made touch the button to backspace À Touch Save to store the name or Cancel to exit À The job will appear in the Job List À Touch Close to exit ...

Page 123: ...Assembly tab À Touch the Stored Job button À Select the required job in the list and touch the Retrieve button A confirmation message will be displayed in the message area À Touch Close Review the programming or change any of the options before copying Any changes will not be saved on completion of the job À Load the documents and press Start ...

Page 124: ...the Added Features tab and then the Job Assembly tab À Touch the Stored Job button À Highlight the required job in the list then touch Delete À Select Confirm to accept or Close to cancel in the pop up window À The job be deleted from the Job List ...

Page 125: ...ace screens in this chapter are based on a fully configured Document Centre 332 340 and the appearance of these interface screens may differ slightly on other models or configurations However feature descriptions and functionality remain the same as described If the touch screen default has been set to Fax the Fax and Added Features tabs will be displayed Otherwise touch the Fax tab in the top rig...

Page 126: ...of the touch screen Use the following steps to send a fax 1 Press the Features button À Press the Features button À Press the Clear All button once to cancel any previous screen programming selections Pressing Clear All twice will clear all the programming pathways and return the machine to its default status Features Button Clear All ...

Page 127: ...Xerox Document Centre 220 230 332 340 User Guide Page 4 3 Fax Fax Fax À Touch the Fax button on the right hand side of the screen À The first Fax screen will be displayed ...

Page 128: ...Page 4 4 Fax 2 Load the documents À Load documents face up in to the Document Feeder ...

Page 129: ...red after this character press the Dial Pause button on the control panel before continuing to enter the fax number NOTE Dial Pause is displayed as a dash If using manual dialing the Dial Pause character is not required instead wait for the outside line dial tone before proceeding Dial Pause button À Press Start The Fax Job Monitor pop up window will be displayed This shows information about the f...

Page 130: ... indicates the telephone line being used If there is a problem transmitting the fax it will be recorded in the machine s Activity Report available in the Reports Setups tab and in the Completed Fax Jobs List in the Job Status button A status of Completed in the Fax Queue means the fax has been received but it does not mean it has been printed The standard memory in the fax machine is 10 megabytes ...

Page 131: ...tion it is recommended that the job be resent when more memory is available To obtain more memory on the machine reduce the resolution or send the job in text mode The fax transmission report contains information about the job and a reduced image of the first page in the set of documents In Immediate Send Mode the confirmation page contains the information and page numbers as usual but it does not...

Page 132: ...fects the appearance of the fax at the receiving fax terminal A higher resolution yields better quality for photos A lower resolution reduces communication time Standard 200 x 100 dpi recommended for text documents It requires less communication time but does not produce the best image quality for graphics and photos Fine 200 x 200 dpi recommended for line art It produces output with a resolution ...

Page 133: ...scanned for transmission Text use this setting for text line art and documents with large solid areas It produces sharp text images but might reduce the quality of halftone or photographic images This is the factory default setting Auto senses the image and automatically selects the best text or photo option Use this setting for combinations of text and photos or text and graphics Photo use this s...

Page 134: ...tions are available 1 Sided each document is single sided 2 Sided each document is double sided 1 2 2 2 the first page of the set of documents is single sided and the rest of the document is double sided If the document is double sided specify the type of document Portrait or Landscape Head to Head or Head to Toe À Touch the Sides Scanned button to access the options available ...

Page 135: ...about the Dialing options Next Destination Use this feature to send an original to more than one location À Enter the first fax number using the keypad speed dial etc À Touch Next Destination the touch screen displays the Dial Directory À Enter the next fax number A maximum of 50 numbers can be entered using Next Destination ...

Page 136: ... sending a fax to multiple destinations will cancel the fax job and all selected destinations Dialing Characters Dialing characters are special characters that are used for entering fax numbers Some characters are used only when auto dialing such as and Dialing characters are entered as part of the fax number Because Dial Pause is so commonly used it is available as a button on the control panel a...

Page 137: ...e fax number but before the charge code numbers to ensure that the telephone line is ready to accept the numbers Mask data to protect confidential information Press the forward slash key before entering confidential numbers After entering the last confidential number press the slash key again to turn off Mask Data The characters or numbers entered between the slash characters are displayed as aste...

Page 138: ...inal mode during the fax operation You might need to use pulse mode to make the connection and tone mode to access a mailbox This is similar to a telephone response system Dial the number and wait for instructions After the call is answered and the greeting is heard you are prompted to press 1 or some other designated character if you are calling from a touch tone phone When the designated charact...

Page 139: ...e 1 is checked first if this is not available Line 2 is used Line 1 select this option if Line 1 is required Line 2 select this option if Line 2 is required After selecting one of the above options or if only one telephone line is available press Send or Receive to tell the machine the type of job Enter the phone number and press the Start button The Document Centre 220 230 332 340 does not have a...

Page 140: ...the dialing keypad They are available only through a special character keypad Select the special character keypad from the touch screen Keypad The keypad refers to the control panel telephone keypad buttons Press keypad to use it instead of another method Speed Dial Entering a telephone number into the dial directory automatically establishes it as a speed dial number a short cut version for quick...

Page 141: ...ed Dial numbers are at the front of the list and Group Dial numbers are at the end Use the Speed Dial button to quickly jump to a location in the Dial Directory For example to jump from number 5 to 150 press Speed Dial and enter 150 The Speed Dial button can Speed Dial 12 To dial a continuous block of numbers For example if the members of the Sales Department are assigned numbers beginning with 12...

Page 142: ...elected if sending a fax to more than one recipient The Dial Directory can store a maximum of 200 numbers Each speed dial telephone number can contain a maximum of 39 characters digits spaces and pauses In addition a telephone number from the dialing keypad can also be entered Use this is an alternative to selecting a speed dial number from the dial directory Up to 120 digits or special characters...

Page 143: ...e following Cover Letter Page 4 19 Transmission Report Page 4 21 Lighter Darker Page 4 21 Communications Mode Document Centre 332 340 Forced 4800 Mode Document Centre 220 230 Page 4 22 Delayed Start Page 4 23 Send Priority Document Centre 332 340 Page 4 25 Cover Letter Cover Page Use this feature to automatically generate a Cover Letter for an out going fax À Touch the Added Features tab À The Mor...

Page 144: ...ent A Fax cover letter title The name or telephone number of the remote terminal If the fax number has been entered manually instead of using the Dial Directory the first line of the To comment is blank The To comment recipient s name The local name The From comment sender s name The telephone number for the local or sending terminal The number of pages not including the cover page The date month ...

Page 145: ... fax and a reduced copy of the image from the first page of the fax When sending a fax to multiple recipients broadcast one transmission report will be printed listing all of the recipients Lighter Darker Adjusts the image quality of the document being scanned for fax transmissions À Load the document À Touch the Added Features tab on the first Fax screen À Touch the Transmission Report button À T...

Page 146: ...s the only available option The following options are available À Load the document À Touch the Added Features tab on the first Fax screen À Touch the Lighter Darker button À Use the scroll bars to increase or decrease the image adjustment for the document À Touch Save and press Start À Load the document À Touch the Added Features tab on the first Fax screen À Touch the Communications Mode button ...

Page 147: ...he fax communications are susceptible to errors To minimize errors set the Document Centre 220 230 332 340 to run at a communication mode of 4800 This mode is slower but it is less susceptible to errors In some regional areas the use of the Communication Mode Forced 4800 bps feature is restricted Delayed Start Delayed Start is mainly used to transmit faxes during off peak hours when telephone char...

Page 148: ...wer is restored À Load the document À Touch the Added Features tab on the first Fax screen À Touch the Delayed Start button À Touch ON the Delayed Start screen will be displayed À Use the up down scroll arrows to indicate the hour and minutes when you would like the fax to be transmitted À Touch Save and press Start ...

Page 149: ...se either a high or normal priority for a fax job If Normal is selected the job will not be sent until all the high priority jobs have been sent NOTE Send Priority can be used with Delayed Start À Touch the Added Features tab on the first Fax screen À Touch the Send Priority button À Select either Normal or High À Touch Save to close ...

Page 150: ...n about the features available refer to the following Build Job Page 4 27 Poll Remote Fax Page 4 28 Store for Polling Page 4 29 Fax Mailbox Page 4 33 Original Size Document Centre 332 340 Mixed Size Originals Document Centre 220 230 Page 4 36 À Touch the Added Features tab À Touch the Advanced Features tab to display the options available ...

Page 151: ... Touch the Build Job button and touch On À Press Start the documents will be scanned The Build Job feature selection screen will appear on the touch screen À Make any programming requirements for the next section À Load the documents and press Start Repeat the above steps until all the sections of the document set have been scanned in À Touch End Build Job when the last section of the job has been...

Page 152: ...n the transmission fails it does not redial the number If this happens start the job again After the telephone connection is made the Document Centre 220 230 332 340 lists the job in the Fax Job Queue located in Job Status Polling retrieving a document from a remote fax machine Delayed polling retrieving a document at a programmed time Only one delayed polling job is allowed at one time DTMF Mailb...

Page 153: ...ure polling a password is required to retrieve the fax The document is sent if the Document Centre 220 230 332 340 recognizes the password used by the remote user The Document Centre 220 230 332 340 must identify the remote terminal ID number as one of the passwords previously registered Passwords can contain up to 20 characters The machine checks the entire password and sends the document stored ...

Page 154: ...up to 20 numeric characters each À Load the document À Enter the fax number for the remote machine À Touch the Added Feature tab on the first Fax screen À Touch the Advanced Features tab À Touch the Store for Polling button Touch Secure Polling À Enter the password then touch Close À Press Start ...

Page 155: ...hen trying to store a document for secure polling cancel the operation and try again later when more memory is available À Touch the Polling Password button À If necessary use the up down scroll arrows to select a blank location in the list À Use the pop up keypad to enter the fax ID number fax telephone number of the remote machine that will be retrieving the document À Touch Add À Press Start Th...

Page 156: ...appear on the touch screen Print documents Used to print the original documents stored for polling If the Document Centre 220 230 332 340 is configured by the Key Operator to delete the stored documents after they are printed a confirmation message will appear confirming the request Configuring the machine to delete the stored documents after printing saves memory ...

Page 157: ...re to Mailbox NOTE On the Document Centre 332 340 mailbox numbers are 3 digits from 001 200 On the Document Centre 220 230 mailbox numbers are 2 digits from 01 30 NOTE There is no password restriction for storing documents in a mailbox À Touch the Added Features tab on the first Fax screen À Touch the Advanced Features tab À Touch the Fax Mailbox feature À Touch the Store to Mailbox button À Using...

Page 158: ... tab À Touch the Fax Mailbox feature À Touch the Print from Mailbox button À Using the keypad on the control panel enter the mailbox number À Using the keypad on the control panel enter the four digit mailbox password 0000 9999 The password will be displayed as À Touch Enter After the document is printed it is deleted ...

Page 159: ...rd have been entered À Touch the Added Features tab on the first Fax screen À Touch the Advanced Features tab À Touch the Fax Mailbox feature À Touch the Delete Mailbox Contents button À Using the keypad on the control panel enter the mailbox number À Using the keypad on the control panel enter the four digit mailbox password 0000 9999 The password will be displayed as À Touch Enter ...

Page 160: ...the Document Feeder À Load the documents face up in to the document feeder À Touch the Added Features tab on the first Fax screen À Touch the Advanced Features tab À On the Document Centre 332 340 touch the Original Size button On the Document Centre 220 230 touch the Mixed Size button À On the Document Centre 332 340 touch Save On the Document Centre 220 230 touch On and then Save À Press Start ...

Page 161: ...d other specifications For more information about the features available refer to the following Fax Reports Page 4 37 Answer Mode Page 4 38 Dial Directory Setup Page 4 40 Comment Setup Page 4 45 Transmit Header Print Document Centre 332 340 Page 4 47 Fax Reports The following reports are available on the machine À Touch the Added Features tab À Touch the Reports and Setups tab ...

Page 162: ...bs Report contains information about the jobs still in memory In addition this report gives a percentage of available memory Options Report Document Centre 220 230 provides the current settings for the machine and the programmed comments message stamp comments stored jobs and firmware version Dial Directory Report Complete Report provides information about the Dial Directory numbers Print a comple...

Page 163: ...d 15 seconds This depends on the way the machine is used The delay gives recipients an opportunity to answer the telephone After the programmed time delay or immediately if it is set to 0 the machine automatically answers Manual Answer the Document Centre 220 230 332 340 will not automatically answer On answering the telephone and if a fax tone is heard touch Receive and Start to switch from the t...

Page 164: ...ant to include in a group Individual Use this feature to enter numbers in to the Dial Directory À Touch the Added Features tab À Touch the Reports Setups tab À Touch Dial Directory Setup À Touch the Individual button À Select a blank location in the Dial Directory list À Touch the Next button À Using the keypad on the control panel enter the fax telephone number for the individual À Touch the Next...

Page 165: ...eypad to enter the name of the individual up to 18 characters If an incorrect entry is made touch the button to backspace À Touch the Next button À Select the desired settings for the faxes to be sent to this individual Resolution Communication Mode and Maximum Storage Width À Touch Next ...

Page 166: ...The Cover Letter screen will appear À Touch either Cover Letter On or Off If Off is selected Touch Next À If On is selected touch the To Comment À Select a comment from the Comment List À Touch the From Comment À Select a comment from the Comment List À Touch Next the Delayed Start options screen will be displayed À Touch Save OR select On and use the scroll arrows to indicate the hour and minutes...

Page 167: ...ssly In this case the document will be stored as an 8 1 2 x 11 document based on the requirements of the remote fax machine Deleting a number from the Dial Directory À Select the number to be deleted À Touch Delete NOTE Numbers cannot be deleted out of order Always start from at the bottom of the list ...

Page 168: ...s can be programmed and stored Each group can contain a maximum of 20 destinations À Enter a group name in the Group Directory follow the same steps used to enter a name in the Individual Directory À Choose a group number name the group and save À From the Dial Directory select the individual names and numbers that are to be included in the group À After each name and number touch Add to add it to...

Page 169: ...mments To use a comment scroll through the comments and choose the one required or create a new comment À Touch the Comment Setup button on the Reports Setups tab À Select an empty line in the Comment List to enter the name s you want to program À Touch Next Document Centre 332 340 or Enter Document Centre 220 230 to display the keypad If an incorrect entry is made touch the button to backspace À ...

Page 170: ...Letter and On The Comment List will be displayed À Touch To Comment and select the recipients name from the list The name appears under To Comment À Touch From Comment and select the senders name from the list The name appears under the From Comment À Touch Save ...

Page 171: ...o have the following automatically printed on the top of each page of an outgoing fax Machine ID number Company logo Destination name Date Time and Page number Use the following steps to switch this feature on for an individual job À Touch the Transmit Header Print feature on the Reports Setups tab À Touch On and then Save ...

Page 172: ...andard ISDN line is capable of providing two separate telephone connections each of which can have its own telephone number You can take full advantage of these features and improve the productivity of your Document Centre 332 340 by having a second fax kit fitted and connecting both fax ports to a TA that supports two analogue ports Your machine will then be capable of simultaneously sending and ...

Page 173: ...ystem Administrator The mailbox contains 10 bins On the Document Centre 332 340 each bin can accommodate 8 1 2 x 5 1 2 through 11 x 17 paper sizes and can hold approximately 100 sheets of 80 g m2 On the Document Centre 220 230 each bin can accommodate 8 1 2 x 5 1 2 through 11 x 17 paper sizes and can hold approximately 70 sheets of 20lb substance 20 Each bin contains a Bin Full sensor that indicat...

Page 174: ...d on the machine Select paper sizes applicable to the Paper Trays Fonts lists the fonts available Paper Output tab selects options such as the job type and the number of copies The choices available are based on the options installed on the machine Use the scroll arrows to change the default settings To display the job type list use the arrow scroll button next to Normal Print If the fax option is...

Page 175: ...a time out period is enabled and the job is not released during this time the machine automatically deletes the job Sample Set enables the review of one set of a multiple copy job before final print After the first proof set is printed the job is placed on hold until released either locally or remotely Touch the Release button to release a job in the Print Queue When released all of the requested ...

Page 176: ...ns when printing graphics for example raster and vector PostScript tab use this screen to select the postscript output options Bitmaps can also be compressed which saves memory and enables faster printing General tab prints a test page Details tab use to print to a new port or a new network path update or change print drivers and select timout settings Capture Settings tab enables selection of Cap...

Page 177: ...from a floppy disk at the Document Centre 220 230 332 340 NOTE The graphic representations of the user interface screens in this chapter are based on a fully configured Document Centre 332 340 and the appearance of these interface screens may differ slightly on other models or configurations However feature descriptions and functionality remain the same as described ...

Page 178: ...S formatted À At your workstation select the Print to File option and select the options required for the job Print your files to PostScript or PCL ASCII and copy them on to a floppy disk À At the Document Centre 220 230 332 340 insert the disk into the floppy drive Floppy Drive À Touch the Media Print button on the touch screen ...

Page 179: ...e list to find the file to be printed If the file is inside a subdirectory select the subdirectory to display the list of files À To exit the subdirectory touch Close Directory À Select the file to be printed The file name is automatically added to the Print List Select the name again to remove it from the list À When all of the files required appear in the Print List press Start The system reads ...

Page 180: ...Page 6 4 Media Print ...

Page 181: ...image quality settings The scanned in document is converted to TIFF 6 0 Multipage Tiff or PDF file format and stored electronically on a TCP IP or NetWare file server NOTE The Document Centre 332 340 supports both PDF and TIFF File Formats The PDF image format is a TIFF image enclosed within a PDF wrapper The Document Centre 220 230 supports only the TIFF image format NOTE The graphic representati...

Page 182: ...t Feeder or place it on the Document Glass À Touch the Scan button À Select a template with preprogramming instructions applicable to the scan job from the Template List À Touch the Added Features tab to access the three setup tabs Refer to the following pages for information about the individual setup tabs NOTE Each setup screen contains features which allow changes to be made to the template À A...

Page 183: ...job then automatically files faxes and prints the job as specified in the template NOTE If Pause is selected while the job is actively scanning the machine displays a message that deletes the job If this happens please begin again À Access the Scan Queue to check on the status of the job this will only show active or pending scan jobs À Access the electronic version of the document at your worksta...

Page 184: ...owered On It contains only the template files available on the local disk The Summary Box on the right hand side of the screen displays information about the selected template Each time you select another template file the Summary Box updates to display information associated with the selected template Directory the name of the directory in which the file you are scanning will be stored Document F...

Page 185: ...screen at any one time to view the remaining templates use the scroll buttons When a template is selected from the list the system downloads a copy from the local disk To obtain an updated copy press the Refresh Template button The system will attempt to retrieve the latest version of the template from the file server If the file server cannot be accessed or the file cannot be found the machine di...

Page 186: ...o accepts the machine s automatic size sensing Do not use Auto for non standard sizes The machine cannot sense the size of non standard documents Custom to define the magnification level by programming the X and Y settings for non standard sizes Basic Image Quality to adjust the settings for the output Original Type to control the contrast and sharpness of the image and the way the TIFF image is p...

Page 187: ...k or white HINT For best results scan a maximum of 5 photos in one job unless the machine has additional memory Auto Exposure enables you to enhance documents that have colored backgrounds When Auto Exposure is set to ON the system selects an exposure level that is appropriate for the type of documents Lighter Darker adjusts the density of copies and scanned images in the Text Auto and Photo mode ...

Page 188: ...our own settings in 1 increments NOTE Touching the numeric input area on the touch screen displays a pop up keypad which can be used to enter values Stored Image Settings to define the image output requirements for the produced image and the target output image size Resolution to define the resolution of the stored image You can select 400 x 400 dpi 300 x 300 dpi 200 x 200 dpi or 100 x 200 dpi Sto...

Page 189: ...uture scanned images to Tiff Multipage Tiff or PDF files Erase to erase unwanted marks from the scanned document Specify either Border Erase or Edge Erase Border Erase erases equal amounts 0 2 in from the top bottom and both sides of the document Edge Erase erases amounts 0 2 in specified from the top bottom and both sides independent of each other ...

Page 190: ... 2 LEF 8 1 2 x 11 SEF 8 1 2 x 14 SEF 11 x 17 SEF Paper Size Sensed Actual Paper Size Output Image Size 8 1 2 x 5 1 2 LEF Paper width 6 1 2 8 1 2 x 11 SEF 8 1 2 x 11 SEF Paper width 12 8 1 2 x 11 SEF 8 1 2 x 11 SEF Paper width 12 8 1 2 x 14 mm SEF 8 1 2 x 11 LEF Paper width 9 1 2 11 x 17 SEF 8 1 2 x 14 SEF Paper width 14 8 1 2 x 14 SEF 11 x 17 SEF Paper width 17 11 x 17 SEF ...

Page 191: ...cters Document Path the path or route taken to reach the directory in which the scanned document will be placed For NetWare the document path includes the physical volume name Physical Volume Name Directory Path If the physical volume name is Vol1 and the directory path is user dcs specify the document path as Vol1 user dcs Document Folder the specific folder which is located in the directory that...

Page 192: ... supports only the TIFF image format Files are stored on the file server and directory path specified within the job template If a file server is not specified the default repository is used If a folder name is specified within the job template the system creates the subdirectory Folder Name xsm in the directory path If a folder name is not specified the folder name used is ddhhmmss whereasdd the ...

Page 193: ...ile server The error is recorded in the confirmation report and the job is terminated Server cannot be reached The error is recorded in the confirmation report and the job is terminated Invalid login The error is recorded in the confirmation report and the job is terminated The specified directory path does not exist The error is recorded in the confirmation report and the job is terminated The sp...

Page 194: ...ting telephone number in the Current Dial List You can select a number from the Current Dial List or add a number from the Dial Directory Delayed Start to scan a document into the machine and send as a fax at a later time À Select the Current Dial List À Select the number from the Dial Directory À Touch Next Destination À Select the next number and touch Next Destination Repeat this step until all...

Page 195: ... Document Centre 220 230 332 340 is designed to use a variety of types of paper and other media This chapter offers information about loading paper and other types of media into the Document Centre 220 230 332 340 as well as recommending the different types of paper and media that can be loaded in to the various paper trays on the machine ...

Page 196: ...window giving the option to change the paper and its attributes or load more of the same paper Please refer to Page 3 21 for more information about programming the paper tray attributes Preparing paper for loading Before loading paper into the paper trays fan the edges This procedure separates any sheets of paper that are stuck together and reduces the possibility of paper jams ...

Page 197: ...ays Tray 1 and Tray 2 All four paper trays are standard on the Document Centre 340 NOTE If the Document Centre 220 230 332 340 is currently processing a job do not open the active paper tray HINT To avoid jams and misfeeds do not load paper on top of paper that may still be in the tray Remove the paper stack it and reload it on top of the new stock loaded À Pull out the paper tray towards you ...

Page 198: ...paper tray guides to accommodate the new paper size To release the rear guide push down on the tab and slide the guide to its new position The tab will reset once the guide is correctly in place To adjust the right guide lift the guide and slide the guide to its new position If not positioned correctly the guide will not slot into place À Make sure that the guides lock tightly into place If the pa...

Page 199: ...ower speed when jobs require rotation À Referring to the tray labels load the paper neatly into the tray An arrow is imprinted in the left front corner of each paper tray Place one corner of the stack of paper tightly into the corner of the tray covering the arrow À Take care not to fill above the maximum fill line À If the paper tray guides have been moved slide the guides so that they are just t...

Page 200: ...and other media NOTE Mixing paper standards can lead to image loss Paper can be loaded either short edge feed or long edge feed however the default orientation is long edge feed Long Edge Feed LEF Short Edge Feed SEF ...

Page 201: ...Tray The tray senses the paper and the machine displays a confirmation pop up window on the touch screen to change the attributes NOTE To reduce unnecessary fuser and paper feed jams it is important that the paper size color and type programmed in the Change Attributes window for the Bypass Tray is identical to the paper stock loaded in the tray Bypass Tray with the Left Tray À Following the copie...

Page 202: ...acket of paper with the seam side of the packet face up turn the paper over when loading it in to the Bypass Tray This prevents curled output À Slide the High Capacity Feeder and Finisher unit away from the machine À Load the Bypass Tray as described on the previous page À Slide the unit back to the machine ...

Page 203: ...n be loaded Mailing envelopes must be at least 4 wide and between 6 and 9 5 long Reliable envelope sizes include Commercial 10 DL C5 Monarch 7 3 4 and B5 Reliable envelope styles include Wallet and Pocket types NOTE The Envelope Tray can only be inserted in place of Tray 1 However all 4 paper trays can be removed from the machine CAUTION To prevent damage to a tray after it has been removed from t...

Page 204: ...velope Tray Attributes Touch Confirm to accept the size shown or touch Change Envelope Size to change the size À Adjust the guides in the tray to accommodate the size of the envelopes À Load large envelopes long edge feed with the envelope flap face down in the tray À Side flap envelopes should be loaded with any folded edges to the right À Place the envelopes in the tray with the opening of the e...

Page 205: ...ough the High Capacity Feeder is designed to accept 16 110lb substance 16 110 paper it can hold 2 000 sheets of 20lb substance 20 8 1 2 x 11 paper Loading the High Capacity Feeder À Use the handle on the front to pull open the High Capacity Feeder The elevator in the tray lowers À Place the paper tightly against the right hand side of the tray À Close the High Capacity Feeder The elevator rises an...

Page 206: ...he other if the active tray runs out of paper This is called Auto Tray Switching However the Document Centre 220 230 332 340 will not automatically switch to a tray that contains a different size type or color of paper HINT On the Document Centre 332 340 the Bypass Tray can also be used with Auto Tray Switching When not in use the paper trays can be opened and paper can be loaded while the Documen...

Page 207: ...the Document Centre 220 230 332 340 Damaged curled or damp paper can cause jams and image quality problems Follow these simple rules to store paper Store paper in dry conditions away from extreme heat or cold such as radiators or open windows Store paper flat on a shelf or pallet above floor level Leave the paper wrapped and boxed until ready to be used Re wrap partly used packages of paper ...

Page 208: ...t Centre 220 230 332 340 Check the following table for special considerations NOTE Although 16 24lb substance 16 24 bond paper is an acceptable weight the machine might experience a problem with paper curl when feeding light weight paper Whenever possible use 20lb 24lb substance 20 24 bond paper ...

Page 209: ...SEF postcards cannot be duplexed To print on both sides feed paper through the Bypass Tray then turn the paper over and feed through the Bypass Tray again to print on the second side High Capacity Feeder do not use in this tray 5 1 2 x 8 1 2 Statement Paper Billing account state ments Tray 1 load LEF 500 sheets maximum 20lb substance 20 paper Trays 2 3 4 do not use in these trays Bypass Tray load ...

Page 210: ...rk jobs High Capacity Feeder load LEF 2000 sheets maximum 20lb substance 20 paper 8 1 2 x 11 Xerox brand Recycled Paper Standard documents Trays 1 2 3 4 load SEF or LEF 500 sheets maximum 20lb substance 20 paper Bypass Tray load SEF or LEF 50 sheets maximum 20lb substance 20 paper 8 1 2 x 11 SEF paper cannot be fed from the bypass tray when printing network jobs High Capacity Feeder load LEF 2000 ...

Page 211: ...maximum 20lb substance 20 paper High Capacity Feeder do not use in this tray 11 x 17 the Docu ment Centre 332 340 requires 64MB of memory otherwise the machine will not print on these sizes Over sized or enlarged documents ledgers Trays 1 2 3 4 load SEF 500 sheets 20lb substance 20 paper Bypass Tray load SEF 50 sheets 20lb substance 20 paper High Capacity Feeder do not use in this tray Media Uses ...

Page 212: ... the holes on the right for duplexing load with the holes on the left Load SEF with the holes facing the back of the machine for duplexing load with the holes facing the front of the machine 50 sheets maximum 20lb substance 20 paper High Capacity Feeder load LEF with the holes on the right for duplexing load with the holes on the left 2000 sheets maximum 20lbsubstance 20 paper Media Uses and Speci...

Page 213: ...xing load face up High Capacity Feeder load LEF face down 2000 sheets maximum for duplexing load face up Start with a test run use paper that has preprinted materials from ultraviolet cured or oxidative inks whenever possible Tabbed paper Pages that have extended tabs to sep arate pages Trays 1 2 3 4 do not use in these trays Bypass Tray load a maximum of 10 tabbed sheets LEF with the tabs on the ...

Page 214: ... down Inserts colored stock standard size Dividers Trays 1 2 3 4 load SEF or LEF 500 sheets maximum 20lb substance 20 paper Bypass Tray load SEF or LEF 50 sheets maximum 20lb substance 20 paper High Capacity Feeder load LEF seam side down 8 and 24 up Xerox labels 33 up labels may not give maxi mum performance and are not recommended Self adhesive labels for envelopes and packaging Trays 1 2 3 4 lo...

Page 215: ... 4 do not use in these trays Bypass Tray load LEF or SEF face up Maximum performance may not be achieved when feeding 90lb 110lb substance 90 110 SEF stock High Capacity Feeder load LEF face down Cover stock Booklets Trays 1 2 3 4 load LEF or SEF face up Bypass Tray load LEF or SEF face down High Capacity Feeder load LEF face down Media Uses and Special Considerations Media Use Specifications ...

Page 216: ... fed from these trays Bypass Tray load LEF or SEF paper or removable strip up Always feed paperbacked transparencies long edge feed only with the glued edge as the feed edge No special instructions for clear transparencies High Capacity Feeder load LEF paper and removable strip up with the glued edge as lead edge Always feed paperbacked transparencies long edge feed only with the glued edge as the...

Page 217: ...0 332 340 User Guide Page 9 1 Maintenance Maintenance Maintenance 9 Maintenance There will be times when the machine will require maintenance tasks to be carried out Information contained in this chapter will assist in these tasks ...

Page 218: ...solutions editing markers and staples are available for the Document Centre 220 230 332 340 To obtain supplies contact your local Xerox office giving your company name the product number and it s serial number Use the space below to record the telephone number in the space below Supplies Telephone Number ...

Page 219: ...lies and cleaning materials only as directed in this documentation Keep all cleaning materials out of the reach of children WARNING Do not remove the covers or guards that are fastened with screws You cannot maintain or service any of the parts that are behind these covers and guards Do not attempt any maintenance procedure that is not specifically described in the documentation supplied with your...

Page 220: ...oth lightly dampened with water The Document Feeder and Output Trays Use water to clean the Document Feeder output trays paper trays and the outside areas of the Document Centre 220 230 332 340 À To clean the glass areas use a lint free cloth lightly dampened with water or Xerox Lens and Mirror Cleaner À Clean the white tabs located on the under side of the Document Cover and in the Document Feede...

Page 221: ...until the replace cartridge message appears WARNING When ordering a new Copy Print Cartridge make sure the correct cartridge is ordered for your Document Centre For assistance the product number will be displayed on the cartridge box Cartridges for the Document Centre 332 340 and the Document Centre 220 230 are not compatible CAUTION Do not shake an empty cartridge or hold it close to you Some ton...

Page 222: ...intenance À Slide the Finisher and or High Capacity Feeder away from the machine À To open the Duplex Module door release the lever located at the front of the Duplex Module optional on the Document Centre 220 230 ...

Page 223: ...Xerox Document Centre 220 230 332 340 User Guide Page 9 7 Maintenance Maintenance Maintenance À Release the handle to open the Upper Left Door À Pull the Left Front Cover open towards you ...

Page 224: ...py Print Cartridge away from you to avoid spilling any toner residue À Holding the colored lever as shown slide the cartridge out until you can take hold of the handle on top of the cartridge À Using the handle lift the cartridge out of the machine ...

Page 225: ...idge is not recommended because critical components may need replacing To recycle used Print Copy Cartridges return them to Xerox in the original packaging Return labels are included with each new cartridge Inserting the new Copy Print Cartridge À Remove the new Copy Print Cartridge from the box Vigorously shake the cartridge from side to side before removing it from the bag À Remove the paper str...

Page 226: ...dle as you slide the Copy Print Cartridge all the way to the back of the frame It should click into place À Pull the colored tab to remove the sealing tape from the cartridge It is located on the front of the cartridge À Close the Left Front Cover NOTE The Left Front Cover will not close if the cartridge is not completely in place À Close the Upper Left Cover IF FITTED À Close the Duplex Module À ...

Page 227: ...age 9 11 Maintenance Maintenance Maintenance CAUTION Occasionally after the Copy Print Cartridge is replaced the first page printed is blank This is because the roller has not yet turned over to distribute fresh dry ink If this happens reprint the job ...

Page 228: ...sher optional The Finisher contains an automatic stapler One cartridge contains 5000 staples The staple cartridge is located in the Finisher To replace the cartridge À Press and hold the button on top of the Finisher to lower the Finisher Tray ...

Page 229: ...nance Maintenance Maintenance À The staple cartridge is located inside the small door which has a staple imprinted on the outside Pull open the door À Take hold of the cartridge with your thumb and index finger À Gently pull out the cartridge and dispose of the unit ...

Page 230: ...ance À Unpack the new stapler cartridge À Slide the new cartridge into place À Close the staple cartridge door À Press and release the button on top of the Finisher to return the Finisher Tray to its operating position ...

Page 231: ...pen longer than 30 seconds when closed the Finisher Tray immediately returns to its raised position If the staple cartridge door has been open less than 30 seconds when closed the Finisher Tray does not return to its operating position Press and release the button on top of the Finisher to return the Finisher Tray to its operating position ...

Page 232: ...artridge needs replacing or a staple jam occurs the indicator light on the right hand side of the Convenience Stapler will be lit One cartridge contains 5000 staples Indicator light À Holding the sides of the Convenience Stapler door gently pull the door open towards you ...

Page 233: ...traight out of the stapler do not slide at an angle À Dispose of the used cartridge À Unpack the new cartridge À Before replacing the new cartridge check the position of the first staple The staple should be laying flat on the metal striking plate If the staple is on the end or appears damaged manually remove the staple À Slide the new cartridge into the stapler and close the stapler door ...

Page 234: ...Page 9 18 Maintenance ...

Page 235: ...ng The Document Centre 220 230 332 340 has built in information to help identify and manage error messages and problems It also contains troubleshooting and problem solving procedures to help quickly resolve the problem Refer to the information contained in this chapter to resolve any problem solving issues ...

Page 236: ...odes displayed in the Print Queue or Faults List in the Machine Status mode Refer to Page 10 16 for an explanation of some of the fault codes and corresponding corrective actions Alternatively contact your Document Centre 220 230 332 340 Key Operator for assistance Or switch the machine off and then on again Make sure that you follow the relevant power On Off instructions as described in Chapter 2...

Page 237: ...ntil you are ready to use it Media must be loaded correctly in the tray you select for the job The orientation of the media in the paper tray must match the orientation of the documents Check the fill line in the tray to make sure the paper tray is not overloaded Do not use media that is torn wrinkled or folded To clear paper in any area of the machine always look for the green dial or lever Turn ...

Page 238: ...ge The machine makes a squealing noise after it powers OFF À 3 to 5 minutes after powering OFF the machine might make a squealing noise This is a normal occurrence Various components within the machine are still powering OFF The document will not feed through the Document Feeder À Check to see if the Document Feeder is overloaded The Document Feeder can hold 50 pages À Check to see if the document...

Page 239: ...lf when options are attached The machine does not accept documents into memory À Check with the Key Operator about the available memory capacity If the memory is almost full print and delete unnecessary files The machine displays a memory full error message À Check with the Key Operator about available memory À Divide the remaining pages of the job into several small jobs and run the job again The...

Page 240: ...220 230 Booklet Creation Gray Scale Copying Document Centre 220 230 Build Job uncollated copies custom size documents or Bound Documents Re program the job Machine does not edit À Replace the editing marker Inserts have images printed on them À Insert blank sheets of paper with the documents to mark each location for an insert Drilled paper holes are on the wrong side À For double sided copying us...

Page 241: ... when it is delivered to the Finisher À When using paper longer than 8 1 2 x 11 select the Center Output Tray instead of the Finisher To staple the output begin by pressing and then releasing the button on the top edge of the Finisher A green light is displayed If a job is currently in process the light will flash Wait until the job finishes and then try again Looking at the Finisher from the left...

Page 242: ...ting feature À Keep the Document Feeder closed securely when scanning an edited document The exception is when using Bound Originals and Original Size À Do not place edit marks within 1 4 of the edge of a document À The edited area must be fully enclosed If you draw a circle square or other object around the area to be edited you must close the object to ensure that the machine edits the area as p...

Page 243: ...un the job from the Document Glass À Reinstall the Copy Print Cartridge À Check the quality of the document Use Border Erase or Edge Erase to remove lines and marks from the edges of the document À Load fresh paper À Check the humidity in the machine location Refer to Reference on Page 11 1 for environmental specifications Output is too light or too dark À Load fresh paper À Check the quality of t...

Page 244: ...ge Missing characters À Load fresh paper À Reinstall the Copy Print Cartridge Gloss variations coining À Check the quality of the documents À If the document has large areas of solid density adjust the contrast Light copies when scanning glossy shiny or coated documents through the Document Feeder À Use the Document Glass instead of the Document Feeder Ghosting À Check the quality of the documents...

Page 245: ...e the Copy Print Cartridge Image loss À When copying a document from a larger paper size to a smaller size reduce the image to fit onto the smaller paper size À If you are using 8 1 2 x 11 size paper reduce the document slightly copying 90 instead of 100 À Select Auto Center on the touch screen Output does not reflect the selections made on the touch screen À Press Save after each selection on the...

Page 246: ...type that is not loaded Check the attributes and run the job again Jams in the Document Feeder À Open the Document Feeder and check to see if any paper or objects are inside À Check to see if the top cover on the Document Feeder is firmly closed À Check documents If using computer fanfold forms ensure that the perforations down each side of the sheets have been removed When removed the forms can b...

Page 247: ...paper in the High Capacity Feeder and Bypass Tray seam side down À Load non standard media in the Bypass Tray À Refer to Paper and other media on Page 8 1 for procedures With an external control device con nected such as a coin operated device the machine displays a Ready to copy message but users cannot log in À Check the external control device to ensure that it is properly connected and powered...

Page 248: ...ins several graphics the machine might not have enough memory The machine will not answer if memory is low Additional memory is an option À Remove stored documents and jobs and wait for existing jobs to complete This will increase available memory An image is reduced on a transmission À Confirm the original size of the documents Documents might be reduced based on the available standard paper supp...

Page 249: ...bles fax printing on that specific type of paper À Contact the Key Operator and make sure that the Junk Fax feature is not enabled in the Fax Communications setups A fax will not print it is marked Held in the Fax Queue À Check Paper Supply Status in Machine Status to see if the paper in the paper tray is fax enabled If it is not enabled contact the Key Operator For example if the Key Operator ena...

Page 250: ...escription and Corrective Action 4A51 Document Feeder jam Open the top cover of the Document Feeder and remove any paper or objects 4B71 Copy Print Cartridge error Check to see that the Copy Print Cartridge has the correct part number 0060 0062 A communication error occurred Check the connection to the telephone line and begin again 00A3 The job was stopped by pressing Clear 0220 A communication e...

Page 251: ...directory code contains a DTMF code after a secure code and begin again 0250 0252 A communication error occurred Contact the remote operator check the telephone line and begin again 0254 Operator error The image size was changed to match the capability of the remote fax 0255 Operator error The resolution was changed to match the capability of the remote fax 0291 An error occurred during diagnostic...

Page 252: ...n error occurred Check the telephone line and begin again 0570 Check the ID of the remote machine and begin again 0671 Repeat the job 0573 057A Either the dial tone was not detected or the telephone circuit was busy Check the tele phone line and begin again 057B A communication error occurred Begin again 057E 0589 Either the dial tone was not detected or the telephone circuit was busy Check the te...

Page 253: ... or near a radiator Avoid sudden changes in the Document Centre 220 230 332 340 s environment When a change occurs allow the Document Centre 220 230 332 340 at least two hours to adjust its settings to the new environment depending on the severity of the change Follow regular maintenance schedules for cleaning areas such as the Document Glass CVT and output trays Refer to Maintenance on Page 9 1 A...

Page 254: ...Center Telephone Numbers The telephone number of the Xerox Welcome Center is provided at the time of product installation For your convenience and future reference please record the telephone number in the space below Canada English French and local Toronto 800 939 3769 United States 800 821 2797 Welcome Center Telephone Number ...

Page 255: ...cations are designed to provide for the safety of users and to ensure that the machine operates in a fully functional state You can use the specifications listed in this chapter to quickly identify the capability of the machine In addition you can use the specifications to quickly find details about each feature including environment requirements such as space temperature humidity and electrical n...

Page 256: ...Feeder 72 D x 72 W 1828mmD x 1828mmW Document Centre 220 230 332 340 with Finisher Finisher Stand or High Capacity Feeder Finisher Output Tray Duplex 72 D x 79 W 1828mmD x 2006mmW Document Centre 220 230 332 340 with Convenience Shelf Duplex Catch Tray 72 D x 79 1 2 W 1828mmD x 1943mmW Document Centre 220 230 332 340 with Finisher Finisher Stand or High Capacity Feeder Convenience Shelf Duplex 72 ...

Page 257: ...er side Document Centre 332 Simplex 8 1 2 x 11 LEF 32 cpm 11 x 17 SEF 20 cpm Duplex 8 1 2 x 11 LEF 23 copies per side 11 x 17 SEF 14 copies per side Document Centre 340 Simplex 8 1 2 x 11 LEF 40 cpm 11 x 17 SEF 20 cpm Duplex 8 1 2 x 11 LEF 31 copies per side 11 x 17 SEF 14 copies per side FCOT for the Document Centre 220 230 Center Tray using the Document Feeder 6 seconds Center Tray using the Pla...

Page 258: ... 500 sheets of 20lb substance 20 per tray Paper Weights 16 24lb substance 16 24 Paper Sizes 8 1 2 x 5 1 2 LEF tray 1 only 8 1 2 x 11 SEF 8 1 2 x 11 LEF 11 x17 SEF Auto Size Sensing Document Centre 220 230 8 sizes from all 4 trays Document Centre 332 340 10 sizes from tray 1 8 sizes from trays 2 3 and 4 Simplex Duplex Feed from all 4 trays Media Type Bond Index Covers Labels Transparencies Drilled ...

Page 259: ...s Paper Sizes 4 x 6 SEF to 11 x 17 SEF Paper Weights 16 110lb substance 16 110 Delivery face down in order with offsetting Left Tray Capacity 200 sheets Paper Sizes 4 x 6 SEF to 11 x 17 SEF Paper Weights 16 110lb substance 16 110 Delivery face up in order without offsetting Finisher optional Capacity 1000 sheets of 20lb substance 20 paper Paper Sizes 8 1 2 x 5 1 2 to 11 x 17 Set Size 50 sheets of ...

Page 260: ...nge 198 264V Document Centre 332 340 102 140V Document Centre 220 230 Frequency 50 60 HZ Power Consumption Maximum average 1 38KVA 115 230VAC Operating Environment per MAS STD Temperature 41 90 F 10 32 C Humidity 10 85 relative humidity Altitude 0 6000 feet 0 1829 meters Storage Environment per MN2 803 1 Temperature 4 104 F 20 40 C Humidity 15 95 relative humidity Altitude 0 6000 feet 0 1829 meter...

Page 261: ...ds Document Centre 220 230 33 6 Kbps standard less than 4 seconds 14 4 Kbps standard less than 7 seconds ITU No 1 document Telephone Line Requirements Public switched telephone network or equivalent leased or dedicated telephone lines not required Circuit Connectivity Worldwide PTT approvals Compatibility G3 ECM G3 Xerox proprietary mode NSF PSTN PTT Approval PSTN PTT approval USA PTT approval bas...

Page 262: ... 200 x 100 dpi 200 x 200 dpi 200 x 400 dpi 300 x 300 dpi 400 x 400 dpi Resolution Conversion Available for fax sending and receiving smooth on fax receiving Long Document Send Receive Send 3600 mm maximum length Receive 65535 lines ...

Page 263: ...2 340 User Guide Page 12 1 Glossary Glossary Glossary 12 Glossary This chapter contains a list of terms used in the User Guide Each term has a corresponding definition that reflects the meaning of the term as it is used in this Guide ...

Page 264: ... Answer Mode A fax mode where the Document Centre 220 230 332 340 is programmed to automatically answer calls Auto Exposure an image quality setting which enhances documents that have color backgrounds The Document Centre 220 230 332 340 adjusts its settings for different types of images Auto Off Mode a Power Saver Mode in which the Digital Copier shuts off after a combined 120 minutes of Stand by...

Page 265: ...o Copy Print Cartridge a customer replaceable unit that contains xerographic elements for the machine Copy Sets groups of copies of a multi page set of documents If you have a four page document and you want to make 10 copies of your document you will be making 10 copy sets Covers paper used to add to the front or back of a copy set usually colored stock Default Settings the settings used by the m...

Page 266: ...actory Defaults settings which are incorporated into the machine at the factory and used by the machine when the user does not specify settings File Server a computer that has a hard disk drive large enough to hold and share files It provides the ability for multiple users to simultaneously access the same file Forced 4800 Document Centre 220 230 a setting that minimizes errors on telephone lines ...

Page 267: ...cument at the bottom of the page You typically turn over the page from the bottom edge Input the documents placed on the Document Glass or in the Document Feeder to be scanned Inserts paper used to separate sections or topics in a set of documents typically colored stock IP Internet Protocol Job Monitor a pop up window that appears on the Fax touch screen and identifies information about the activ...

Page 268: ...of the private data Media Print prints Postscript and PCL files from a floppy disk inserted into the floppy disk drive in the machine Memory a capacity for storing documents Node a number that identifies a network It works like an address Non Standard Paper sizes other than 5 1 2 x 8 1 2 8 1 2 x 11 8 1 2 x 14 and 11 x 17 Open System the Document Centre 220 230 332 340 is not connected to a trackin...

Page 269: ...r PostScript Files PS files a page description language from Adobe Systems Inc that is used extensively on MACs and PCs as well as workstations mini computers and main frame Power Saver Modes energy saver modes that significantly reduce the power consumption during periods of inactivity Printer Configuration Report a report that lists the status of the printer options installed options PCL5 option...

Page 270: ...rt Edge Feed SEF the short edge of the paper is positioned to enter the machine first Sleep Mode a condition of reduced power consumption while the machine is not performing a transaction Speed Dialing a form of abbreviated dialling that enables the dialing of a number by entering a three digit code Stabilizer Feet attachments that replace the casters under the machine and keep it from moving Stan...

Page 271: ...0 User Guide Page 12 9 Glossary Glossary Glossary Transmit to send Uncollated output programming whereas the specified number of copies for each page in a copy set is delivered in the order the documents were placed in the Document Feeder ...

Page 272: ...Page 12 10 Glossary ...

Page 273: ...aper Supply Copy 3 22 Auto Reduce Enlarge Copy 3 20 Auto Answer Fax 4 39 Auto Center Image Shift Copy 3 31 Auto Exposure Copy 3 33 Auto Select Fax 4 15 Auto Tray Switching 8 12 B Basic Image Quality Scan 7 6 Blank Covers 3 53 Book size Copy 3 30 Booklet Creation Copy 3 51 Border Erase Copy 3 34 Bound Originals options Copy 3 30 Bound Originals Copy 3 29 Build Job Copy 3 55 Build Job Fax 4 27 Butto...

Page 274: ...s Copy 3 52 Current Dial List Fax 4 18 D data coupler information 1 7 Date Copy 3 45 Delayed polling Fax 4 28 Delayed Start Fax 4 23 Delete documents stored for polling Fax 4 32 Delete Mailbox Contents Fax 4 35 Deleting a Dial Directory number Fax 4 43 Deleting a stored copy job 3 60 Destination Setups Scan 7 14 Dial Directory Reports Fax 4 38 Dial Directory Setup Fax 4 40 Dial Directory Fax 4 17 ...

Page 275: ...Job Status button 2 21 Fax Reports 4 37 Fax Setups Scan 7 14 FCC regulations 1 6 data coupler information 1 7 send header requirement 1 6 Feature button 2 17 Filing Policy Scan 7 11 Filing Setup Scan 7 11 Fine Resolution Fax 4 8 Finisher 2 5 loading staples 9 12 Finisher optional 9 12 Forced 4800 Fax 4 23 Format Copy 3 46 Free Polling Fax 4 29 G G3 Fax 4 23 Glossary 12 1 Glossary Terms Defined 12 ...

Page 276: ...ading the envelope tray 8 10 Loading the paper trays 8 3 Local ID Fax character check 4 14 Login Name Password Scan 7 11 Long Edge Feed LEF 1 3 8 6 Low Power Mode 2 11 M Machine components 2 2 Machine Information 2 28 Machine Specifications 11 2 MachineStatus button 2 28 Mailbox Fax 4 33 Mailbox Tower 2 5 5 1 Manual Answer Fax 4 39 Manual Dialing Fax Telephone 4 15 Manual Stapling Convenience Stap...

Page 277: ...nal Size Scan 7 4 7 6 Original Type Fax 4 9 Other Paper Supply Copy 3 22 Other Reduce Enlarge Copy 3 20 Other media 8 14 Output 3 16 Output Format tab Copy 3 40 Output images sizes Document Feeder Scan 7 10 Output Quality 10 19 Output Tray cleaning 9 4 Output Copy 3 12 ozone safety 1 14 P Page Edit options Copy 3 38 Page Edit Copy 3 37 Page Numbering Copy 3 46 Paper storing and handling 8 13 Paper...

Page 278: ...38 Printing from a floppy disk 6 2 problem solving 10 1 Problem Solving Tables 10 4 Program a new comment Copy 3 47 Pulse to tone switch Fax 4 14 Pulse to Tone Fax 4 16 R Receive Fax 4 16 Recycled Paper 2 12 Recycling the Print Cartridge 9 9 Reduce Enlarge options Copy 3 20 Reduce Enlarge Scan 7 8 Reduce Enlarge Copy 3 19 Reference 11 1 Refresh List 7 4 Related Documentation 1 6 Reports Counters 2...

Page 279: ...r Polling Fax 4 29 Store to Mailbox Fax 4 33 Stored Image Settings Scan 7 8 Stored Jobs Copy 3 57 Storing a copy job 3 57 Storing and Handling Paper 8 13 Super Fine Resolution Fax 4 9 Super G3 Fax 4 23 Supplies 9 2 System controls 2 30 T Telephone Fax 4 15 Off Hook 4 15 On Hook 4 15 templates Scan 7 5 Text Image Quality Copy 3 23 Text Original Type Fax 4 9 Tower Mailbox 2 5 5 1 Transmission Report...

Page 280: ...Page 13 8 Index ...

Reviews: