background image

Copying 

5-12 

Copying 

Recorded data files can be copied in the following three directions: 
 
Memory to Media 
Memory to PC 
Media to PC 
 

z


When a data file is copied, the header file paired with the data file and also the sound file are copied at 
the same time.   


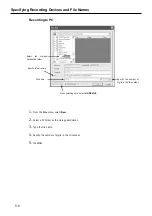
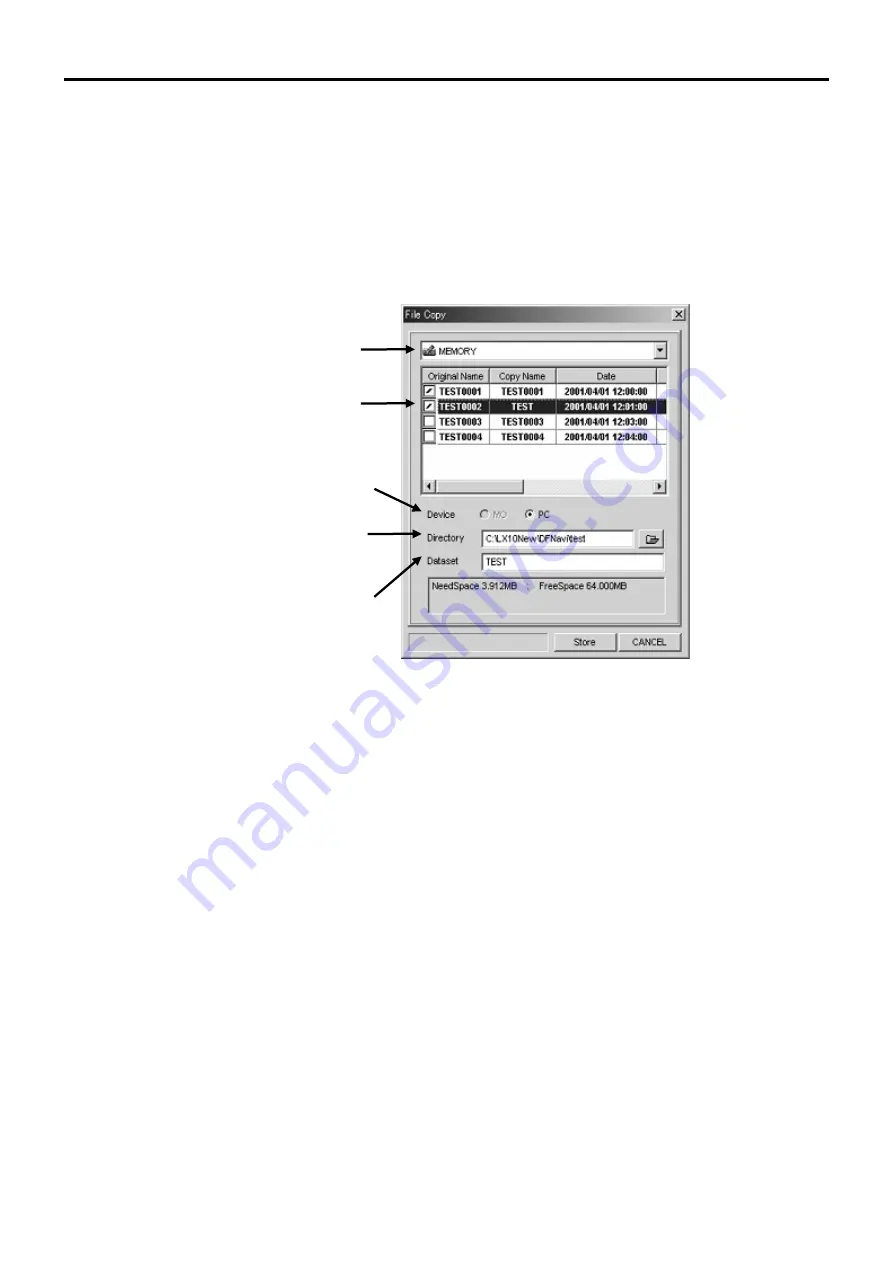
1.

 From the 

File

 menu, choose 

Copy


2.

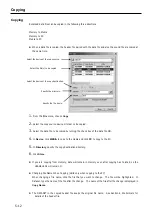
 Select the copy source device or folder to be copied. 


3.

 Select the data file to be copied by turning the check box of the data file ON.   


4.


In 

Device

, click 

MEDIA 

to copy to the media and click 

PC

 to copy to the PC. 


5.

 In 

Directory

, specify the copy destination directory.


6.

 Click 

Store

.


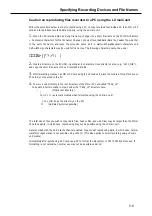
z


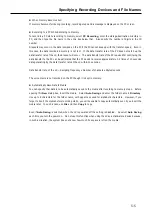
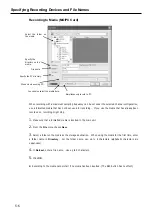
If you are copying from memory, data will remain in memory even after copying has finished, so the 

USAGE LEDs will remain lit.   


z


Changing File Name When Copying (Valid only when copying to the PC) 
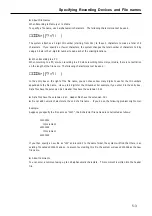
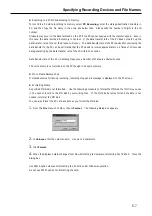
When changing a file name, click the file that you want to change.  The file will be highlighted.  In 
Dataset, type the name of the file after the change.    The name of the file after the change is displayed in 

Copy Name

.


z


The DATASET in the copied header file keeps the original file name.  See Section 6 File Formats for 

details of the header file.   

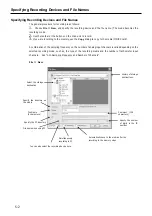
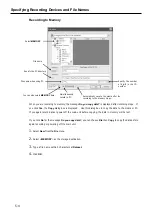
Select the device at the copy source. 

Select the file(s) to be copied. 

Select the device at the copy destination.

Specify the directory. 

Specify the file name. 

Summary of Contents for LX Series

Page 1: ...TEAC Corporation May 2006 D00634900D RECORDING UNIT LX Series Instruction Manual Please read this manual before using the product and keep the manual handy...

Page 2: ......

Page 3: ...facturer s instructions have been adhered to 10 Power Sources This product should be operated only from the type of power source indicated on the marking label If you are not sure of the type of power...

Page 4: ...an to restore the product to its normal operation e if the product has been dropped or damaged in any way f when the product exhibits a distinct change in performance this indicates a need for service...

Page 5: ...erference in which case the user may be required to take adequate measures Pour les utilisateurs en Europe AVERTISSEMENT Il s agit d un produit de Classe A Dans un environnement domestique cet apparei...

Page 6: ...its such activity You may not rent or lease the SOFTWARE You may not reproduce the SOFTWARE except for archival purpose 4 TERMINATION Your rights under this Agreement terminate upon the disposal of al...

Page 7: ...g and Ejecting Media 2 23 Inserting Media 2 23 Ejecting Media 2 24 About Data on Media 2 24 About Expansion Unit 2 25 About Slot Settings 2 25 About Maximum Sampling Frequency When Using Expansion Uni...

Page 8: ...ing 5 23 Recording Synchronization 5 24 Settings and Recording Operations 5 24 Connecting Recording Synchronization Cables and Turning on Power 5 25 Operations 5 26 Section 6 Specifications Main Unit...

Page 9: ...Contents vii Section 7 Appendixes Troubleshooting 7 2 Supplied Accessories and Options 7 3 Supplied Accessories 7 3 Options 7 3...

Page 10: ...Contents viii...

Page 11: ...1 1 Section 1 Preface Overview 1 2 Features 1 3 About TAFFmat 1 5 Notes on Usage 1 6 Names and Parts 1 8 Front 1 8 Rear 1 10 Recording Times 1 12 Sampling Frequency and Number of Channels 1 13...

Page 12: ...ercially available analysis software From a PC you can use the supplied LX Navi software to set recording conditions such as the input range or sampling frequency The interface with a PC is hot plugga...

Page 13: ...o 512 MB as option internal memory Stored data can be transferred to the removable media or the PC MO recording Recording to 1 3GB MO Stored data on the MO can be loaded into the PC by using an MO dri...

Page 14: ...ger or external trigger was satisfied Post trigger Continues to record for a set period even after a recording stop condition based on a level trigger or external trigger was satisfied Interval operat...

Page 15: ...ile with the extension wav The above files share a common file name to which is appended an ID number When a new file name is specified this ID number becomes 1 Each time recording starts this number...

Page 16: ...4 903 1GB CF1GB 80 380 128MB HB288128A5 SDCFB 2000 801 2GB CF2GB 40 380 512MB HB28B512A6 2GB SDCFH 2048 J60 1GB HB28B1000A6 I O Data Compact Flash 2GB HB28B2000A8H Hagiwara sys com Compact Flash 256MB...

Page 17: ...er touch the media being inserted to the PC card slot while recording and playing back z Make Sure to Select FAT16 When Formatting Media by Windows Operation The LX file format does not support FAT32...

Page 18: ...When an earphone is inserted sound does not come from the speaker 7 MEMO IN jack Connects to a microphone used for voice memos 8 USAGE LEDs Indicates the usage rate of the recording device During reco...

Page 19: ...k amp card is installed into the slot When the output signal for some channel is larger than 10 of a set output range the LED glows green When the signal exceeds 115 of the range the LED glows red 11...

Page 20: ...NO MADE IN JAPAN Rear LX 10 IEEE 1394 Version The LX 10L LAN version has an interface at 7 shown below LX 20L LAN Version The LX 20 IEEE 1394 version has an interface at 7 shown above 1 2 3 4 4 5 6 8...

Page 21: ...gger signal when using an external contact signal as the trigger to start recording 4 Cooling fan Exhaust fans used for cooling the main unit Do not cover the outlet vent 5 BU 80 connector Uses to con...

Page 22: ...ncy vs the number of analog input channels can be selected in each recording mode Number of tachometer input channels use 2 in 16 bits mode 2 for 32 bits 1 channel mode or 4 for 32 bits 2 channels mod...

Page 23: ...536 27 4 2 2 N A 32 768 13 8 4 4 4 16 384 6 16 8 8 8 8 192 3 32 24 24 24 4 096 1 7 32 32 32 32 2 048 0 8 32 32 32 32 1 024 0 4 32 32 32 32 Max number of analog input channels based on the tachometer...

Page 24: ...32 6 2 5 32 32 32 32 3 1 25 32 32 32 32 1 5 0 625 32 32 32 32 65 536 kHz Series Sampling Frequency kHz Bandwidth kHz No 16bits 2ch 32bits 1ch 32bits 2ch 65 536 27 8 4 4 N A 32 768 13 16 8 8 8 16 384 6...

Page 25: ...2 32 32 6 2 5 32 32 32 32 3 1 25 32 32 32 32 1 5 0 625 32 32 32 32 65 536 kHz Series Sampling Frequency kHz Bandwidth kHz No 16bits 2ch 32bits 1ch 32bits 2ch 65 536 27 8 4 4 N A 32 768 13 16 8 8 8 16...

Page 26: ...Sampling Frequency and Number of Channels 1 16...

Page 27: ...Navi 2 15 Installing LX 10L 20L LAN Version 2 16 Installing LX Navi 2 16 About IP Address Settings 2 17 Starting Program 2 18 Starting Navi directly without the LX Network dialog box displayed 2 22 In...

Page 28: ...Monitor output Oscilloscope etc External trigger input Contact signal DC power 11 to 30 V Or use the specified AC adaptor Optional Battery unit BU 80 Connect to PC IEEE 1394 interface Either is availa...

Page 29: ...esolution 800 600 dpi or better Memory 128 MB or more 256 MB or more for Windows XP 2000 Free space on hard disk 2 GB or more CD ROM drive Present for the program installation LX 10 20 IEEE 1394 versi...

Page 30: ...rdBus specification Check with your PC manual on the PC card slot information z You may not insert the IEEE 1394 interface card with other types of the PC card at a time z You may not install it to th...

Page 31: ...installed Follow the below procedures to confirm the driver has been installed correctly 2 Double click Control Panel from My Computer Double click System to open the dialog box 3 Click Hardware tab a...

Page 32: ...ctly as follows Double click Control Panel from My Computer to open the dialog box Double click System Click Device Manager then double click 1394 Bus Controller Confirm Texas Instruments OHCI Complia...

Page 33: ...stallation You can confirm that driver has been installed correctly as follows Double click Control Panel from My Computer to open the dialog Then double click System Click Device Manager then double...

Page 34: ...or Windows 2000 Follow the same procedures for Windows XP 1 When the LX 10 20 is first connected to the PC the following dialog box is displayed Click Next 2 In the dialog box click Search for a suita...

Page 35: ...Installing LX 10 20 IEEE 1394 Version 2 9 4 Specify the driver folder of the inserted CD ROM and click OK 5 Click Next 6 In the dialog box click Finish This completes installation of the device driver...

Page 36: ...following dialog box is displayed If not displayed proceed to the later page Click Next 2 In the dialog box click Search for the best driver for your device Recommended and then click Next 3 Insert t...

Page 37: ...ce driver If the Add New Hardware Wizard dialog box is not displayed when the LX 10 20 is first connected to the PC install the driver following the steps below 1 From the Windows Start menu choose Se...

Page 38: ...Installing LX 10 20 IEEE 1394 Version 2 12 2 Click Reinstall Driver 3 Click Next 4 Click Search for a better driver than the one your device is using now Recommended and then click Next...

Page 39: ...Version 2 13 5 Insert the supplied CD ROM and select Specify a location Specify the Driver folder of the inserted CD ROM and click Next 6 Click Next 7 In the dialog box click Finish This completes ins...

Page 40: ...the LX 10 20 is first connected to the PC the following dialog box is displayed Insert the supplied CD ROM and select Automatic search for a better driver Recommended Then click Next 2 In the dialog b...

Page 41: ...i software 1 Execute Setup exe which is in the supplied CD ROM 2 Follow the displayed instructions and proceed with setup Click IEEE1394 at the dialog box to be appeared in the middle of installation...

Page 42: ...ng LAN cards CBET100 CL from I O DATA FNW 3603 TX from PLANEX COMMUNICATIONS Transmission rate 10 M full duplex fixed One to one connection with LX 10L 20L using a cross cable Installing LX Navi To in...

Page 43: ...er z However in a situation such as when the LX 10L 20L is in a remote location and communications are constrained by low speed paths use the LX 10L 20L with a reduced sampling rate z The LX 10L 20L E...

Page 44: ...L main unit or remove the LAN cable not only the communications fail but also the congestion processing is caused to the network Make sure to close LX Navi first to detach the LX 10L 20L from the netw...

Page 45: ...ea the LX Property dialog box appears In this dialog box you specify settings such as the IP address parameters and the recorder name Name Enter the address parameters that match the network environme...

Page 46: ...rect IP address for the same segment a grey check box is displayed along with IP ERR is the status field In such a case specify an appropriate IP address or check the IP address settings Subnet mask G...

Page 47: ...getting full with the un transferred data It is caused by depending on the PC specifications and the networktraffic however the following sampling setting is not applicable for the real time PC record...

Page 48: ...unch directly without the LX Network dialog box displayed The LX Network dialog box is displayed if previously used serial numbers of LX are connected to I F Example 1 Open the LxNavi shortcut propert...

Page 49: ...recording and playing back 1 Power on the LX main unit Wait until the STOP lamp glows before proceeding to the next step 2 Open the cover of the drive 3 Insert the media with the label facing up into...

Page 50: ...ic electricity from your body touch a metallic surface near you before handling the unit Never touch the PC card being inserted to the PC card slot while recording and playing back 1 Open the cover of...

Page 51: ...pper slot to the lower Slot 1 Input amp Slot 2 Input amp Slot 3 Output amp Slot 4 Output amp 32 inputs Install input amps into all slots About Slot Settings When the expansion unit is added tabs are a...

Page 52: ...O About Power Supply Connection LX Main Unit AU LXEPIO LX Main Unit AU LXEPIOP Optional battery unit BU 80 DC power Supply 11 to 30 V Or the supplied AC adaptor When the optional battery unit BU 80 is...

Page 53: ...3 1 Section 3 Introduction to LX Navi Outline of Main Window 3 2 Overview of Steps in Recording and Reproduction 3 4...

Page 54: ...Menu bar New Select the device on which data is to be recorded and specify the file name Open Select data to be reproduced Copy Copy data Format Format a media Exit Quit the application System Set op...

Page 55: ...rt Pause Event mark Eject Stop the fan Listen to data View Bar View Digit Execute calibration View Hdr Zero balance Remaining fan stop time Displays the mode RECORD for recording or VIEW for reproduct...

Page 56: ...Start LX Navi Recording File New Reproducing File Open Specify the recording device and file name Mode becomes the recording mode Operations to control recording After finishing recording to memory s...

Page 57: ...ons 4 11 Auto Offset 4 13 Calibration By Using Calibrator 4 14 Zero Balance 4 15 Setting Tachometer Pulse Inputs 4 16 Output Amp Settings 4 18 Outline of Trigger Recording 4 19 Repeat Mode 4 19 Interv...

Page 58: ...5 kHz at the LX 10 10L LX 20 20L You can select the sampling frequency from the followings 96k 1 5k for 96 kHz 48 kHz 24 kHz 12 kHz 6 kHz 3 kHz or 1 5 kHz 100k 1k for 100 kHz 50 kHz 20 kHz 10 kHz 5 k...

Page 59: ...10 minutes The remaining time to stop the fan is displayed at the status display See 3 3 Outline of Main Window Toolbar and Status Display Panel When you set this to Lock you can disable the control...

Page 60: ...an select the following parameters show at the dialog The parameters can be set are automatically appeared depending on the selection of the output signal Sin Sweep Start Freq Set the start frequency...

Page 61: ...owever the input margin level is approximately 120 Input the signal then click button on the right and specify the setting while checking the level Auto When you input the signal and click Auto the op...

Page 62: ...r 10 minutes or more and then executing manual calibration In order to execute the manual calibration for precisely measurement click button on the toolbar of the LX Navi Also it is recommended to use...

Page 63: ...nput signal source is connected to ground do not connect the LX frame ground FG to ground When using circuit signals DC of operations powered by an AC power source Input Mode Unbalanced Unbal mode If...

Page 64: ...C setting Select the weighting filter A A filter C C filter FLAT Flat Select HPF High Pass Filter OFF No 10Hz 10 Hz 20Hz 20 Hz Select the input range 0 01 V 0 0316 V 0 1 V 0 316 V 1 V 3 16 V 10 V Sele...

Page 65: ...r to execute the manual calibration for precisely measurement click button on the toolbar of the LX Navi Also it is recommended to use the balanced input mode for precisely measurement z Input Connect...

Page 66: ...etting Dialog Select the input range Click uST to turn the button at the right bottom to mV V Change the input range display between uST and mV V Change the bridge voltage Turn to OFF to set the DC in...

Page 67: ...nsducer is not complied with the IEEE TEDS standard template the LX cannot read and display the information correctly 1 Click the toolbar icon in the main window 2 The TEDS dialog is displayed If you...

Page 68: ...Manufacturer name manufacturer and Calibration date cal date Turn on the check box of the channel to reflect the sensitivity of the loaded TEDS information 5 Click OK to write the applicable slope va...

Page 69: ...this offset value 1 Click on the toolbar at the stop state of the LX main unit 2 The Channel Unit table is displayed 3 Click Auto Offset on the Channel Unit table at the timing to execute the offset...

Page 70: ...hannel Unit table is displayed 3 Click Calibration 4 The Cal Sound Vibration dialog is displayed 5 After the calibration is done click Exit or click to return to the main window Select the channel Sel...

Page 71: ...the LX main unit 2 The Strain Zero Balance dialog is displayed to start the zero balance 3 Start Zero Balance is displayed while implementing the zero balance of all ST amp channels at the time 4 Com...

Page 72: ...nput channels Therefore if you turn ON tachometer pulse input channel s in order keep the same analog input channels lower the sampling frequency is required by following the setting of tachometer pul...

Page 73: ...Measurement mode pulse gate Pulse count mode within the gate time pulse total Total counts from measurement start to stop Period Cycle count mode Frequency Frequency measurement mode Rpm RPM measurem...

Page 74: ...corded at the low speed sampling mode 1 kHz to 1 60 Hz by changing the playback sampling frequency at 1 5 kHz or higher z Make sure to specify the source slot installed the input amp at the Output Slo...

Page 75: ...ndition is not satisfied during a set period z Pre trigger A pre trigger also records the data that was read into a buffer before one of the above recording start conditions was satisfied The voice me...

Page 76: ...ding for a specified number of times during a specified period Recording once is also possible Example When repeating 3 times Stop Specified recording time Specified time Specified pause time Start St...

Page 77: ...on the LX main unit The post trigger is not enabled for stopping recording by operations that use the toolbar or the buttons on the LX main unit Start PreTrig Stop PostTrig Specify the length of the...

Page 78: ...dition satisfied will stop recording Level Select this to enable a level trigger You can set level trigger details in the dialog box displayed by choosing Level Trig and then Property See the next pag...

Page 79: ...d Down The condition is regarded as having been satisfied when the input signal crosses from higher than the specified level to lower The condition is regarded as not having been satisfied if the spec...

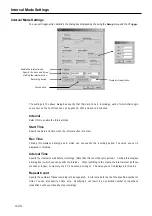
Page 80: ...set is displayed in this area Interval Time Specify the interval to wait before recordings Note that this is not the cycle period Clicking this displays a dialog box in which you can specify the inter...

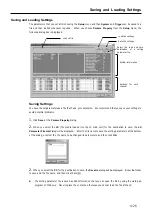
Page 81: ...unit for the destination to save the LX Parameter File List dialog will be displayed Enter the file name to save the setting parameters at the bottom of the dialog or select the file name to be change...

Page 82: ...will be displayed Select the file name to load its parameters and then click OK The loaded file name is displayed at Params Property dialog 2 When you select the PC for the destination to load the Op...

Page 83: ...ing Point Skip 5 14 Searches 5 15 Convenient Features 5 16 Displaying Waveform 5 16 Channel Property 5 17 Displaying Bar Meter 5 18 Displaying Digital Values 5 18 Viewing Header Information 5 18 Chang...

Page 84: ...quency vs the number of analog input channels is varied depending on the selected recording mode such as the type of the recording media and the number of tachometer input channels See 1 13 Sampling F...

Page 85: ...e name you can choose how many digits to use for the ID numbers appended to the file name Use up to 8 digits for the ID number For example if you enter 2 in the entry box Data files have the extension...

Page 86: ...ory will be lost If you click No for the message Do you copy data you can choose File then Copy to copy the data before again recording or powering off the main unit 1 Select New from the File menu 2...

Page 87: ...of 10 seconds data generating by the data transfer rate of the LX within 10 seconds Data transfer rate of the LX Sampling frequency x Number of channels x 2bytes second The voice memo is not recorded...

Page 88: ...the File menu choose New 3 Select a folder on the media as the storage destination When using the media for the first time enter a folder name in Directory For the folder name use up to 8 characters a...

Page 89: ...n 10 seconds Data transfer rate of the LX Sampling frequency x Number of channels x 2bytes second The voice memo is not recorded on the PC though it is kept in memory z When Media Becomes Full If medi...

Page 90: ...ect New 2 Select a PC folder as the storage destination 3 Type the file name 4 Specify the number of digits in the ID number 5 Click OK Select the storage destination folder File name Specify the numb...

Page 91: ...d data file 3 After formatting media on an MO or PC card using the LX main unit place the media into the MO drive or PC card slot connected to the PC 4 There is a sub directory in the root directory o...

Page 92: ...ows REC and recording starts When recording to memory or recording to the media the USAGE LEDs show the percentage of the total capacity used 5 Click on the toolbar Alternatively press the EVENT butto...

Page 93: ...g a message is displayed and recording stops The file up to that point is made You can replace the media and again start recording z When Auto Saving Is Selected When the media becomes full during cop...

Page 94: ...opy destination directory 6 Click Store z If you are copying from memory data will remain in memory even after copying has finished so the USAGE LEDs will remain lit z Changing File Name When Copying...

Page 95: ...le setting Changing the reproduction rate does not change the sampling frequency setting for recording The rate of voice memo reproduction is not changed even when Sample setting is changed In this ca...

Page 96: ...an select from the following 4 options File Moves from the current file to the older file determined by ID number in the same folder Scan Moves the specified number of scans only When you select Scan...

Page 97: ...he range of values that can be searched Count search Searches for times hours minutes seconds from the start of recording The lower 2 boxes show the range of values that can be searched Time search Se...

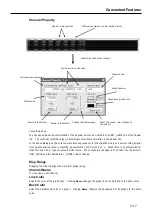
Page 98: ...the channel to display Click to return to the original The channel is displayed on top Select the graph you want to display on top Display all channels Arrange the graphs in the order of channels Dis...

Page 99: ...e header file the units for VERT_UNITS and the SLOPE and Y_OFFSET values change Disp Range Dragging the slider changes the waveform graph range Channel Name You can name each channel Line Color Select...

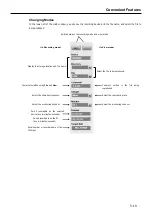
Page 100: ...ing Header Information To display header information choose View and then Hdr This takes effect after you select a file in the View mode Switch between and dB Clear the peak hold Use the slider to cha...

Page 101: ...mode Display the storage location and file name Select the file to bereproduced Comments written using File and New Comment written in the file being reproduced Select the sampling frequency Select th...

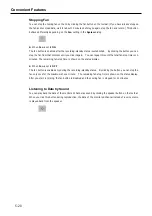
Page 102: ...peat this until the total fan stop time is 10 minutes The remaining fan stop time is shown on the status display z When Fan is set to OFF The fan button is enabled only during the recording standby st...

Page 103: ...efore turning off the power Moving the unit while the media is inserted might result in damage When recording to the media insert a formatted media before opening File then New the New dialog box Also...

Page 104: ...button and remove the MO media Remove manually on the PC card media z After the above if you turn off the power and then turn it back on and record to the same media the ID number will be automaticall...

Page 105: ...o one ID After this each time the FWD and PAUSE buttons are pressed an ID will be recorded and the ID numbers will be incremented automatically 8 To stop recording press the STOP button z Take care in...

Page 106: ...dia However when the power is turned off any data in memory will be lost and you will be unable to reproduce such data To reproduce data press the FWD button on the front of the LX To pause reproducin...

Page 107: ...on re launch LxNavi disabling the master slave settings and execute it as an independent unit z Change the settings of the sampling frequency of recording and the recording media destination Memory MO...

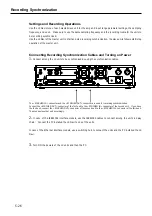
Page 108: ...LX units to be synchronized by using the synchronization cables The SYNCHRO IN connector and the SYNCHRO OUT connector are used for recording synchronization Connect the SYNCHRO OUT connector of the...

Page 109: ...onnected to the same group and the serial number 107100 for the master and 107366 for slave 1 have been selected Click master and slave 1 in the order you wish to set them in the sync select column In...

Page 110: ...clicked upon A check mark is displayed for the unit set to the master unit and a check mark with a grey background is displayed for the unit set to the slave unit Confirm the verification test result...

Page 111: ...nization operations connection result NG No check mark present NG SLAVE n n is the slave number Set stand alone unit No check mark present NO SYNC Non responsive unit model for synchronization operati...

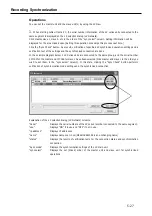
Page 112: ...r Target Unit the M name or serial number is displayed This main screen indicates the master unit Moreover the slave unit connected to the master unit is show below in S name or serial number In order...

Page 113: ...of the screen under Target Unit the S name or serial number is displayed This main screen indicates the slave unit Open the main display for other slave units connected in the same manner While maxim...

Page 114: ...ws the state after right clicking on the sync select column where synchronized operation serial number 107100 has been reverted back to independent unit settings Click the Sync Check button while in t...

Page 115: ...ations 6 9 Block Diagram 6 10 PA Amp Specifications 6 11 ST Amp Specifications 6 13 Output Amp Specifications 6 15 Block Diagram 6 16 File Format 6 17 Types of Files 6 17 File Name 6 17 Directory Stru...

Page 116: ...24 kHz DC 10 kHz 12 kHz DC 5 kHz 6 kHz DC 2 5 kHz 3 kHz DC 1 25 kHz 1 5 kHz DC 625 Hz 100 1 kHz 100 kHz 50 kHz 20 kHz 10 kHz 5 kHz 2 kHz 1 kHz 65 536 1 024 kHz 65 536 kHz 32 768 kHz 16 384 kHz 8 192...

Page 117: ...Main Unit Specifications 6 3 External Dimensions...

Page 118: ...p Output Amp Microphone Amp Speaker Amp Front Panel I F SCSI I F SDRAM SRAM ROM CPU Front Keys Front LEDs Drive MO or PC Card BUS I F IEEE1394 or 1000BASE TX PLD Clock Decode External Trigger Circuit...

Page 119: ...32 bits mode Divided Rate 1 to 255 Moving Average 1 to 16 Number of Pulse per Revolution 1 to 255 Tachometer Pulse Timing Use LSB 1 bit for the tachometer pulse timing Note that this function is avai...

Page 120: ...tput Number of Output Channel 1 channel Output Level 1 to 5 V at 0 1 V steps same as the monitor output Output Connector MON OUT Monitor output BNC Types of Outputs SIN SWEEP SIN Pulse Pink noise Whit...

Page 121: ...for DC Amp Amp Slot 2 slots Dimensions 300W 30H 200D mm excluding protrusions Mass Approximately 1 2 kg AU LXEPIOP Expansion Unit for PA Amp ST Amp Amp Slot 2 slots Power Supply 11 to 30 V DC comes w...

Page 122: ...Expansion Unit Specifications 6 8 External Dimensions 300 mm 300 mm 200 mm 200 mm 30 mm 50 mm LX Main Unit AU LXEPIO LX Main Unit AU LXEPIOP...

Page 123: ...less 3 degrees or less in same range with bandwidth 40 kHz AR LXDC2 Addition to the specifications of the AR LXDC Low speed sampling mode 1 kHz to 1 60 Hz is available Conversion Method 128 times over...

Page 124: ...1 times from 1 of the 1 2Fs The attenuation is abrupt so attenuation occurs quickly up to the noise level Calibration When the power is turned on all channels and all ranges self calibrate using a DS...

Page 125: ...n 2 or less Linearity 0 1 or less Distortion Factor At 48 kHz or 96 kHz sampling When the input range is 0 316 V or more 0 05 or less When the input range is 0 1 V or less 0 2 or less At sampling of 2...

Page 126: ...filter 10 Hz 0 5 dB or less 20 Hz 0 5 dB or less Weighting A curve C curve Flat IEC TYPE1 Power to Sensor 28 V DC 4 mA 24 V DC 4 mA internal switch S N and Crosstalk S N Crosstalk Input Range Within...

Page 127: ...version Method 128 times over sampling delta sigma modulation at 96 kHz sampling 64 times over sampling is used Sampling Frequency Depends on the sampling frequency of the LX main unit Range Precision...

Page 128: ...less with same range and a bandwidth of 20 kHz or less 3 degrees or less with same range and a bandwidth of 40 kHz Conenctor Lemo 7 pin 10 EGC0B Type Power Consumption Approx 8 W Signal IN Signal IN...

Page 129: ...d analog filters Linearity 0 1 or less Distortion 0 05 or less at bandwidth of 20 kHz Drift 0 1 or less Dynamic Range 80 dB within bandwidth S N 78 dB within bandwidth Crosstalk 78 dB within bandwidth...

Page 130: ...cy 1 2Fs The digital filter attenuation characteristics are about 6 dB at 1 2Fs The input amp and output amp are both added for the input signal so as shown in the following diagram the attenuation is...

Page 131: ...emented each time the recording restarts If a data file with the same name or same ID number already exists when recording to the media or PC the next ID number is used z When Recording to Memory or t...

Page 132: ...ade automatically if it does not already exist 2 TEST0001 Name of the directory entered in Directory which is in the dialog box displayed by choosing File and then New 3 Aaaaa001 dat Aaaaa001 hdr Aaaa...

Page 133: ...der file The organization of a data file is shown in the following diagram In this document a collection of data as shown in the example is called one scan A data file consists of scan repetitions Exa...

Page 134: ...t channel Tachometer pulse input channel A 1 x 32 bits tachometer input channel Tachometer pulse input channel B 2 x 32 bits tachometer input channels Tachometer pulse input channel A and B 25 000 is...

Page 135: ...put Bit7 Bit0 Channel A Bit15 Bit8 Tachometer Pulse Input Bit7 Bit0 Channel B Bit15 Bit8 8 analog channels and 2 x 32 bits tachometer pulse input mode Keyword on the header file for the tachometer pul...

Page 136: ...000 The input value is obtained from the following formula Input value A D conversion value of the data file x SLOPE Y_OFFSET z About the tachometer pulse input data 25 000 is 100 range value at 16 bi...

Page 137: ...001 TIME 16 32 55 00 RATE 1500 VERT_UNITS V V V V V V V V HORZ_UNITS Sec COMMENT LX 10 NUM_SERIES 8 STORAGE_MODE INTERLACED FILE_TYPE INTEGER SLOPE 0 00008000 0 00008000 0 00008000 0 00008000 0 000080...

Page 138: ...on the PC when recording to a PC while recording to memory or the media DEVICE LX 10 LX 20 This is a fixed value The information below is not recorded when recording to a PC SLOT1_AMP The ID name num...

Page 139: ...ode number range setting Measurement Mode 0 Pulse counter mode gate 1 Pulse counter mode total 2 Cycle count mode 3 Frequency mode 4 RPM mode PULSE_LEVEL_A Threshold level DIVIDE_RATE_A Divided rate M...

Page 140: ...2 AGND Reserved 5 RESERVED Reserved 23 AGND Reserved 6 RESERVED Reserved 24 AGND Reserved 7 GND Ground 25 AGND Reserved 8 RESERVED Reserved 26 RESERVED Reserved 9 RESERVED Reserved 27 RESERVED Reserve...

Page 141: ...tions Number of Units to be Synchronized 4 Inter channel Phase Differences Channels with the different units 5 degree or less with same range and a bandwidth of 20 kHz or less 7 degree or less with sa...

Page 142: ...Recording Synchronization Specifications 6 28...

Page 143: ...7 1 Section 7 Appendixes Troubleshooting 7 2 Supplied Accessories and Options 7 3 Supplied Accessories 7 3 Options 7 3...

Page 144: ...g to the media is not working Make sure that the media is formatted Make sure that the media is not full Make sure that the Auto Saving option is selected Note that turning off the power will disable...

Page 145: ...rophone 1 Earphone 1 Ferrite Core 2 CD ROM LX Navi 1 MO Disk 1 Only for the MO model Instruction Manual this manual 1 AC Adaptor 1 Options MO Disk T0005380 MO Cleaning Kit TZ 381 Lens Cleaner 0240470...

Page 146: ...Note 7 4 Note...

Page 147: ......

Page 148: ...Copyright 2006 TEAC Corporation All rights reserved TEAC CORPORATION 3 7 3 Naka Cho Musashino Shi Tokyo 180 8550 Japan E mail tic_cs teac co jp Phone 81 422 52 5014 Fax 81 422 52 1990...

Reviews: