Operating & Maintaining the Stratasys P750K 3D Printer
6–6
DOC08010 Rev. A (DRAFT 1)
3. cartridgesOn
ȱ
the
ȱ
printer
ȱ
interface,
ȱ
click
ȱ
the
ȱ
red
ȱ
button
ȱ
to
ȱ
switch
ȱ
the
ȱ
printer
ȱ
to
ȱ
online
ȱ
mode.
The
ȱ
color
ȱ
of
ȱ
the
ȱ
button
ȱ
changes
ȱ
from
ȱ
red
ȱ
to
ȱ
green
ȱ
(see
ȱ
figure 6
Ȭ
4).
ȱ
If
ȱ
there
ȱ
is
ȱ
a
ȱ
job
ȱ
in
ȱ
the
ȱ
Job
ȱ
Manager
ȱ
queue,
ȱ
it
ȱ
is
ȱ
sent
ȱ
to
ȱ
the
ȱ
printer.
ȱ
In
ȱ
the
ȱ
printer
ȱ
interface,
ȱ
the
ȱ
printer
ȱ
mode
ȱ
changes
ȱ
from
ȱ
Idle
ȱ
to
ȱ
Pre
Ȭ
print,
ȱ
as
ȱ
the
ȱ
printer’s
ȱ
components
ȱ
prepare
ȱ
themselves
ȱ
for
ȱ
production:
ȱ
•
The
ȱ
ȱ
block
ȱ
is
ȱ
heated.
•
The
ȱ
UV
ȱ
lamps
ȱ
are
ȱ
powered
ȱ
and
ȱ
they
ȱ
warm
ȱ
up.
When
ȱ
printing
ȱ
begins,
ȱ
Objet
ȱ
Studio
ȱ
sends
ȱ
seven
ȱ
slices
ȱ
to
ȱ
the
ȱ
printer
Ȭ
control
ȱ
application.
ȱ
This
ȱ
is
ȱ
the
ȱ
standard
ȱ
buffer
ȱ
between
ȱ
Objet
ȱ
Studio
ȱ
and
ȱ
the
ȱ
printer.
ȱ
As
ȱ
each
ȱ
slice
ȱ
is
ȱ
printed,
ȱ
another
ȱ
slice
ȱ
is
ȱ
sent
ȱ
to
ȱ
the
ȱ
printer.
Depending
ȱ
on
ȱ
the
ȱ
size
ȱ
of
ȱ
the
ȱ
model(s)
ȱ
to
ȱ
be
ȱ
produced,
ȱ
printing
ȱ
can
ȱ
take
ȱ
between
ȱ
several
ȱ
hours
ȱ
to
ȱ
several
ȱ
days.
ȱ
As
ȱ
long
ȱ
as
ȱ
there
ȱ
is
ȱ
enough
ȱ
Model
ȱ
and
ȱ
Support
ȱ
material
ȱ
in
ȱ
the
ȱ
supply
ȱ
cartridges,
ȱ
printing
ȱ
proceeds
ȱ
automatically
ȱ
until
ȱ
the
ȱ
job
ȱ
is
ȱ
finished.
The
ȱ
Stratasys
ȱ
P750K
ȱ
printer
ȱ
uses
ȱ
up
ȱ
to
ȱ
six
ȱ
different
ȱ
Model
Ȭ
material
ȱ
cartridges
ȱ
to
ȱ
produce
ȱ
models.
ȱ
In
ȱ
addition,
ȱ
two
ȱ
Support
Ȭ
material
ȱ
cartridges
ȱ
are
ȱ
required.
ȱ
If
ȱ
additional
ȱ
cartridges
ȱ
are
ȱ
installed
ȱ
and
ȱ
they
ȱ
are
ȱ
not
ȱ
needed
ȱ
for
ȱ
the
ȱ
current
ȱ
ȱ
job,
ȱ
the
ȱ
printer
ȱ
interface
ȱ
indicates
ȱ
which
ȱ
are
ȱ
being
ȱ
used:
•
Blue
ȱ
cartridge—used
ȱ
for
ȱ
the
ȱ
ȱ
job
•
Gray
ȱ
cartridge—not
ȱ
used
ȱ
for
ȱ
the
ȱ
ȱ
job
You
ȱ
can
ȱ
monitor
ȱ
printer
ȱ
status
ȱ
indicators
ȱ
by
ȱ
switching
ȱ
the
ȱ
printer
ȱ
interface
ȱ
display.
ȱ
To
ȱ
do
ȱ
this,
ȱ
click
ȱ
the
ȱ
display
ȱ
toggle
ȱ
button
ȱ
in
ȱ
the
ȱ
printer
ȱ
interface
ȱ
screen.
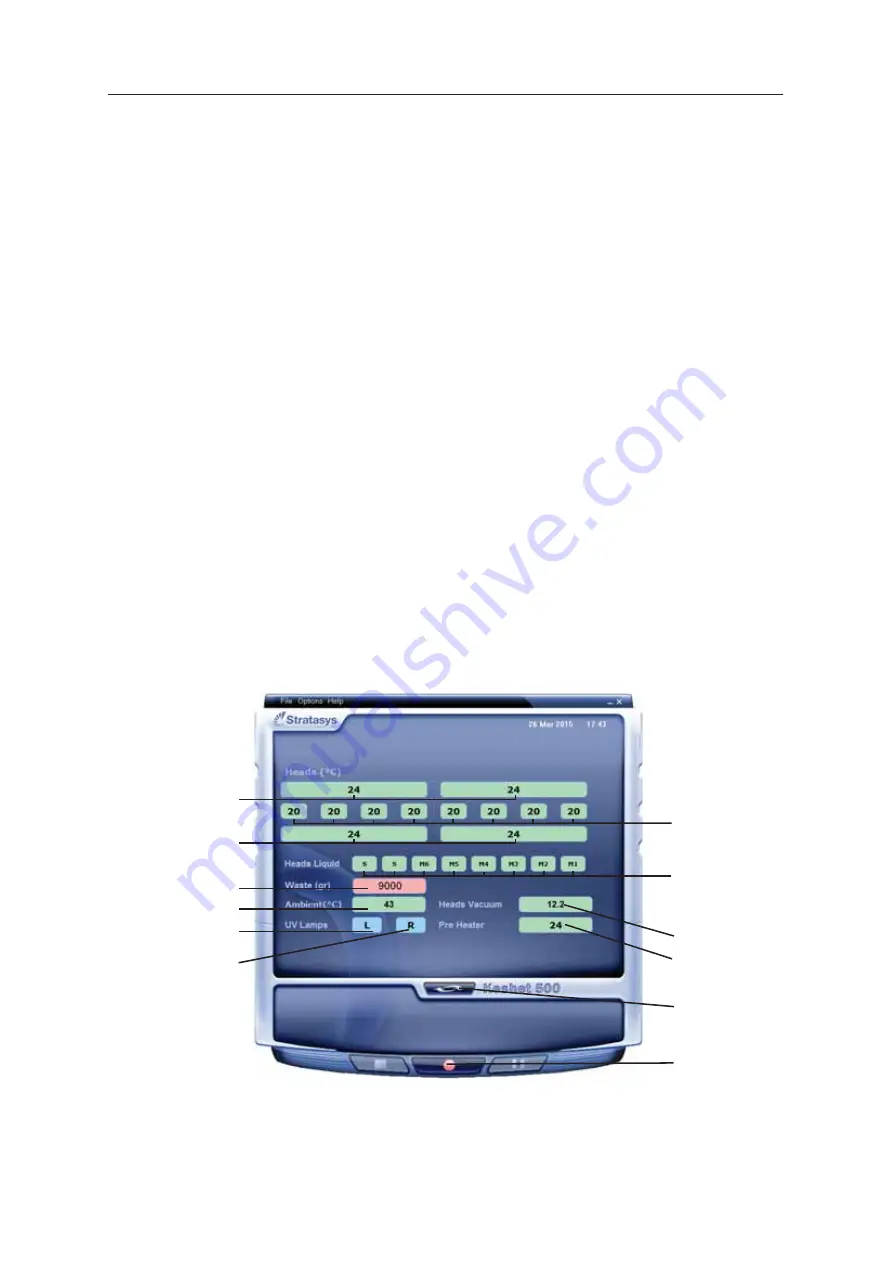
Figure 6-4: Printer indicators
Temperature.
in front of
print block
Temperature
behind
print block
Waste weight
Display
toggle button
Printer set to
online mode
(green)
Chamber temp.
Left UV lamp
Right UV lamp
Temp. of each head
Support/Model
material in print-
block reservoir
System
vacuum level
Temp. of material
pre-heaters