PART 1: CX-Programmer
OMRON
CHAPTER 4 – Reference
CX-Programmer _Page 103
Auto Online to a PLC
When maintaining a PLC, CX-Programmer can start monitoring the program of the connected PLC with a
toolbar button, after CX-Programmer is started. A PC must be connected to a PLC.
Use the following procedure to go on-line to the PLC automatically.
1, 2, 3…
1. Select
the
Auto Online
button from the toolbar. A dialog is displayed showing the PLC
type and the network settings of the connected PLC, which CX-Programmer is searching.
When CX-Programmer successfully finds the PLC information, it automatically goes on-
line and transfers all the data from the PLC, for example, programs, expansion function
(if available), PLC settings, IO table (if available), symbol tables and comments.
2. Select
the
Select Serial Port
option from the PLC Auto Online menu to change the serial
port when Auto Online. The default serial port is set to COM1.
Note:
When the Auto Online connection is executed using CX-Programmer Ver.7.2 (CX-One Ver.2.1) or
higher, the available personal computer serial ports are automatically detected (automatic detection
of computer serial ports function). If a serial port than can be connected online is found, the
automatic connection is made from that serial port.
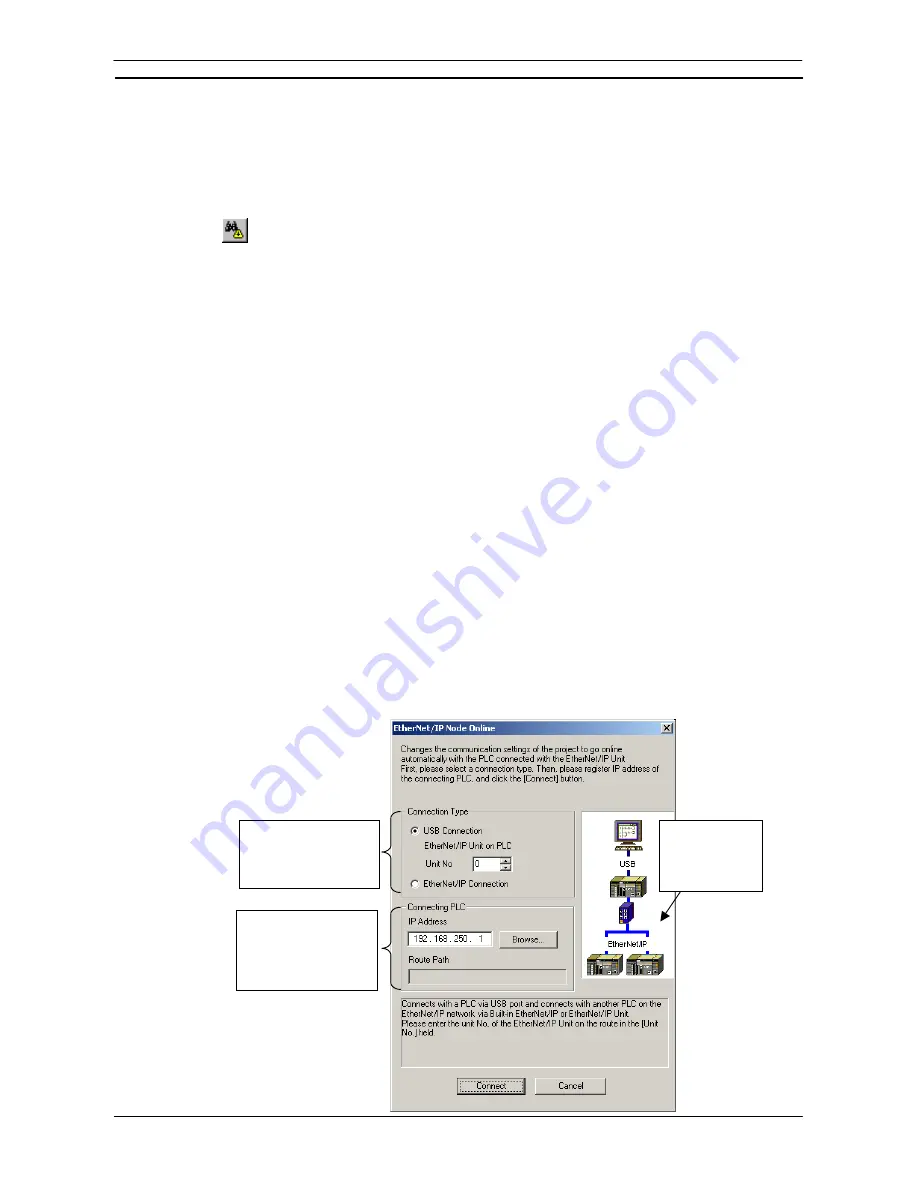
Auto online - EtherNet/IP Node Online
You can automatically and easily connect online to a PLC when using CJ2 CPU Units connected to nodes on an
EtherNet/IP network.
Connection Types
♦
Connecting to the Target PLC When Connected to a PLC through a USB Cable
♦
Connecting to the Target PLC through an Ethernet Port on a Computer
Note:
When running the CX-Programmer on Windows XP (SP2 or higher) or Windows Vista and
connecting online to a PLC via EtherNet/IP for the first time, the settings of the Windows Firewall
will need to be changed. Refer to
Appendix B EtherNet/IP Connections from Windows XP (SP2 or
Higher) or Windows Vista
in
Part 1: CX-Programmer
for details on making the changes.
Procedure
1. Select
Auto online - EtherNet/IP Node Online
from the PLC Menu. Alternatively, click the
EtherNet/IP
Node Online
Button on the toolbar. After doing either of these, the EtherNet/IP Node Online Dialog Box
will be displayed.
Set the connection path
from the computer to the
PLC. An image of the path
for the connection type will
be displayed on the right.
Specify the IP address for
the target PLC. The Browse
Button can be used to
select an IP address from a
list if the exact IP address is
not known.
An image of the
connection path to
the PLC from the
computer is
displayed here.
Summary of Contents for CX-Programmer 9
Page 1: ...Cat No W446 E1 10 CX Programmer Ver 9 SYSMAC WS02 CXPC_ V9 OPERATION MANUAL...
Page 2: ......
Page 3: ...SYSMAC WS02 CXPC V9 CX Programmer Ver 9 Operation Manual Revised December 2009...
Page 4: ......
Page 6: ......
Page 19: ...CX Programmer_Page xvi Unit Versions and Lot Numbers...
Page 30: ......
Page 31: ...PART 1 CX Programmer...
Page 32: ......
Page 100: ......
Page 120: ......
Page 198: ...PART 1 CX Programmer CHAPTER 4 Reference OMRON CX Programmer _Page 118...
Page 224: ...PART 1 CX Programmer Keyboard Shortcuts CX Programmer OMRON CX Programmer _Page 144...
Page 240: ......
Page 241: ...PART 2 CX Server PLC Tools...
Page 242: ......
Page 250: ......
Page 256: ......
Page 268: ...PART 2 CX Server PLC Tools CHAPTER 2 PLC Memory Component OMRON CX Server PLC Tools_Page 18...
Page 286: ......
Page 338: ......
Page 382: ......
Page 414: ......
Page 430: ......
Page 436: ......
Page 437: ...PART 3 CX Server Runtime...
Page 438: ......
Page 482: ......
Page 488: ......
Page 504: ......
Page 530: ......
Page 540: ......
Page 541: ......
Page 542: ......


